When you click on links to various merchants on this site and make a purchase, this can result in this site earning a commission. Affiliate programs and affiliations include, but are not limited to, the eBay Partner Network.
How to replace strut rod bushings on 1st gen LS400
OK, easy job, but no definite guide anywhere, so here it comes (I hope oldskewel, deanshark, Billydpowel, PureDrifter and others are around to keep me honest! )
NOTE: this is entirely different from 2nd gen, so don't go by this if yours is a '95+ LS!
EDIT: added a picture of the front of of the strut bar cushion showing 24mm nut.
First of all, some basics:
- You cannot visually inspect strut rod bushings without taking them out - they will most likely look just fine while installed (mine did).
- If your car makes a clunking noise every time you go over a speed bump or a pot hole, if the brakes tend to vibrate, sometimes, at certain speeds and pedal pressure as if the rotors are warped, and if you hear an occasional squeal in the suspension as if your ball joints are going bad, then the most likely culprit is these strut rod bushings. The clunking drove me nuts and the brake vibration is not to be ignored, even though for me it only happened in certain conditions (on a downhill, at 50-60 mph, pressing lightly)
- The part number is 48674-50010 which was replaced by 48674-50030 (so no one carries 48674-50010 any more. Doesn't matter, they are identical)
- The part is expensive here in the US (around 175 each!), but cheap on Amayama ($40 + shipping, total $76 ea.) I ordered from them, original Lexus part, and it took about 2 weeks to get here.
- You will need:
Original parts (obviously). I would change both sides together, just like any other suspension component
14mm socket (you can use power tools for the three nuts, they are easy access)
24mm socket (or 15/16 SAE, fits even better) NOT a deep socket (it won't fit, or if it does, it will be a bit of PITA - just ask me, I did it with the deep socket)
Jack and stands
About 30 min of your time, or one hour if you like to take it easy, have your wife make you a drink while doing it on a hot day, and so on
1. Jack up the car, lift only the front end and put it on the stands.
2. Take off both front wheels
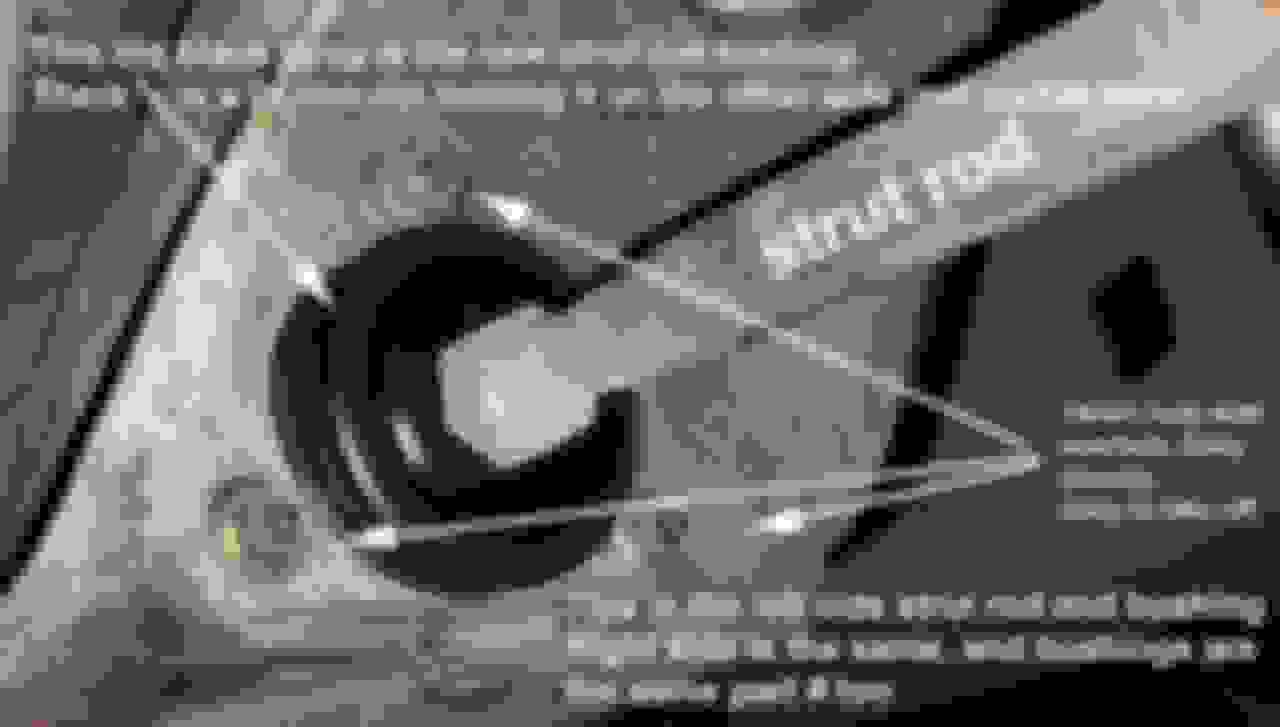
3. The strut rod is a horizontal bar that is attached to the steering knuckle on one end, with two bolts (which you don't have to take off and don't need to loosen either) and which goes into the strut rod cushion/bushing on the other end, which is at the very front of the vehicle, just behind the front bumper. See picture above for reference, you can't miss it on your car.
4. Loosen the three 14mm nuts that you see in the picture above. They are easy to take off, and you can even use your power tools if you have them.
5. On the other side of the strut bar cushion is a big, 24mm nut holding the strut rod in place (see picture below). That one is tight, so use a breaker bar. Has a BIG washer, don't lose it!
6. Once the three 14mm nuts and the big 24mm nut are off, you can slide off the strut bar cushion - it comes off toward the front, through the round hole it is in; just jiggle it, and it will come off, not much force needed. A child could do it.
7. Once the old cushion is off, you can inspect it and see how cracked the rubber is. It's much worse than you thought.
8. Take the new cushion out of the nice Lexus wrapping with the part number on it, and place it in the same spot, where the old one used to be. NOTE: the strut bar is LONG and heavy, so it will drop a few fractions of an inch - just lift it a bit with your other hand, as you are putting the cushion back on there. No big deal, again a child could do it, provided someone helps the kid with the strut bar which needs to fit through the hole in the cushion.
9. The cushion is symmetrical, so no worries "which way it goes". Just line up the center hole with the strut bar and three threads through the little holes and you're done. NOTE: Someone suggested we use some grease on the interior part of the cushion but I decided against that. Here's why: that entire part of the strut rod is threaded, so if you put any grease there, the grease will cover the area where the big 24mm nut goes and that can't be a good thing (the bolt may come off due to grease). Besides, the fit is not tight at all, so I don't see any advantage to adding grease.
10. Put on the three 14mm nuts on the back and you can tighten them to spec, which is 59 ft lbs of torque I believe
11. Put on the 24mm nut on the front of the strut bar, and tighten but not all the way. That needs to be tightened with the wheels on the ground (or your ramps).
12. Put the wheels back on, lower the car (I lowered mine onto the ramps, to have more space for the torque wrench) and now tighten the 24mm nut to proper spec - 87 ft lbs (That's the proper torque with wheels on the ground, so loaded, not up in the air)
That should be all! Now you can enjoy a quiet, nice ride with perfect braking.
Did you replace front strut bar bushing as well 4867440051?
That part number is for 2nd gen, so - no. But it probably refers to the rubber itself - the part I bought had the rubber AND metal around it, so no need to do any extra work, just remove and replace.
Replacing the rubber bushing only is probably a little cheaper on the part itself, but will take a lot more time and probably some extra tools (a press to push them in?). I decided that it was not worth it to try and save a few bucks when I could just get the whole part and be done with it in minutes.
 09-22-19, 11:33 AM

 )
)