
The DIY Nav Display Unlock, Bluetooth Unlock, and NAV destination input while driving
 12-07-09, 01:01 PM
#16
Driver School Candidate

Join Date: May 2008
Location: NJ
Posts: 35
Likes: 0
Received 0 Likes
on
0 Posts
Scubadogg,
Where did you get that perfect-matching switch? I tried a number of websites and stores, but could not find anything other than black?
I will have my audio installer try and duplicate your suggestion regarding the NAV override.
Please let me know where I can get a switch like yours.
Thanks!!!
Where did you get that perfect-matching switch? I tried a number of websites and stores, but could not find anything other than black?
I will have my audio installer try and duplicate your suggestion regarding the NAV override.
Please let me know where I can get a switch like yours.
Thanks!!!


 02-01-10, 08:04 PM
#19
Instructor

Took me about 4 hours without doing the VSS/parking brake mod. The instructions here are for the 2005 Nav system, but I have the Gen2/3 2002 system.
2005:
Parking brake signal - (M4-16)
Speed signal from combination meter - (M4-25)
2002:
Parking brake signal - (M4-13 LT GRN)
Speed signal from combination meter - (M4-5 VIO/WHT)
2005:
Parking brake signal - (M4-16)
Speed signal from combination meter - (M4-25)
2002:
Parking brake signal - (M4-13 LT GRN)
Speed signal from combination meter - (M4-5 VIO/WHT)
Last edited by StanVanDam; 04-23-10 at 03:15 PM. Reason: added wiring details for 2002
02-01-10, 11:42 PM
#20
Driver

Join Date: Jul 2008
Location: Alabama
Posts: 185
Likes: 0
Received 0 Likes
on
0 Posts
Does the 2006 LS430 have a DVD or just CD player? Is it a CD (multi) player in the dash and a DVD player in the trunk? You have to play DVD's from the drive in the *trunk*???
02-02-10, 01:39 AM
#21
Pole Position
iTrader: (1)
Join Date: Dec 2009
Location: queens, nyc
Posts: 233
Likes: 0
Received 0 Likes
on
0 Posts
Took me about 4 hours without doing the VSS/parking brake mod. The instructions here are for the 2005 Nav system, but I have the Gen2/3 2002 system.
2005:
Parking brake signal - (M4-16)
Speed signal from combination meter - (M4-25)
2002:
Parking brake signal - (???)
Speed signal from combination meter - (???)
2005:
Parking brake signal - (M4-16)
Speed signal from combination meter - (M4-25)
2002:
Parking brake signal - (???)
Speed signal from combination meter - (???)
crap and i wanted to do this on my 02

anybody have some input on how to do this on a gen 2/3 navi?
04-13-10, 10:37 PM
#22

this deserves a bump
thanks again to scubadogg for this DIY
I did it this weekend and works like a charm.
1. dialing on the screen is enabled
2. inputting destination is enabled
Summary:
3 wires to cut.
FRONT-behind nav screen
1. Cut green wire. Ground the wire that is coming into the radio
2. Cut violet/white wire. Cap off both ends.
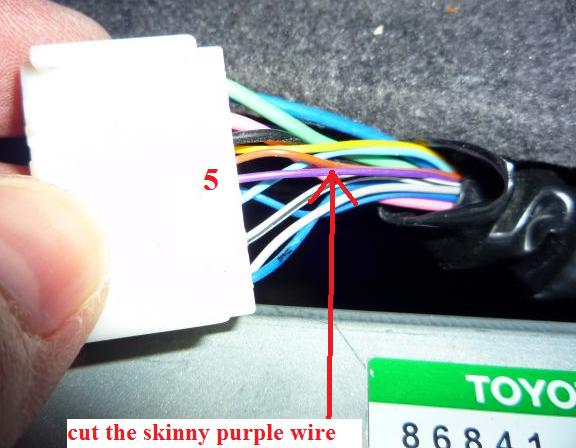
TRUNK-right side, nav unit
3. Cut SKINNY violet/white wire. Connect an ON/OFF switch and route it to the front seat.
Here is where you will save at least 1 hour of your labor. After removing the black panel, the whole damn back seat is SEALED.
Don't split up the black panel when you remove it. It's held up with a bunch of triangle-shaped screws. Remove it as one whole panel.
I poked, prodded, and scraped a lot skin finding an entry into the back seat.
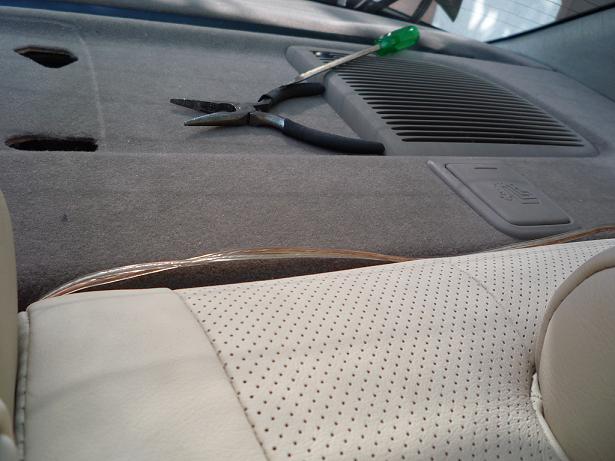
Finally, the easiest spot is UNDER the SUBWOOFER COVER.
I'll let the pictures do the talking:
I routed the wires coming up the passenger side

it's suppose to say "rear seat, not set"

loops through the holes in the rail


if you look underneath, you'll see a large opening. Make sure you're not using any of the 4 holes that the sub cover is attaching to.


this is the hardest and time consuming part. you're going to fish through and UNDER the gray panel down to hide the wire into the 3rd seat head rest area


you are then going to fish the wire upward and tuck it behind the seat


go down along the seat. pull off the door panel, tuck the wires and run it to the front to where ever you want to put your switch
I didn't take picture of my switch but I stuck under the steering column

thanks again to scubadogg for this DIY
I did it this weekend and works like a charm.
1. dialing on the screen is enabled
2. inputting destination is enabled
Summary:
3 wires to cut.
FRONT-behind nav screen
1. Cut green wire. Ground the wire that is coming into the radio
2. Cut violet/white wire. Cap off both ends.
TRUNK-right side, nav unit
3. Cut SKINNY violet/white wire. Connect an ON/OFF switch and route it to the front seat.
Here is where you will save at least 1 hour of your labor. After removing the black panel, the whole damn back seat is SEALED.
Don't split up the black panel when you remove it. It's held up with a bunch of triangle-shaped screws. Remove it as one whole panel.
I poked, prodded, and scraped a lot skin finding an entry into the back seat.
Finally, the easiest spot is UNDER the SUBWOOFER COVER.
I'll let the pictures do the talking:
I routed the wires coming up the passenger side
it's suppose to say "rear seat, not set"
loops through the holes in the rail
if you look underneath, you'll see a large opening. Make sure you're not using any of the 4 holes that the sub cover is attaching to.
this is the hardest and time consuming part. you're going to fish through and UNDER the gray panel down to hide the wire into the 3rd seat head rest area
you are then going to fish the wire upward and tuck it behind the seat
go down along the seat. pull off the door panel, tuck the wires and run it to the front to where ever you want to put your switch
I didn't take picture of my switch but I stuck under the steering column
Last edited by GS3Tek; 04-27-10 at 11:18 AM.
04-14-10, 05:52 PM
#23

Great posts, thanks guys.
Glad GS3Tek bumped it, I was not aware of this thread. And maybe for once I can add something......
Way back when, Sparky3 asked about whether the VSS wire at the NAV EU could be accessed from inside the cabin, thus avoiding running the 2 wires to the trunk.
I just got out the factory wiring book, and I think Sparky may have been on to something:
tracing the Violet VSS wire at the NAV EU in the trunk: yes, it does (appear) to go to the front cabin!
The book says it goes to connector IF4 and enters at position 8. It exits the other side of IF4 as a 2 toned "V-W" wire, I believe that's violet with white stripe. Again per the book: IF4 is alongside the shifter; it's the rearmost of 3 similar connectors there. This is where you younger types will have to take over:
I pulled my shifter wood cover, expecting to see IF4 in all it's glory; but no joy. Apparently, it's hidden under an octopuslike black plastic cover that starts under the cup holder and goes up under the dash.
Now proceeding: the V-W wire continues on to a connector J16/J17 behind the NAV display, and it shares the connector, only 3 wires involved, with the V-W wire that then goes from J16/J17 to M4-25 ! The way I read the diagram, if you trace the M4-25 wire back from the M4, you should be led to J16/J17. Careful: J16/J17 connects 3 wires, but all of them are V-W color scheme! Analyze carefully: you should be able to identify the V-W from the trunk, and then splice the new switch into it behind the NAV display. Wouldn't it be great if this works?(ie: it would mean I can read a diagram).
Due to the press of daily routine, it will be a while before I can dig back in and actually try the switch behind the display theory.
I encourage others to get there before me, and post your results.
Again, kudos to scubadogg and GS3Tek for outstanding posts.
04-23-10, 10:18 PM
#25
Instructor
Parking brake signal - (M4-13 LT GRN)
Speed signal from combination meter - (M4-5 VIO/WHT)
So replace these 2005 wires in the instructions:
Parking brake signal - (M4-16 LG-W-B)
Speed signal from combination meter - (M4-25 V-W-W-B)
Can anyone confirm if this is correct? Also, can anyone with a switch installed (on any year) show us some pics?
05-01-10, 04:36 AM
#26
OK, maybe I can find time to get into the dash and see if possible to intercept the speed signal to the NAV EU.
But first: can someone tell me: does this mod enable inputting destination on the move for ALL Nav disc versions, like up to the latest 9.1?
Thanks in advance.
But first: can someone tell me: does this mod enable inputting destination on the move for ALL Nav disc versions, like up to the latest 9.1?
Thanks in advance.
05-03-10, 06:02 AM
#27
Instructor
The disc version doesn't matter. This mod just tricks the system into thinking that the car is stopped with the parking brake enabled. These 2 criteria must be met for VAISTech units to play video on the navigation screen. The car being stopped is the only criteria for the Lexus touchscreen input and cutting the speed signal to the Nav system does that.
05-04-10, 11:34 AM
#28
Update, after more attempts to intercept the VSS wire to the NAV EU in the trunk:
1) Earlier I posted maybe possible to get to the VSS where it enters J16/J17 junction behind the NAV Display. Well, I found J16/J17, but they are tucked up high and far to the front under the dash top; that area is all but inaccessible for the purpose of splitting wires out and splicing into them. So, on to....................
2) I revisited trying to find the harness-to-harness connector IF4, somewhere to the right of and below the shifter. JOY! Turns out it is hiding behind the carpet on the passenger side of the tunnel, alongside the shifter. To access it, you will want to remove all 4 bolts holding the pass seat down, and ( leaving the seat wiring attached ) slide and tilt the seat rearward to expose as much carpet as possible. I also removed the air grille towards the front, but it did not free up the carpet enough to help. The carpet just pries downward to clear the bottom of the console side, and then pulls out to expose the wiring. IF4 is the 2nd connector from the rear of the car. The VSS wire, purple coming from the NAV EU, entering from below, purple with white stripe exiting from the top of IF4, is in position 8, easily visible as the rightmost wire in the nearest row to you.
I spliced into the purple/white as it leaves IF4 and heads forward. To get some slack wire to work with, I disconnected IF4 , and also the connector to the right of it, and I slit the electrical tape around the wire bundle in a couple of places.
The carpet goes back into position easily.
I believe this approach is more convenient than that of splicing in the trunk, but your mileage may vary.
For a switch, I found one laying around that looks exactly like scubadogg's! I mounted it in the left wall of the glovebox. It's totally hidden there; to use it, I reach over and open the glovebox; it's easy to reach the switch.
Now I'm ready to start looking for latter day discs. No problem now that scubadogg gave us a hard wired solution to the old software issue.
Maybe someone will post pix of this. Sorry I'm not versed in that arena.
09-02-10, 07:12 PM
#29
Hi All,
My car= 2005 LS430 UL.
I just had my stereo shop do this mod while they were installing my new system.
My results are as follows:
Once I flip the switch to bypass/unlock the BT and Nav, I am able to start to use the Nav while driving but after a min or so, the fields on the nav screen will go back to be locked so I can not input any new data.
I have also found that I can not re-connect to any BT(bluetooth) device at all if the switch is in either position.
Not sure if something was done incorrectly or not.
Can anyone else help with this? Is this normal or is something wrong?
04-21-11, 01:55 PM
#30
Instructor
For 2005+ owners, TTomB resolved his problem: "Looks like the Bluetooth issue may have been caused by my old Palm Pre. I just purchased the HTC EVO and all seems better."
For the 2002 owners (and probably 2001 and 2003), here is what I've found:
I can confirm my findings above that M4-5 (VIO/WHT) is the SPD signal (cut+tape), and M4-13 (LT GRN) is the PKB (ground the end going into the Nav system, tape the other)
Regarding N4-5, unfortunately nc356's instructions don't apply. I've just taken the passenger seat out and the carpet does not lift alongside the shifter. I then checked some diagrams and it seems connector IF4 does not exist.
The 2003 diagram shows N4-5 is YEL/RED, as opposed to VIOLET in 2005. The YEL/RED N4-5 plugs directly into the Stereo Amplifier (also in the trunk) at pin 25.
Since N4-5 doesn't seem to run into the cabin, I think the only solution is to run wires from the trunk into the cabin. Can anyone else confirm?
EDIT: When I turned the ignition to ON, video wouldn't play, whether the parking brake was engaged or not. This led me to believe that the parking brake line was not grounded correctly. I checked the diagrams for a nearby ground and found that M3-6 (GND1, white with black stripe) connects directly to vehicle grounding point IJ (right dash brace). This looks like the same spot as the bolt in scubadogg's picture, but for whatever reason, it didn't work for me.
Instead of running a wire from M4-13 to that bolt, I made a much shorter wire and connected M4-13 directly to M3-6. I've confirmed that video plays when the ignition is ON with the parking brake released, so it is now properly grounded.
EDIT2: I noticed my GPS icon wasn't lighting up but found the problem: when I was playing around with the trunk nav unit, I missed reconnecting the grey coaxial-looking, single wire cable that goes in the top left rear of the nav unit. This is apparently the GPS antenna. Diagnostic mode shows that no GPS signal is received when this cable is unplugged, but all systems function perfectly fine otherwise. Dead reckoning (aka autonomous) mode is then the sole method for the computer to track your position. It will become wildly inaccurate after a few turns and lane changes, especially in areas with high street density.
Last edited by StanVanDam; 05-02-11 at 09:05 PM. Reason: Parking brake grounding problem, GPS icon problem