
LS 430 Door Lock Actuator Tutorial
 07-16-15, 09:08 AM
#226

This was a pain in the ***. I took everything apart quickly but taking the actuator out and putting back in was a pain. Also that metal rod was a pain to put back and take out the hole as well. For some reason I assume my original motor wasn't mabuchi. It had stamped made in china on the metal casing also. Anyway, I bought a nichibo motor since mabuchi doesn't sell the flat d shaft anymore and swapped over the cap with the brushes. The brushes were worn out on old one. May this one last another 10 years because I don't want to change anymore door lock motors..
 07-16-15, 09:56 AM
#227
AMEN TO THAT!!! I couldn't believe how aggrevating this install was. I'd almost rather do my own dental work (like Tom Hanks in Castaway) than do this job again!
07-16-15, 07:31 PM
#228
Lexus Test Driver
just hope u dont have to go back in again.....I have been back in my door 3 or 4 times due to my errors and adjustments. Getting the actuator back in place is a pain every time......well now after a year my actuator isnt working again.....I am sure I need to tighten the zip ties....or glue together this time.....but I am not looking forward to cracking that door open again.
07-16-15, 08:13 PM
#229

This is why I opted to just fork over the cash for a new module. The re-installation dance is too delicate to be worrying about whether or not I sealed the case properly. That lightening hurt bad enough the first time it struck. Certainly don't want it striking twice.
07-18-15, 06:08 AM
#230
Lexus Test Driver
I first replaced the motor.....10 bucks vs 200 was a no brainer I thought. Then it really bothered me how loud the new motor was so I put the new motor head on the old motor....that worked great and it was the OEM sound. Then I had to go back in for the grinding sound......got that fixed......now it isnt working again. Yes if i knew i was going to go through all of this I would have forked out the 2 hundo.......but soooooo many here have had successful actuator repairs I think its worth a shot.
Note it is very hard if not impossible to glue the clamshell together because it has grease all over the inner voids...
Note it is very hard if not impossible to glue the clamshell together because it has grease all over the inner voids...
07-18-15, 01:08 PM
#231
Driver School Candidate

Just finished, thanks and more thanks to all who have contributed to this thread.
Just a couple of notes for UL owners:
You need to remove wiring harness control cable that connects the door ECU to the Regulator/Door Lock Mechanism,
For some reason removing the door look lever took more effort than I planned. After removing/ detaching the white clip I had to really pull hard towards the door hinge to get the lever to release, but it did.
I thought breaking down the regulator to install the motor was more involved that I had planned. Just be careful and make note of all the mechanical connections. Make sure the cable are attached correctly during build-up.
Label your screws or take photos along the way,
As everyone said getting that massive unit back in the door was the tricky part. I had my wife help me. Watch the door latch it will get stuck on everything as you reinstall. And remember the unit has to go behind the window track.
So in summary took me 3 hours going slow and it cost me $5. I'm lov'n it! Bought a second motor, and I cant wait till I can save $1000 again!
07-18-15, 03:17 PM
#232
Advanced

Do all LS430 have the actuator or is it only on certain trimlevels,
What is the DA actually doing?
Can you operate the door without the DA
Did I just add another abbreviation?")
What is the DA actually doing?
Can you operate the door without the DA
Did I just add another abbreviation?
07-18-15, 03:55 PM
#233
All LS's have them and they are a common failure. Models with easy close are an easier repair because you don't have to glue or zip tie the assembly back together. Otherwise the repair process is fairly simple and saves a ton of money over purchasing a new actuator assembly.
The actuator motor is what mechanically operates the door lock switch. If the motor fails you can lock and unlock manually.
The actuator motor is what mechanically operates the door lock switch. If the motor fails you can lock and unlock manually.
07-21-15, 12:35 PM
#234
Driver School Candidate

Join Date: Dec 2013
Location: Tennessee
Posts: 4
Likes: 0
Received 0 Likes
on
0 Posts
For those of you still wrestling with the zip ties, grinding gears, failure after replacement, etc, I remind you of what I discovered a couple of years ago, which I described in posts #144 and 145 on page 10. The way I did rejoined the two halves of the gear case has held up very well. Back then I said,
"In reassembling the casing, I cleaned out the perimeter snap channel, degreased it, and then put some epoxy in it, being careful not to put too much. A bead not much bigger than thick thread should be enough. Even after it dries, it will be possible to get the case apart again. (Believe me, I did it three times for mistakes I don't think you will make.)
"After replacing the motor and putting glue around the edge, I reassembled the two halves and clamped the case together in three places around its perimeter with small c-clamps until the glue dried. This gave me an idea. I had read in the posts above about using zip ties, and had seen Randy B's photos showing their placement. I had zip ties, but I tried something else instead that the c-clamps made me think of. I happened to have some spring steel binder clips (made by Universal - see here:http://www.officedepot.com/a/product...mall-34-Black/ of the same size as the thickness of the actuator case (about a half inch or so). I used only one of those instead. I removed the wire handles on the binder clip and cut off and filed down the clip so it would be flat against the side of the actuator housing, and so it would be out of the way of any screw holes. So far, it has worked fine. The case has stayed together and there has been no grinding sound.
There is a photo in of the clip placement in post #145
Last edited by Augie; 07-21-15 at 12:44 PM. Reason: To correct a dead link, typos, etc.
 08-07-15, 04:02 PM
#236
Lexus Test Driver
Immmmmm Baaaack...........well......if u have read the entire thread u might know I have been through all of the possible scenarios w the actuators. I learned a couple more tips and tricks today....so will share them as well.
Note...my first repl motor was a flat shaft....it was so loud it startled my passenger
Switched out that motor .....performed trick on this thread....use new motor head and old motor body....this worked well and was OEM quiet.
Some time had passed now the damn actuator not working again......I pulled the motor and tested it w 12volts....it was dead.......ok...I can live with that...time to replace again
Note.....problem is I want a quiet motor....now most people on this thread ordered round shaft and had no complaints about loud motors......this time I ordered both round and flat shaft. After speaking to seller on ebay he said the flat shaft is known to be a little more powerful.....thats all i needed to hear. So I opted for the round shaft and filed it down to flat....installed...and its perfect.
Now for new tips.....Im so good at the door and actuator removal now I swear I could have the actuator motor in my hand in less then 2 minutes. However that is not my style...slow and easy wins the race. There are so many traps to screw u up if u are Johnny rush a lot........my tip this time is to use a large piece of thick cardboard.........draw a large pic of the door.....as u remove a screw stick it into the cardboard where it came from.....this works great...no guesswork no labeling. I also use little pieces of blue painters tape inside the door as visual reminders.......
I did disconnect the neg batt cable as a precaution........And u MUST STUDY HARD how that actuator comes out so u can reinstall.......for the first time I slid that sucker right back in w no issues...........
good luck all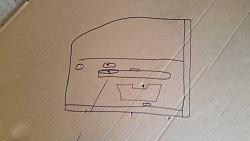
 09-01-15, 07:31 PM
#237
Lexus Test Driver
Man .....I have bad actuator luck. My last venture going back in and operating went so fast and so smooth....it figures something would be wrong. Now the door un locks via the un lock button on the door.....or the key fob no problem. However....when the wife tries to make the quick exit before we pull in the garage...she cant open the door w door flipper...its jammed stiff......also jammed stiff is the little flipper......cant use either flipper manually.....but works via power button.........what the hell could have got mixed up? My guess is that the motor is in the full throw position.....not the proper wind up spot......but this will be hard to figure out when I go back in.
10-08-15, 05:27 PM
#239
Driver School Candidate
 10-12-15, 11:15 PM
#240
I scraped the text from the wayback machine; but the images are toast:
Door Lock Actuator Tutorial LS 430.
The door lock actuators eventually wear out. There are a number of
references to this problem if one Googles the problem, however I was unable to
find a do it yourself tutorial. Since my timing belt tutorial has had >2500 hits I
figured there was a large population of do-it-yourself LS 430 owners so I took
some pictures, copied some manual pages and did a little reverse engineering.
The doors are locked and unlocked by a small motor.(MABUCHI) In addition
the actuator has circuitry to signal the computer the status of the lock and the
position of the key in the door. The door key had 3 positions. It can be neutral
or signal "lock" or "unlock". Most of the time the problem with the actuator is
the motor burning out. The motors cost a couple of bucks and simply slips out
and slips in. First you remove the door panel. The manual describes it well.
There are 4 plastic clips
holding the panel to the
door. These clips pop out
with gentle prying and
pulling.
The panel has to
be raised up about 1/2 inch
to release from the door.
These are the 2 cables connecting the
drivers door lock/opener to the
actuator. They are easily removed.
The white cable goes to the lock
mechanism and the green cable to the
door opener
If you don't disconnect the wiring at the front
of the door panel you will need to support
it. Here the door panel is supported by a
motorcycle workstand. This is sufficient
access to remove the actuator. Carefully
remove the vapor barrier. I used a razor
knife to cut the adhesive. It will reseal itself
when you reinstall it.
There are 2 bolts which hold the window rail
and 5 screws (Torx 30) which hold the actuator
in place. The window rail needs to be loose
to slide the actuator out. There is a rod that
connects the actuator to the door handle. It
has a clip which folds over the rod. This will
have to be removed. I could not get a good
photo since it is deep in the door. The key
connects to a spade fitting that fits into a cup in
the actuator.
Disconnect the wire
harness. The window rail
can be moved a little out of
the way and the actuator
come out easily.
The white cup with the slot is where the
key connects to the actuator. The key is
connected to a spade which fits into this
slot. The white cup then connects to the
actuator circuitry. The schematic is
below. This needs to be carefully
reassembled. Upon reassembly with
everything just finger tight make sure the
key in the door can move freely to lock
and unlock position. If the cup is
mis-assembled with the spade the key
will not move freely and the computer will
get a signal indication that the key is
stuck in the "lock" position or "unlock"
position. I know this because I put it all
back together in the stuck "unlock"
position. When you do this you will not
only be unable to unlock the car with a
key but the computer will command all
kinds of bizarre behavior. In the stuck
"unlock" position the remotes don't work
and the computer commands the sunroof
and windows to open. Much cussing
later I figured out problem.
You can check the lock motor at contacts 5 &
6.
Contacts 2- 1 signal the computer if the door
is locked or unlocked. (open circuit when
locked)
The key in the lock position closes circuit
2-4. The key in the unlock position closes
circuit 2-3. In the neutral positon 2-4 and 2-3
are open. This circuitry tells the computer
when you turn the key in the door. This is
how the computer knows to lock other doors.
Also when key in "unlock" position for 3-5
seconds the windows and sunroof will open.
The Actuator assembly prys apart
easily and this is what you find. The
motor pops out. The gear on the
motor slides off. The contacts for
the motor are obvious (although not
in this picture).
When you get a replacement
motor make sure the shaft is "D"
shaped not round "O" shaped. The
gear will not fit on a round shaft.
Pop in a new motor and put it back
together and you are done. $5
dollars to do it yourself versus $700
at the dealer.
When I open up the assembly I
found that I not only had the wrong
motor (the shaft was round and not
"D" shaped) but also that my
copper contacts were broken.
Since the contacts were broken I
elected to replace the entire
assembly.
The part number is 69040-50181.
$200. I ordered from
OEMLexusParts.com.
(Stevinson Lexus of Frederick)
Price was excellent, service was
excellent. Delivered to my door in 3
days. I talked to a real Lexus parts
guy before ordering to make sure I
got the correct part.
Reassembly is the reverse of assembly. Make sure that the spade fitting from the
key mechanism in the door handle fits into the white cup in the door lock actuator
assembly. If you don't the key won't turn freely, won't work, and the computer will
get a signal that key is stuck open or stuck closed. The remote wont work, the key
won't work and the computer will command bizarre behaviour.