Door pillar paint chip repair
 08-22-10, 12:09 PM
#1
Driver
Thread Starter

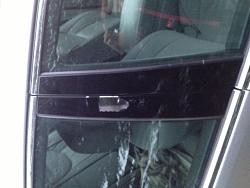
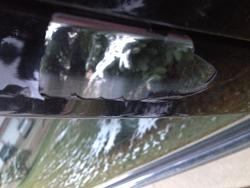
I am not sure how this happened but I have an 1/8th inch diameter paint chip about half way up the passenger side door pillar. 
I am referring to the vertical black high gloss area the frames the window glass in the B pillar area. The chip has gone all the way down to the steel and I need to do something to prevent corrosion. Is this is a special paint? I was thinking of using some high gloss enamel as a possible option, at least as a temporary measure.
I am referring to the vertical black high gloss area the frames the window glass in the B pillar area. The chip has gone all the way down to the steel and I need to do something to prevent corrosion. Is this is a special paint? I was thinking of using some high gloss enamel as a possible option, at least as a temporary measure.
 08-22-10, 01:15 PM
#2
I use Duplicolor Scratch-Fix Touch-up on virtually every car I've ever owned. The caveat is that usually the primer is still underneath the rock chip or scratch. If there is a way to add a dab of primer somehow before you lay enamel or touch up paint over that exposed steel, it would be preferable.
10-10-12, 06:56 PM
#3
Driver
Join Date: Jan 2010
Location: Alberta, Canada
Posts: 184
Likes: 0
Received 0 Likes
on
0 Posts
Hi guys,
I had a similar unfortunate thing happen to my passenger side door pillar. All of the door pillar products I have been seeing are talking about using an adhesive covering to attach new material onto what lies below. Mine has a significant peeling going on and I don't think simply attaching an adhesive over top would stop the peeling underneath.
Does anyone have any other ideas of how to address this? Thanks in advance.
PS My apologies for the sideways pics,they wouldn't stay saved as rotated upright for some reason.

 10-11-12, 02:35 AM
#4
Advanced
I would remove all of the existing black stuff and try some 3M vinyl from a sign shop. Just take care when trimming it to fit.
10-11-12, 09:10 AM
#6
I know on the Es300 I owned, I had something similar with my pillars where they had been discolored over the years and looked really bad. I just purchased new ones from the Lexus dealership (online) for around $70 a piece (a rip off for a piece of plastic, but it was a 2 minute job that looked perfect afterwards) they were attached to the body with simple plastic push pins. Not sure though if the LS is the same way.
BTW, am I the only one that would prefer a "satin" finish to the high gloss? It always looks like crap around that area as a result of fingerprint smudges.
11-11-14, 05:55 AM
#7
Driver School Candidate

Join Date: Sep 2014
Location: Deje
Posts: 5
Likes: 0
Received 0 Likes
on
0 Posts
My door pillars looks really bad,the plastic has cracked like the Picture above.
Is it hard to remove them? I want to my Lexus dealer and they said that they change the whole piece, not just the plastic.. any ideas?
Is it hard to remove them? I want to my Lexus dealer and they said that they change the whole piece, not just the plastic.. any ideas?
Trending Topics
 11-12-14, 12:24 PM
#10
Sure was a pain. That paint is really on there. It makes me wonder how some area of it began to chip away so easily while the rest is stuck on like gorilla glue. Nevertheless, i did buy some of those eBay strip but only replaced the one door that was affected. Cleaned it up as much as i could and stuck on the overlay. Not an exactly flush due to the adhesive tape pushing it out about an 1/16 of an inch but for the most part it works and looks better than having a chipped paint look. I'll save the other pieces for if/when the others start to chip away.
11-16-14, 08:00 AM
#11
Driver

I have a set of 6 custom strips that are made for our door pillars, that I bought for my LS - and ended up not using. They are the shiny black and adhere to the current pillars - very easy to install. I am willing to sell them to anyone - $20 plus shipping.
11-20-14, 10:06 PM
#12
I am not sure how this happened but I have an 1/8th inch diameter paint chip about half way up the passenger side door pillar.
I am referring to the vertical black high gloss area the frames the window glass in the B pillar area. The chip has gone all the way down to the steel and I need to do something to prevent corrosion. Is this is a special paint? I was thinking of using some high gloss enamel as a possible option, at least as a temporary measure.
I am referring to the vertical black high gloss area the frames the window glass in the B pillar area. The chip has gone all the way down to the steel and I need to do something to prevent corrosion. Is this is a special paint? I was thinking of using some high gloss enamel as a possible option, at least as a temporary measure.
First step, clean out chip of any debris or rust with a jewelers flat tip screwdriver or the corner of a razor blade , next tape off the chipped area, exposing only the chip, next apply paint by either a needle or artist paint brush depending on size of chip, building up the chipped surface.You may even find the opposite end of the artist paint brush works by letting the paint drip onto the chipped surface, same technique as using needle. It may take several coats to build up the chipped area, allow first coat to dry before applying second coat. Take a straight edge razor at a 45 degree and slide across the chip, the middle of the razor should be leveling the paint while the outer edges of the razor glides along the tape (this will ensure that you get the chip filled in high enough, yet not to high therefore reducing amount of required wet sanding)...
Note: You may need to let the paint set and thicken before leveling... another method is to build the paint up and scrape high spots with razor after drying, then proceed with wet sanding..
Once paint has cured for at least 24-48 hours, lightly wet sand with 2500 grit to remove high spots, blending/feathering into existing paint, afterwards polish to a brilliant shine with a da or rotary polisher. Slow process, so be patient
Search online for videos of Dr Color Chip application.. easy wipe on, wipe off procedure. Not perfect but works There may even be a Club Lexus sponsor that sells touch up paint for our vehicles
Attached are some before and after pics of my 2002 door pillars. Note the scratches and water spots, dull color. A polisher can bring back life to them...


 11-21-14, 05:56 PM
#13
[HiQUOTE=xtr3me;8796709]If I'm not mistaken, the door pillars are 202 gloss onyx black in color, you may wish to confirm paint code with Lexus first. For chip repairs you can try either Dr. Color Chip, Lexus or Toyota touch up paint or similar product such as Toyo/Lexus touch up pens sold on Amazon. Another option is to have your local or preferred auto body paint store mix you up a pint, no catalyst or clear coat needed
First step, clean out chip of any debris or rust with a jewelers flat tip screwdriver or the corner of a razor blade , next tape off the chipped area, exposing only the chip, next apply paint by either a needle or artist paint brush depending on size of chip, building up the chipped surface.You may even find the opposite end of the artist paint brush works by letting the paint drip onto the chipped surface, same technique as using needle. It may take several coats to build up the chipped area, allow first coat to dry before applying second coat. Take a straight edge razor at a 45 degree and slide across the chip, the middle of the razor should be leveling the paint while the outer edges of the razor glides along the tape (this will ensure that you get the chip filled in high enough, yet not to high therefore reducing amount of required wet sanding)...
Note: You may need to let the paint set and thicken before leveling... another method is to build the paint up and scrape high spots with razor after drying, then proceed with wet sanding..
Once paint has cured for at least 24-48 hours, lightly wet sand with 2500 grit to remove high spots, blending/feathering into existing paint, afterwards polish to a brilliant shine with a da or rotary polisher. Slow process, so be patient
Search online for videos of Dr Color Chip application.. easy wipe on, wipe off procedure. Not perfect but works There may even be a Club Lexus sponsor that sells touch up paint for our vehicles
Attached are some before and after pics of my 2002 door pillars. Note the scratches and water spots, dull color. A polisher can bring back life to them...
What kind of polish did u use with the rotary polisher?
11-23-14, 09:22 AM
#14
One side was polished with Meguiar's M205, the other side with Menzerna SF4000 using a tangerine hydro-tech pad on a da polisher...I did not break out the big toys
Both polishes finish down nicely with similar end results
Both polishes finish down nicely with similar end results
11-24-14, 05:41 PM
#15