
HOW TO: Gummy Trunk Button Fix
 12-25-12 | 02:01 PM
#1

Thread Starter
Pit Crew
Joined: Aug 2004
Posts: 156
Likes: 27
From: Texas
Like many of you here, I have a gummy sticky trunk release button which gives me sticky black fingers if I dont use the remote.
I ordered a new button online and decided to go in the garage and tackle this (its more peaceful and quiet than inside the house this time of year.
Tools needed:
New Switch Assembly: 84840-21010
A trim fork is a MUST for this project. If you dont have one, use lots of blue tape and make sure you have extra clips for the ones you break without the fork.
Dental Pick, Phillips and Flat head
Phillips Head Screwdriver
Ratchet
10 mm socket or wrench
I hold no responsibility to this write up, proceed at your own risk.
Paper towels/rags/spray cleaner, its dusty underneath
Procedure:
This is not a hard job, just lots of dis-assembly required. It is labor intensive. I also removed far more than I needed to, (trunk lock cylinder and backup camera), being the first time, but in this case, I'm just going to tell you what you need to take off, not all the other stuff that I removed.
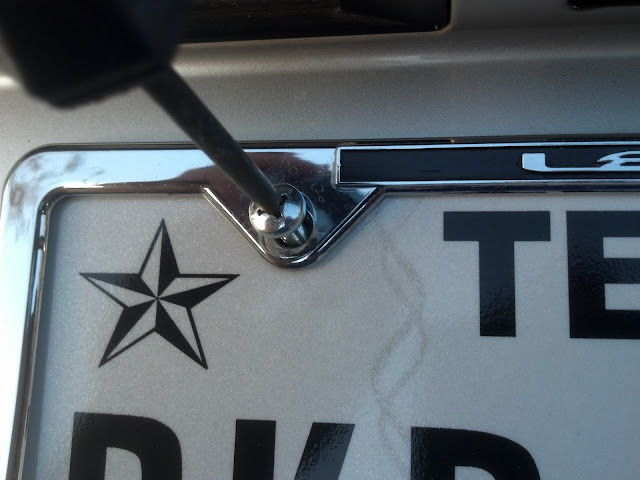
1. Remove your License plate and frame (if equipped)
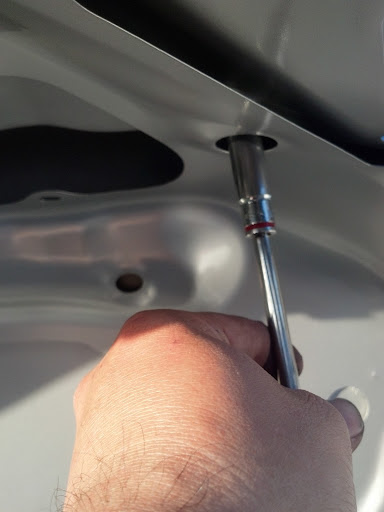
2. Open the trunk, and remove the trim panels on the trunk arms on each side of the trunk. Each arm has 3 push clips. 2 on the outside and 1 on the inside. Use your pick or phillips to gently push the center piece in and the clip comes out with the trim fork or flathead. Remove the trim by pulling up, There is a hook that hooks into the arm itself.

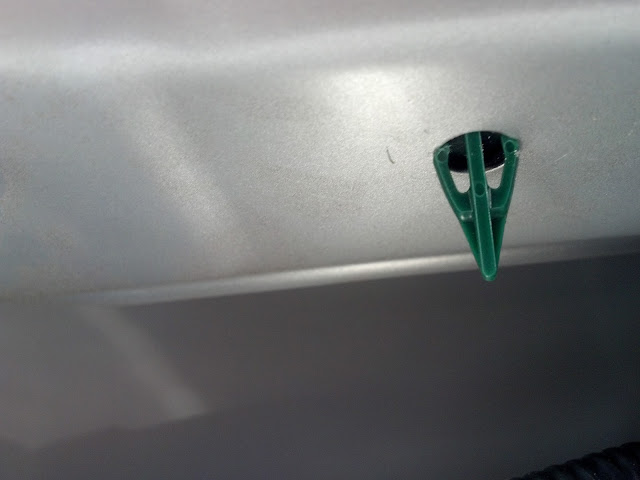
3. Remove the Christmas tree clips on the base of the trunk arms. There is one on each side of the trunk, as well as two in the middle of the trunk lid liner. The trim fork does a great job of this.

4. Remove the trim around the trunk pulldown button. Use a flathead to pop the manual pulldown handle, and remove the two phillips head screws. Remove the two panels in the trunk lid liner on the edges (where the inner tail lights bolt).
Inner tail light panels

Trunk close button

5. Using the trim fork, remove the trunk light and unplug it. Now gently pry around the trunk lid liner, popping the clips out all around. You will have to gently maneuver the emergency release switch out of the lid itself. I wiggled and moved it to the passenger side and it slipped out easily.

6. Now, youll want to remove a bunch of 10mm nuts. The inner tail lights have 4 each. Unplug the wiring harnesses and put them somewhere like the trunk or a box out of the way.
Inner tail lights:

Trim panel:


7. the trunk trim panel has many more as well as some christmas tree clips look around the edges and you will see many. The "top" (below the Lexus logo) has 3 bolts. You will need the help of the trim fork to get this plastic garnish/trim panel off.

8. Now that the trim panel is off, you will see the reverse light/trunk pop assembly. Note the gummy rotten ness of the trunk button. Inside the trunk panel you see the wiring harness, Unplug it.


9. If you choose, now is a good time to use your detailer mist or wet rag to wipe off all the dust and grime off this area.
10. Remove the covers and unscrew the two phillips head screws retaining the trunk button. The button should come out.

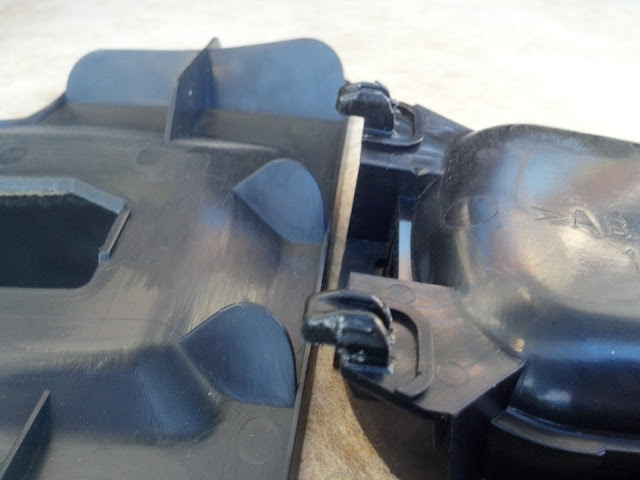
11. Push the two green clips inside the trunk lid in, releasing the license plate light assembly to remove the trunk button harness. There is electrical tape holding the harness.

New Switch with grommet installed.

New Switch Plug

12. I used brake cleaner sprayed onto a rag and then wiped the goo off the license plate light assembly before installing the new button. Dont forget the trim buttons that go over the screws.

13. New button installed and wiring harness run and plugged in.
14. Reinstall rear fascia/trim/garnish panel, snugging them down once you have verified its all lined up. Install all the nuts and clips. You dont need He-man strength, Just snug them up. maybe 10 ft lbs. I used a nut driver so I dont go crazy with the torque.
15. Reinstall inner tail lights. And plug them in.

16. verify all you have left is clips for the trunk lid liner.
17. Install trunk lid liner making sure the emergency release is the first thing to go in. Make sure the wiring for the trunk courtesy light is sticking out of the hole. Then the clips and christmas tree fasteners. Reinstall the trunk pulldown panel, as well as the trim around the power pulldown button.
Trunk Light harness:

18. Plug in trunk light, Hook the trunk arm trim pieces back then put the pushclips back into place.
19. Check for any leftover hardware. Vacuum trunk out and test button.
Nice shiny new Button:

I ordered a new button online and decided to go in the garage and tackle this (its more peaceful and quiet than inside the house this time of year.
Tools needed:
New Switch Assembly: 84840-21010
A trim fork is a MUST for this project. If you dont have one, use lots of blue tape and make sure you have extra clips for the ones you break without the fork.
Dental Pick, Phillips and Flat head
Phillips Head Screwdriver
Ratchet
10 mm socket or wrench
I hold no responsibility to this write up, proceed at your own risk.
Paper towels/rags/spray cleaner, its dusty underneath
Procedure:
This is not a hard job, just lots of dis-assembly required. It is labor intensive. I also removed far more than I needed to, (trunk lock cylinder and backup camera), being the first time, but in this case, I'm just going to tell you what you need to take off, not all the other stuff that I removed.
1. Remove your License plate and frame (if equipped)
2. Open the trunk, and remove the trim panels on the trunk arms on each side of the trunk. Each arm has 3 push clips. 2 on the outside and 1 on the inside. Use your pick or phillips to gently push the center piece in and the clip comes out with the trim fork or flathead. Remove the trim by pulling up, There is a hook that hooks into the arm itself.
3. Remove the Christmas tree clips on the base of the trunk arms. There is one on each side of the trunk, as well as two in the middle of the trunk lid liner. The trim fork does a great job of this.
4. Remove the trim around the trunk pulldown button. Use a flathead to pop the manual pulldown handle, and remove the two phillips head screws. Remove the two panels in the trunk lid liner on the edges (where the inner tail lights bolt).
Inner tail light panels
Trunk close button
5. Using the trim fork, remove the trunk light and unplug it. Now gently pry around the trunk lid liner, popping the clips out all around. You will have to gently maneuver the emergency release switch out of the lid itself. I wiggled and moved it to the passenger side and it slipped out easily.
6. Now, youll want to remove a bunch of 10mm nuts. The inner tail lights have 4 each. Unplug the wiring harnesses and put them somewhere like the trunk or a box out of the way.
Inner tail lights:
Trim panel:
7. the trunk trim panel has many more as well as some christmas tree clips look around the edges and you will see many. The "top" (below the Lexus logo) has 3 bolts. You will need the help of the trim fork to get this plastic garnish/trim panel off.
8. Now that the trim panel is off, you will see the reverse light/trunk pop assembly. Note the gummy rotten ness of the trunk button. Inside the trunk panel you see the wiring harness, Unplug it.
9. If you choose, now is a good time to use your detailer mist or wet rag to wipe off all the dust and grime off this area.
10. Remove the covers and unscrew the two phillips head screws retaining the trunk button. The button should come out.
11. Push the two green clips inside the trunk lid in, releasing the license plate light assembly to remove the trunk button harness. There is electrical tape holding the harness.
New Switch with grommet installed.
New Switch Plug
12. I used brake cleaner sprayed onto a rag and then wiped the goo off the license plate light assembly before installing the new button. Dont forget the trim buttons that go over the screws.
13. New button installed and wiring harness run and plugged in.
14. Reinstall rear fascia/trim/garnish panel, snugging them down once you have verified its all lined up. Install all the nuts and clips. You dont need He-man strength, Just snug them up. maybe 10 ft lbs. I used a nut driver so I dont go crazy with the torque.
15. Reinstall inner tail lights. And plug them in.
16. verify all you have left is clips for the trunk lid liner.
17. Install trunk lid liner making sure the emergency release is the first thing to go in. Make sure the wiring for the trunk courtesy light is sticking out of the hole. Then the clips and christmas tree fasteners. Reinstall the trunk pulldown panel, as well as the trim around the power pulldown button.
Trunk Light harness:
18. Plug in trunk light, Hook the trunk arm trim pieces back then put the pushclips back into place.
19. Check for any leftover hardware. Vacuum trunk out and test button.
Nice shiny new Button:
Last edited by wchain; 12-25-12 at 02:07 PM.

The following users liked this post:
samene (06-20-24)
12-26-12 | 06:43 PM
#5
Moderator
Joined: May 2008
Posts: 3,761
Likes: 68
From: Atlanta, GA
Great job & write up! The 2013's have a new button design made of hard plastic that much better than the last one. My button is really bad to the point I have press it in a certain spot in order for it to work, I will be doing this fix when I get time.

Trending Topics
12-27-12 | 01:52 PM
#8
Lexus Champion
Joined: Feb 2011
Posts: 2,404
Likes: 9
From: Florida
That reminds me of that system that Ford made,( I think), where you wave your foot under the bumper to open the trunk. I wonder why the button becomes so sticky though. I need to change it on another car though; people think its gum when they touch it xD
04-08-13 | 05:28 AM
#10

Lead Lap
Joined: Jul 2003
Posts: 582
Likes: 8
From: Texas
Awesome write up. Thanks wchain
Btw does the hard plastic 2013 model fits previous year models? (2007-2012)? I'm concerned that if we are replacing a defective parts/design with the exact same defective parts, it will go bad/gummy again in a short period of time again...
Btw does the hard plastic 2013 model fits previous year models? (2007-2012)? I'm concerned that if we are replacing a defective parts/design with the exact same defective parts, it will go bad/gummy again in a short period of time again...
Last edited by randomwalk; 04-08-13 at 07:51 AM.
The following users liked this post:
tomgarv (02-26-24)

The following users liked this post:
fheapes (05-16-21)
 04-10-14 | 12:31 PM
#14
Lead Lap
Joined: Jul 2010
Posts: 4,785
Likes: 151
From: The South
