When you click on links to various merchants on this site and make a purchase, this can result in this site earning a commission. Affiliate programs and affiliations include, but are not limited to, the eBay Partner Network.
ahh that makes the most sense. I didn't realize those were possibly aftermarket poly bushings.. I think I read on one of your previous posts you were able to swap out the upper arms without removing the air strut. Am I correct or dreaming?
Thanks again.
If the poly bushing is squeaking then it is most likely too dry in the inside where the bushing rotates around the bolt. You really need to remove the arm so you can lube the inside of the bushing GENEROUSLY for the squeak to go away. Even then there's no guarantee that you won't be repeating this procedure in another couple of months. Some ppl love the poly bushings but I just did not feel like repeating that procedure again and again. That's why I removed the Superpro bushings with less than 1k miles on them. The Superpro bushings also produced a slight wobble at times. You could barely notice it but since I've been driving these cars for over 20 years I could feel the difference which I did not like. I'm not knocking the poly but there is a noticeable different feel.
On my RWD 460 I was able to remove the upper control arms without removing the air struts. The rearward arms were easy since the clearance was not a problem. The forward arms are a little more challenging since you have to slide the bushing bolt out at the right angle for it to clear the strut and the control arm mounting bracket but it is doable. You also have to remove a 10mm bolt right above the front arm mounting bracket that's under the hood which will give you enough clearance to rotate the bracket up so you can get the bushing bolt out. I did not remove the top bracket bolts for either the forward or rearward arms, I just loosened the bolts so the brackets could move freely.
I know all that sounds complicated to someone who has not done this before but it's really not that difficult. Just make sure you have 2 14mm wrenches and one should be a ratcheting wrench. Offset wrenches would help make it easier but are not necessary. I hope this helps.
You guys rock. It was nice to start this bushing swap knowing the struts could remain in place. For the upper rear control arms I unbolted the control arm brackets and they came right out. I couldn't get the bolt loose that holds the control arm to the bracket so I removed the whole thing.
Your right sha4000 the 2 piece poly bushings were dry and squeaked the entire time during removal. I pressed in my aftermarket bushings. The left side is complete.
I had issues on the right side. The control arm was really stuck inside the steering knuckle tower. I used heat, mini sledge, air chisel, ect. Turning the car on and rotating the wheel left and right to whack it at different angles finally did the trick. I used some sacrificial nuts and a washer from ace hardware. Unfortunately, I still managed to bugger up the threads a bit. The threads are m12 1.25 pitch if anyone is curious. Amazon had the die to clean the threads up, it should be here tomorrow.
I also plan on replacing the castle nut as it was missing a chunk before I started. castle nut Lexus Part No.: 90171-12012
The upper forward control arms look fairly new with normal bushings. I didn't mess with them.
Update: I chased the threads with the die. They weren't too bad. The old nut still gets stuck. A new nut wasn't available locally. I ordered 4 from my local dealer, with any luck they will be here tomorrow.
This is my first experience with poly bushings, not a fan. These poly bushings appear to have a sizable gap too.
I locked 2 nuts together with a washer. The washer gave my air chisel something to hit. I think the washer is what buggered the threads up. Whacking the aluminum is what eventually freed it. It's freed up in this picture that's why there is no gap between the nut and aluminum.
You guys rock. It was nice to start this bushing swap knowing the struts could remain in place. For the upper rear control arms I unbolted the control arm brackets and they came right out. I couldn't get the bolt loose that holds the control arm to the bracket so I removed the whole thing.
Your right sha4000 the 2 piece poly bushings were dry and squeaked the entire time during removal. I pressed in my aftermarket bushings. The left side is complete.
I had issues on the right side. The control arm was really stuck inside the steering knuckle tower. I used heat, mini sledge, air chisel, ect. Turning the car on and rotating the wheel left and right to whack it at different angles finally did the trick. I used some sacrificial nuts and a washer from ace hardware. Unfortunately, I still managed to bugger up the threads a bit. The threads are m12 1.25 pitch if anyone is curious. Amazon had the die to clean the threads up, it should be here tomorrow.
I also plan on replacing the castle nut as it was missing a chunk before I started. castle nut Lexus Part No.: 90171-12012
The upper forward control arms look fairly new with normal bushings. I didn't mess with them.
Update: I chased the threads with the die. They weren't too bad. The old nut still gets stuck. A new nut wasn't available locally. I ordered 4 from my local dealer, with any luck they will be here tomorrow. This is my first experience with poly bushings, not a fan. These poly bushings appear to have a sizable gap too. I locked 2 nuts together with a washer. The washer gave my air chisel something to hit. I think the washer is what buggered the threads up. Whacking the aluminum is what eventually freed it. It's freed up in this picture that's why there is no gap between the nut and aluminum. New bushing pressed in That'll teach ya to mess with me.
LMAO Mike! I'm surprised you don't have some of these in your vast collection of tools. I used them to pop off all of the control arm ball joints except for the the lower forward arms. For those, I just tapped them with a 3lb hammer a few times after having removed the knuckles with both lower arms attached.
Lwphat66, lol I don't know why it never crossed my mind to use my puller. Next time that'll be the first tool I grab! Thank you!
The 600 is all back together with a new nut. It's a pleasure to drive with the new bushings, no more squeaks. Now that it is quiet I do hear a very subtle rattle from the front left at 25 mph. It seems to occur as the wheel hits small expansion cracks in the pavement.... Still pursuing perfection. It goes in to Firestone tomorrow for an alignment.
I had been using a mom and pop shop for alignments but they seemed to drop the ball with my 460. The alignment went out the same day I picked it up, after only driving 15 miles. They " fixed " it but imo it's still slightly off. They charged $70.
Firestone has a lifetime alignment deal for $200. I will likely need another alignment this winter if I replace the rear struts. I also like the option of taking it to another firestone anytime if it's not perfect. Who do you guys prefer for an alignment?
Another update. I had the alignment done at firestone. The steer ahead angle was nearly perfect. I guess I got the steering shaft lined up in exactly the same location after replacing the engine mounts. The rest of it wasn't too far off. It drives pretty much the same.
I've also traced down the noise over small road gaps. While doing about 20mph I hung my head out the window like our dog, minus the slobber, well maybe a little. It sounded like brake pads jingling. After stopping I reached inside the left front wheel. Sure enough the outside brake pad is loose. I was able to create the same noise by moving the brake pad. I ordered a brake pad fitment kit, should be here tomorrow. The right front pads were tight, no wiggle.
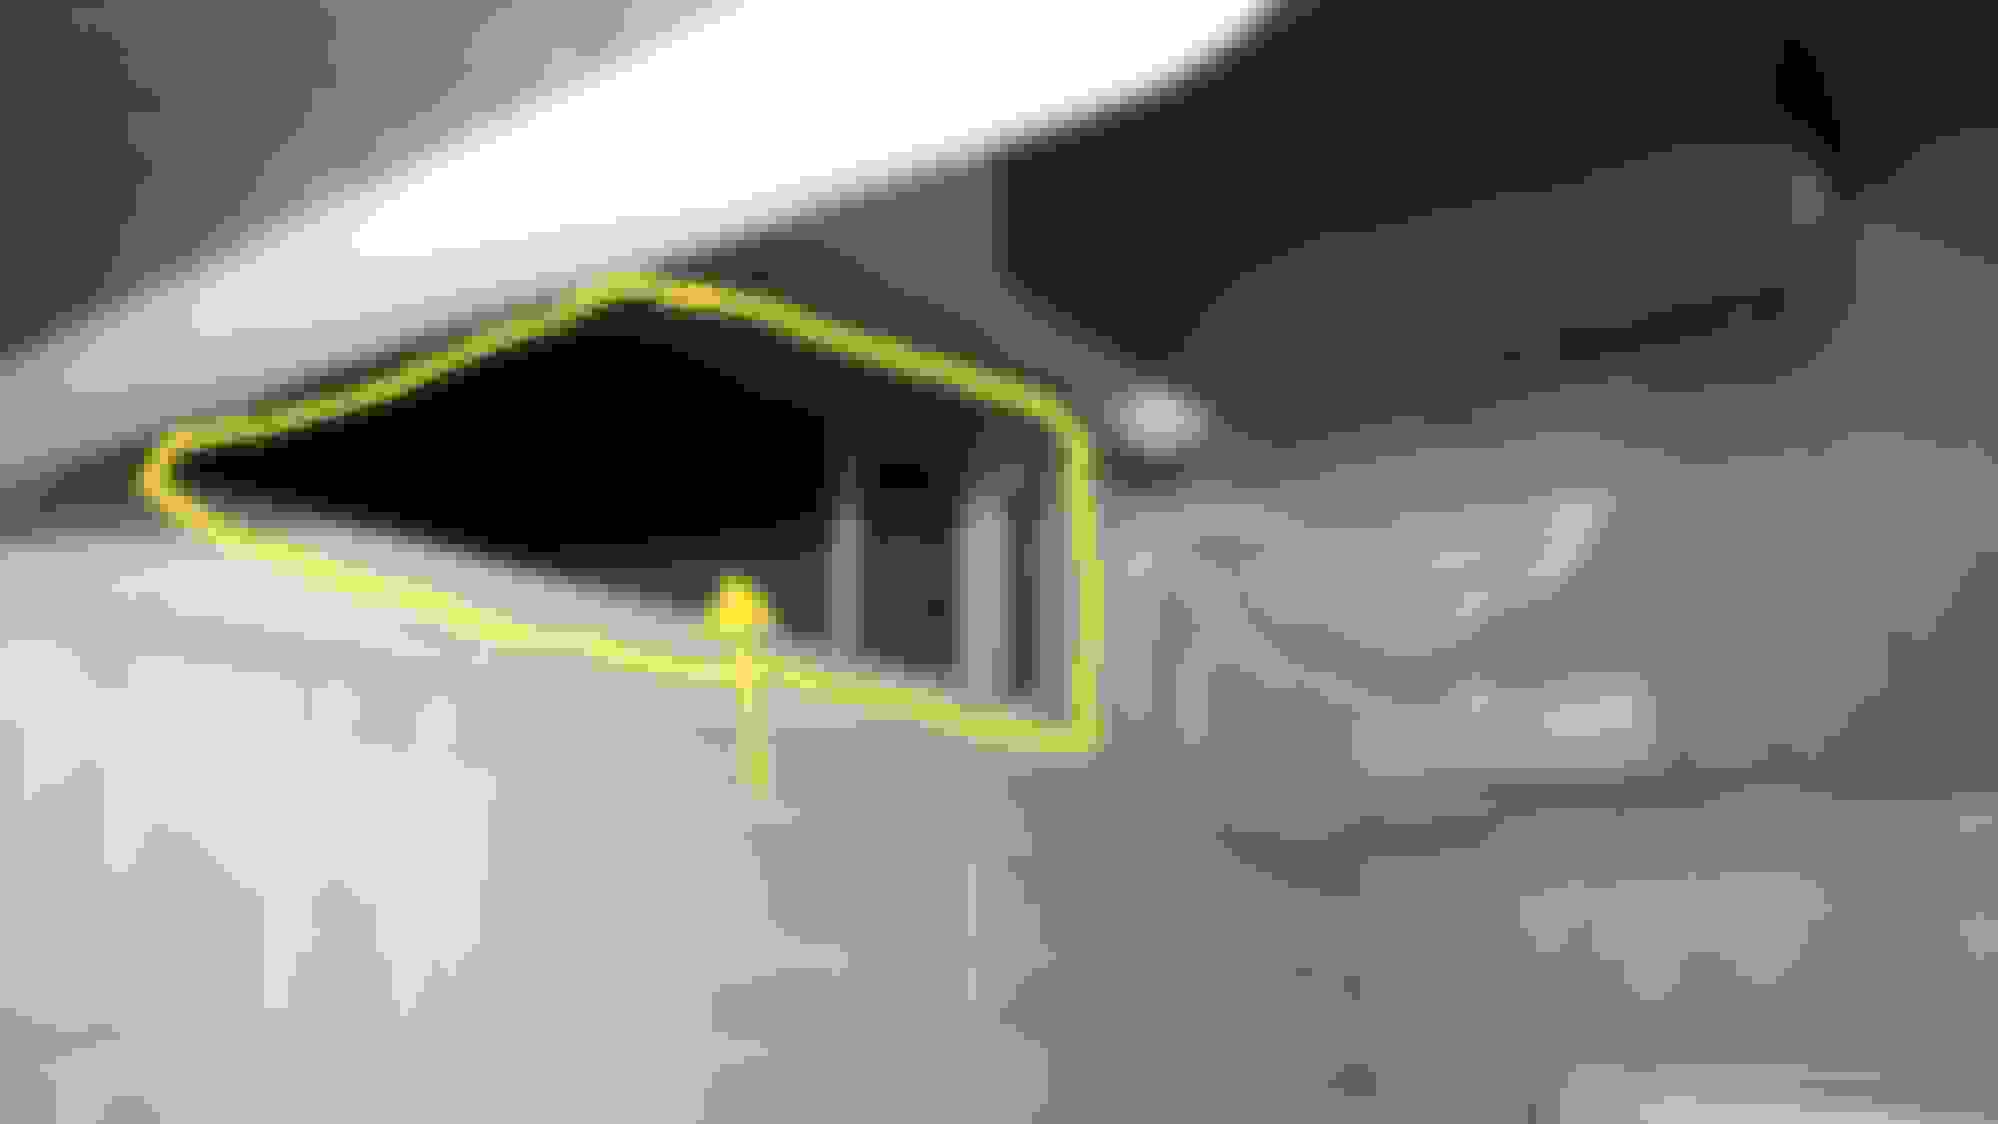
Today I discovered the rear seat side vents upper and lower have no air flow. I can select multiple speeds for the rear blower motor in the trunk. It does spin, seems to be functioning normally at all speeds. I removed the filter and took these pictures. Can someone confirm the fan housing should look like this? To me it looks to be missing some ductwork (I can see carpet through the duct). It would be helpful if someone with rear ac can confirm when the rear fan is set to high I should be able to feel airflow by hand. I put a Kleenex in front of the vents, I got nothing.
No airflow out of these vents. The right vents are also dead.
View from inside the trunk with filter removed looking toward upper left of housing.
View from inside the trunk with filter removed looking toward upper right of housing
LILEVO The videos are helpful. It looks like you were able to feel airflow out the top vents, maybe not the mid B pillar vents. Currently our kid car seat is in the middle blocking the rear controls from folding down. I've been turning the rear fan on by means of the front touch screen. I noticed the front touch screen does not have an option for adjusting the rear upper or lower vents. When I turn the rear fan on and off the air purifier light illuminates. I'll need to remove the car seat to experiment with those controls.
The "purifier" button turns on the rear blower which ONLY has A/C - no heat, and comes out of those top vents. A lot of people think they crank up the blower in back they will get heat, but the heat comes from the front ducts and front blower/servos only.
I removed the carseat and played with the controls for awhile. Your right by selecting auto on the panel In the backseat cold air blows out the vents. I determined on the dash controls if I unselect 4 zone control the rear seat auto gets turned off. In order to turn rear auto on again the car seat needs to be removed. It's going to be 118f in a few days, much appreciated.
Brake rattle solved...
The small spring attached to the brake pad was worn out. This made quite the rattle at low speeds. The interior is so well isolated it was hard to hear with the windows up. I believe all the pops and rattles while driving have been sorted out. I'd consider the car safe for a long road trip.
I still have a few items I'd like to replace but nothing is urgent or required. These will likely be done in 6 months when it cools off.
1. Replace tranny mounts. Visually the center mount looks squished. When parked on electric only for 5 minutes and the ice engine kicks on to charge the hybrid battery there is a .5 second vibration felt in the car. I believe the tranny mounts will help although the brief vibration may be a characteristic of the car.
2. Install dynamat on drivers door and replace door panel clips. ( Door still sounds slightly hollow when closed hard)
3. Replace tranny fluid and filter
4. Replace Rear brakes and struts
Cheap seems to have become relative at this point
No kidding lol. Initially when I started looking for one of these it was to replace our 97 es300 which was my beater / tow car. I used our es300 only a few times a month for towing stuff. Since it sat so much I didn't bother fixing every little issue with it. I thought this 600 was going to be similar and sit the same amount of time. After our first few drives as a family in the 600 nobody wanted to ride in our 460 anymore which was previously our daily driver. Our daughter likes the drop down tv and wireless headphones. The Mrs. and I enjoy the quiet.
The es300 story probably more accurately fits the definition of "cheap". 3 years ago I purchased it non running for $500, towed it a few blocks to get it home. I found a broken crank position sensor wire. After soldering the wire together plus adding some heat shrink tubing she started right up. Over the course of the 3 years I replaced timing belt, engine mounts, 4 struts and the front lower suspension A arms. I also painted it white. All together including the purchase price I was probably in it for a grand. The parts were ridiculously cheap compared to the 460 /600. I sold the es300 this year for about 2 grand. I doubt I'll be so fortunate to come out ahead with the 600.
That's amazing. Literally the mechanic's tales of legend.
Having needed to buy two door mouldings recently, my eyes nearly pope out of my eye socket finding out they're $300 a piece, I've told myself never again working on a luxury car. Buy, yes, but never to fix up in any capacity.
 05-25-21, 05:56 AM