
DIY: 90-94 LS400 Front Air Suspension Removal (Air Struts)
 04-17-11, 01:12 PM
#1

I am in the process of installing Daizen upper and lower control arm bushings in my 90 LS400. There are quite a few tutorials on how to accomplish this, and I have primarily used the excellent tutorials on www.lexls.com as my guide.
The only real issue that came up was the removal of the front struts/shocks which is necessary to get access to the bolts that attach the upper control arms to the body of the car within the wheel well. The tutorials I am using don't have any information about the air struts because the car used in the tutorials is a non-air equipped LS400. I went about searching the forum for the specifics on removing the air struts and really didn't find anything that outlined this process clearly. I then did the obligatory Google search and came up with limited information there as well. There are some diagrams on www.strutmasters.com (installation instructions for their replacement coil over system) but they are kind of cryptic.
The following is a DIY for how to remove the struts. It's not much different than removing a normal shock, but there are some considerations that need to be made for the air system. This applies to all first gen LS400's with air suspension (90-94). It may apply to other generations as well, but I'm not certain.
The following steps assume that you have taken apart the upper ball joint connection between the steering knuckle and the upper control arm. That will need to be done first in order to have clearance to remove the air strut
(ENSURE THAT THE AIR SUSPENSION SWITCH IN THE TRUNK IS TURNED TO THE OFF POSITION BEFORE JACKING UP THE CAR AND BEFORE DOING ANY OF THE FOLLOWING)
Sorry these pics are a little large, I didn't have time to re-size them prior to posting this. At least you can see the detail
First step will be to remove the three 14mm nuts that hold the shock actuator covers on. Disconnect the actuator wiring harness and then put the actuator cover off to the side (I did not have to completely remove the cover).
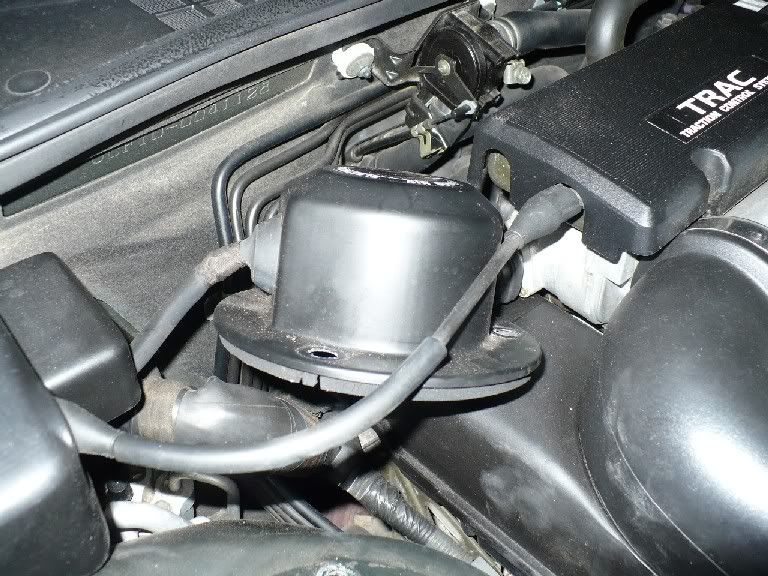
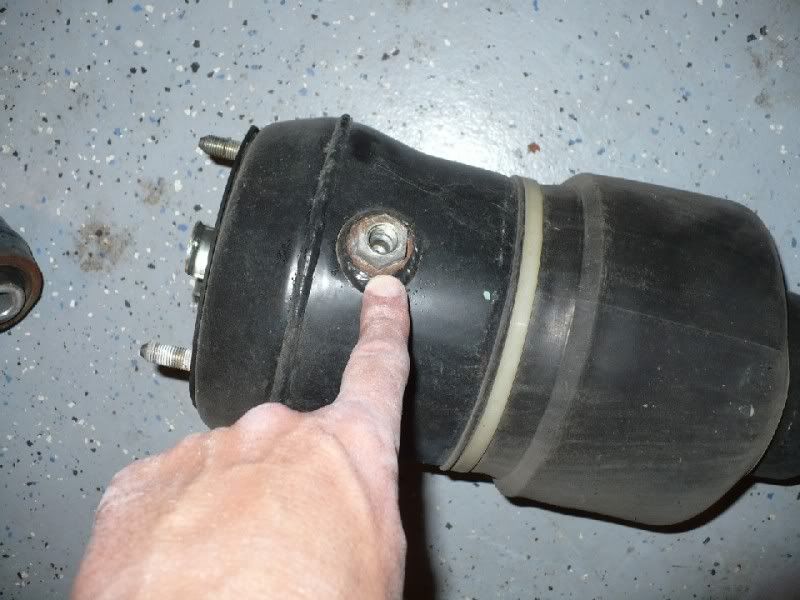
Next loosen (do not remove entirely yet) the three 14 mm bolts that hold the air strut to the shock tower. Then remove the actuator from the top of the air strut and set aside.

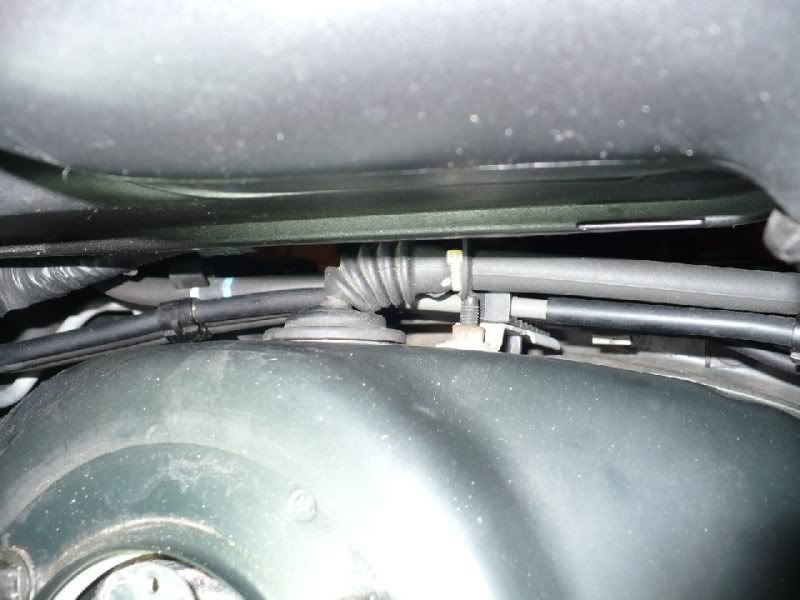
This next step is important when removing air struts, vs. removal of a normal shock. You must first bleed the air out of the strut before removing it. You must also remove the air coupling from the strut before attempting to remove the strut. If you do not do this, you risk damaging either the air coupling, the strut or both. The air inlet for each strut is located inside the engine bay, about half way down the shock tower between the engine and the shock tower. The photo is taken pointed straight down. You will see the rubber grommet on the side of the shock tower. It is a very tight fit to get tools and/or hands down there to reach the inlet, but it can be done. I did not have to remove the intake or remove anything inside the engine bay to get access to the inlet.
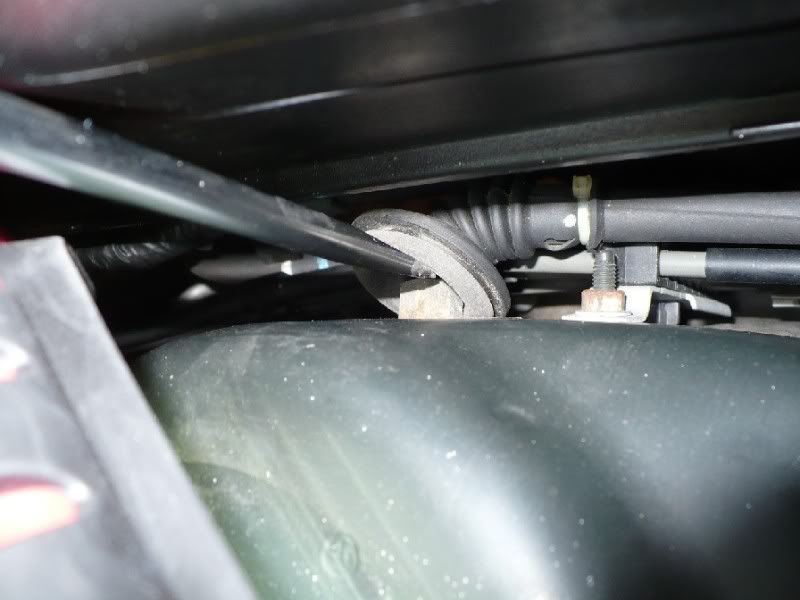
Begin by taking a flat head screwdriver and prying away the rubber grommet from the inlet valve. It will come away fairly easily. This will expose a nut that holds the inlet valve to the shock tower. I don't recall what size wrench I used to loosen this nut, but I believe it was a 5/8 box wrench. You will need to use a box wrench to loosen the nut, there isn't enough clearance for a socket wrench. Loosen the nut until it is free and then carefully pull the inlet valve away from the shock tower. Be prepared, because it will pull away without much effort, and when it does there will be a rush of air that escapes from the air bladder in the strut. The rush of air is a little concerning at first (I thought I had missed a step turning off the air somewhere or something) but after about 30 seconds or so it will stop. The air strut is now empty of air and the air inlet coupling is free so you can now remove the air strut without causing any damage. The driver side air inlet is removed in the same manner, but it is easier to get to then the passenger side.
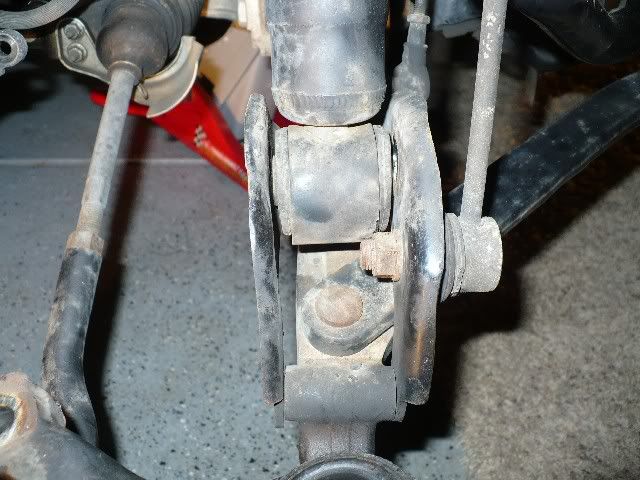
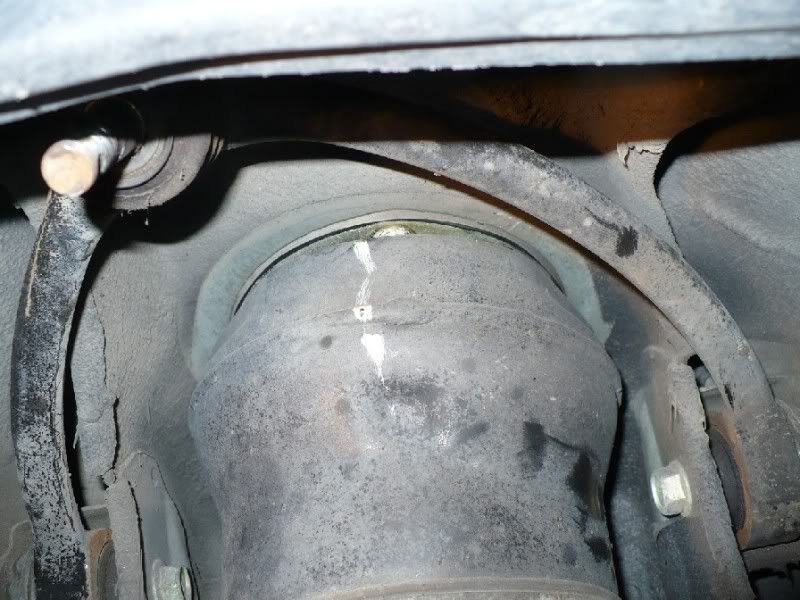
Next, remove the bolt holding the bottom of the air strut to the bracket on the lower control arm. This will free the strut from it's mounting. You should now be able to move the strut and it will dislodge and hang from the nuts you loosened prior. Go ahead and remove the shock tower nuts and remove the strut. Installation is reverse of removal.
Disconnecting lower strut bolt:
Strut hanging from three screws in shock tower:
This is what the inlet hole with the air inlet looks like behind the strut:
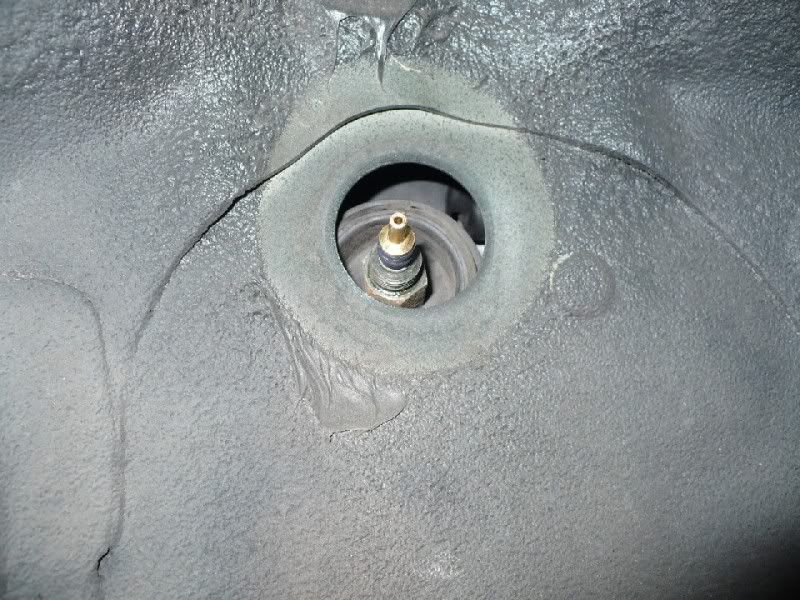
In case anyone is curious, I took a photo of the strut with the air inlet hole visible so you know what that looks like. This is hidden when the strut is in place.
Hope this helps anyone with air suspension who needs to know how to remove their front air struts safely. It's a pretty easy job, but I didn't find much information specific to air suspension. Happy wrenching.
The only real issue that came up was the removal of the front struts/shocks which is necessary to get access to the bolts that attach the upper control arms to the body of the car within the wheel well. The tutorials I am using don't have any information about the air struts because the car used in the tutorials is a non-air equipped LS400. I went about searching the forum for the specifics on removing the air struts and really didn't find anything that outlined this process clearly. I then did the obligatory Google search and came up with limited information there as well. There are some diagrams on www.strutmasters.com (installation instructions for their replacement coil over system) but they are kind of cryptic.
The following is a DIY for how to remove the struts. It's not much different than removing a normal shock, but there are some considerations that need to be made for the air system. This applies to all first gen LS400's with air suspension (90-94). It may apply to other generations as well, but I'm not certain.
The following steps assume that you have taken apart the upper ball joint connection between the steering knuckle and the upper control arm. That will need to be done first in order to have clearance to remove the air strut
(ENSURE THAT THE AIR SUSPENSION SWITCH IN THE TRUNK IS TURNED TO THE OFF POSITION BEFORE JACKING UP THE CAR AND BEFORE DOING ANY OF THE FOLLOWING)
Sorry these pics are a little large, I didn't have time to re-size them prior to posting this. At least you can see the detail
First step will be to remove the three 14mm nuts that hold the shock actuator covers on. Disconnect the actuator wiring harness and then put the actuator cover off to the side (I did not have to completely remove the cover).
Next loosen (do not remove entirely yet) the three 14 mm bolts that hold the air strut to the shock tower. Then remove the actuator from the top of the air strut and set aside.
This next step is important when removing air struts, vs. removal of a normal shock. You must first bleed the air out of the strut before removing it. You must also remove the air coupling from the strut before attempting to remove the strut. If you do not do this, you risk damaging either the air coupling, the strut or both. The air inlet for each strut is located inside the engine bay, about half way down the shock tower between the engine and the shock tower. The photo is taken pointed straight down. You will see the rubber grommet on the side of the shock tower. It is a very tight fit to get tools and/or hands down there to reach the inlet, but it can be done. I did not have to remove the intake or remove anything inside the engine bay to get access to the inlet.
Begin by taking a flat head screwdriver and prying away the rubber grommet from the inlet valve. It will come away fairly easily. This will expose a nut that holds the inlet valve to the shock tower. I don't recall what size wrench I used to loosen this nut, but I believe it was a 5/8 box wrench. You will need to use a box wrench to loosen the nut, there isn't enough clearance for a socket wrench. Loosen the nut until it is free and then carefully pull the inlet valve away from the shock tower. Be prepared, because it will pull away without much effort, and when it does there will be a rush of air that escapes from the air bladder in the strut. The rush of air is a little concerning at first (I thought I had missed a step turning off the air somewhere or something) but after about 30 seconds or so it will stop. The air strut is now empty of air and the air inlet coupling is free so you can now remove the air strut without causing any damage. The driver side air inlet is removed in the same manner, but it is easier to get to then the passenger side.
Next, remove the bolt holding the bottom of the air strut to the bracket on the lower control arm. This will free the strut from it's mounting. You should now be able to move the strut and it will dislodge and hang from the nuts you loosened prior. Go ahead and remove the shock tower nuts and remove the strut. Installation is reverse of removal.
Disconnecting lower strut bolt:
Strut hanging from three screws in shock tower:
This is what the inlet hole with the air inlet looks like behind the strut:
In case anyone is curious, I took a photo of the strut with the air inlet hole visible so you know what that looks like. This is hidden when the strut is in place.
Hope this helps anyone with air suspension who needs to know how to remove their front air struts safely. It's a pretty easy job, but I didn't find much information specific to air suspension. Happy wrenching.


 04-15-12, 11:55 AM
#3
Rookie

Join Date: Sep 2011
Location: Texas
Posts: 74
Likes: 0
Received 0 Likes
on
0 Posts
Thanks for the guide. It looks like your upper a-arm is disconnected from the picture but you didn't mention it. did that require a ball-joint puller or does that bolt slide right out?
04-15-12, 03:29 PM
#4
Pole Position

Join Date: Mar 2010
Location: VA
Posts: 341
Likes: 0
Received 0 Likes
on
0 Posts
04-15-12, 04:59 PM
#5
Yes, you have to disconnect the upper control arm from the steering knuckle in order to get the strut out. I used a Pittman puller that I got from Pep Boys for 11 bucks. Worked great.
Trending Topics
10-03-14, 04:06 AM
#10
Pole Position

Join Date: Mar 2014
Location: Oregon
Posts: 397
Likes: 0
Received 0 Likes
on
0 Posts
Well im talking about pulling the suspension ECU entirely, with all wiring, all the air lines, and selling it off or whatever. I dont want any of that stuff lol
the compressor from lexus is almost $3000!! its insanity.
the compressor from lexus is almost $3000!! its insanity.


Thread
Thread Starter
Forum
Replies
Last Post
International F.S 96 LS400 AIR Suspension Struts/shock
MattLS400
LS460 / 430 / 400 / 600h Classifieds
1
02-10-15 09:20 AM
dranoeld
LS - 1st and 2nd Gen (1990-2000)
5
03-17-09 03:30 PM