
LX470 New owner, intro and build thread
 01-31-22, 06:09 AM
#16

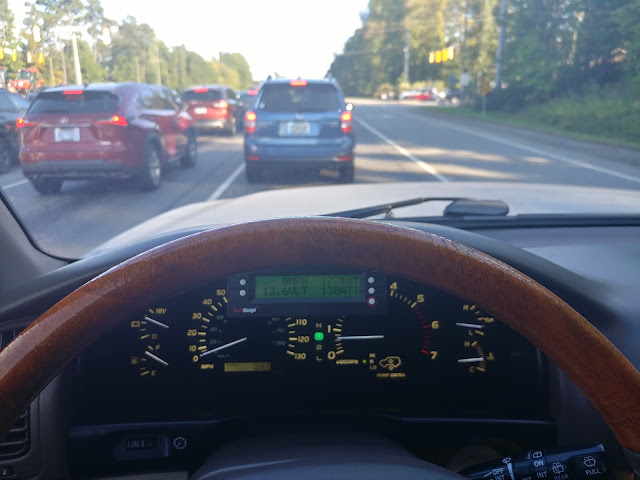
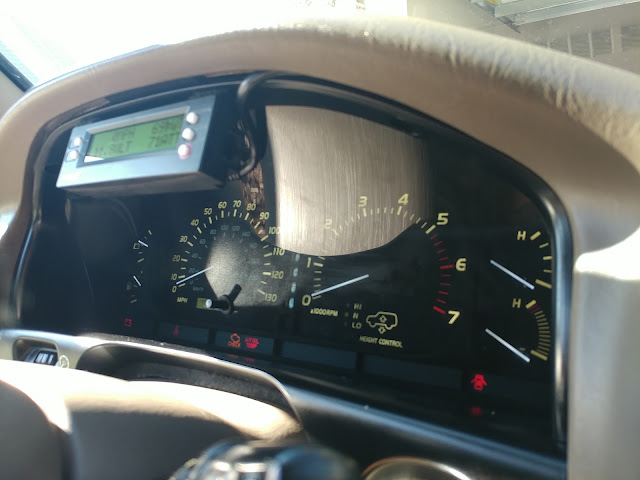
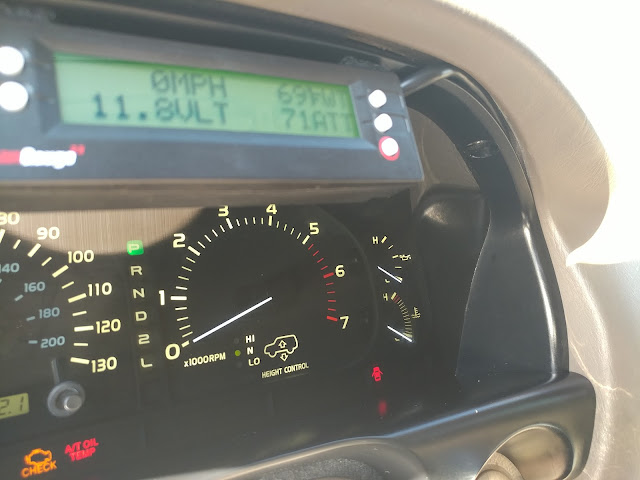
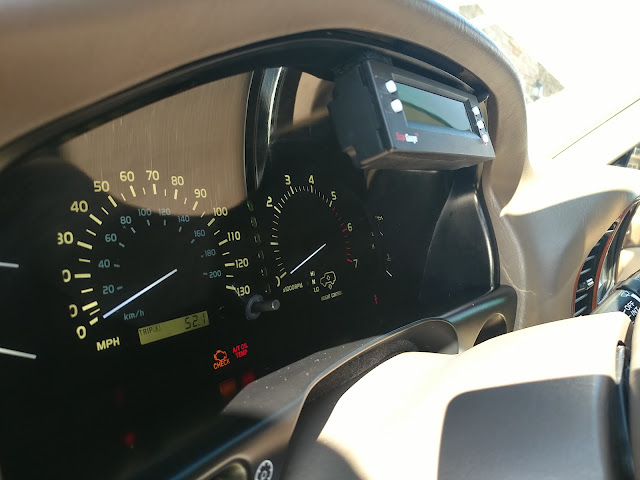
I've been trying to find a good spot for this scan gauge in the car and something that I could look at at a glance without taking my eyes off the road. I tried putting it on top of the steering shifter column but I didn't like how it would cover up the warning lights etc.
@ben3dbuild makes an awesome mount to go in the upper console and a couple of other places. I liked the upper console location except my LX470 does not have the upper console with the sunglass holder which came in the 2003 and up LX's. I was debating on swapping the upper console from the 03 and up LX. While all this was going on I had to tow a car and wanted to make sure the rig was good for the tow so temporarily hooked up the ScanGauge and left it in the cluster area. I really liked the location and after my tow I thought I'd want to mount it in the same area without covering up any warning lights etc. I went down the rabbit hole of designing a holder to 3D print and going down that path also get a decent/cost effective 3D printer to do so. Well a couple of weeks went by and the wire was annoying me so I just ran the wires behind the panels and then I just used some velcro on both edges of the edges of the ScanGauge to accommodate the for the curve on the cluster and well attached it.
Sometimes I think just keeping it simple works.
 01-31-22, 07:02 AM
#17
Been stocking up on parts slowly with plans on refreshing the LX this included some Doug Thorley headers. I can hear that the issue currently, either the header has a crack in it or the header gasket is shot. My mentality on maintenance is while I'm in there... so with that thought process in mind I was planning on replacing the following while changing out the headers:
Doug Thorley Short Tube Headers - 98-04 - THY-561-SS-C
(2) Manifold Gaskets OEM 17173-50021
(0-16) Manifold to Cylinder Head Studs OEM 90126-10015
(2) Header to Cat gasket OEM 90917-06065
(16) Header nuts OEM 90179-10070While the headers are being done there are parts that make sense in changing while it is getting swapped out so the following parts were on the list.
Engine mount L& R (12361-50121 x 2) 190.87 X 2
Engine Stabilizer L& R (12381-50100 x 2) 53.15 X 2
Transmission mount (12371-50081)
Front stabilizer end linksI currently don't have room to have a vehicle down or work on over a couple of days so I waited for a friend of mine who is a really good tech to have some time to install these parts. There are maybe a handful of people that I trust to work on my vehicles. After a short wait he got me in, Well in about 4 hours he had the headers done, end links, motor and transmission mounts & diff arms and bushings done. While he was doing all that up front I got the rear lower control arms, pan hard bars, springs and end links done. So productive weekend for sure, got a lot done.
Rear suspension parts:
KING KTRS-79 Coils
Rear - Lateral pan hard bar OEM (48740-60080)
Rear - Lower OEM (48720-60040) x 2
Parts I forgot to take with me to install so going to do that later.
Rear - Upper Right (Air box side) OEM (48710-60070)
Rear - Upper Left OEM (48710-60080)


New headers.


New Diff bushings


New transmission mount

New motor mounts


New end links front and rear


New lower control arms, pan hard bars and King springs.


Bye bye, old parts you've served the LX well.


Doug Thorley Short Tube Headers - 98-04 - THY-561-SS-C
(2) Manifold Gaskets OEM 17173-50021
(0-16) Manifold to Cylinder Head Studs OEM 90126-10015
(2) Header to Cat gasket OEM 90917-06065
(16) Header nuts OEM 90179-10070While the headers are being done there are parts that make sense in changing while it is getting swapped out so the following parts were on the list.
Engine mount L& R (12361-50121 x 2) 190.87 X 2
Engine Stabilizer L& R (12381-50100 x 2) 53.15 X 2
Transmission mount (12371-50081)
Front stabilizer end linksI currently don't have room to have a vehicle down or work on over a couple of days so I waited for a friend of mine who is a really good tech to have some time to install these parts. There are maybe a handful of people that I trust to work on my vehicles. After a short wait he got me in, Well in about 4 hours he had the headers done, end links, motor and transmission mounts & diff arms and bushings done. While he was doing all that up front I got the rear lower control arms, pan hard bars, springs and end links done. So productive weekend for sure, got a lot done.
Rear suspension parts:
KING KTRS-79 Coils
Rear - Lateral pan hard bar OEM (48740-60080)
Rear - Lower OEM (48720-60040) x 2
Parts I forgot to take with me to install so going to do that later.
Rear - Upper Right (Air box side) OEM (48710-60070)
Rear - Upper Left OEM (48710-60080)
New headers.
New Diff bushings
New transmission mount
New motor mounts
New end links front and rear
New lower control arms, pan hard bars and King springs.
Bye bye, old parts you've served the LX well.
Last edited by kuWuPt; 01-31-22 at 07:06 AM.
04-19-22, 05:53 AM
#18
Driver School Candidate

Hello,
Since you replaced the AHC system with a regular suspension setup I was wondering if I could take the old components off of your hands for a price (that is if you still have them)? Just let me know what works best for you!
Thanks,
Brandon
Since you replaced the AHC system with a regular suspension setup I was wondering if I could take the old components off of your hands for a price (that is if you still have them)? Just let me know what works best for you!
Thanks,
Brandon
The following users liked this post:
BrandonMLR (04-27-22)
07-17-24, 06:42 AM
#20
Really liked the idea of some raptor style lights on the grill. Saw the aftermarket grill options for the LX but I wanted a more subtle OEM+ look. So got some lights to mod up and see where it goes.
The lights I got had a smoked finish because I wanted it to blend in when not in use. They were made for a Tacoma grill I believe. When I got it, I saw that it had some extensions so trimmed that. And I also used silicone to seal all the edges etc just to ensure that it was watertight.


This is how I liked the placement of the final product to be.

So guess snow ball time, the grill looked rough, it is 23 years old so it was time for a refresh anyway. sanded the whole grill down except for the chrome and used epoxy to glue all the lights down.


Sealed the whole grill before paint and then on went paint and clear. Tried to match the paint as close as possible but went with a slightly lighter shade, very OEM +.


All the wiring was heat shrunk and used braided cable sleeves to keep the wiring clean and protected.


Routed all the wiring between the grills so you don't see any of it from the outside.

 Happy with how this turned out.
The lights I got had a smoked finish because I wanted it to blend in when not in use. They were made for a Tacoma grill I believe. When I got it, I saw that it had some extensions so trimmed that. And I also used silicone to seal all the edges etc just to ensure that it was watertight.
This is how I liked the placement of the final product to be.
So guess snow ball time, the grill looked rough, it is 23 years old so it was time for a refresh anyway. sanded the whole grill down except for the chrome and used epoxy to glue all the lights down.
Sealed the whole grill before paint and then on went paint and clear. Tried to match the paint as close as possible but went with a slightly lighter shade, very OEM +.
All the wiring was heat shrunk and used braided cable sleeves to keep the wiring clean and protected.
Routed all the wiring between the grills so you don't see any of it from the outside.
Happy with how this turned out.
07-17-24, 06:46 AM
#21
This has been long overdue. When I acquired the LX470 it came with the delaminating clear coat issue and a paint job was always in the cards as part of the 'restoration'. My buddy's body shop was shutting down for a month for a much needed vacation and they allowed me to use the shop and was going to help get this complete. Thanks Jeremy!!
I've gone through this a couple of times but I wanted to try to do a lot of the work myself this time and boy did I bite off more than I could chew. This has been a long process and it took me almost 3 weeks of working on it everyday after work like a second job. Body work was clearly not my forte and I still need to do things multiple times to get it right.
The plan here was to paint everything from the molding up for a couple of reasons. I still am not sure if I am going to do a front and rear bumper change. Also, if I do keep the bumpers then it's not that hard to just paint the bumpers and caps. I also like the two tone currently, but I also like it when it is all one color. Since I am undecided it'll be easier for me to just address the moldings up for now and decide later as things progress.
Started off with a full wash and degrease of every nook and cranny to try to get rid of any contaminants including the under carriage. Removed all the parts that can come off the car like roof rack, headlights, tail lights, moldings, side mirrors door handles etc. Then got to sanding to get rid of all the old paint off down to the factory primer/sealer. Everywhere there was rock chips and wherever it required body work took it down to metal to get rid of any surface rust etc. All the bare metal surfaces got a coat of Ospho metal treatment to prevent rust.


 After multiple tries to get the body work right I wasn't a 100% satisfied. I asked another friend who does body work to just look over my work and he did!! He fixed up whatever needed to get fixed up and after multiple spot priming, surface preps and sanding, got the car and all the parts in primer.


Gave the car a couple of days to cure and then with guide coat applied got back to blocking the car with 400 grit sandpaper to make sure everything was levelled out. With everything leveled out, it was time for a final wash, degrease and prep for paint. With the car in the booth the plan was to break up the painting into different sessions. Before paint, the parts were wiped down with prep solution and a tack rag to catch any loose dust particles. After prep, the parts were sealed and multiple coats of base and then multiple coats of clear was applied. First session was to tackle the roof and tailgate.

 Second session was the hood and all the parts that came off the car.


Third session was to cover the left and right side.


With everything painted, gave it a couple of days to cure before reassembly. Every single part that went back on the car was thoroughly cleaned and all the plastics got some conditioner. The tail lights, fog lights and side markers even got a polish before going back on.


Having gone through this with a more hands on approach I completely see how a good paint job costs thousands of dollars. Understanding the steps to achieve not just the initial outcome but also longevity will lead you to prep everything accordingly. Prep and using the right materials at the right steps will assure longevity and a clean job. I think I have over a 100 hours in just getting the car ready for paint and that's not including the hours my friends helped me.
I don't think this car has ever been this clean since it left the production plant. With all new moldings etc. I couldn't be happier with the outcome. Now to go ahead and mount all the accumulated parts on the car!
I've gone through this a couple of times but I wanted to try to do a lot of the work myself this time and boy did I bite off more than I could chew. This has been a long process and it took me almost 3 weeks of working on it everyday after work like a second job. Body work was clearly not my forte and I still need to do things multiple times to get it right.
The plan here was to paint everything from the molding up for a couple of reasons. I still am not sure if I am going to do a front and rear bumper change. Also, if I do keep the bumpers then it's not that hard to just paint the bumpers and caps. I also like the two tone currently, but I also like it when it is all one color. Since I am undecided it'll be easier for me to just address the moldings up for now and decide later as things progress.
Started off with a full wash and degrease of every nook and cranny to try to get rid of any contaminants including the under carriage. Removed all the parts that can come off the car like roof rack, headlights, tail lights, moldings, side mirrors door handles etc. Then got to sanding to get rid of all the old paint off down to the factory primer/sealer. Everywhere there was rock chips and wherever it required body work took it down to metal to get rid of any surface rust etc. All the bare metal surfaces got a coat of Ospho metal treatment to prevent rust.
After multiple tries to get the body work right I wasn't a 100% satisfied. I asked another friend who does body work to just look over my work and he did!! He fixed up whatever needed to get fixed up and after multiple spot priming, surface preps and sanding, got the car and all the parts in primer.Gave the car a couple of days to cure and then with guide coat applied got back to blocking the car with 400 grit sandpaper to make sure everything was levelled out. With everything leveled out, it was time for a final wash, degrease and prep for paint. With the car in the booth the plan was to break up the painting into different sessions. Before paint, the parts were wiped down with prep solution and a tack rag to catch any loose dust particles. After prep, the parts were sealed and multiple coats of base and then multiple coats of clear was applied. First session was to tackle the roof and tailgate.
Second session was the hood and all the parts that came off the car.Third session was to cover the left and right side.
With everything painted, gave it a couple of days to cure before reassembly. Every single part that went back on the car was thoroughly cleaned and all the plastics got some conditioner. The tail lights, fog lights and side markers even got a polish before going back on.
Having gone through this with a more hands on approach I completely see how a good paint job costs thousands of dollars. Understanding the steps to achieve not just the initial outcome but also longevity will lead you to prep everything accordingly. Prep and using the right materials at the right steps will assure longevity and a clean job. I think I have over a 100 hours in just getting the car ready for paint and that's not including the hours my friends helped me.
I don't think this car has ever been this clean since it left the production plant. With all new moldings etc. I couldn't be happier with the outcome. Now to go ahead and mount all the accumulated parts on the car!
07-17-24, 06:49 AM
#22
After a recent storm I noticed that there was water on the inside of my windshield. On inspection I found that the moldings on the side was held on by screws, which is not supposed to be the case. I also sprayed some soap to the outside perimeter of the windshield and used a a blower from the inside to see that there were a lot of spots where the soap was bubbling up. Which means air is moving between the inside and outside of the windshield. I had also cleaned out all my drains to make sure that wasn't causing any issues. Well called my glass guy and they were able to squeeze me in. I was initially thinking they could just run a sealer on the inside of the windshield to help seal it but they advised me against that. They explained that air/water might be getting in because there was a break or delamination of some sort with the sealant and to properly diagnose the issue the windshield had to come out. Made sense to get to the root cause of the problem and I'm glad I did.

With the windshield out they pointed out where there was surface rust that was forming which was causing the glue to delaminate . Also the glue the previous installer used apparently wasn't the right one because it was hard and brittle.


All the surface rust was removed and a rust inhibitor was used to help prevent it from happening again.


I also asked them to use some rust inhibitor around the holes where the molding goes that the previous installer had used screws for. with everything dry, fresh windshield glue the windshield went back on.

I chose to give it a couple of days to make sure everything was cured before the moldings went back on. This also gave me the chance to do the soap & air test again to verify that there were no leaks. No leaks and the cabin felt quieter!! Onto the moldings.
I wasn't sure if the holes for the moldings were bigger since they used screws earlier so I went ahead and ordered an assortment of black aluminum rivets along with the OEM rivets and new moldings. The OEM rivets unfortunately did not fit, the OEM rivets had a rubber collar so when the rivets are compressed the rubber makes contact with the metal to prevent paint wear due to vibration and hence rust formation. To help replicate this functionality I used some RTV in the holes prior to using the aluminum rivets.


With the outer moldings secured I'm going to wait till I finish doing some wiring to put the inner moldings into the channels to complete the job.
It was a hassle to deal with this but I'm glad this happened sooner than later. The rust issue would've been significantly worse and might have been a bigger hassle to get fixed correctly. For now I believe everything was done right and happy with the outcome.
With the windshield out they pointed out where there was surface rust that was forming which was causing the glue to delaminate . Also the glue the previous installer used apparently wasn't the right one because it was hard and brittle.
All the surface rust was removed and a rust inhibitor was used to help prevent it from happening again.
I also asked them to use some rust inhibitor around the holes where the molding goes that the previous installer had used screws for. with everything dry, fresh windshield glue the windshield went back on.
I chose to give it a couple of days to make sure everything was cured before the moldings went back on. This also gave me the chance to do the soap & air test again to verify that there were no leaks. No leaks and the cabin felt quieter!! Onto the moldings.
I wasn't sure if the holes for the moldings were bigger since they used screws earlier so I went ahead and ordered an assortment of black aluminum rivets along with the OEM rivets and new moldings. The OEM rivets unfortunately did not fit, the OEM rivets had a rubber collar so when the rivets are compressed the rubber makes contact with the metal to prevent paint wear due to vibration and hence rust formation. To help replicate this functionality I used some RTV in the holes prior to using the aluminum rivets.
With the outer moldings secured I'm going to wait till I finish doing some wiring to put the inner moldings into the channels to complete the job.
It was a hassle to deal with this but I'm glad this happened sooner than later. The rust issue would've been significantly worse and might have been a bigger hassle to get fixed correctly. For now I believe everything was done right and happy with the outcome.
07-17-24, 06:51 AM
#23
When I got the LX I immediately changed out all the halogen bulbs with HID kits because visibility at night was horrendous. Having HID kits in the low, high and fog lights helped a little but visibility was still not good. After the paint job I thought it was best to tackle this issue. I chose to do a retro fit, nothing out of the box but one that has been done by a lot of other enthusiasts and hence this is not going to be a detailed write up because it is well documented.
I chose to get some pre-made brackets from LBBuiltwerks. The projectors I used were also the ones suggested by lbbuiltwerks which was the Bi-Xenon: Morimoto Mini H1 8.0 Stage III Kit. Some costs can be cut here, you can just get the brackets and the bi-xenon morimoto mini h1 projectors and use a cheaper H1 HID kit but I just chose to do it once and hopefully will last a long time. So the brackets and the morimoto kit was ordered.

Everything went pretty seamlessly, well written instructions by lbbuiltwerks and quality products just makes for a much easier job. Baked the headlights, installed everything as per direction, the wiring is the only part I changed up a little. I had some spare HID bulb connectors which I de-pinned and fed through the factory cap to make a jumper harness between the ignitor on the outside of the headlight and the bulb which was inside the headlight.


I also chose to tie in the hi beam signal for the low beam to a jumper harness for the high beam.

Everything was sealed properly and aligned on the truck before final assembly.


Fresh Morimoto rubber sealing glue was used to re-seal the headlights as well.


When I say that the difference is night and day I mean it! The cut off lines are beautiful and the light projection is wonderfully bright and far. I cannot recommend this mod enough! Very satisfying.
I chose to get some pre-made brackets from LBBuiltwerks. The projectors I used were also the ones suggested by lbbuiltwerks which was the Bi-Xenon: Morimoto Mini H1 8.0 Stage III Kit. Some costs can be cut here, you can just get the brackets and the bi-xenon morimoto mini h1 projectors and use a cheaper H1 HID kit but I just chose to do it once and hopefully will last a long time. So the brackets and the morimoto kit was ordered.
Everything went pretty seamlessly, well written instructions by lbbuiltwerks and quality products just makes for a much easier job. Baked the headlights, installed everything as per direction, the wiring is the only part I changed up a little. I had some spare HID bulb connectors which I de-pinned and fed through the factory cap to make a jumper harness between the ignitor on the outside of the headlight and the bulb which was inside the headlight.
I also chose to tie in the hi beam signal for the low beam to a jumper harness for the high beam.
Everything was sealed properly and aligned on the truck before final assembly.
Fresh Morimoto rubber sealing glue was used to re-seal the headlights as well.
When I say that the difference is night and day I mean it! The cut off lines are beautiful and the light projection is wonderfully bright and far. I cannot recommend this mod enough! Very satisfying.
07-17-24, 06:53 AM
#24
When prospeed came out with the rack for the 100 series I loved the profile of it. Sleek, followed the contours of the truck and thought it looked the best so had bought it. Well over a year later it's time to install it. Installation is not complicated, pretty straight forward, it just took me over a year because I was waiting on painting my truck and wanted to put it on after the fact.
I added a silicone pad to the bottom of the mounts on the off chance the mount touches the body during installation. Yup, I agree, very unnecessary.

I modified the gutter rail covers and trimmed the factory covers for the cut outs for the new bolt locations. Since I was doing that figured it could use a coat of rubberized paint to freshen it up.


Everything else for installation is pretty self explanatory, only note here would be that there are 12 spacers that come with the rack. 4 taller ones and 8 shorter ones, the 4 taller spacers are to be used for the front mounting points. I just used some silicone sealant to fill in the mounting holes and then bolt the rack down to prevent any leaks.


 I chose the led bar cut out option for the front wind deflector and did have it mounted but the wiring is not long enough to route into the engine bay so need to modify that so that there isn't a plug in the middle of my windshield molding. Would an extra 2 feet of wire too much to ask here?
Love the roof rack though!
For the led bar, needed to extend the wiring so ordered some 12AWG outdoor wiring and got to work. Extended the wiring and made sure everything had heat shrink, electric tape and even the sheathing under more heat shrink.


Trimmed down the cowl enough to clearance the wiring to run down the channel in the windshield trim.


 Done with no visible wiring. Now to figure out a switch panel setup to power them up!
I added a silicone pad to the bottom of the mounts on the off chance the mount touches the body during installation. Yup, I agree, very unnecessary.
I modified the gutter rail covers and trimmed the factory covers for the cut outs for the new bolt locations. Since I was doing that figured it could use a coat of rubberized paint to freshen it up.
Everything else for installation is pretty self explanatory, only note here would be that there are 12 spacers that come with the rack. 4 taller ones and 8 shorter ones, the 4 taller spacers are to be used for the front mounting points. I just used some silicone sealant to fill in the mounting holes and then bolt the rack down to prevent any leaks.
I chose the led bar cut out option for the front wind deflector and did have it mounted but the wiring is not long enough to route into the engine bay so need to modify that so that there isn't a plug in the middle of my windshield molding. Would an extra 2 feet of wire too much to ask here? Love the roof rack though!
For the led bar, needed to extend the wiring so ordered some 12AWG outdoor wiring and got to work. Extended the wiring and made sure everything had heat shrink, electric tape and even the sheathing under more heat shrink.
Trimmed down the cowl enough to clearance the wiring to run down the channel in the windshield trim.
Done with no visible wiring. Now to figure out a switch panel setup to power them up!
Thread
Thread Starter
Forum
Replies
Last Post