LX470 New owner, intro and build thread
 01-22-21, 12:58 PM
#1

I've always loved the LX470, reliable, well built and I guess a little bit of nostalgia associated with it that lead me down the path to getting one. I came across a decent deal and going back and forth with the previous owner the major fault of the car was the paint.
Just wanted to share my LX470 journey with you guys as well.
LX470 Drawer System
LX470 Suspension Baseline
LX470 Park Light & Turn Signal Light mod
LX470 On-board Air
LX470 Ignition Cylinder Rod Fix.
LX470 Rear Diff Pinion Seal
LX470 Cluster bulb change
LX470 ScanGauge II Mounting
LX470 Header & Suspension refresh
LX470 Grill mod
LX470 Paint refresh
LX470 Windshield re-seal
LX470 Morimoto Retrofit
LX470 Prospeed Roof Rack Install
This 2000 LX470 was family owned with extensive service history from Lexus, in fact the owner kept records, receipts etc of everything which was a folder full! The body and chassis was very clean and dent and rust free. Usually you can see the bolt heads have some oxidization and rust formation but there were none. Didn't see any major leaks and the service records showed new valve cover gaskets replaced in the past 20k miles, new alternator, radiator, timing belt etc were also done. It was also a family commuter between Oregon and Virginia so even though it had higher miles @ 260k I wasn't too concerned about the motor. The main issue as mentioned previously was the paint. The clear coat looked like it was delaminating. It was all original paint so the delamination was even all over. On doing a little bit of research this was a common issue with the color Smoky Topaz Micah on these cars. Weighing the pros and cons I opted to get it because clean bones, service history and price outweighed the failing clear coat issue.
Last edited by kuWuPt; Today at 06:53 AM.
 01-22-21, 01:01 PM
#2
Just out of curiosity I wanted to see if I could strip the delaminating clear coat off by pressure washing it. I used my electric pressure washer with a 15 degree tip and it was definitely taking the clear coat off.


My neighbor has a blasting business (dustless and water pressure washing) so he walked over and told me I'd be out here all day trying to pressure wash it off and subsequently offered to lend me hispressure washing rig which I happily obliged. His trailer has a 500 gallon tank setup with two 50hp industrial gas pressure washer setups. Lets just say that I didn't use a 15 degree tip because it can cut into plastic ask me how I found out, lol. This was stripping the clear coat off and in about 20 minutes or so I was done.


Went ahead and used my pressure washer to clean off the underside and chassis as well.


This is how she sits after the cleanup.

My neighbor has a blasting business (dustless and water pressure washing) so he walked over and told me I'd be out here all day trying to pressure wash it off and subsequently offered to lend me hispressure washing rig which I happily obliged. His trailer has a 500 gallon tank setup with two 50hp industrial gas pressure washer setups. Lets just say that I didn't use a 15 degree tip because it can cut into plastic ask me how I found out, lol. This was stripping the clear coat off and in about 20 minutes or so I was done.
Went ahead and used my pressure washer to clean off the underside and chassis as well.
This is how she sits after the cleanup.
01-22-21, 01:04 PM
#3
The interior was not bad either, it had the obvious seats that were worn in the right places and the stitching giving way on some of the seams but it was complete, not broken and nasty. Sure it was a little messy with some dog hair etc but all in all for a 20 year old car not bad at all.


01-22-21, 01:06 PM
#4
The engine bay was fairly clean too, there was no signs of them cleaning the engine bay for a sale which is what I prefer. This way I can kind tell where it is or was leaking etc. Could tell there was a valve cover leak, a shiny new alternator and newer not factory radiator.


With everything noted, I went ahead and cleaned the engine bay.


 Good start so far.
With everything noted, I went ahead and cleaned the engine bay.
Good start so far.
01-22-21, 01:20 PM
#5
Pole Position
kuWuPt, you've got a beautiful truck.
That said, you might consider flushing and replacing the AHC, brake, and power steering fluids...I'm making that suggestion based on dark color on all 3. AHC and PS are simple diy jobs. You can drain and refill the brake fluid, but you'll need a shop or dealer to bleed the ABS system reservoir in front of the master cylinder.
That said, you might consider flushing and replacing the AHC, brake, and power steering fluids...I'm making that suggestion based on dark color on all 3. AHC and PS are simple diy jobs. You can drain and refill the brake fluid, but you'll need a shop or dealer to bleed the ABS system reservoir in front of the master cylinder.
01-22-21, 01:28 PM
#6
kuWuPt, you've got a beautiful truck.
That said, you might consider flushing and replacing the AHC, brake, and power steering fluids...I'm making that suggestion based on dark color on all 3. AHC and PS are simple diy jobs. You can drain and refill the brake fluid, but you'll need a shop or dealer to bleed the ABS system reservoir in front of the master cylinder.
That said, you might consider flushing and replacing the AHC, brake, and power steering fluids...I'm making that suggestion based on dark color on all 3. AHC and PS are simple diy jobs. You can drain and refill the brake fluid, but you'll need a shop or dealer to bleed the ABS system reservoir in front of the master cylinder.

Trending Topics
03-03-21, 11:27 AM
#9
While planning on my stereo system upgrade I wanted to use an ARC 10" sub that I love. I used it on my SC430 and liked it so much at the time that I bought another sub to use for my one of my other vehicles. I never got around to using it until now for the LX. I can't fit the sub in the factory location because the sub called for a sealed box of 0.75cuft box and the sub being 10" wouldn't have fit in the factory location anyway. Since I had to put a sub box anyway in the rear I figured I could incorporate it in with a drawer system so that way I would have storage, a raised bed of sorts so that with the seats folded down I'd have almost a 6ft bed of to put a full sized bed if I wanted to. The pull out drawers would also be more useful for storage etc.
So I haven't really done any cabinetry work, think the most I've done is make a sealed box out of MDF at some point.


So the basic drawer system is done and needed to make sure that it didn't move around and held down firmly and wont decapitate anyone's head off in any unforeseen circumstances.
Found some strap tie downs that was rated at 500lbs and in a khaki color that kinda keeps the color in the same family and wont look out of place I thought.

That worked great for holding the rear portion of the drawer system in place. For the front portion the strap tie down was a little awkward to handle with the angles that they were in.

The tie down straps were also 12ft long and really long for my application so I trimmed the excess and used the straps to adapt to a turn buckle to them.


Adapted the straps to the turnbuckles by stitching the ends. Did one end did a test fit and cut the straps to length and stitched the other end. The turn buckles are rated at 128lbs each so should be good for this application. In conjunction with the rear straps I don't foresee this going anywhere. But no real world testing so do this at your own risk.

With everything strapped down I moved on to work on the side flaps to complete the structure.


Used a tool called the perfect butt, don't google that at work. With some cardboard, tape, straight edge, pencil and the tool I was able to get the profile lines of the flaps and front drawer trim transferred to wood and got the handles shaped.
With all the structural stuff out of the way I moved on to carpeting the interior to give it a more OEM appearance. Ozite/SuperFlex carpet have excellent properties and makes it ideal for automotive use.
Some of the properties are:
- Non-woven fabric will not fray or unravel
- Excellent colorfastness and UV protection
- High heat resistance
- Exceptionally plush, uniform appearance
- Cuts easily into any shape
- Resists stains, mold and mildew
- High resistance to gas, oil and salt
So I ordered a couple of samples and picked a color that blends in but also one that would also hide some of the scuffs, dirt etc from daily use. Got the roll of carpet in and proceeded to wrap all the parts that needed it. I bought a cheap pain gun and shot DAP contact cement through it to adhere the carpet to the wood.

Carpeted and assembled.


The side flaps were still not attached to the boxes but was a snug fit so it stayed in place for pictures. I ordered a couple of hinges to see what would work and once I found one I liked and attached them.


Drawer system is complete for now. Pretty happy with how it turned out.
So I haven't really done any cabinetry work, think the most I've done is make a sealed box out of MDF at some point.
So the basic drawer system is done and needed to make sure that it didn't move around and held down firmly and wont decapitate anyone's head off in any unforeseen circumstances.
Found some strap tie downs that was rated at 500lbs and in a khaki color that kinda keeps the color in the same family and wont look out of place I thought.
That worked great for holding the rear portion of the drawer system in place. For the front portion the strap tie down was a little awkward to handle with the angles that they were in.
The tie down straps were also 12ft long and really long for my application so I trimmed the excess and used the straps to adapt to a turn buckle to them.
Adapted the straps to the turnbuckles by stitching the ends. Did one end did a test fit and cut the straps to length and stitched the other end. The turn buckles are rated at 128lbs each so should be good for this application. In conjunction with the rear straps I don't foresee this going anywhere. But no real world testing so do this at your own risk.
With everything strapped down I moved on to work on the side flaps to complete the structure.
Used a tool called the perfect butt, don't google that at work. With some cardboard, tape, straight edge, pencil and the tool I was able to get the profile lines of the flaps and front drawer trim transferred to wood and got the handles shaped.
With all the structural stuff out of the way I moved on to carpeting the interior to give it a more OEM appearance. Ozite/SuperFlex carpet have excellent properties and makes it ideal for automotive use.
Some of the properties are:
- Non-woven fabric will not fray or unravel
- Excellent colorfastness and UV protection
- High heat resistance
- Exceptionally plush, uniform appearance
- Cuts easily into any shape
- Resists stains, mold and mildew
- High resistance to gas, oil and salt
So I ordered a couple of samples and picked a color that blends in but also one that would also hide some of the scuffs, dirt etc from daily use. Got the roll of carpet in and proceeded to wrap all the parts that needed it. I bought a cheap pain gun and shot DAP contact cement through it to adhere the carpet to the wood.
Carpeted and assembled.
The side flaps were still not attached to the boxes but was a snug fit so it stayed in place for pictures. I ordered a couple of hinges to see what would work and once I found one I liked and attached them.
Drawer system is complete for now. Pretty happy with how it turned out.
01-31-22, 05:58 AM
#10
I'm a huge fan of the AHC (Active Height Control) system the LX470. The AHC adjusts the vehicle height in accordance with driving conditions. I believe this to be a good balance to fulfill on road and off-road capabilities. On road the suspension adapts to the terrain and the driver can control the dampening from in the car to suit his or her needs. Off-road the Height Hi lets you tackle terrain that requires that little bit of clearance if needed.
On a 21 year old system that has not been serviced it was definitely not functioning as I remembered it from my youth. Definitely not as comfortable, seems like the dampening is lacking. On checking the gradation at the AHC reservoir I was getting about 7 gradation which is on the lower end of the scale for it. Good gradation is in the double digit range. The globes can be the issue here but before I have to shell out for new globes I wanted to see if a fluid flush and torsion bar adjustment would help the system at all.
AHC fluid like any other fluids breaks down over time and well it doesn't work as well as they were intended. Torsion bars like everything else gets weak so that affects the pressures in the system. Same for the rear springs. My plan to refresh the suspensions is the cheapest method first. Which means AHC fluid change and crank up the torsion arms to even out the pressures to get it as close to factory as possible. So did that.. the steps are very well documented so I'm not going to do that here.

The fluid as expected was filthy.

Just make sure the tire pressures are even because this can affect the pressure. Also do this on even ground for the same aforementioned reason.

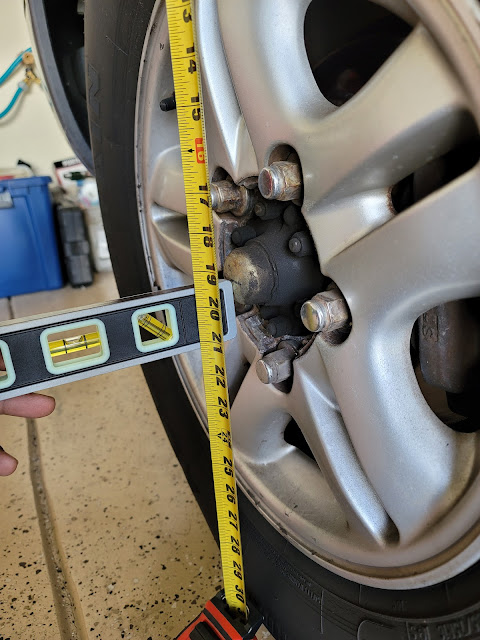
I marked the center of the hub and with a level verified the height after cranking up the torsion bar to get both sides level.

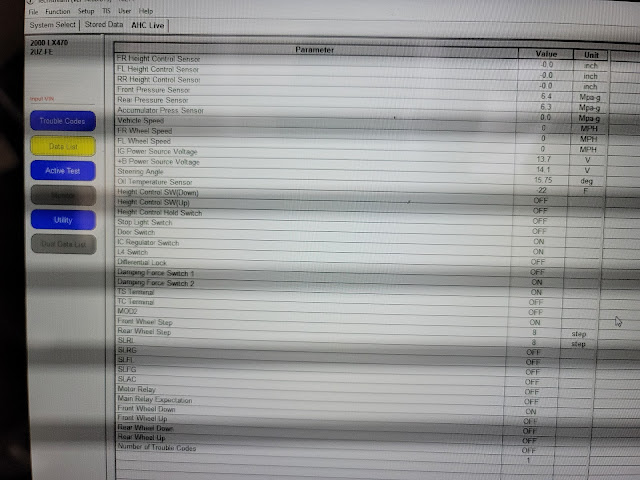
With fresh fluids and the pressure closer to factory spec the ride is definitely better. Ideally front should be around 6.7MPa and the rear below 6MPa. Highway bumps etc. it absorbs rather well. The cracks and small pot holes however still sends a shiver. I'm going to ride around like this for a bit and then check on maybe getting new rear springs and then if needed globes.
On a 21 year old system that has not been serviced it was definitely not functioning as I remembered it from my youth. Definitely not as comfortable, seems like the dampening is lacking. On checking the gradation at the AHC reservoir I was getting about 7 gradation which is on the lower end of the scale for it. Good gradation is in the double digit range. The globes can be the issue here but before I have to shell out for new globes I wanted to see if a fluid flush and torsion bar adjustment would help the system at all.
AHC fluid like any other fluids breaks down over time and well it doesn't work as well as they were intended. Torsion bars like everything else gets weak so that affects the pressures in the system. Same for the rear springs. My plan to refresh the suspensions is the cheapest method first. Which means AHC fluid change and crank up the torsion arms to even out the pressures to get it as close to factory as possible. So did that.. the steps are very well documented so I'm not going to do that here.
The fluid as expected was filthy.
Just make sure the tire pressures are even because this can affect the pressure. Also do this on even ground for the same aforementioned reason.
I marked the center of the hub and with a level verified the height after cranking up the torsion bar to get both sides level.
With fresh fluids and the pressure closer to factory spec the ride is definitely better. Ideally front should be around 6.7MPa and the rear below 6MPa. Highway bumps etc. it absorbs rather well. The cracks and small pot holes however still sends a shiver. I'm going to ride around like this for a bit and then check on maybe getting new rear springs and then if needed globes.
01-31-22, 06:01 AM
#11
This might be pointless to some but I didn't like how the top corner lights was just park lights and the turn signals were down next to the fog lights. I was going to upgrade the headlights and fog lights to white and I wanted the park lights in the corner lights to be white as well to match. At the same time I wanted to use the corner lights to be amber turn signals as well and the turn signals in the bumper next to the fog lights to be amber turn signals and amber park lights.
To start I wanted to clean up and smooth out the fog lights which was definitely showing its age. Sanded the fog lights using 600, 800, 1200, 2000 and then got them cleared using PPG's 2K Clear.


With the fog lights looking fresh, I ordered the clear corner lights as well.
 The fog lights and the corner lights from factory come with a two pin connector. For what I want to accomplish the two pin connector needs to be converted to a three pin connector to use a dual filament bulb.
Parts List:
For the socket that goes into the corner lights and the fog lights:
Toyota part: 90075-60060 x 4
For the connectors to go into the sockets you can either go OEM:
Toyota part: Housing connector (3 Prongs): 90980-11020 x2
Toyota part: Terminal Repair (for insert into housing connector) - 82998-12440 x 12
OR
Aftermarket Toyota style connector: Corsa-technic - TS090-3S-6
Bulbs needed:
Light Bulb (Dual Filaments): Sylvania 7443 x2
Switch back LED: 7443 x 2
Now to test and note what control what on the connector. For this I just used a 12V battery to power and test the connectors.


Below is the wiring schematic for the connector.

With the schematic figured out, I created a harness to integrate into the factory wiring. Everything is soldered, heat shrinked and used techflex wire loom for a clean look.


The white wire coming out of the harness I made goes to the park light side trigger of the harness. This white wire I spliced into the green wire which is the park light signal on the factory harness. The yellow wire on my harness goes to the the turn signal side trigger of the harness. This yellow wire gets spliced into the green wire on the factory fog light harness. The ground black wire from my harness goes to the white and black wire on both ends of the factory harness.

I left the factory connectors and wiring in place just incase the mod needed to be reversed. All the wiring was soldered, heat shrunk and taped up where needed.


This is what it looks like with the park lights on now. White up top and amber at the bottom.


With the turn signals on, both top and bottom blink amber.

Happy how it turned out, now I just need to figure out what I want to do for the headlights and fog lights.
To start I wanted to clean up and smooth out the fog lights which was definitely showing its age. Sanded the fog lights using 600, 800, 1200, 2000 and then got them cleared using PPG's 2K Clear.
With the fog lights looking fresh, I ordered the clear corner lights as well.
The fog lights and the corner lights from factory come with a two pin connector. For what I want to accomplish the two pin connector needs to be converted to a three pin connector to use a dual filament bulb. Parts List:
For the socket that goes into the corner lights and the fog lights:
Toyota part: 90075-60060 x 4
For the connectors to go into the sockets you can either go OEM:
Toyota part: Housing connector (3 Prongs): 90980-11020 x2
Toyota part: Terminal Repair (for insert into housing connector) - 82998-12440 x 12
OR
Aftermarket Toyota style connector: Corsa-technic - TS090-3S-6
Bulbs needed:
Light Bulb (Dual Filaments): Sylvania 7443 x2
Switch back LED: 7443 x 2
Now to test and note what control what on the connector. For this I just used a 12V battery to power and test the connectors.
Below is the wiring schematic for the connector.
With the schematic figured out, I created a harness to integrate into the factory wiring. Everything is soldered, heat shrinked and used techflex wire loom for a clean look.
The white wire coming out of the harness I made goes to the park light side trigger of the harness. This white wire I spliced into the green wire which is the park light signal on the factory harness. The yellow wire on my harness goes to the the turn signal side trigger of the harness. This yellow wire gets spliced into the green wire on the factory fog light harness. The ground black wire from my harness goes to the white and black wire on both ends of the factory harness.
I left the factory connectors and wiring in place just incase the mod needed to be reversed. All the wiring was soldered, heat shrunk and taped up where needed.
This is what it looks like with the park lights on now. White up top and amber at the bottom.
With the turn signals on, both top and bottom blink amber.
Happy how it turned out, now I just need to figure out what I want to do for the headlights and fog lights.
01-31-22, 06:03 AM
#12
After the drawer system was done, I felt that the rig could use a compressor system. I had a couple of components for air at home so I set out to plan for that. I wanted to utilize the space under the flaps on one side just to maximize space so set out to do that.
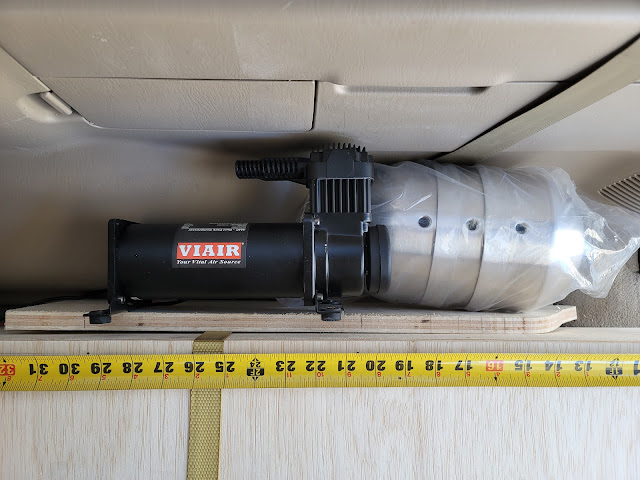
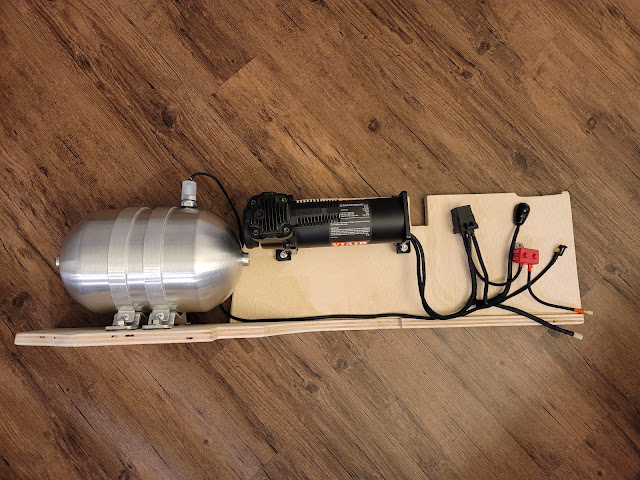
First I laid out the tank and compressor to see what works best as far as layout, clearances etc.
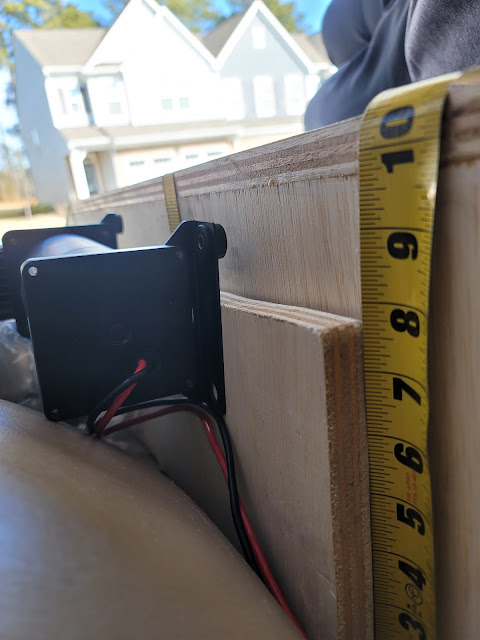
With the measurements of the components in place traced out the floor and the sides. This would make it completely removable and going to integrate the straps etc. to hold the onboard air in place as well. Pics below shows the platform I came up with.
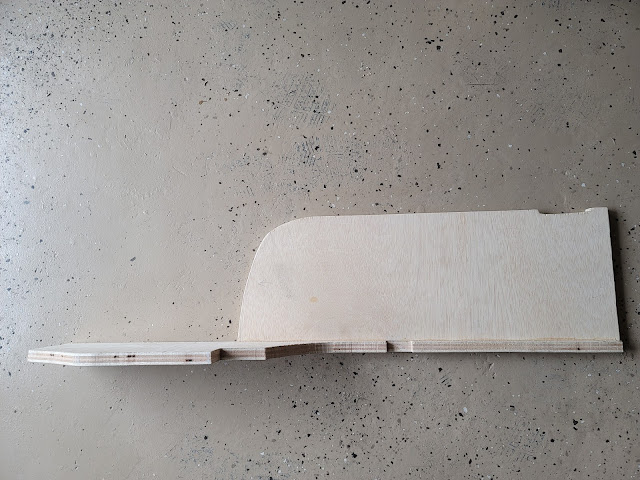

The platform was clearanced and fits perfectly under the flap.

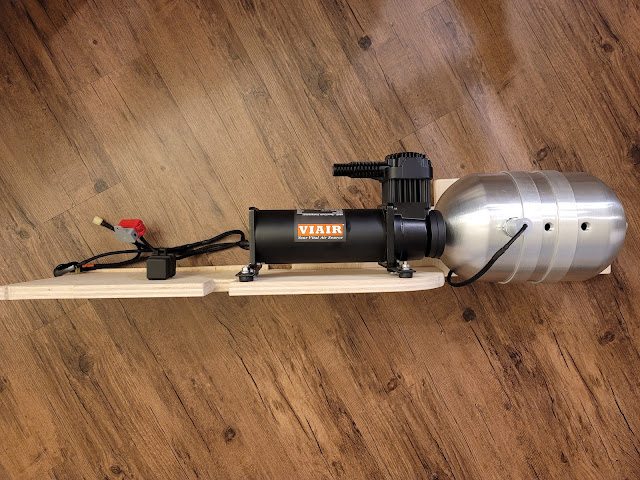
With the platform clearanced, positioned the compressor and tank for it's final location.

The mockup and mounting of components. Created a wiring harness utilizing a switch, a pressure switch, a relay and an automatic reset trip fuse. I wanted the setup to work only when the car is on and the switch is on as well. When the tank reaches 150psi the pressure switch turns the compressor off, when the tank falls to 120psi the pressure switch turns the compressor on. All the wires are soldered, heat shrunk where needed and used tech flex to clean up the wiring.
There are three wires to unplug and the whole unit is removable. Power, Ground and ignition trigger.

All the components mounted.


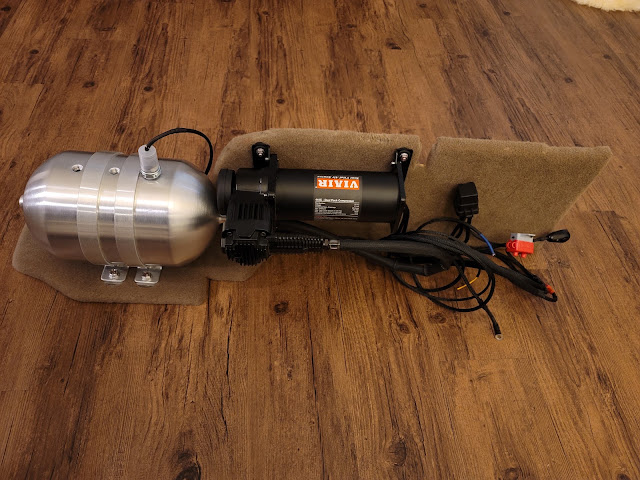
Dismounted everything and then carpeted the platform to match the drawer system.


Platform carpeted and everything mounted.


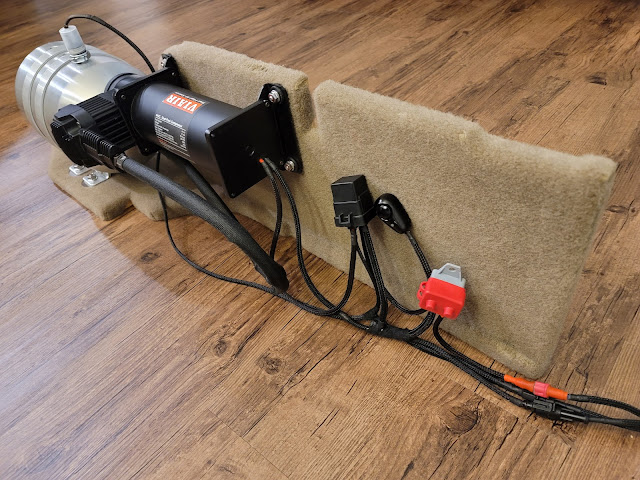
This is the other end of the harness that will get wired to the car.

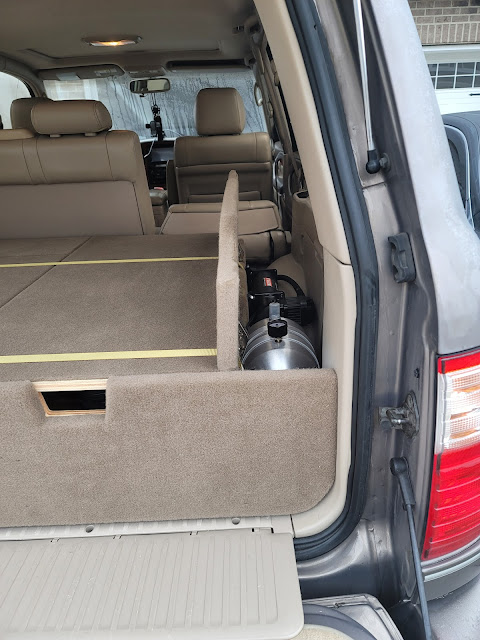
Unit mounted and strapped down using the same straps holding the drawer system down as well.


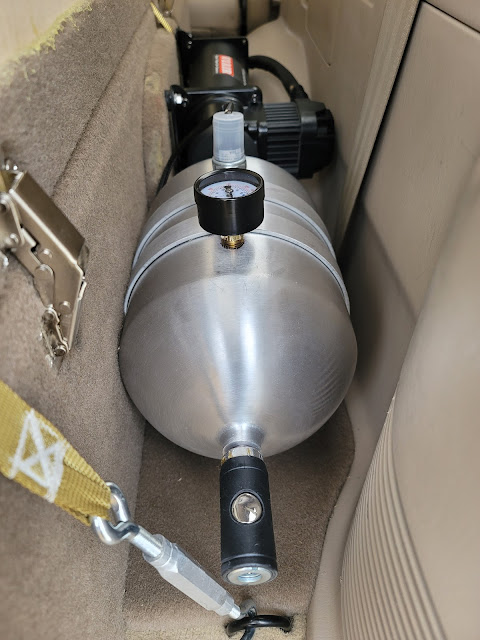
Used one of the tank holes to mount a pressure gauge and another with a safety coupler to attach an air hose and fittings.

Everything fits nicely under the flap.


Happy with how everything turned out.
First I laid out the tank and compressor to see what works best as far as layout, clearances etc.
With the measurements of the components in place traced out the floor and the sides. This would make it completely removable and going to integrate the straps etc. to hold the onboard air in place as well. Pics below shows the platform I came up with.
The platform was clearanced and fits perfectly under the flap.
With the platform clearanced, positioned the compressor and tank for it's final location.
The mockup and mounting of components. Created a wiring harness utilizing a switch, a pressure switch, a relay and an automatic reset trip fuse. I wanted the setup to work only when the car is on and the switch is on as well. When the tank reaches 150psi the pressure switch turns the compressor off, when the tank falls to 120psi the pressure switch turns the compressor on. All the wires are soldered, heat shrunk where needed and used tech flex to clean up the wiring.
There are three wires to unplug and the whole unit is removable. Power, Ground and ignition trigger.
All the components mounted.
Dismounted everything and then carpeted the platform to match the drawer system.
Platform carpeted and everything mounted.
This is the other end of the harness that will get wired to the car.
Unit mounted and strapped down using the same straps holding the drawer system down as well.
Used one of the tank holes to mount a pressure gauge and another with a safety coupler to attach an air hose and fittings.
Everything fits nicely under the flap.
Happy with how everything turned out.
01-31-22, 06:05 AM
#13
This was a weird problem. Went to crank up the LX one morning and well key turned heard a clicking noise but no startup. Turning the key again I felt no resistance. I did some research and come to find out that the cause of this is a particular rod in the ignition cylinder that breaks. It is a known issue in high mileage cars documented more so on the Land cruisers and LX470. This is probably documented more so on these cars because they actually last a long time. Also at this I should point out that ih8mud.com is an awesome resource and most of the explanations etc. I find that makes sense to me is from people on that forum that actually like to analyze the problem. So thank you ih8mud. Anywho onto the problem at hand.
Cause of this issue is a rod in the ignition cylinder rod that breaks at a particular stress point over time. The rod is a cast metal part and a 21 year old cast metal part can only do so much. The fix is to change the ignition column bracket, part # 45280-60510.

To do this there are some security bolts that needs to be drilled out and then the old part can come out and new one reinstalled. Well I didn't want to do that. The other method is to actually change just the ignition cylinder rod that is broken. A quick google search shows a lot of different options or manufacturers rather for replacement part. I ended up ordering a couple and I ended up using a part made by or rather sold by Bross, part# is BSP36FBA. The reason why I ended up with this is because the part had the same stampings the new superseded part Toyota uses. If it's lasted 21 years I'm ok with that. I'm not going to go into detail on how to replace this part. This video pretty much does all that and I want to thank the poster for doing this. Below are just pictures to show how some components from the old cylinder rod is transferred onto the new one and a couple of slight modifications I did to help prolong the integrity of the part.
On the left is the new part and the right is the old part depicting where it broke off. As you can see both the parts have the same stampings.


The spring and two blades that sit in the ignition rod are shown below.


This is the steps to insert the spring and blades into the new rod.

Only thing that I did differently is smooth out the new part. My thought process was that if the part has sharp edges etc that just adds more force on the weak points of the ignition rod. Smoothing out these lobes I felt would help lower the tension the part is under by causing the part to move more freely through its sequence. I used a 800 grit scotch-brite buffing wheel on a rotary tool to smooth out the lobes and polish up the part. I used the old part as reference to see how the lobes have worn out and tried to mimic it.


 Use enough grease on the ignition rod and reinstall. Everything is back together and functioning as it should.
Cause of this issue is a rod in the ignition cylinder rod that breaks at a particular stress point over time. The rod is a cast metal part and a 21 year old cast metal part can only do so much. The fix is to change the ignition column bracket, part # 45280-60510.
To do this there are some security bolts that needs to be drilled out and then the old part can come out and new one reinstalled. Well I didn't want to do that. The other method is to actually change just the ignition cylinder rod that is broken. A quick google search shows a lot of different options or manufacturers rather for replacement part. I ended up ordering a couple and I ended up using a part made by or rather sold by Bross, part# is BSP36FBA. The reason why I ended up with this is because the part had the same stampings the new superseded part Toyota uses. If it's lasted 21 years I'm ok with that. I'm not going to go into detail on how to replace this part. This video pretty much does all that and I want to thank the poster for doing this. Below are just pictures to show how some components from the old cylinder rod is transferred onto the new one and a couple of slight modifications I did to help prolong the integrity of the part.
On the left is the new part and the right is the old part depicting where it broke off. As you can see both the parts have the same stampings.
The spring and two blades that sit in the ignition rod are shown below.
This is the steps to insert the spring and blades into the new rod.
Only thing that I did differently is smooth out the new part. My thought process was that if the part has sharp edges etc that just adds more force on the weak points of the ignition rod. Smoothing out these lobes I felt would help lower the tension the part is under by causing the part to move more freely through its sequence. I used a 800 grit scotch-brite buffing wheel on a rotary tool to smooth out the lobes and polish up the part. I used the old part as reference to see how the lobes have worn out and tried to mimic it.
Use enough grease on the ignition rod and reinstall. Everything is back together and functioning as it should.
01-31-22, 06:06 AM
#14
Did my rear pinion seal and diff fluid yesterday, nothing exciting to report but just a few notes. I wasn't comfortable using just the 54mm axle nut socket but I had a 60mm to 73mm hub centric ring lying around which fits perfectly around the Pinion seal. It also has a lip that would sit flush with the diff when you are driving it in so as not to overdrive the seal into the lip. Used the 54mm socket to drive the hub centric ring as shown in the pictures.


I used Amsoil 75W/90 for the diff fluid. I found an expandable nozzle that screws perfectly onto the Amsoil bottle and worked perfectly to fill the rear diff. The expandable nozzle came with a Peak Blue Def diesel exhaust fluid bottle.


I used Amsoil 75W/90 for the diff fluid. I found an expandable nozzle that screws perfectly onto the Amsoil bottle and worked perfectly to fill the rear diff. The expandable nozzle came with a Peak Blue Def diesel exhaust fluid bottle.


