When you click on links to various merchants on this site and make a purchase, this can result in this site earning a commission. Affiliate programs and affiliations include, but are not limited to, the eBay Partner Network.
Rear USB charge ports and other amenities Lexus chose to omit
The Covid-19 "forced downtime" has provided a unique opportunity to add some desirable (at least to me) features to our 2019 NX, as described below. While time-consuming, none were particularly difficult.
(1) Courtesy lights:
On when the door is open; Off when the door is closed. Each door is independent of the other three.
(2) Interior door handle lighting:
On when the interior switch illumination is on. All 4 remain on for approximately 45 seconds after the car is turned off to assist passengers in locating the handle, and then gradually fade out.
(3) Memory seat selector switch back-light:
Lexus "cheaped out" by not lighting this switch, which is mounted in a location that is difficult for the driver to see at night.
(4) Rear seat dual USB charge port:
Mounted on lower rear of the console. Backlit and top-lit for easier access in darkness.
Recessed jacks, so USB plugs do not protrude into the limited floor space.
(5) Rear toe space lighting:
LEDs are mounted on the underside of the front seats. Light appears blue in the photo, but is actually pure white to match existing interior illumination.
(6) Rear heater / AC outlet volume control marker LED:
This control was impossible to see in darkness.
There are also barely-visible LEDs projecting light into the ducts so the angle of the grilles is easier to discern.
(7) Rear door storage "cubby" lighting:
On whenever the switch illumination is on. Light appears blue in the photo, but is actually pure white to match existing interior illumination.
(8) Rear armrest cup-holder lighting:
On in Accessory or Run (ignition). Light appears blue in the photo, but is actually pure white to match existing interior illumination.
If anyone is interested, I can post details and intermediate step images on Dropbox and provide links. Just ask.
DaJoDJ -
Here is a broad outline of the project. I can fill in the details if anyone actually wants to duplicate the rear cup holder modification.
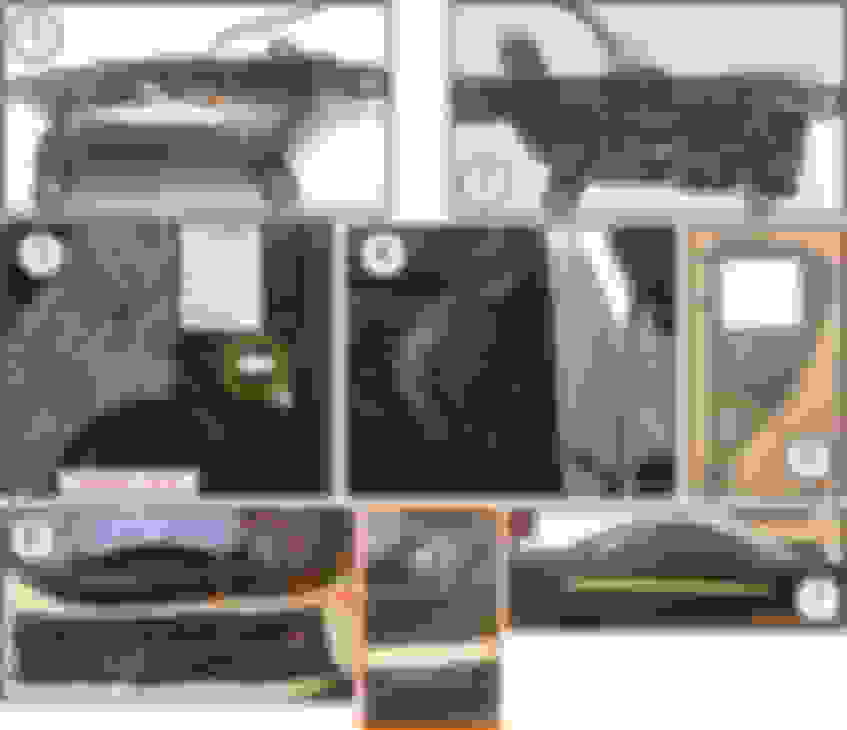
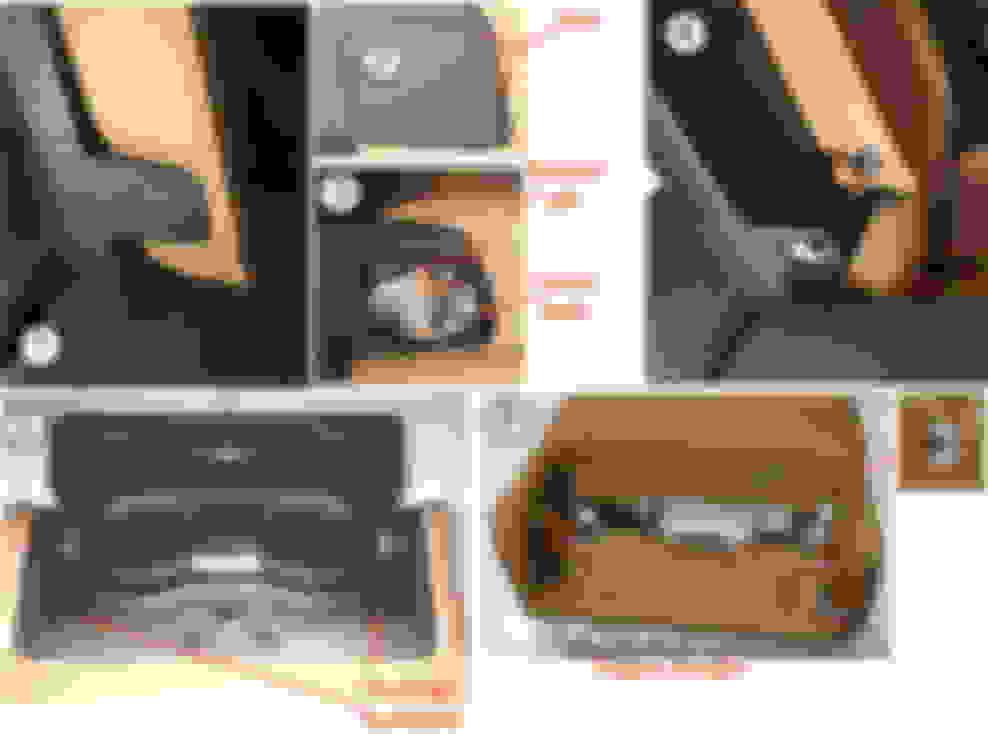
Protect the seats with old towels or rags (there will be grease on the armrest pivot shafts).
Remove the armrest (images 1 - 5).
Separate the cup holder from the armrest (screws are located under the rubber bumpers).
Remove the armrest cover (images 6 and 7).
Run 2 small wires between the cup holder area and the right side pivot shaft (I used a stiff steel rod to make a passageway through the foam - images 7 and 8).
Drill 3/16" holes and mount LEDs with hot melt glue. Wire the 2 LEDs in series (image 9).
Re-apply the armrest cover (bring out the LED wires through the existing right side pivot shaft hole in the fabric - image 10).
Screw the cup holder back in place, folding the excess wire below it, and then re-insert the rubber bumpers.
Re-mount the armrest in the vehicle. Route the wire down toward the floor under the carpet fabric that covers the gap between seat back and cargo area floor. It will not be visible.
Chose a location to tap either Accessory or Ignition, and ground. I used a 10K current limiting resistor to set the brightness level (LED operating current = ~0.006 Amps).
Endless -
I will organize a similar image array for the door modifications.
nigel821 -
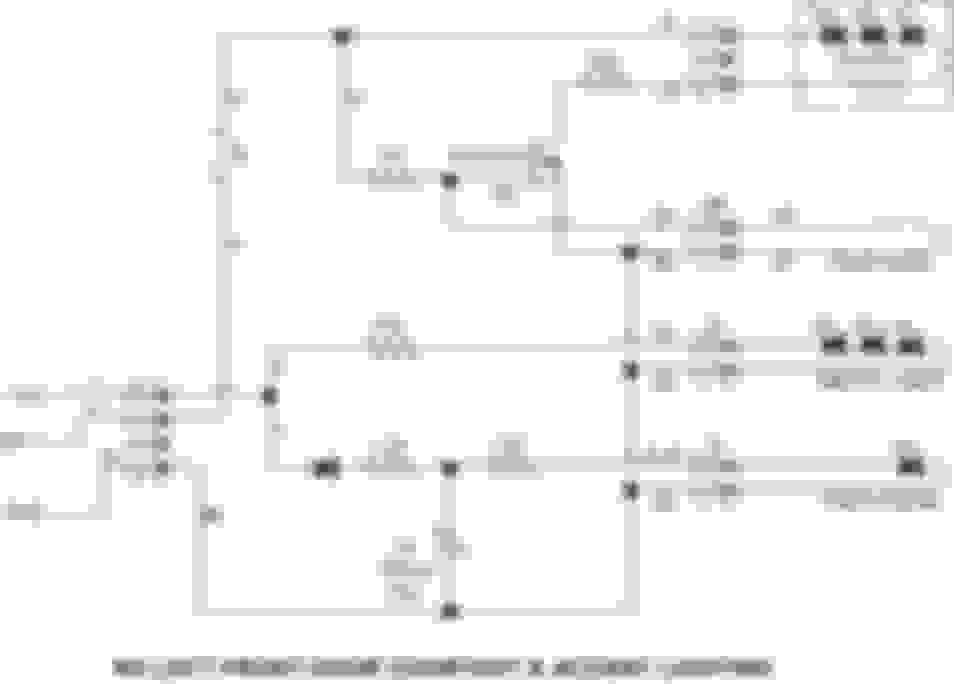
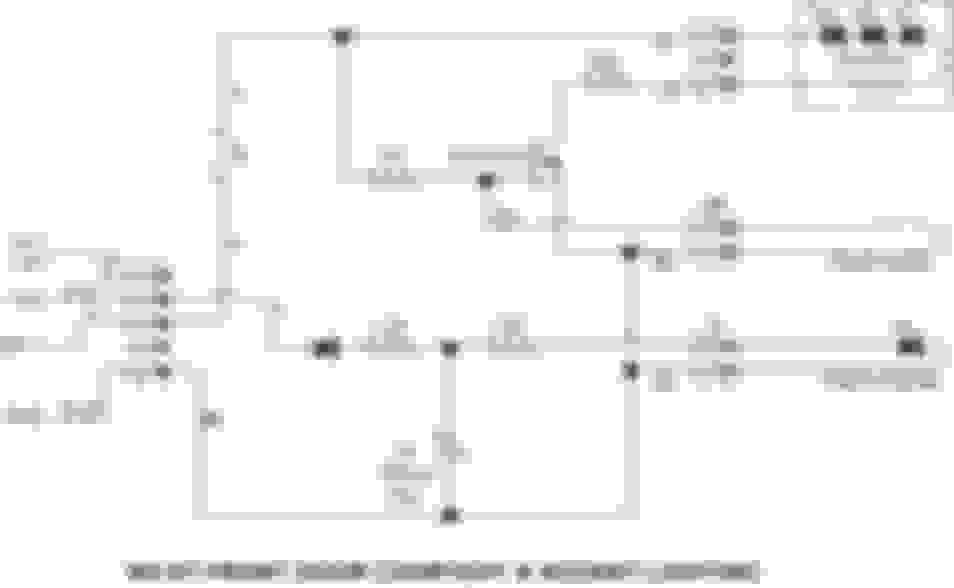
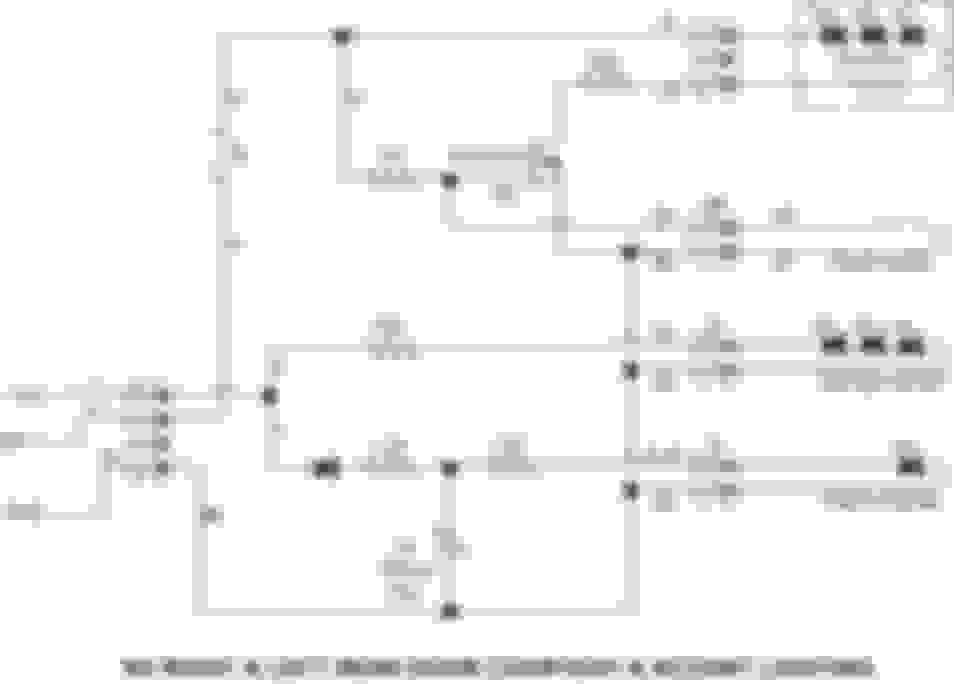
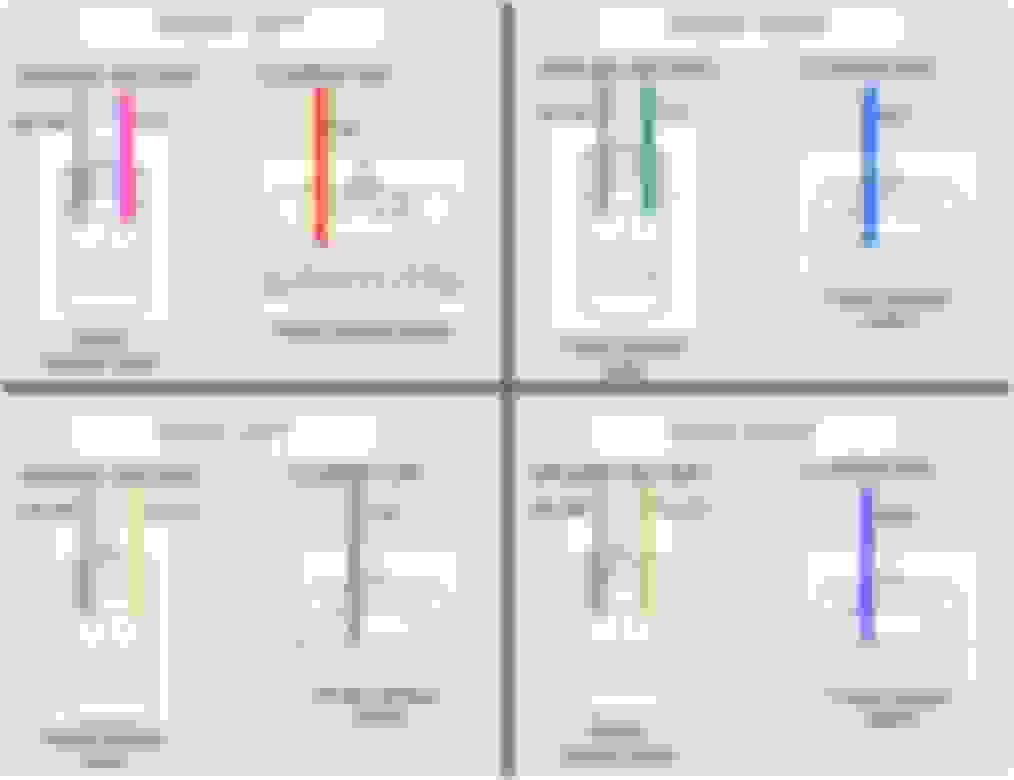
My chosen method (I considered others) only required 3 wires within each door: Battery, Illumination+ (same as tail lamps), and Ground. All were readily available and easy to access behind all four door trim panels.
Here are the wiring diagrams, which may help to explain how the delayed-off function works (energy is simply stored in a capacitor). Since no "door-open" trigger wire was available, my choices were adding another wire into each door (not fun . . comparable to a root canal ), or providing my own independent trigger. I chose the latter, and used a magnetic reed switch (commonly used for alarms) attached to the inside surface of the trim panels with hot melt glue. The magnets are mounted behind interior panels and invisible (front - ends of the instrument panel; rear - door sill molding). When a door is closed, the magnet comes within ~3/4" of the reed switch, which is adequate to close the contacts. The reed switches only handle ~12 microAmps of current, and will outlast the vehicle several times over.
(1) Courtesy lights - these require an external current limiting resistor to prevent overheating.
(2) Door handles; rear cup holders - mount in a 3/16" hole. Soldering required to attach wires.
(3) Rear USB power/charge port.
(4) Rear heat / AC vent / control. Have integral molded light pipes.
(5) Under-seat floor lighting; USB port niche light; rear door storage "cubbies". These are thin and flexible enough to bend to conform to a curved mounting surface. Purchased the battery operated wall-mount lights for US$2 each at a dollar store and scavenged the LED strips. Will require new wires to be soldered.
Thanks. I was considering doing the same to the doors. Would you please post the intermediate steps. I like your idea of using reed switch to detect the door opening. I was also struggling on how to detect the door opening without snaking a cable in.
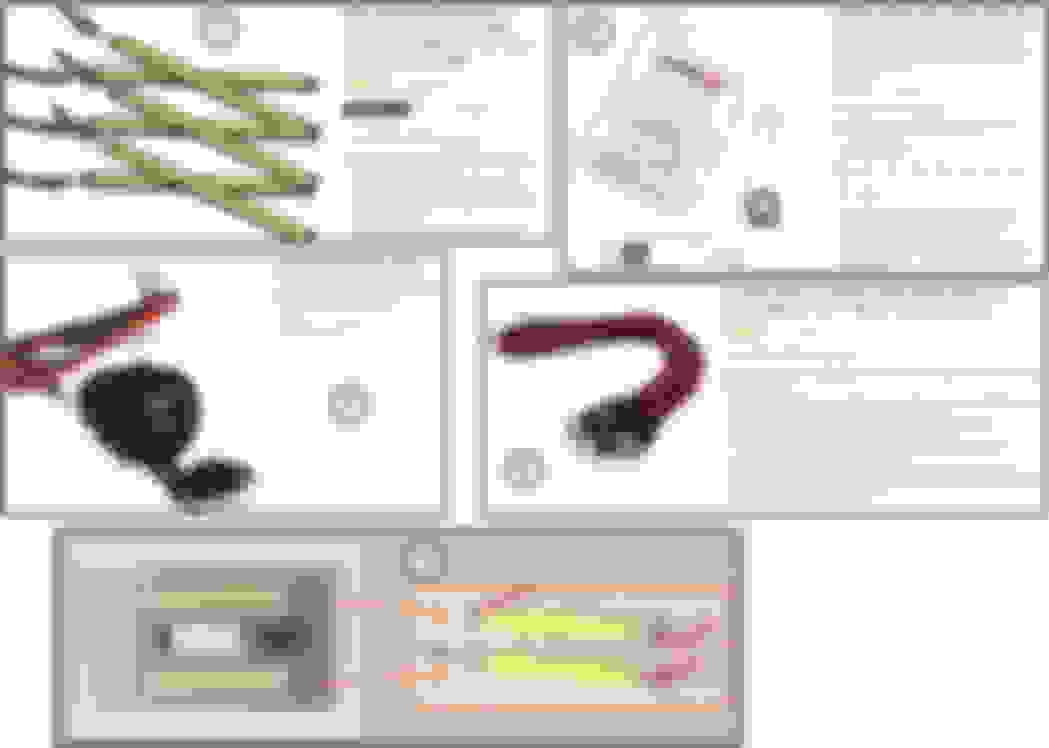
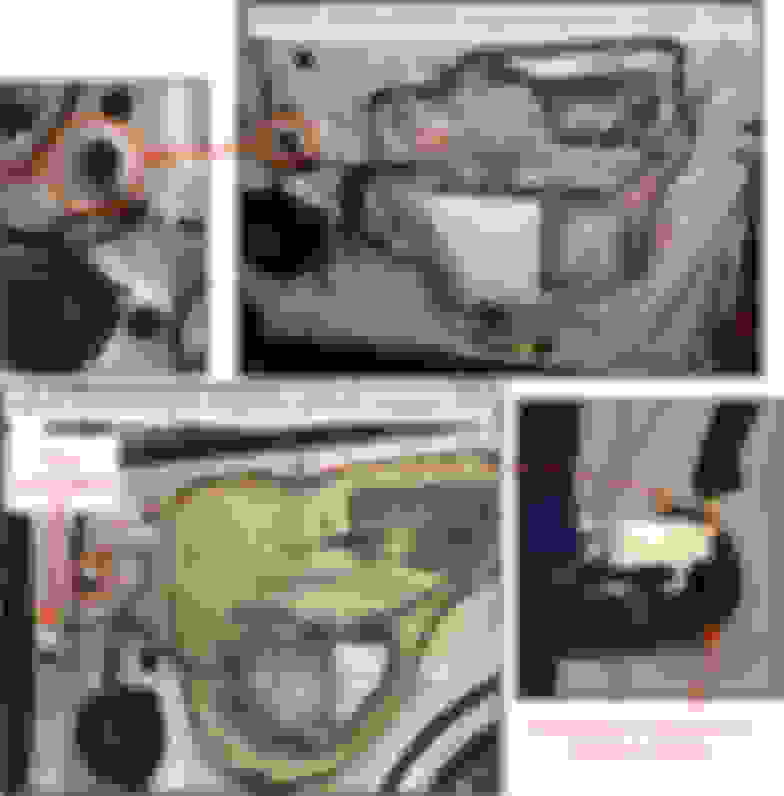
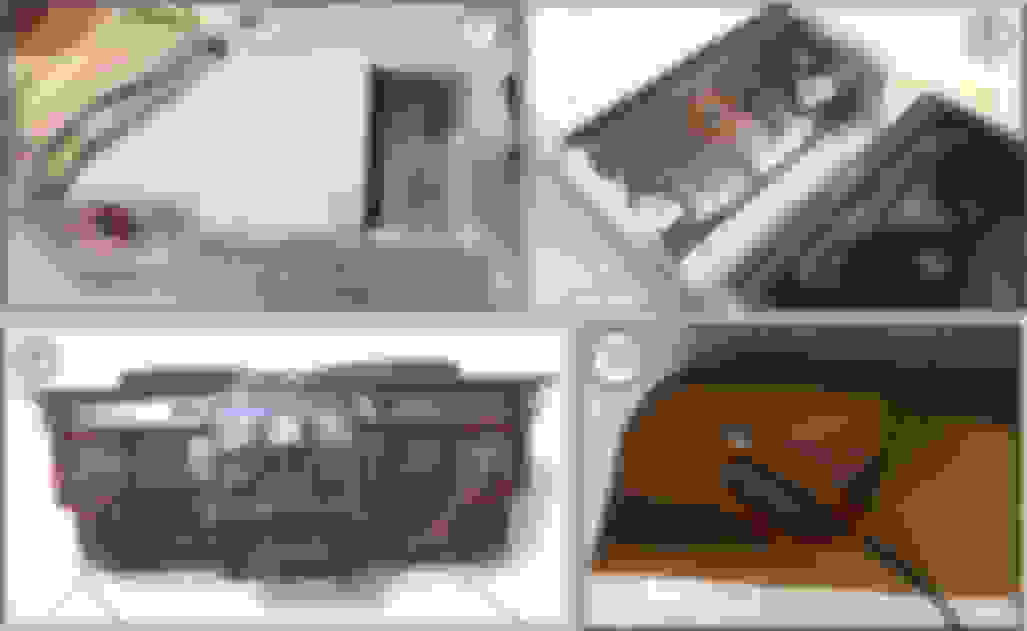
(1) Door handle assembly with LED (red circle) mounted and wires attached - front view.
(2) Door handle assembly with LED (red circle) mounted and wires attached - rear view.
This assembly is fastened to the door trim panel with 6 (!) screws. Not likely to ever fall off . One of the screws is a different color and shorter in length, so make a note or take a photo before removing.
(3) Reed switch (yellow circle) mounted to the rear of the right front door trim panel with 3M molding tape (
).
(4) Right end of the instrument panel with cover removed. Use a nylon molding tool to pry open, beginning near the vent, then pull toward you once all the clips have released. The right side may have a junction connector fastened to this cover; twist and pull off if you prefer to mount the magnet on a workbench.
(5) Magnet glued to the inside of the cover. I temporarily tape the magnet to the outside of the cover with masking tape to determine the best location, and then glue it on the opposite side.
Magnets used:
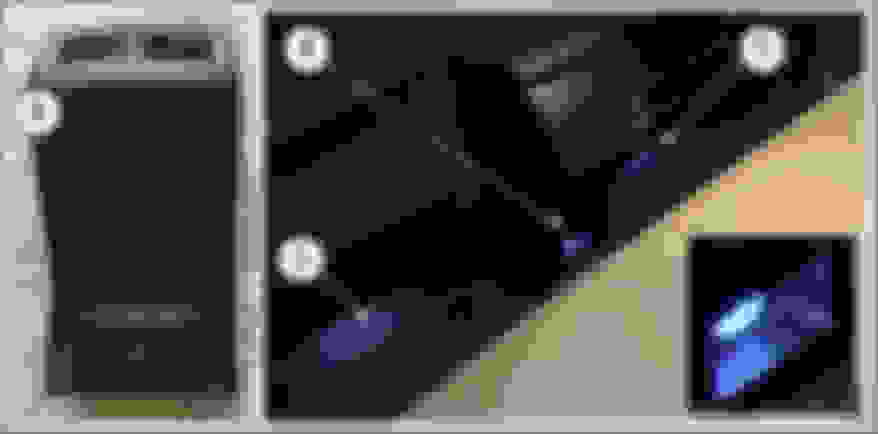
(6) Reed switch and magnet (red ellipse) glued to bottom inside of rear door trim panel and to the rear door sill plate. The brown material leading away from the reed switch is self-stick craft felt (Walmart) I use to cover all wire runs and connectors to prevent rattles and vibrations from the door speaker.
(7) Courtesy light LED strip mounted to bottom of rear door trim panel with 3M molding tape. The wires pass through a small hole drilled at the left end and covered with weather seal compound.
Next post: wire colors and where to find them.
= = = = = = = = = = = = = = = = = = = = = = =
Lexus NX300 Interior door trim removal notesPry off inside door handle trim cup with nylon trim tool to reveal a screw. Warm first with hair dryer if the interior is cool . Pry near the lock lever.
Use a small trim tool to lift a corner of the door pull bottom liner ("carpet"); then remove it to reveal a screw with washer.
Remove the window / door lock switch bezel to reveal a large screw. Push a nylon trim tool between fabric and bezel to create a gap, then pry at various locations with a larger trim tool.
At the rear of the bezel, push release tabs with a small screwdriver and pry with the trim tool to disconnect window, lock (and mirror for front left) switch connectors.
Remove the 3 screws that were covered by the door handle cup, door pull "carpet", and switch bezel. Make a note of what screw came from where; one is silver and one has an integral washer.
Feel along the bottom of the interior door panel for a gap, Insert trim tool here and pry to release a blind fastener. Work toward the upper edges in both directions to release all of the similar blind fasteners, including 2 that are located close to the window (one on each side).
The panel will now swing outward at the bottom, but still be retained along the top edge (near the window). Starting at the outer edges, pull the top of the panel toward you at a ~90 degree angle relative to the panel Just pull enough to release the clips retaining the top of the panel to the weather strip. Don't pull the panel to far out, or the clips that retain the door handle and door lock cables may be damaged.
Reach behind the panel with one hand to release 2 cables from plastic guides molded into the rear of the panel (pull each cable away from you). At the rear of the door handle assembly, pull the cables away from you to release them from friction retainers at one end of the door handle assembly.
Move the position of the panel so the cables can be rotated to a right angle relative to the handle assembly. Now lift each cable to detach it from the door handle or lock mechanism.
Front left only: detach the connector at the seat memory switch.
Rear doors only: Wiggle the tweeter speaker to detach it from its bracket.
The interior door trim panel can now be completely removed.
At the rear of the door trim panel, each of the blind fasteners should have a felt isolation washer attached to it. Some may fall off or remain stuck to the mating holes in the door. Transfer all to the rear of the trim panel to prevent loss.
The attached images show location and colors of battery, ground, and illumination wires in the doors.
To disconnect the power window connector, push the release tab sideways, with a small screwdriver, toward the connector, and then withdraw the plug.
Fuses can be temporarily pulled to remove battery power from each power window plug while adding the wire taps to battery. All power window fuses are 20A.
Door . . . . . . . . Fuse . . . . Location
Front Left . . Door F/L . . . . IP**
Front Right . Door F/R . . . . IP**
Rear Left . . . Door R/L . . . IP**
Rear Right . . Door R/R . . . FB2***
** Fuse panel under instrument panel
*** Under-hood fuse box near wiper fluid filler
To expose a wire, cut back some of the harness sheath material (replace afterward with vinyl electrical tape). I slide a craft stick ("Popsicle stick") into the harness to prevent accidental damage to a wire while cutting the sheath.
It is not essential to use connectors; they are for convenience and make the project "plug and play" after the door trim panel is re-mounted. Wires from LEDs, reed switch, and power taps are all run to a location accessible from the cavity under the window/lock switch bezel. When finished, I plug everything together and install the 2A fuse through the switch bezel opening, and then test. After testing, I stuff all the connectors and components into the cavity under the bezel, and then snap the bezel back into place..
I just picked up an NX and didn't realize there are no charging ports for backseat passengers. I hate resurrecting old threads, but would it be possible to get the steps on how you did the rear usb install?
 05-28-20, 07:45 PM


 ), or providing my own independent trigger. I chose the latter, and used a magnetic reed switch (commonly used for alarms) attached to the inside surface of the trim panels with hot melt glue. The magnets are mounted behind interior panels and invisible (front - ends of the instrument panel; rear - door sill molding). When a door is closed, the magnet comes within ~3/4" of the reed switch, which is adequate to close the contacts. The reed switches only handle ~12 microAmps of current, and will outlast the vehicle several times over.