When you click on links to various merchants on this site and make a purchase, this can result in this site earning a commission. Affiliate programs and affiliations include, but are not limited to, the eBay Partner Network.
@itsadavy I followed LstoneX's guide and just did the hardwiring for 2 channel. Yes those 2 empty spots you have marked are the correct ones. The add a fuse kit you have linked is different from what I used though. I used low profile mini add a fuse kit with 5amp fuses. Here's a
Make sure the fuse is on the top slot, bottom should be left empty as there's no existing fuse in the slot. and reference LstoneX's picture on which direction the wire is facing before plugging it in, as there's + -
@itsadavy I followed LstoneX's guide and just did the hardwiring for 2 channel. Yes those 2 empty spots you have marked are the correct ones. The add a fuse kit you have linked is not though. You should be looking for low profile mini add a fuse kit with 5amp fuses. Here's a canadian amazon example.
Make sure the fuse is on the top slot, bottom should be left empty as there's no existing fuse in the slot. and reference LstoneX's picture on which direction the wire is facing before plugging it in, as there's + -
Dang! You're right about the fuse taps. I didn't look hard enough. Thanks for correcting.
@itsadavy I followed LstoneX's guide and just did the hardwiring for 2 channel. Yes those 2 empty spots you have marked are the correct ones. The add a fuse kit you have linked is different from what I used though. I used low profile mini add a fuse kit with 5amp fuses. Here's a canadian amazon example.
Make sure the fuse is on the top slot, bottom should be left empty as there's no existing fuse in the slot. and reference LstoneX's picture on which direction the wire is facing before plugging it in, as there's + -
I watched a bunch of YouTube videos and decided it couldn't be so hard that I couldn't tackle it.
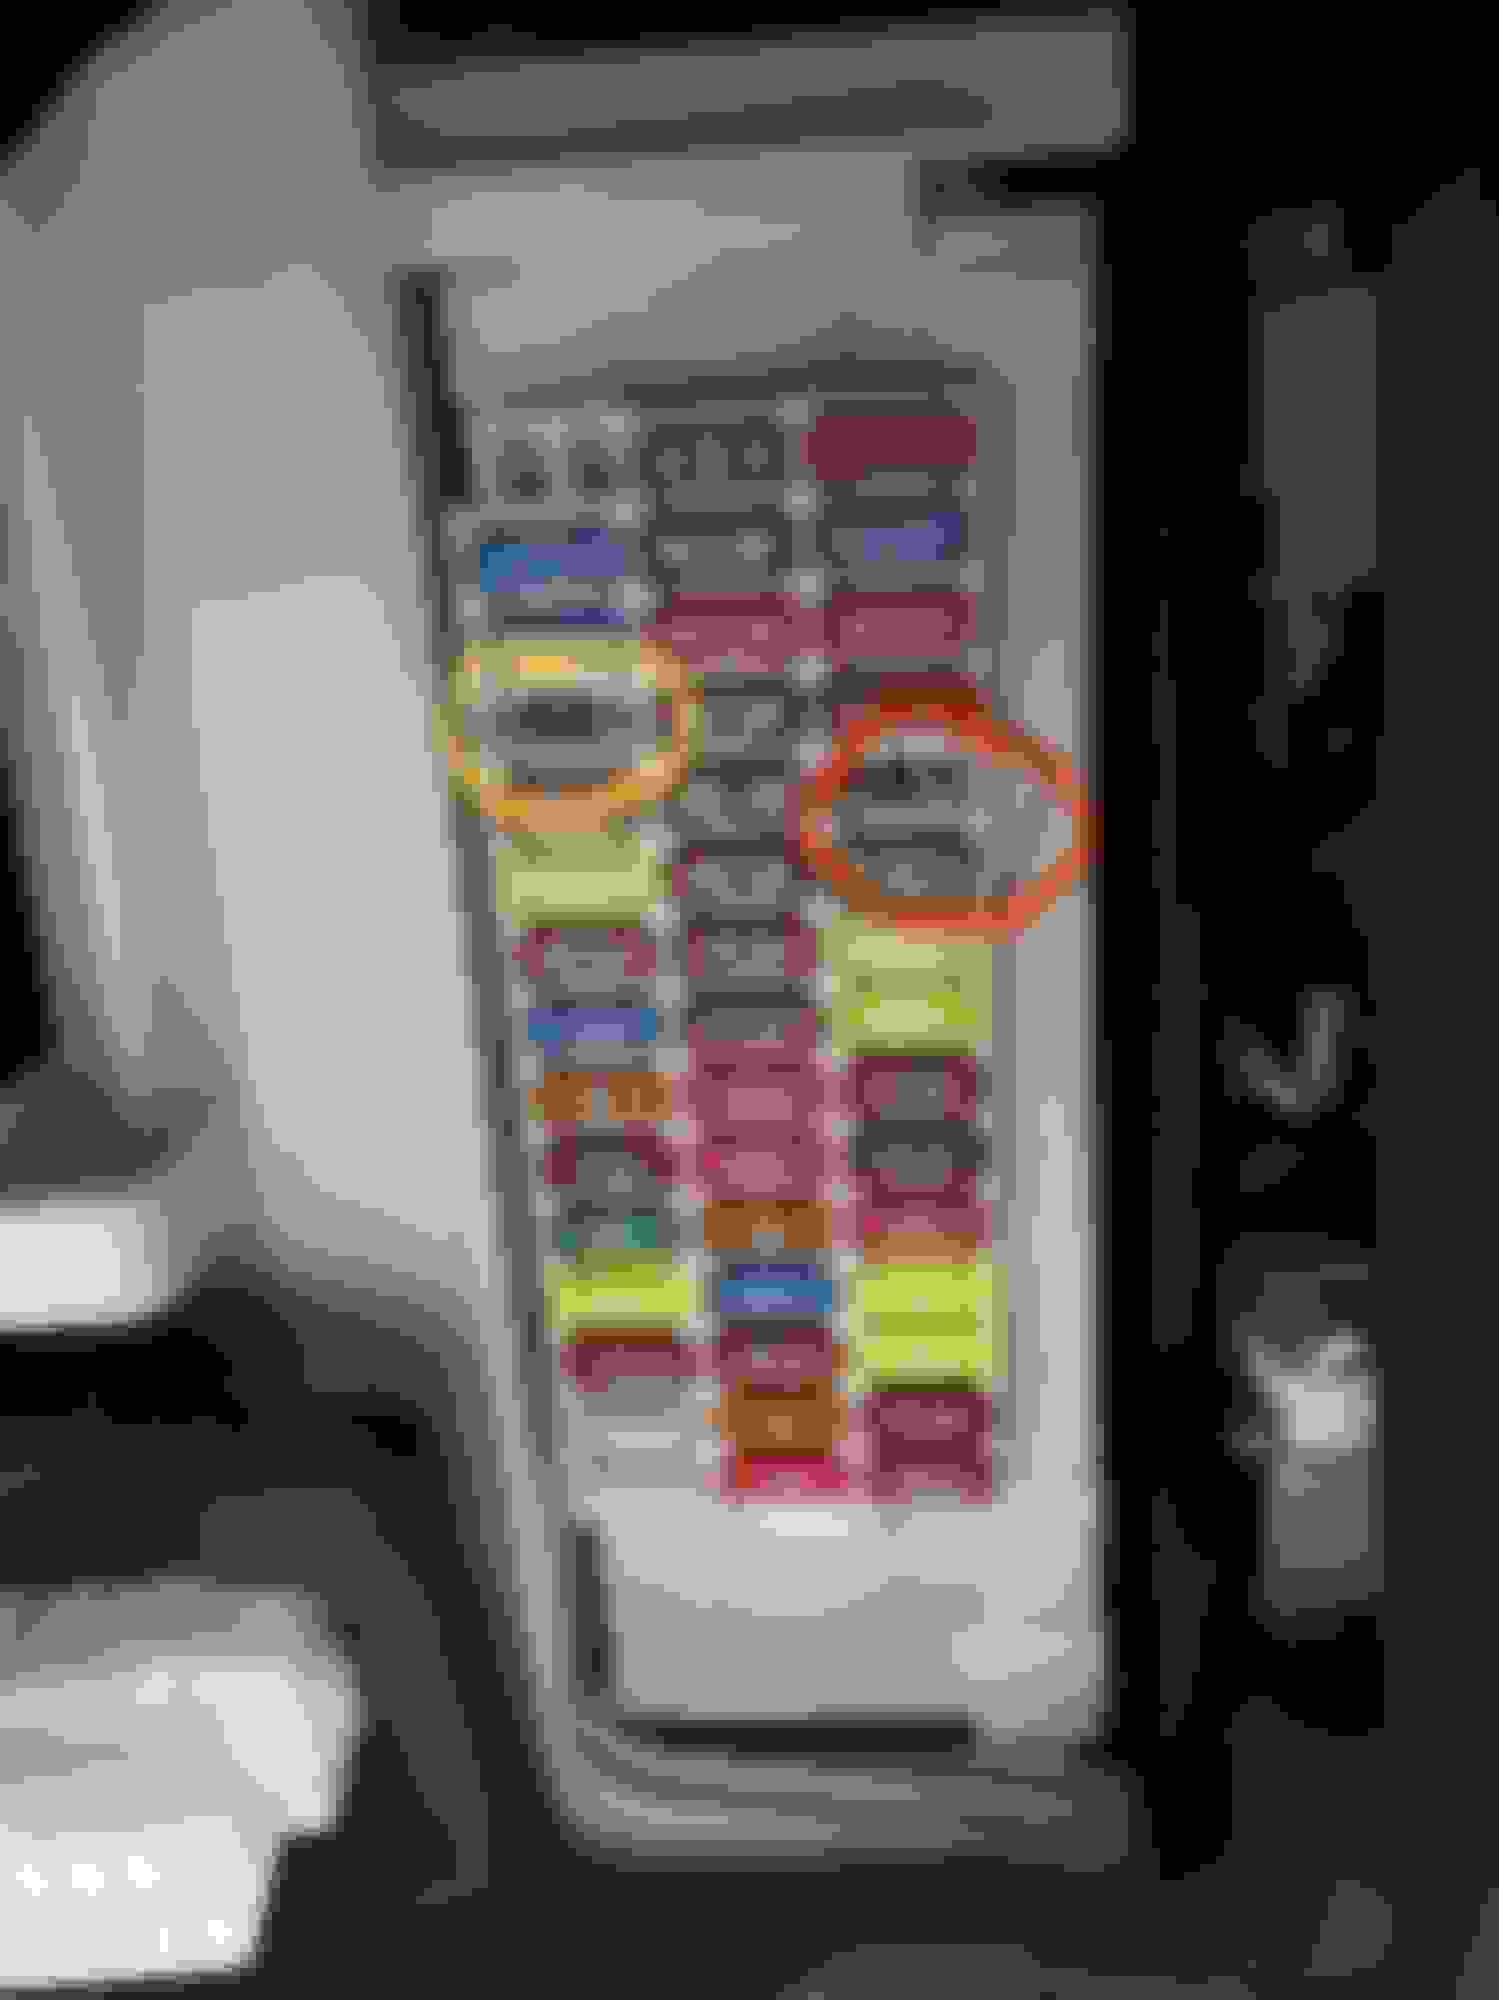
So I picked up my multimeter, grab a bunch of tools and went down with my dashcam. I decided how i was going to route the cables. I decided to use the fuse box under the driver side of the dash. I found there were a couple of fuse slots and chose to use those instead of tapping an existing guide; just to avoid any potential (though not likely) issues. Testing with the multimeter, I found that the slots marked below would do. The Red circled slot has power even when the car is off and the yellow circled slot only had power when the car was on.
That corresponds to these slots of you're looking at the fuse box cover. Red is for always on and blue is the one which is one only when the car is running.
Then I ran my cables, loosened the panel just to the left of the footwell to allow me some room to route the cable. Once you loosen it, there's a 10mm bolt which you can use for the ground cable.
Once grounded, it was just a matter of connecting my fuse taps to the wires and then plugging them in to those earlier identified slots. I was going to use 2 10A fuses but I ran out and had only one. So for the fuse tap that was connected to the always on, I used a 15A fuse. I might swap that out later for a 10A once I get some more fuses, but the 15A would have to do for now.
Then it was just a matter of tightening the lose panel and testing the camera. If you're for a dual channel solution, make sure to test your rear camera before you mount it so you don't put it upsidedown😜. The fuse box cover will not fit once the taps are in so remember to keep the cover in a safe place for future reference.
Here's what the fusebox looks like after installing the taps.
In all, because I kept on going up and down to find a tool or get some supplies, it ended up taking me about 90 mins. But if you have everything with you and are very organized, it shouldn't take more than an hour.
Even a novice with little experience can tackle this under 2 hours after watching a couple of YouTube videos. There's the official Thinkware video as well as a couple of other good ones that were very useful for me. Links to those videos are below.
For those thinking about Hardwiring your dashcam, I hope this helps. If you got any questions, feel free to reach out.
Would you mind sharing a picture of where you connected the ground. I followed how you did with ACC and constant exactly but the camera can�t be turned on. And there�s spark when the ground touched a random bolt.
Would you mind sharing a picture of where you connected the ground. I followed how you did with ACC and constant exactly but the camera can�t be turned on. And there�s spark when the ground touched a random bolt.
Below is a picture of the panel I removed to aliow me 'ground' the dashcam. There's a little **** towards the back which you turn counterclockwise to unscrew (circled in that faint yellow) after which the whole panel comes off... There's a clip too which pulls out.
Underneath it, there's a big bolt (indicated by the red arrow) which I tapped to ground the dashcam and then covered it all back up.
Just curious if you guys encountered any low battery issues with hardwiring? Even with the low voltage cutoff, I heard it can cause problems with Lexus vehicles.
Just curious if you guys encountered any low battery issues with hardwiring? Even with the low voltage cutoff, I heard it can cause problems with Lexus vehicles.
Just curious if you guys encountered any low battery issues with hardwiring? Even with the low voltage cutoff, I heard it can cause problems with Lexus vehicles.
Nothing whatsoever. I sometimes forget the dashcam is there🤣
I wasn't adventurous enough to do this myself, but I am having some issues with my newly installed dashcam. It was working properly when the auto electrician installed, but the next day, dashcam went into parking mode while I was driving.
Then I did a factory reset and formatted the SD card. After doing this, camera won't start after ignition is on and won't go into parking mode when ignition is off. This happened in the morning while driving to work.
After I came back home in the evening, the camera worked properly again without me changing anything.
Is there some kind of weird interaction with power to the fuse slots and a hybrid car?
Also, I don't have circuit tester, can anyone check for me if the TAIL fuse is ACC power and FUEL OPEN NO1 fuse is constant power?
Those are where my fuse taps are and I want to check if the installer used the proper fuse slots,
Just coming back here because it keeps popping up in my feed😜
I've had my hardwired dashcam installed for over 16 months now with no issues. Or works fine, parking recording works too and I honestly forget that It's there.
It's been through a winter, some snowstorms, sitting, crazy bushfires and lots of rainfall and still working fine.
If you're on the fence and thinking about if this might be a hazard for your precious, fear not. You'll be fine.
So my 'professional' installer tapped the fuse slots marked red and yellow and the dashcam was giving me all sorts of problems, like going into parking mode mid drive. I checked those slots with my multimeter and confirmed they were correct ACC and Constant fuse slots.
Funny, I checked that the camera was working properly before the installer left, parking mode was working properly. So really couldn't blame the installer.
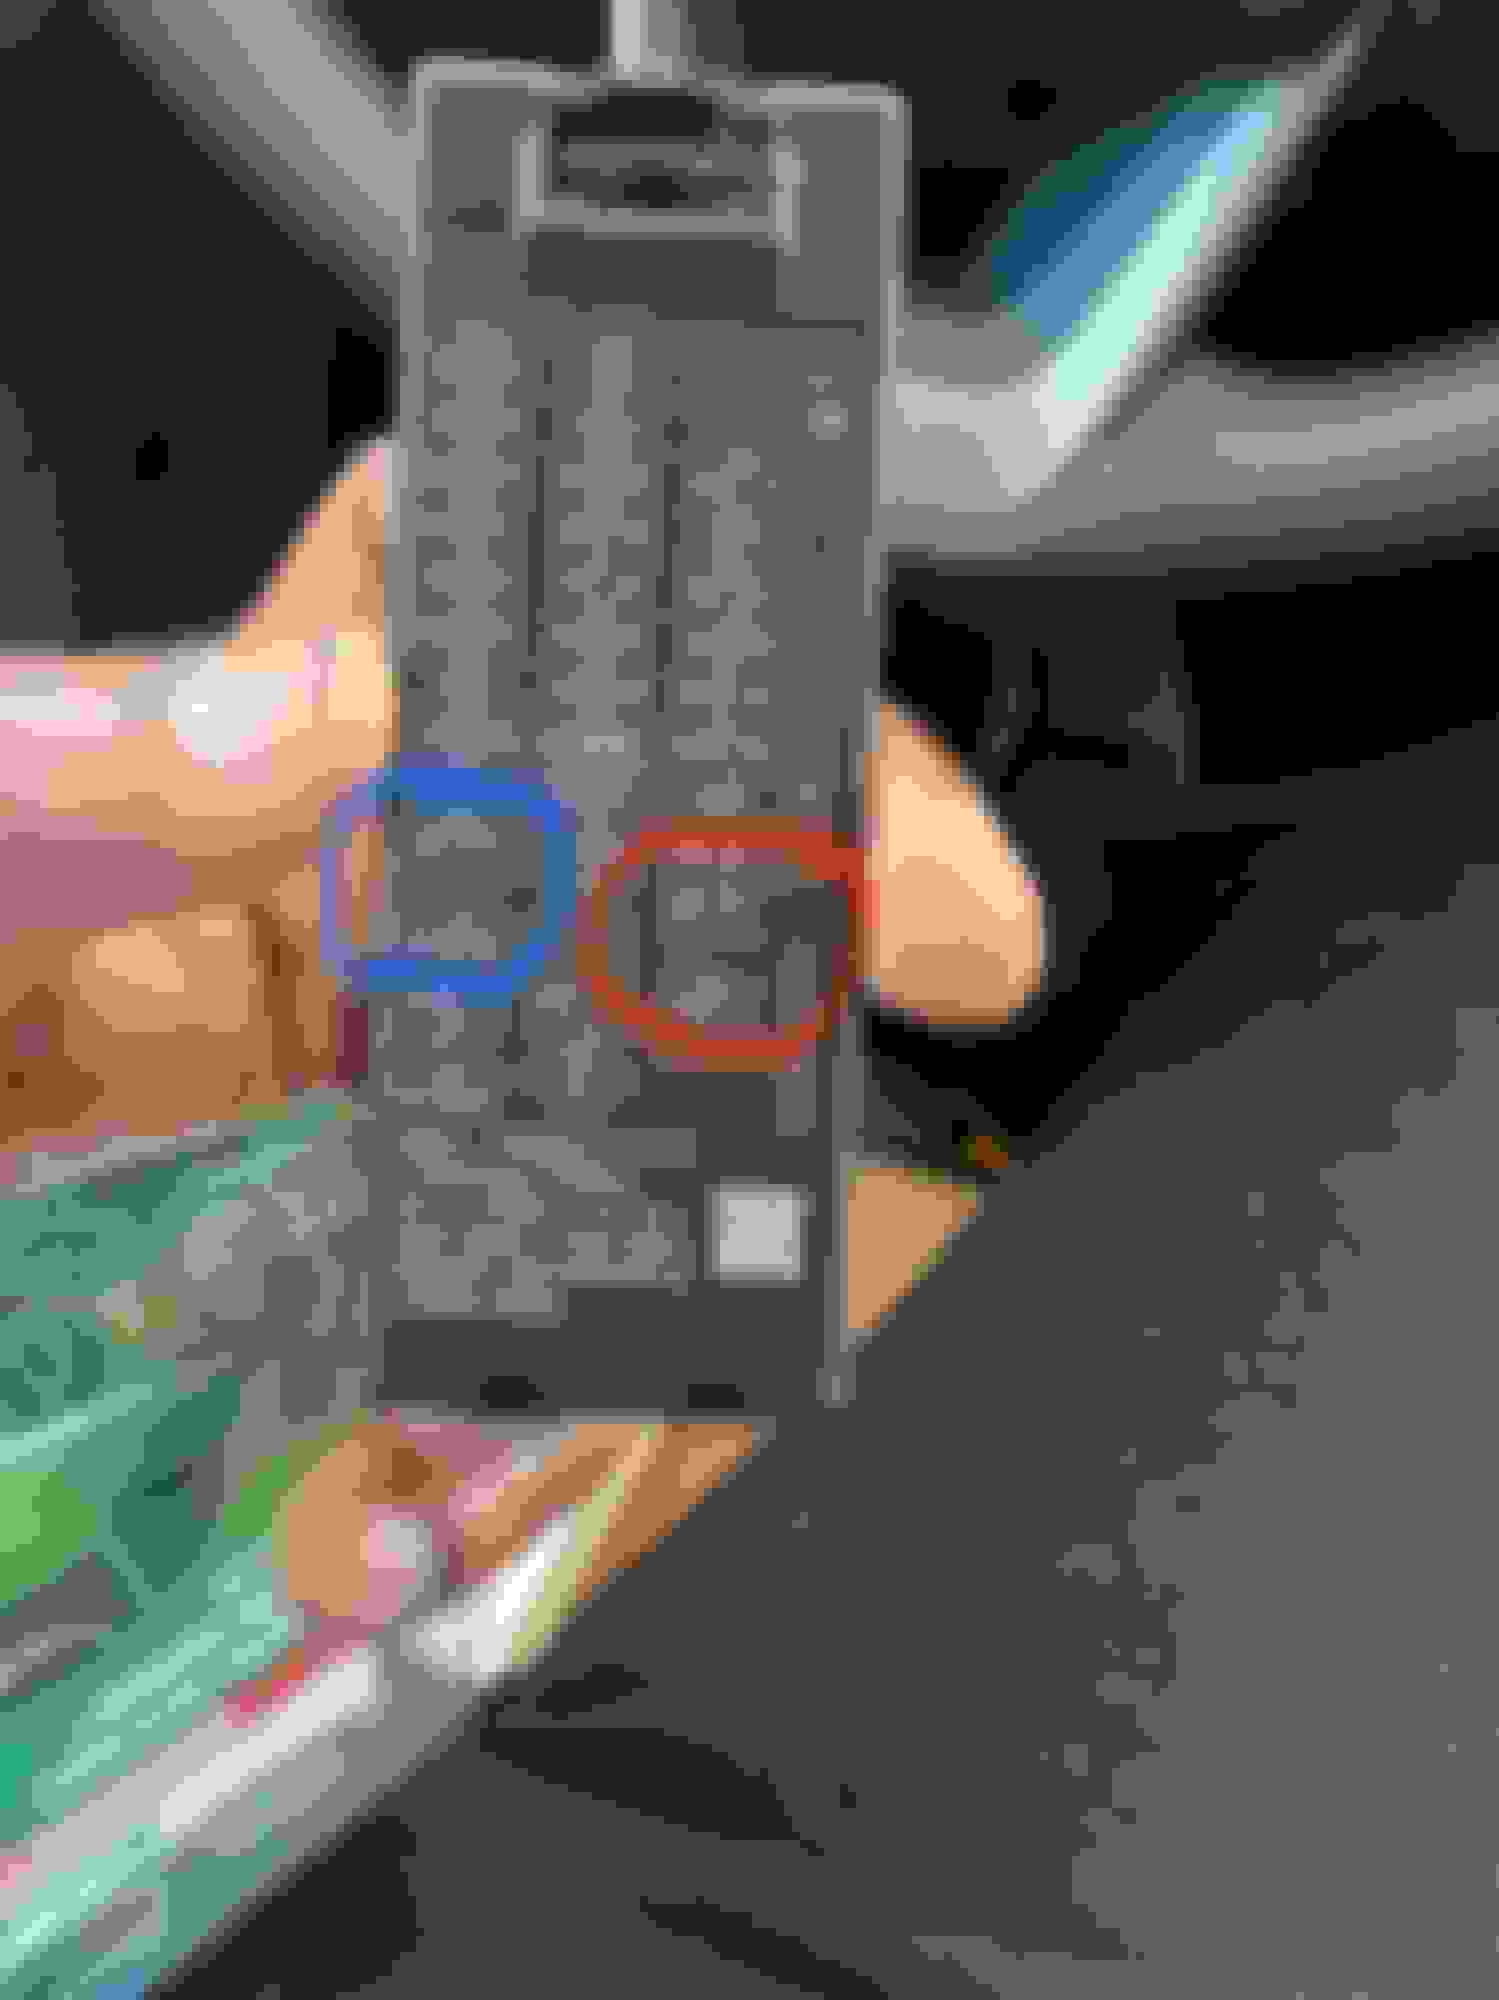
In a nutshell, if you are DIY or getting someone else to install your dashcam in your NX, you might want to suggest to them to tap the same empty fuse slots as @LStoneX (highlighted in green below).
I have since moved my fuse taps there and had zero issues.
Hi guys, could you advice me if it's a good way to put linkwire from the dashcam located on the right side to the driver side fuse panel? I prefer to use a pillar A on the right instead this on the left side.
Red line of course is my planned way.

 11-14-22, 02:50 PM