
DIY: Engine Coolant Temperature Sensor Replacement- 2jzge I6 SC300
 07-08-09, 11:33 PM
#16
Lexus Test Driver
iTrader: (7)
Join Date: Oct 2006
Location: SoCal & SLOcal
Posts: 927
Likes: 0
Received 0 Likes
on
0 Posts
The diagram of the head is incorrect. It shows an oil pressure sensor located to the right of the temp sensor. That is the location of the second temp sensor. There are 2, one (2)wire for the gauge cluster and one single wire for the ecu. The one you changed was for the gauge cluster.
The oil pressure sensor is located on the block. fyi
The oil pressure sensor is located on the block. fyi
Last edited by sc-driver; 07-08-09 at 11:39 PM.
 07-08-09, 11:44 PM
#17
Lexus Test Driver
iTrader: (7)
Join Date: Oct 2006
Location: SoCal & SLOcal
Posts: 927
Likes: 0
Received 0 Likes
on
0 Posts
This is straight from the manual. Its kind of hard to see, but (1) points to the sensor on the left while (2) points to the sensor on the right. I also looked at the wiring diagram and there are 2 wires from the sensor that go to the ecu.
07-09-09, 07:43 AM
#18

If you look in your manual at the wiring diagrams, you will find that the 2 wire sensor signal goes to the gauge cluster.
07-09-09, 03:56 PM
#19
Lexus Test Driver
iTrader: (7)
Join Date: Oct 2006
Location: SoCal & SLOcal
Posts: 927
Likes: 0
Received 0 Likes
on
0 Posts
As you can see there is only one wire going to the combination meter (instrument panel) from the engine coolant temperature sender. The wiring diagram below that one shows how there are 2 wires from the engine coolant temperature sensor to the ecu.
Hope this clarifies any confusion.
Hope this clarifies any confusion.
07-09-09, 05:13 PM
#20
As you can see there is only one wire going to the combination meter (instrument panel) from the engine coolant temperature sender. The wiring diagram below that one shows how there are 2 wires from the engine coolant temperature sensor to the ecu.
Hope this clarifies any confusion.
Hope this clarifies any confusion.
Thanks for taking the time to post that up man, great work.
 07-10-09, 06:29 AM
#21
sc-driver, I have completely different diagrams from my manuals. What year manuals do you have? Seeing the p65 connection which is sensor ground does make sense. I will be sure to check my info when I can and will delete the above posts if I am incorrect. My intent is to make sure the correct information is presented so we can all benefit.
Last edited by gadgetSC; 07-10-09 at 06:44 AM.
 07-25-09, 07:14 PM
#24
Banned
iTrader: (3)

Join Date: Sep 2008
Location: NA
Posts: 1,262
Likes: 0
Received 0 Likes
on
0 Posts
If i was reading that one post right then the car only uses the ECT sensor until it gets to operating temp to adjust the a/f mixture. Once it gets to temp, it uses the data from the maf and o2 sensors instead.
08-25-09, 06:44 PM
#25
Driver School Candidate
iTrader: (1)
Join Date: Jul 2008
Location: Tucson, AZ
Posts: 18
Likes: 0
Received 0 Likes
on
0 Posts
I just bought the Toyota Tem sensor @ $63.13. It doesn't come with the copper gasket.
Went back again to Toyota and bought the gasket (90430-12005) @ $1.00. By the way I can't find the locaton of the Temp sensor. Appreciate if someone can snap a pictue on where it is on the SC300. (92 manual). thanks in advance.
Went back again to Toyota and bought the gasket (90430-12005) @ $1.00. By the way I can't find the locaton of the Temp sensor. Appreciate if someone can snap a pictue on where it is on the SC300. (92 manual). thanks in advance.
08-26-09, 11:48 AM
#26
I just bought the Toyota Tem sensor @ $63.13. It doesn't come with the copper gasket.
Went back again to Toyota and bought the gasket (90430-12005) @ $1.00. By the way I can't find the locaton of the Temp sensor. Appreciate if someone can snap a pictue on where it is on the SC300. (92 manual). thanks in advance.
Went back again to Toyota and bought the gasket (90430-12005) @ $1.00. By the way I can't find the locaton of the Temp sensor. Appreciate if someone can snap a pictue on where it is on the SC300. (92 manual). thanks in advance.
09-04-09, 07:19 PM
#27
Driver School Candidate
iTrader: (1)
Join Date: Jul 2008
Location: Tucson, AZ
Posts: 18
Likes: 0
Received 0 Likes
on
0 Posts
Thanks. Mole. Found it. Its a really tight spot. No way take any pictures. Went ahead and bought some deep socket and extension. You have to buy the 1/2" drive cos the 3/8" drive deep socket was not deep enough. I broke the brittle connector tap while removing. Finally replaced it after 15 minutes and losing afew piece of skin. I took it for a test drive and noticed that its alittle more responsive and the idling is much smoother.
09-04-09, 08:15 PM
#28
Thanks. Mole. Found it. Its a really tight spot. No way take any pictures. Went ahead and bought some deep socket and extension. You have to buy the 1/2" drive cos the 3/8" drive deep socket was not deep enough. I broke the brittle connector tap while removing. Finally replaced it after 15 minutes and losing afew piece of skin. I took it for a test drive and noticed that its alittle more responsive and the idling is much smoother.
 08-04-14, 11:57 AM
#30
Driver School Candidate

Join Date: Aug 2014
Location: Florida
Posts: 2
Likes: 0
Received 0 Likes
on
0 Posts
Well after replacing the engine coolant temperature sensor on my friend's 1990 Camry and seeing the recent threads on the 1UZ-FE, I decided to change it on my 2jzge 1993 sc300. My sensor was probably original and the new part is not too expensive so why not? 
I used the following:
Duralast (Autozone) part number: SU4007
Price: $29.99
If you want to use Toyota:
OEM part number: 8942220010
MSRP: $63.13
Online: ~$42 - $52
Many Lexus/Toyota vehicles use the same coolant temperature sensor so it should be easy to find.
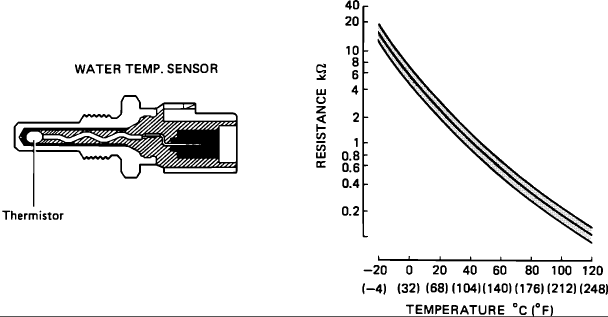
PURPOSE
"The engine coolant temperature (ECT) sensor measures engine temperature by sensing water temperature. The ECM uses this information for determining the proper air/fuel mixture for all conditions." -via alldata.
If you know how to test it then refer to this:
LOCATION
Green colored harness located under the front intake runner going into the block.
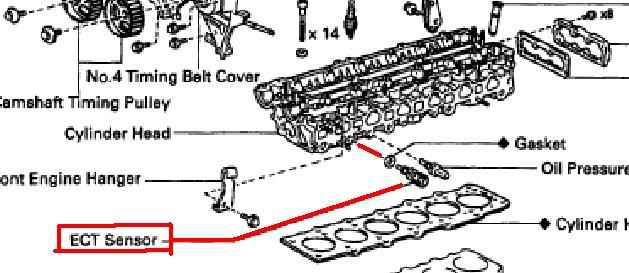
Hope 93MSB doesn't mind me borrowing his pic from here: https://www.clublexus.com/forums/per...-95-sc300.html
TOOLS NEEDED
-Ratchet and extension(s)
-Deep socket 19mm (Make sure it fits over the harness side of the sensor and reaches the bolt. I tested it on the new sensor first.)
-Drain pan (coolant will pour out)
STEPS
-(optional) Remove lower shield under the engine.
-(optional) Place drain pan under car because coolant will poor out once the sensor is removed. It may get messy so have some rags/paper towels ready to soak up excess coolant.
-(optional) If you have a container or pan that will fit under the sensor then it will be easier than removing the lower shield.
-Unplug harness from sensor. The area is pretty tight so I reached under with my right hand to press the release tab and used my left hand to pull on the harness. Came off easily once I got the technique down.
-Slip the deep socket 19mm over the sensor. Again, the area is pretty tight so it may take some wiggling around to get it on the bolt part. There were several times when I thought the socket was on the bolt, but it was only over the harness plug. Just keep pushing in and rotating the socket slowly until it catches since it is a snug fit.
-While removing the sensor, coolant will start pouring out. Have the new sensor out of the box and ready to install. You can also temporarily plug up the hole with your finger as you reach for the new sensor.
-Screw on the new sensor, tighten, and plug the harness back. Sorry I do not have the torque value, but just make sure you don't overtighten since the part is aluminum. Also, make sure it does not leak.
RESULTS and THOUGHTS
-As far as physical appearance, the old sensor did not look too bad after wiping some of the gunk off. It may have still worked fine.
-I have not noticed any significant performance gains in the last week since, but it seems to accelerate a bit easier. It can just be in my head though...
-I hope that it will improve my miles per gallon (mpg). I am still on the same tank so I will report back with any results.
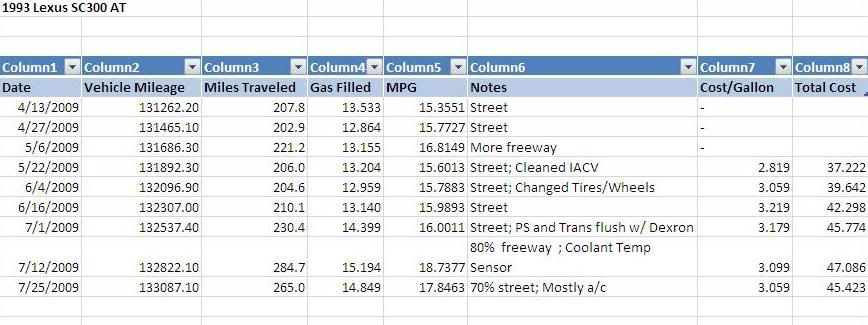
UPDATE: 7/25/2009
-Here is my mpg log with brief descriptions. I'll let you guys decide if there are any differences after changing the sensor
PICS
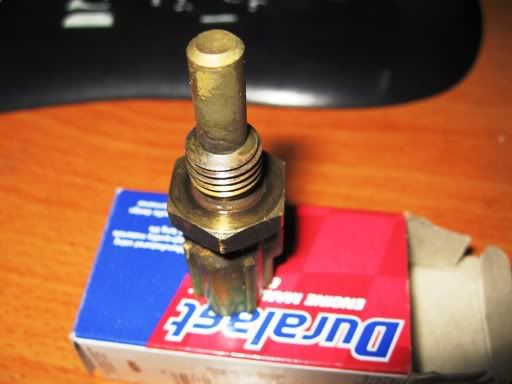
Old sensor with some gunk
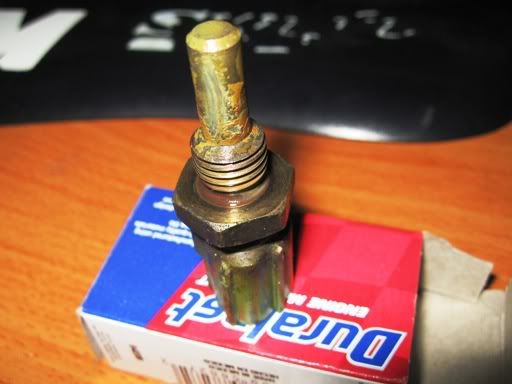
Old sensor after wiping off gunk
Reference threads from the 1UZ-FE community:
https://www.clublexus.com/forums/per...placement.html
https://www.clublexus.com/forums/ls4...ange-pics.html
I used the following:
Duralast (Autozone) part number: SU4007
Price: $29.99
If you want to use Toyota:
OEM part number: 8942220010
MSRP: $63.13
Online: ~$42 - $52
Many Lexus/Toyota vehicles use the same coolant temperature sensor so it should be easy to find.
PURPOSE
"The engine coolant temperature (ECT) sensor measures engine temperature by sensing water temperature. The ECM uses this information for determining the proper air/fuel mixture for all conditions." -via alldata.
If you know how to test it then refer to this:
LOCATION
Green colored harness located under the front intake runner going into the block.
Hope 93MSB doesn't mind me borrowing his pic from here: https://www.clublexus.com/forums/per...-95-sc300.html
TOOLS NEEDED
-Ratchet and extension(s)
-Deep socket 19mm (Make sure it fits over the harness side of the sensor and reaches the bolt. I tested it on the new sensor first.)
-Drain pan (coolant will pour out)
STEPS
-(optional) Remove lower shield under the engine.
-(optional) Place drain pan under car because coolant will poor out once the sensor is removed. It may get messy so have some rags/paper towels ready to soak up excess coolant.
-(optional) If you have a container or pan that will fit under the sensor then it will be easier than removing the lower shield.
-Unplug harness from sensor. The area is pretty tight so I reached under with my right hand to press the release tab and used my left hand to pull on the harness. Came off easily once I got the technique down.
-Slip the deep socket 19mm over the sensor. Again, the area is pretty tight so it may take some wiggling around to get it on the bolt part. There were several times when I thought the socket was on the bolt, but it was only over the harness plug. Just keep pushing in and rotating the socket slowly until it catches since it is a snug fit.
-While removing the sensor, coolant will start pouring out. Have the new sensor out of the box and ready to install. You can also temporarily plug up the hole with your finger as you reach for the new sensor.
-Screw on the new sensor, tighten, and plug the harness back. Sorry I do not have the torque value, but just make sure you don't overtighten since the part is aluminum. Also, make sure it does not leak.
RESULTS and THOUGHTS
-As far as physical appearance, the old sensor did not look too bad after wiping some of the gunk off. It may have still worked fine.
-I have not noticed any significant performance gains in the last week since, but it seems to accelerate a bit easier. It can just be in my head though...
-I hope that it will improve my miles per gallon (mpg). I am still on the same tank so I will report back with any results.
UPDATE: 7/25/2009
-Here is my mpg log with brief descriptions. I'll let you guys decide if there are any differences after changing the sensor
PICS
Old sensor with some gunk
Old sensor after wiping off gunk
Reference threads from the 1UZ-FE community:
https://www.clublexus.com/forums/per...placement.html
https://www.clublexus.com/forums/ls4...ange-pics.html