When you click on links to various merchants on this site and make a purchase, this can result in this site earning a commission. Affiliate programs and affiliations include, but are not limited to, the eBay Partner Network.
So my 97' SC300(200,000miles) has code P0401. I have tested the EGR valve itself and it seems to be fine. I have looked over the vac lines and everything seems to be solid. I have read where using a 10k 1/2watt resistor should turn my CEL off. Problem is in all of the threads I have found I can't seem to pin point which connector I need to stick the resistor in. Can someone point me in the right direction?
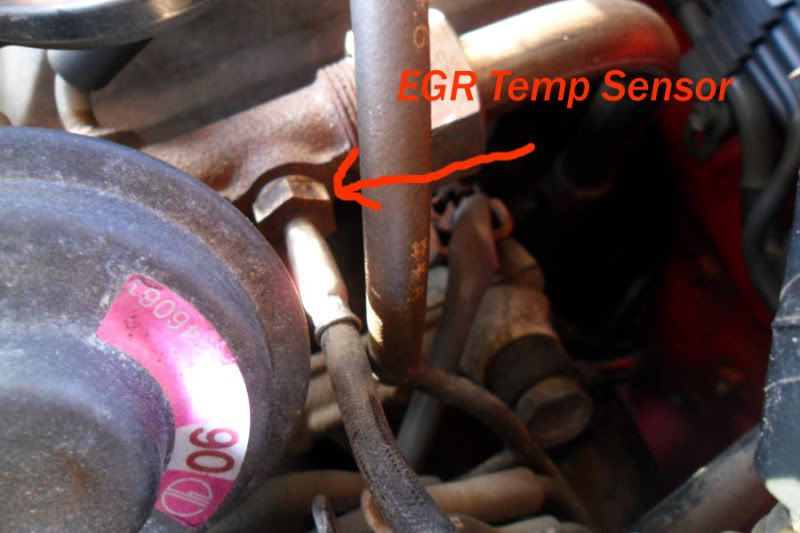
the connector on the egr probe that sticks out of the pipe on the intake side between the back of the intake manifold and the firewall. it should have 2 wires, its kind of tricky to get your hands back there.
Have your car the EGR Valve with under pressure? My 97 SC400 have a electric Valve.
Is this mod also possible by the electric EGR? I have the EGT sensor in front of the Valve in the intake manifold. If i close the EGT piping, after hard driving comes CEL with "no circulation EGR" . Is this problem fixed with the resistor?
The first one shows the EGR gas temp sensor. It seems to be the sensor we need the ECU into thinking is working correctly. It has two wires coming from it that are several inches long. There is a connector mounted to the rear or the head/block that you need to get to and separate. It is very tricky to reach. I used a long regular screwdriver to pry it out of the mount it was attached to. Next hard part is getting the connector apart as there is very little extra wire to be able to get the thing into a better position to get at it.
Once apart I cut the wires a few inches from where it goes into the sensor.
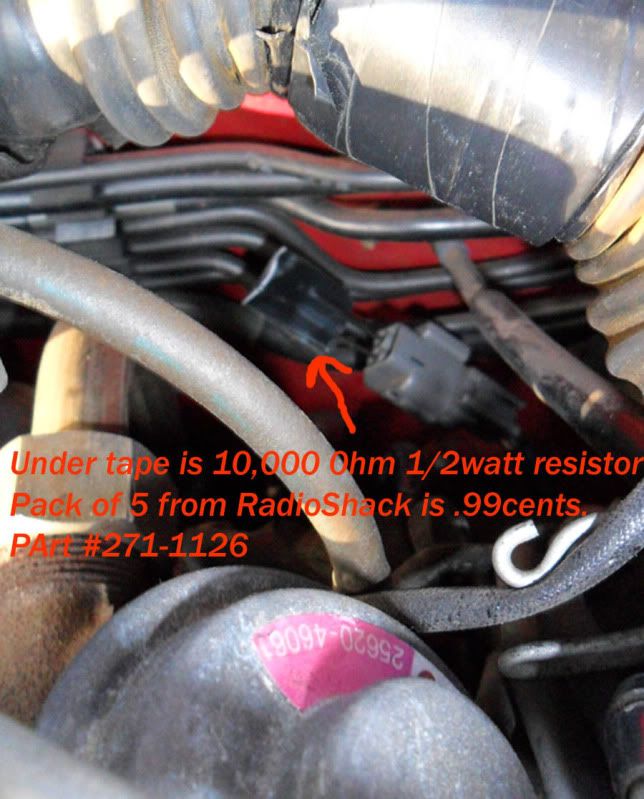
For the most part the hard work is done. Next I took the loose connector and one 10K 1/2watt resistor and using some heat shrink tubing connected it to the two wire left on the connector. I covered it with a piece of tape to protect it till I come up with a better idea once I see if it fixes my problem.
Snapped it back into it's connector on the car and went for a drive. After about 40 miles sure enough the check engine light that I have been looking at for over a year went OFF!!!! Dash seems empty without it now!!!!
omg ive had the same exact problem for sooo long. so let me get this straight, u took the resistor and put it in where the egr temp sensor would plug in?
i removed the temp sensor, unplug it, cut the wires put in resistor jumping the 2 wires leading back to the plug electrical tape it all back up n plug it back in
Just wanted to report another way for this resistor fix. I actually unclip the EGR temp sensor plug, remove the white plastic part inside the plug and insert the resistor in with each leg in either pin hole. Try to keep the physical resistor up close to the pins as possible to prevent snagging when you�re plugging it back in(think the resistor occupies the space the white plastic part used to sit) I then plug this back in the original harness. Went for a drive and bam no more P0401 and the thing looking STOCK! No cut wires, electrical tape, dangling unplugged connector or anything<<<important for visual inspection and this is the best way to conceal it.
A little more info if anyone wants to geek out, the manual calls for 9k ohms or less at Normal Operating Temperature for EGR temp sensor. http://www.97supraturbo.com/Trouble%...0401%20EGR.pdf page 10. So I actually use a 8k ohms resistor for this mod to account for any temperature effect. Also by hooking it up like this�in parallel to the OG sensor, the resistance will be very close but won�t go past 8k ohms (1/R1 + 1/R2 = 1/Rtotal) doesn�t matter what the EGR temp sensor resistance is (assuming much higher than our resistor since we�re getting a �insufficient flow� CEL)
A little more note for brain food, this mod works to get rid of p0401 CEL for if you have a working EGR system and failed EGR sensor or an individual failure within the EGR system (ECU, VSV, Modulator, deposit build up, vacuum line leaks). So for the prior case, essentially you can be actually having proper EGR operating. If this effect is undesirable for you you need to do really block off EGR or disable one of the mentioned system.
While working on getting condensation out of my driver side headlight assembly, I just added resistor to my 1993 sc300 to prevent the check engine light from my egr system�A couple years after blocking off my egr and living with egr check engine light.
Few notes and elaborated upon details of job from my year 2023 experience to add to other people�s write ups here �
below is an eBay photo of something that *resembles our egr sensor plug. On one end is the plastic electrical clip that plugs in to back of intake manifold near firewall. On other end is bolt that screws into egr pipe. The bolt end is easy to access from top of engine. The plastic plug is lot harder. I could get fingers on the top or the bottom of the clip, but not strong enough at the same time to unclip it. Pliers or screwdriver would help unclip it but I couldn�t get it too and didn�t want to crack connector.
This job would be much much much easier if you removed the whole thing and worked away from engine. If I moved the brake fluid reservoir, as I probably did when I blocked off my egr, I probably could have gotten to it better.
So I worked with it on car. Use wire cutters and cut off sensor side as close to bolt as possible. Place cut off bolt piece in labeled plastic bag to save for posterity�Ha! Slide down the casing protecting cord from heat and there are 2 very thin wires coated in rubber. Carefully strip inch or so off each of these with wire stripping tool. Probably really easy to cut all way through wire since so small in diameter, especially while leaning over engine to access these short wires.
take out a resistor from the box (see bottom photo below for resistor pack I ordered off Amazon�note power and resistance values there too) and attach one end of resistor to one wire, the other end to the other wire.
It�s hard to twist each end of the resistor to the egr wires since the egr wires are braided and don�t really twist, while the resistor wire is thin and flimsy. Due to access, I couldn�t get electrical tape to wrap the wires and stay in place so I got some shrink wrap tubing. Used an inch or so tubing to fit over each pair of twisted wires and heat gun to shrink it. Lots of failed attempts, trust me. When I got the tubing in place I held it with pliers while I applied the heat from the gun.
There is a metal hook piece that held this originally located egr wire away from engine block that I used to hold my newly spliced and wrapped wires. I drove for the day and check engine light stayed off. Because my battery had been disconnected, the check engine light had cleared. Later I used some high temp electrical tape to cover the exposed resistor. Used zip tie to better attach it to metal hook.
The end
Hey, thinking about doing this whole egr delete to my sc300, just so I'm clear, up to the point that you decided to do the resistor mod, you had the probe that screwed into EGR dangling with the connector end plugged into the wiring harness...correct? The only reason im asking is because i keep reading conflicting threads. Some people say the temp sensor connects to the intake manifold where in that case i would ask why you didnt keep the probe plugged in. But now I believe it screws into the egr which makes sense why you bagged it away because once you cut it off, theres no egr for it to plug into and no connector for it to dangle from.
 01-08-11, 11:09 AM


 wait, youre in NC not a good idea.