
Free Toyota Pre-OBD Datalogger Found!!
 01-26-13 | 09:24 AM
#61
I for one would like to say thank you for sharing this information - even though something on my end prevented it from working. Since my car is running awesome, I have dropped this way down on my priority list.
01-26-13 | 09:41 AM
#62

Driver
Joined: Feb 2008
Posts: 125
Likes: 0
From: Illinois
You're from Texas. Nice try.
Since it's negative 10 degrees outside all week here in New England (Man country), and I have been moving, I decided to rip out my hard-wired cable so you guys can see what I did, since I'm such an idiot, and have no idea what I'm talking about.")
Well, looks like I built my cable just like the schematic says. Just like all of you should do.


Can I go put this thing back in now? Pretty please?
The trouble must be in the cable drivers. A lot of the time auto-update can't find it.
Google "USB2.0-Serial" or "USB-RS232" depending on what version of windows you have.
I am running a core 2 laptop with windows XP pro. Works fine.
If anyone else has a problem with all of the things i have learned from experience, and decided to share for no profit, I'll stop.
Then everyone can go back to getting ripped off at shops, makes no difference to me.
Since it's negative 10 degrees outside all week here in New England (Man country), and I have been moving, I decided to rip out my hard-wired cable so you guys can see what I did, since I'm such an idiot, and have no idea what I'm talking about.
Well, looks like I built my cable just like the schematic says. Just like all of you should do.
Can I go put this thing back in now? Pretty please?
The trouble must be in the cable drivers. A lot of the time auto-update can't find it.
Google "USB2.0-Serial" or "USB-RS232" depending on what version of windows you have.
I am running a core 2 laptop with windows XP pro. Works fine.
If anyone else has a problem with all of the things i have learned from experience, and decided to share for no profit, I'll stop.
Then everyone can go back to getting ripped off at shops, makes no difference to me.
Pretty sweet, Can you replicate this cable for Me? I am wayyyyy tooo lazy plus my soldering skills are none existent

 01-30-13 | 05:47 AM
#64
01-30-13 | 06:09 AM
#65

You're from Texas. Nice try.
Since it's negative 10 degrees outside all week here in New England (Man country), and I have been moving, I decided to rip out my hard-wired cable so you guys can see what I did, since I'm such an idiot, and have no idea what I'm talking about.
Well, looks like I built my cable just like the schematic says. Just like all of you should do.
Can I go put this thing back in now? Pretty please?
The trouble must be in the cable drivers. A lot of the time auto-update can't find it.
Google "USB2.0-Serial" or "USB-RS232" depending on what version of windows you have.
I am running a core 2 laptop with windows XP pro. Works fine.
If anyone else has a problem with all of the things i have learned from experience, and decided to share for no profit, I'll stop.
Then everyone can go back to getting ripped off at shops, makes no difference to me.
04-12-13 | 05:55 PM
#69

Is this the correct capacitor
04-25-13 | 07:18 AM
#70
Yes, that is the correct one.
Sorry I haven't updated this thread in a while, but here's a few tips.
1.Building the cable correctly.
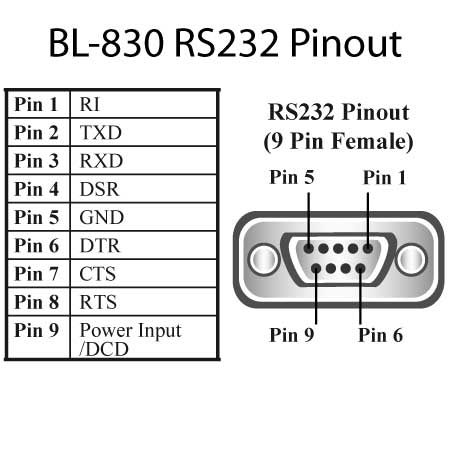
-Make sure that you are not looking at the mirror image of the Serial pinout. I.E. use the "Female" pinout for soldering your connector.
-Use the correct capacitor. There are different ways to label component strength like the decimal system. If you can't find a 3300pF (Pico-Farad) capacitor, a 0.0033uF (Micro-Farad) will work. Any voltage over 12v will work.
2.DLC2 Connections (Under the dash)
-Make sure that DB9 FEMALE pin #5 goes to E1, and the wire tapped off goes to TE2. This makes the diagnostic mode ready.
-DB9 FEMALE pin #6 goes to the VF1 or ENG pin. This is the data stream pin.


3.Program settings.
-Make sure you have the correct air metering device and other applicable options selected.
(MAF, or MAP),under the "MORE"-->"PROGRAM SETTINGS".
-Make sure to test the cable signal inversion.
Program running-->Toyota CAR Key to "ON"-->"MORE"-->"CHECK THE CABLE ON THE INVERSION".
If you have a 1 flash, run it inverted under "PROGRAM SETTINGS". If you don't have a 1, normal.
4.Initial Run.
-Once you have built the cable correctly, and defined the correct settings, run the program by selecting "READ".
-Start the car, give it 10 seconds.
-HAPPY DATALOGGING!!!
In my case with the crap gas I get, I found that my initial timing was 10-11 degrees at idle. I would knock under certain conditions.
I retarded the timing down to 7*, and it runs like a champ with NO knock!
Any other questions, feel free to chime in!
Sorry I haven't updated this thread in a while, but here's a few tips.
1.Building the cable correctly.
-Make sure that you are not looking at the mirror image of the Serial pinout. I.E. use the "Female" pinout for soldering your connector.
-Use the correct capacitor. There are different ways to label component strength like the decimal system. If you can't find a 3300pF (Pico-Farad) capacitor, a 0.0033uF (Micro-Farad) will work. Any voltage over 12v will work.
2.DLC2 Connections (Under the dash)
-Make sure that DB9 FEMALE pin #5 goes to E1, and the wire tapped off goes to TE2. This makes the diagnostic mode ready.
-DB9 FEMALE pin #6 goes to the VF1 or ENG pin. This is the data stream pin.
3.Program settings.
-Make sure you have the correct air metering device and other applicable options selected.
(MAF, or MAP),under the "MORE"-->"PROGRAM SETTINGS".
-Make sure to test the cable signal inversion.
Program running-->Toyota CAR Key to "ON"-->"MORE"-->"CHECK THE CABLE ON THE INVERSION".
If you have a 1 flash, run it inverted under "PROGRAM SETTINGS". If you don't have a 1, normal.
4.Initial Run.
-Once you have built the cable correctly, and defined the correct settings, run the program by selecting "READ".
-Start the car, give it 10 seconds.
-HAPPY DATALOGGING!!!
In my case with the crap gas I get, I found that my initial timing was 10-11 degrees at idle. I would knock under certain conditions.
I retarded the timing down to 7*, and it runs like a champ with NO knock!
Any other questions, feel free to chime in!
04-25-13 | 07:25 AM
#71
If you still have the FIC/8, which doesn't give you the base numbers but rather a range to adjust over OEM values, you can now utilize the timing function on your AEM since you now have the OEM ECU reporting in real time!
EX.
"Oops, getting a little knock at 5250RPM"
*Takes one degree timing out at 5250 at WOT via AEM FIC/ MAP ECU2/GReddy E-manage*
"YAAAYYYY, no more knocking at 5250, turn the boost up"!
 04-25-13 | 08:37 AM
#72

great instructions, I think that should clear it up for most on how to build one, I'm getting a capacitor and getting on top of this been trying to figure out how well my tps and everything is working.
 04-25-13 | 11:21 AM
#74

anyone have any idea where we could get a male obd1 plug? that would make this setup complete, or what do you guys use to put in the pins that will stay?
Last edited by Tam4511; 04-25-13 at 11:25 AM.
04-25-13 | 11:39 AM
#75
that would be neat if there was one but I am going to guess it will be hard to find.
the mcguiver way is to strip alot of the wire on the end, double the stripped part back on itself to make it thicker, insert into female pin snugly, and wrap whole connector with electrical tape so they can't ever move/back out. Its not the most scientific way to do it but its not like we use that connector for anything else.
the mcguiver way is to strip alot of the wire on the end, double the stripped part back on itself to make it thicker, insert into female pin snugly, and wrap whole connector with electrical tape so they can't ever move/back out. Its not the most scientific way to do it but its not like we use that connector for anything else.