
P1349 VVT System Malfunction (Bank 1b) blocked oil control valve filter
 02-29-12, 09:26 PM
#91
16 only has 1 bank, not 2. V6 has 2, V8 has 2. etc.
There are never bank 2 codes on a 2JzGE I6. The 2 headers are simply there for design/engineering. Banks has to do with fuel rails and intake/cams. The I6 only has 1 fuel rail and intake 1 cam, and therefore doesnt have a 2nd bank to send info to the ECU.
Just for clarification.
There are never bank 2 codes on a 2JzGE I6. The 2 headers are simply there for design/engineering. Banks has to do with fuel rails and intake/cams. The I6 only has 1 fuel rail and intake 1 cam, and therefore doesnt have a 2nd bank to send info to the ECU.
Just for clarification.
In addition, if you hooked up a scanner and watch the fuel trim STFT and LTFT does it have bank 1 and bank 2?
 03-01-12, 08:55 AM
#92
Pole Position

Join Date: Nov 2010
Location: NY
Posts: 331
Likes: 0
Received 0 Likes
on
0 Posts
 03-01-12, 09:51 AM
#93
first you have remove the cover it has 4 allen bolts I think they're 4 or 5 mm and then there's a 10 mm bolt that holds the solenoid in....and the big bolt i think its a 15/16 or 7/8 that big one has a screen inside you have to clean it out and theres a 10 mm bolt that holds the line in it will be easier to do if you take it out. I already did it on my car you'll be done in about 30 min..
I hope this helps you out..any questions you can pm.. me
I hope this helps you out..any questions you can pm.. me
03-02-12, 08:21 AM
#94

I haven’t searched too hard so if this has already be done, oh well. I was doing this last night and had a request to provide info so I went ahead and snapped some pictures and figured I could do a little tutorial.
First remove the forward vanity cover on the front of the engine. It is 4, 5mm allen bolts.
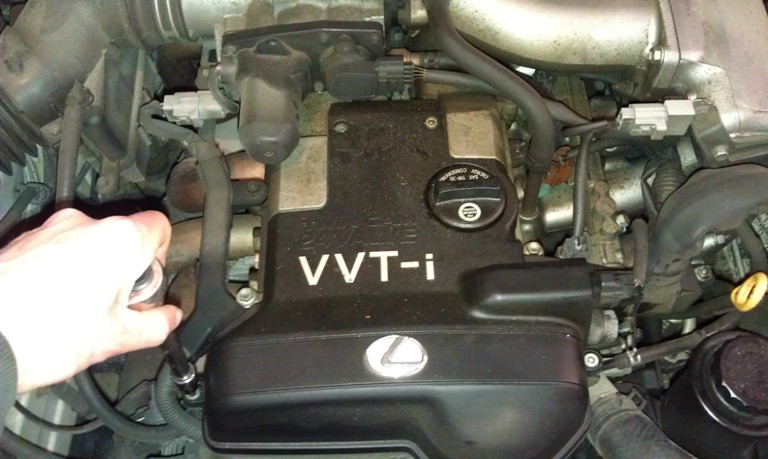
Once cover is removed you can see the VVT solenoid. Disconnect the connector, and remove the 10mm bolt that holds the solenoid in.
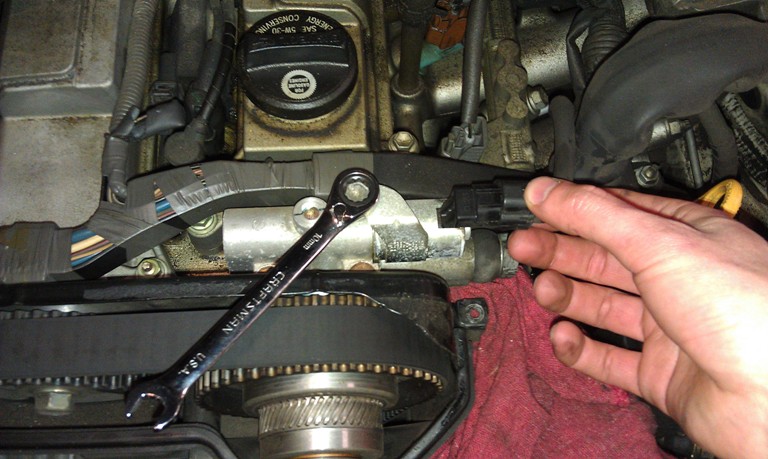
Give solenoid a minor twist to break free and then pull to get it out. Should come straight out.
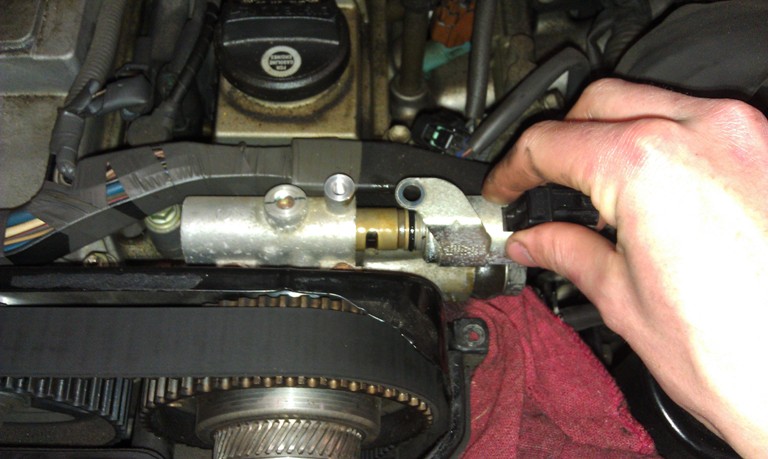
While solenoid was out, I decided to change the oil supply line filter. Yes, you can just clean it out, but at $5 I see no reason to not just replace it. Loosen 22mm banjo bolt and pull it out.
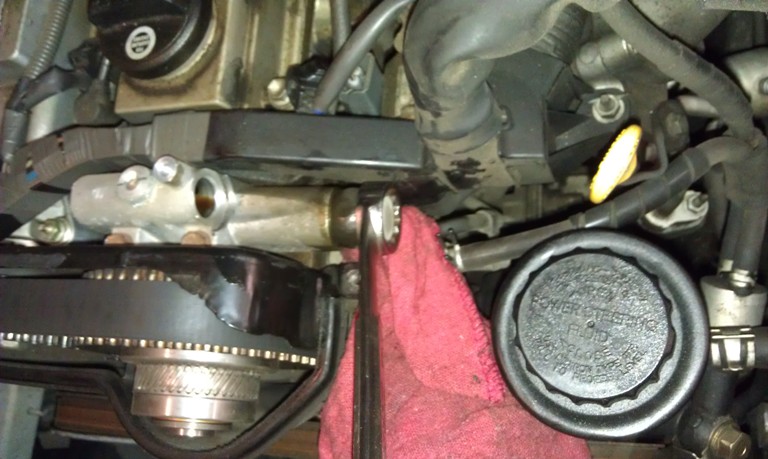

Bolt w/ new screen versus old. Screen just pops out end of bolt. I’d recommend hosing down the bolt w/ some brake cleaner.

Reassemble everything in reverse order. Technically you should replace the washers on both sides of the banjo; I skipped out and didn’t have issues w/ leaks. Typically you can get away w/out doing, but I figured I’d mentioned them anyway. There’s one on each side of the banjo.
Also of note, on the new VVT solenoid (and old) there is an oring to seal it in the bore. Apply some oil to the oring prior to install. This will help prevent it from getting cut while installing.
First remove the forward vanity cover on the front of the engine. It is 4, 5mm allen bolts.
Once cover is removed you can see the VVT solenoid. Disconnect the connector, and remove the 10mm bolt that holds the solenoid in.
Give solenoid a minor twist to break free and then pull to get it out. Should come straight out.
While solenoid was out, I decided to change the oil supply line filter. Yes, you can just clean it out, but at $5 I see no reason to not just replace it. Loosen 22mm banjo bolt and pull it out.
Bolt w/ new screen versus old. Screen just pops out end of bolt. I’d recommend hosing down the bolt w/ some brake cleaner.
Reassemble everything in reverse order. Technically you should replace the washers on both sides of the banjo; I skipped out and didn’t have issues w/ leaks. Typically you can get away w/out doing, but I figured I’d mentioned them anyway. There’s one on each side of the banjo.
Also of note, on the new VVT solenoid (and old) there is an oring to seal it in the bore. Apply some oil to the oring prior to install. This will help prevent it from getting cut while installing.
03-02-12, 09:05 AM
#95
Pole Position
Join Date: Nov 2010
Location: NY
Posts: 331
Likes: 0
Received 0 Likes
on
0 Posts
I haven�t searched too hard so if this has already be done, oh well. I was doing this last night and had a request to provide info so I went ahead and snapped some pictures and figured I could do a little tutorial.
First remove the forward vanity cover on the front of the engine. It is 4, 5mm allen bolts.

Once cover is removed you can see the VVT solenoid. Disconnect the connector, and remove the 10mm bolt that holds the solenoid in.

Give solenoid a minor twist to break free and then pull to get it out. Should come straight out.

While solenoid was out, I decided to change the oil supply line filter. Yes, you can just clean it out, but at $5 I see no reason to not just replace it. Loosen 22mm banjo bolt and pull it out.

Bolt w/ new screen versus old. Screen just pops out end of bolt. I�d recommend hosing down the bolt w/ some brake cleaner.

Reassemble everything in reverse order. Technically you should replace the washers on both sides of the banjo; I skipped out and didn�t have issues w/ leaks. Typically you can get away w/out doing, but I figured I�d mentioned them anyway. There�s one on each side of the banjo.
Also of note, on the new VVT solenoid (and old) there is an oring to seal it in the bore. Apply some oil to the oring prior to install. This will help prevent it from getting cut while installing.
First remove the forward vanity cover on the front of the engine. It is 4, 5mm allen bolts.
Once cover is removed you can see the VVT solenoid. Disconnect the connector, and remove the 10mm bolt that holds the solenoid in.
Give solenoid a minor twist to break free and then pull to get it out. Should come straight out.
While solenoid was out, I decided to change the oil supply line filter. Yes, you can just clean it out, but at $5 I see no reason to not just replace it. Loosen 22mm banjo bolt and pull it out.
Bolt w/ new screen versus old. Screen just pops out end of bolt. I�d recommend hosing down the bolt w/ some brake cleaner.
Reassemble everything in reverse order. Technically you should replace the washers on both sides of the banjo; I skipped out and didn�t have issues w/ leaks. Typically you can get away w/out doing, but I figured I�d mentioned them anyway. There�s one on each side of the banjo.
Also of note, on the new VVT solenoid (and old) there is an oring to seal it in the bore. Apply some oil to the oring prior to install. This will help prevent it from getting cut while installing.
I defintley have searched and there was no clear DIY with pictures for the 300
This is gonna help alot of future people who have this problem who are far from mechanics
I'm gonna do this sunday for sure now...........
 03-02-12, 11:38 AM
#96
 I may have to tuck my tail about 2 banks, at least on the exhaust...Crap, Ive never seen a bank 2 code at all on the GS300.
The ECU very well may have 2 banks on the I6 for exhaust, and one bank for intake, here is a link to a diagram for all: https://www.clublexus.com/forums/2732025-post3.html
I dont know if thats an official Lexus diagram or not, but it definitely shows a bank 1 and bank 2, each with a front and rear sensor for the exhaust side.
03-02-12, 02:33 PM
#97
^ Emm...I want to say it has a O2 pre cat on each but I'm guessing at this point based on loose memory from doing the active test on the diagnostic tool and seeing ST and LT fuel trims for a bank 1 and 2. But yea, really vague memory there.
On that note, replacing the solenoid probably won't remove the check engine light immediately. You may have to drive it around for so many "cycles," have it cleared, or disconnect the battery for a bit to clear it. I had the tool, so didn't really mess with it much to clear it. Maybe someone else has some input.
On that note, replacing the solenoid probably won't remove the check engine light immediately. You may have to drive it around for so many "cycles," have it cleared, or disconnect the battery for a bit to clear it. I had the tool, so didn't really mess with it much to clear it. Maybe someone else has some input.
03-06-12, 12:42 PM
#98
Replacing my solenoid didnt remove the check engine light. I went to Autozone and used the handheld to remove the code.
I think it takes several complete on-off drive cycles to clear the light.
I think it takes several complete on-off drive cycles to clear the light.
03-19-12, 07:49 PM
#101

Hey guys, which OCV should I purchase?
15330-46010
or
15330-46011
The 46011 is listed on the sewell lexus site but the 46010 is listed in many forums as the part number. I feel as though one part is an updated revision that will work better or last longer than the other part.
15330-46010
or
15330-46011
The 46011 is listed on the sewell lexus site but the 46010 is listed in many forums as the part number. I feel as though one part is an updated revision that will work better or last longer than the other part.
03-19-12, 08:34 PM
#102
Hey guys, which OCV should I purchase?
15330-46010
or
15330-46011
The 46011 is listed on the sewell lexus site but the 46010 is listed in many forums as the part number. I feel as though one part is an updated revision that will work better or last longer than the other part.
15330-46010
or
15330-46011
The 46011 is listed on the sewell lexus site but the 46010 is listed in many forums as the part number. I feel as though one part is an updated revision that will work better or last longer than the other part.
03-20-12, 08:46 AM
#103
The 46011 replaced the 46010. Either will work. I went thru this same discovery when I bought my OCV from Lexus dealer, they confirmed the 11 will work. And it does. :-)
You only need 1 OCV if you have the GS300. 2 if you have the V8 400.
You only need 1 OCV if you have the GS300. 2 if you have the V8 400.
Hey guys, which OCV should I purchase?
15330-46010
or
15330-46011
The 46011 is listed on the sewell lexus site but the 46010 is listed in many forums as the part number. I feel as though one part is an updated revision that will work better or last longer than the other part.
15330-46010
or
15330-46011
The 46011 is listed on the sewell lexus site but the 46010 is listed in many forums as the part number. I feel as though one part is an updated revision that will work better or last longer than the other part.
 04-05-12, 10:52 AM
#105
If your getting the code, you need to replace the Solenoid/Valve (which is one piece). Replacing the Solenoid/Valve is easy and does NOT give access to the filter.
As for the filter, just Clean it. Its about the size and shape of a sewers thimble (never thought I EVER use that word) and its a Billet aluminum machined housing with a fine-mesh SS screen. Its virtually indestructible unless you purposely poke the screen. It cleans very good with carb/brake cleaner. Its not a paper filter and has no internal parts for stuff to lodge in.
Some people replace the filter cuz its not too expensive, but the design of it makes replacing it a moot point.
BTW: The GS300 tranny uses a non-disposable SS screen filter as well. Its only serviceable by removing the entire tranny pan and removing the filter, then spraying with cleaner. Kinda wierd. But it obviously works cuz L's last a long long time. They dont even recommend a service interval for it. I did mine at 175K. It was virtually clean.