When you click on links to various merchants on this site and make a purchase, this can result in this site earning a commission. Affiliate programs and affiliations include, but are not limited to, the eBay Partner Network.
RR side ABS replacement speed sensor came in last week. From the neck and on to the tip the housing is all plastic. Today is 30F max but forecast for a 53F sunny day tomorrow. So I am preparing for a working day on the driveway.
Any advice on how to remove the broken sensor tip which is stuck in its "hole?" (See my photos in post #44 above.) Drilling may not be an option unless what's behind the hole (the turning sensor gear?) be removed?
Also, the sensor connector goes into the space behind the wheel well wall and into the chamber behind RR seat. I don't see obvious access doors to that space. Maybe the inside port wire is long enough so I can pull the connector out in to the wheel well space?
Thanks in advance for insights - I try to keep this as "a simple sensor replacement job" and not to blow it into a major RR wheel housing overhaul.
Any advice on how to remove the broken sensor tip which is stuck in its "hole?" (See my photos in post #44 above.) Drilling may not be an option unless what's behind the hole (the turning sensor gear?) be removed?
Also, the sensor connector goes into the space behind the wheel well wall and into the chamber behind RR seat. I don't see obvious access doors to that space. Maybe the inside port wire is long enough so I can pull the connector out in to the wheel well space?
You can see from the new one how wide and deep it is. Put tape on drill bits to mark the depth and carefully drill it out. Maybe go shallow by 1/4 inch to be safe and minimize the junk falling into the hole. As you hollow it you can probably pry the sides away from the walls.
Once the hole is clear look down into it, see if the tone ring is cracked or loose. No point putting in the new sensor if it is.
Enjoy a sunny day on the driveway. Raised the vehicle and put another jack stand under the belly; removed the RR wheel and it took just a couple minutes to yank out the metal core from the sensor hole. Used a flat head screw drive and a household hammer trying to loose the remaining plastic in the hole; the metal housing appears to have a shoulder at the opening - to match with the plastic shoulder on the sensor?
Let my back take a break and will be back to cleaning up the plastic in the hole.
Using hand tools slowly I managed to get the remaining plastic shell out of the hole.
The tone ring looks OK to me.
Now it is time to clean up rust in the hole.
Bad news: after brash the hole well and vacuum rust out of the hole, try fitting the replacement sensor in to the hole and it doesn't want to go in!
Compared the original sensor with the replacement unit and they look exactly the same. Further inspection on the hole well seems to reveal a thin layer of stubborn rust resulted from (well) rust expansion. The layer needs to be sanded away.
Call off for the day and start looking for sanding drums.
Thank you maxSteel for helping me in making progress on this DIY.
maxSteel: After vacuum out the rust in the hole, the tone ring looks good and clean. The last photo above shows one teeth of the tone ring before cleaning.
Got a sanding wheel and a flexible attachment for typical rotary tools.
The spot is too tight and narrow for a typical drill so the smaller handle of this flexible rotary tool attachment is a must. Sanding is just several seconds. Vacuumed out the rust and the sensor can go in easily with no feel of any obstacle. The inside connector does not come out because the wire inside is short - I did not pull too hard. So I cut the old wire, installed the new sensor and inserted new connector in to the chamber behind the wheel well wall. Here is how it looks on the outside.
Then, put the wheel on and lowered the vehicle - outside job is done. I wished that Lexus would make the wire of the inside part of the sensor connection longer so that it can be pulled out to the wheel well and disconnect and reconnect there. It is not so, at least in my this case. The next step is to try find an opening to the connectors from inside behind the RR back seat.
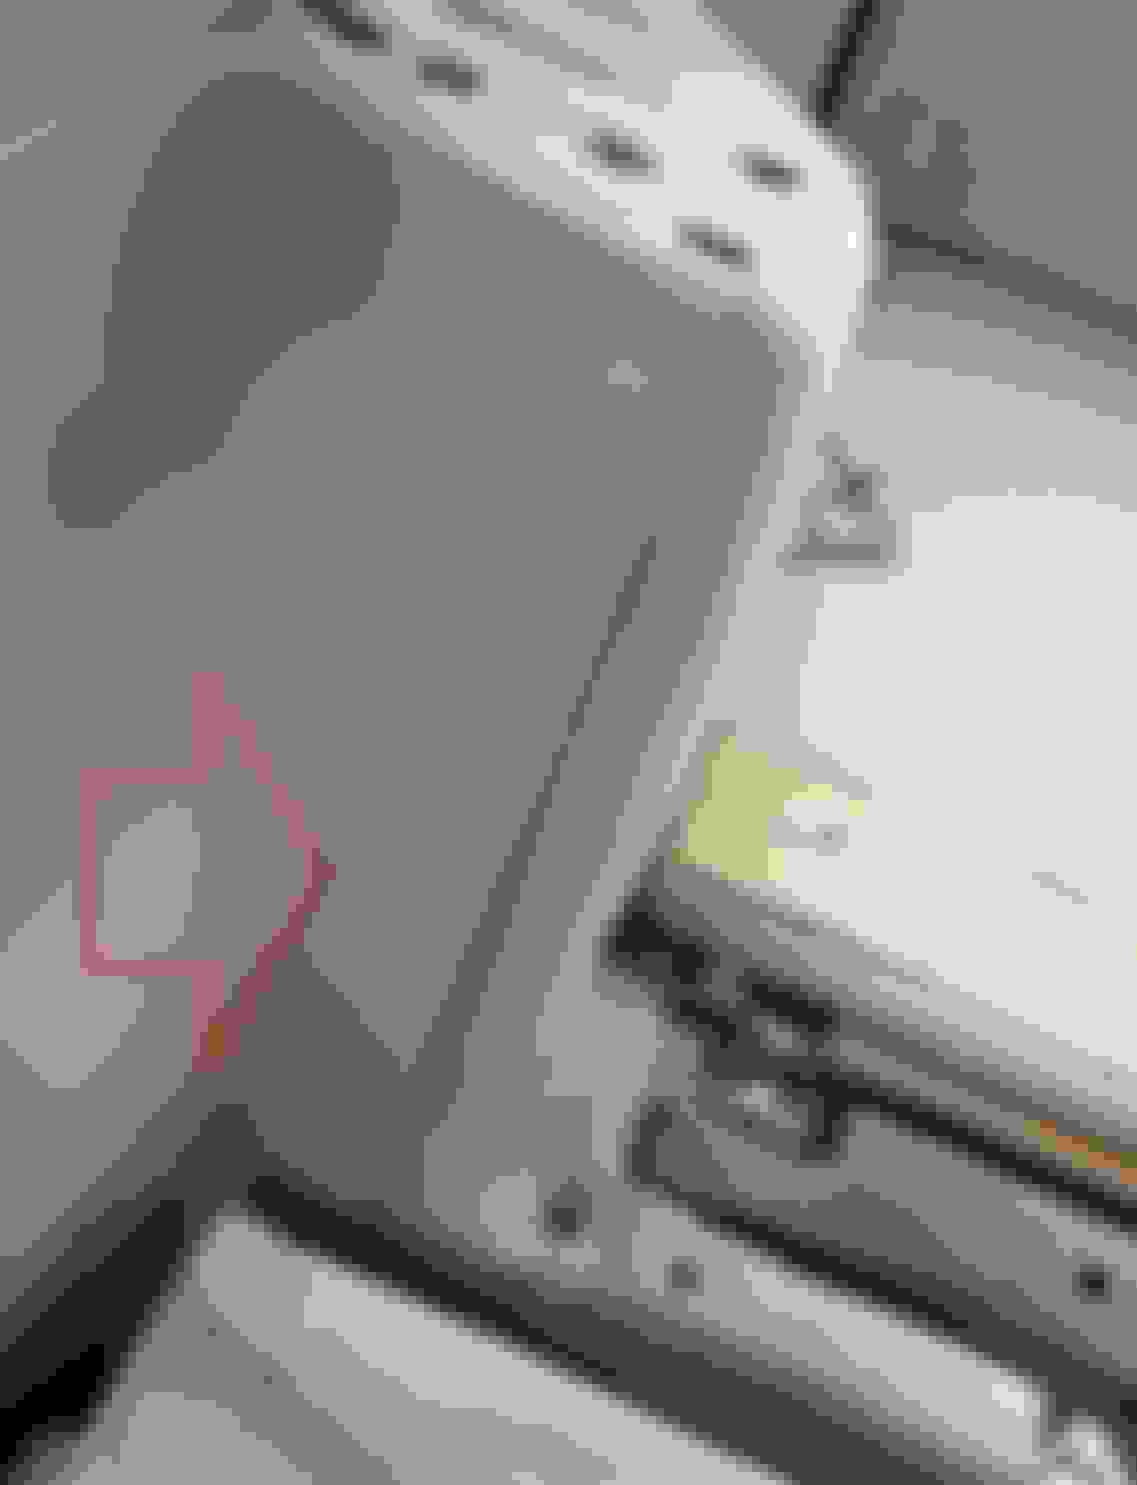
The link in maxSteel's post #47 provides instructions of replacement that include removing back seat. However, without photos it is hard to identify some of the pieces with instructions. The sensor wire connection point is behind this "wall" (pointed by the RED arrow) and inside wire appeared to extend towards the back of the vehicle (when I tried to pull it out to the wheel well I could feel the inside wire came from the rear direction).
Still looking for an easy way to get an opening to access the wire connection.
(1) Put down the backs of the back seats and lift trunk cover's edge at the back seats by hand; no need to apply too much force, as it may break the think back-fit cardboard. Place your 2 hands near both sides of a fastener and lift one at a time.
(2) Use a flat head screw drive and a mid-size wire cutter to remove the 4 black plastic fasteners on the back seats' skirt; they are very tight in my case; try to lift each while also yank it in all directions while pulling it out; be patient and work it slowly, or it would break.
(3) Once the skirt is lifted away from trunk floor, you will see a bolted down belt (shown in the lower-right corner in the last photo above). Unbolt it; now you can pull-up the black metal bar under the RR back seat and move the seat forward. This creates enough gap and space between the RR back seat base and side wall plastic trim cover.
(4) If you have small hands and a long handle wire cutter, you may not need to unbolt the seat and remove it. I have big hands and a short handle household wire cutter, so I need to remove the back seat. There are 2 bolts at the back; use a 14mm socket to remove them. There are 2 of same size at the front; use a flat screw drive to jack up the plastic covers to get to the bolts. Once the seat is unbolted, flip it over to the other side and leave it on top of the left-side seat.
(5) There are 3 plastic fasteners on the side-wall plastic panel; 1 near the top and 2 are on the sides of the belt opening at the bottom. Use flat head screw drive to lift the head of the fastener a little so to insert wire cutter; then apply some force on the wire cutter to lift the fastener. The big head of the fastener is very thin, so work your wire cutter slowly or the head might give away. After removing the 3 fasteners, you must use a combination of a flat head screw drive and hands to lift the left end of the plastic door step cover which is covering the low-right end of the wall panel; this is to release a inter-lock at/under the joint of the 2 pieces.
(6) Now turn the panel towards the door trim so to release the notches which are locked under the trim hardware (don't know what). These notches on the panel's edge are thin and easy to break away if not handled carefully.
Now you can remove the wall panel.
(7) Expend the opening between the wheel well metal and the cover near the door, you now can see the connector of the replacement sensor and the receiving end of the connection.
The receiving end connector has a "built-in" fastener that is pushed into the sheet metal. Use a flat head screw drive to push a release tab at the bottom of the connector from your side, lift it a little and use your finger to push a release tab from the other side and yank it towards you a little; again, work it slow and not to break it.
Now you can remove the old connector and insert the replacement sensor's connector securely (which I found it hard to do while the receiving socket is fixed on the sheet metal). Push the joint connection socket back to the sheet metal. No need to say about putting everything back to their places.
In the coming week I will see, after the car is driven for a bit, if the ABS system would self-correct the ABS warning light. If not, I will apply maxSteel's code clearing instructions in post #39. So stay tuned and I will be reporting back next weekend.
Bad news: After the replacement, driving the car did not reset the ABS warning light. Park the car and stop the engine, applied maxSteel's clear-code steps; start the car and the ABS warning light was OFF; after a couple of miles driving the ABS warning light came up again. Parked the car and turned the engine off; applied maxSteel's blink diagnosis steps and the codes are 3:3 - same code as before.
When you checked the tone ring, did you rotate the wheel and look at the whole thing?
Did you check if it is securely attached to the axle?
The first one of mine that failed I could put my pinky through the sensor hole and move the ring.
I did not check the details of the tone ring at the time, but it looked good and did not have signs of movement. I will take the wheel off tomorrow and have another look at the ring.
You nailed it - although the tone ring looks good, it is loose, very loose, and I can use my little finger get in there and turn it. How was the tone ring fixed on the drive shaft in the manufacturing?
 03-07-20, 09:48 AM