

 12-15-14, 04:42 PM
Last edit by: IB Advertising
See related guides and technical advice from our community experts:
Browse all: Exterior Guides
- How to Replace Your Car Window
Step by step instructions for do-it-yourself repairs
- How to Replace Your Power Window Actuator
Step by step instructions for do-it-yourself repairs
Browse all: Exterior Guides

RX300: DIY door lock actuator fix write-up
11-19-12 | 03:41 AM
#106

Driver School Candidate
Joined: Nov 2011
Posts: 29
Likes: 0
From: NJ
This is how it looks ( it's totally different from the other doors).
http://www.ebay.com/itm/Lexus-RX300-...fe1232&vxp=mtr
http://www.ebay.com/itm/Lexus-RX300-...fe1232&vxp=mtr
 11-23-12 | 05:51 PM
#108

Moderator
Joined: Apr 2001
Posts: 15,703
Likes: 1,119
From: Austin, TX
11-23-12 | 09:05 PM
#109

Rookie
Joined: Jan 2010
Posts: 61
Likes: 1
From: TX
Thank you all who contributed to this thread and with your help, I was able to troubleshoot the door actuator issue I have on my right rear door and confirmed that it is the motor that is going bad. However, I was NOT able to take the actuator out of the door even with the window rod unscrewed. The plastic housing is just too big to even squeeze though the window rod to get it out of the bottom hole. Does anyone have any suggestions?
I will have to buy a motor later to fix this issue but do not want to spend too much time struggling to take the actuator out of the door.
Thanks!
I will have to buy a motor later to fix this issue but do not want to spend too much time struggling to take the actuator out of the door.
Thanks!
11-23-12 | 09:42 PM
#110
Moderator
Joined: Apr 2001
Posts: 15,703
Likes: 1,119
From: Austin, TX
Hopefully some one who has done the back door on RX will share the right process.
If you plan to tackle the motor (and not the piggyback solution) buy the motor first. The cost of the motor is cheap. I see no point in accessing the mechanism and postponing the fix for another day.
Salim
If you plan to tackle the motor (and not the piggyback solution) buy the motor first. The cost of the motor is cheap. I see no point in accessing the mechanism and postponing the fix for another day.
Salim

 Lenny
Lenny

 02-17-13 | 02:23 PM
#113

Driver School Candidate
Joined: Feb 2013
Posts: 1
Likes: 0
From: WA
I just finished replacing the small actuator electro-motor on the rear driver side of my Lexus RX300 2000. It all works. Here are some hint from me:
- My door-lock assembly had a white large plastic housing attached to it - presumably for dust protection. I had to cut this housing in half (and throw it out) in order to get the assembly out of the door frame
- The finer the blade for cutting open the plastic of the gear assembly, the better.
- After replacing the motor but before gluing and screwing the gear assembly back together, I reconnected it back to the electric socket to see if it would switch. But the new motor was strong and I didn't hold the whole thing very tight. As a result it came apart and the gears flew out! Don't make this mistake!
- I didn't have a pinion gear puller. It was very difficult to get the small shaft off. I used heat and maybe that helped in the end.
- There is a lever that connects the exterior door handle with the assembly. Make sure you line it up right when you insert the assembly back into the door frame.
You can e-mail me with questions.
 02-18-13 | 03:56 PM
#115
Lexus Test Driver
Joined: Aug 2009
Posts: 5,700
Likes: 92
From: NJ
02-18-13 | 04:02 PM
#116

Driver School Candidate
Joined: Aug 2012
Posts: 4
Likes: 0
From: ut
02-27-13 | 10:27 AM
#117

Driver School Candidate
Joined: Feb 2013
Posts: 2
Likes: 0
From: CA
Hi There,
After spending my weekend repairing the driver side front lock actuator, I feel I am obligated to share my experience since I got so much help from this Forum. Here are the problems I ran into and how I solved them:
1. There is only ONE (1) hex bolt (instead of �bolts� as stated in the original post) that holds the window frame arm. I wasn�t able to maneuver the actuator module out before I loosened that bolt. Some people might have run into the same issue before. And when putting it back, remember to check if the robber track in the metal arm is fully inserted back.
2. Like other people, cutting the actuator module open is really a pain. A rotary saw is helpful but be careful not to cut too deep as it may damage the plastic gear inside. It might help once your blade cut through the seam at one spot and gradually pry open the cover from that spot.
3. Someone asked after the repair they can�t operate the door lock manually. The reason is because after you open the actuator module, you can see there is a circular spring sitting inside the race trace of the clamshell. The circular spring has an �L� bend on each end. What happened to me was that after I opened the module, the spring sat loosely inside the race track. I didn�t know it was a problem and after I put everything back I wasn�t able to operate the door lock manually, either. I finally realized that the �L� bends need to tie to the two opening edges of the race track, by pulling the spring about 3/4 turn. Without the spring, after the motor is activated and turns the gear, the gear will sit at a position so that the lever (which is hooked up to the �bicycle brake�) won�t be able to turn the gear in the other direction. The spring pushes the rotary gear back about 1/4 turn so that the lever can work in a �free zone� of the gear. So remember to check if the spring is sat properly in the race track.
4. Don�t try to �tap� the pinion out of the old motor and into the new motor. The pinion is very brittle and after I tried that it cracked and didn�t fit in the new motor anymore. Fortunately the new motor I bought on eBay has a copper collar with similar shape as the original pinion, although a bit smaller. I used an aluminum shim to make the collar match tightly with the worm gear and everything works fine now. So investing in a pinion puller is a smart choice.

 03-18-13 | 10:31 AM
#119

Driver School Candidate
Joined: Aug 2006
Posts: 1
Likes: 0
From: ca
I ordered the puller but couldn't wait. Here is the rig that worked for me. Three hammers. Two to wedge and one to tap. Ten seconds and done. Did front and rear passenger doors yesterday. Thanks for all the help on this board.
[IMG]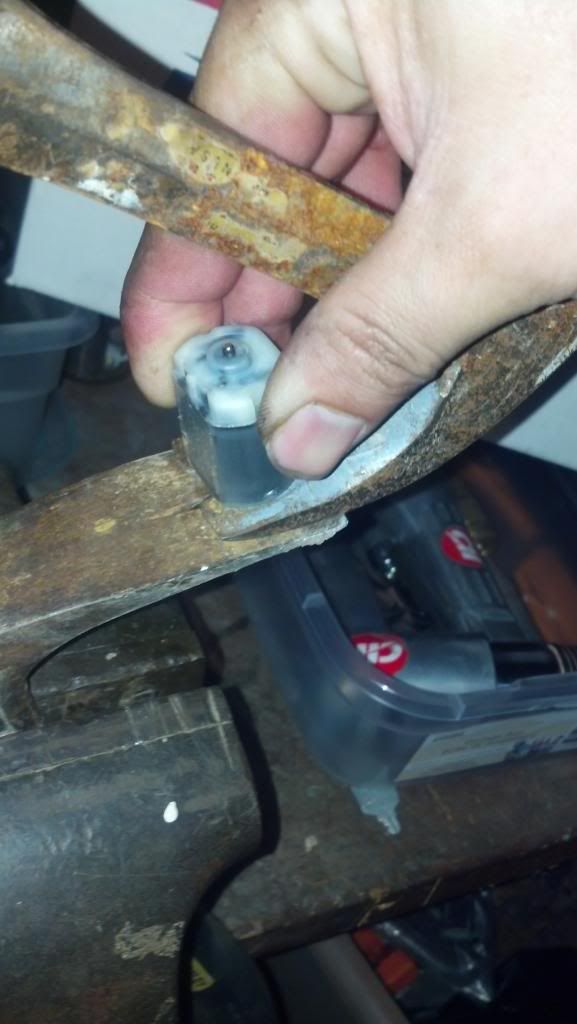 [/IMG]
[IMG]
[/IMG]