When you click on links to various merchants on this site and make a purchase, this can result in this site earning a commission. Affiliate programs and affiliations include, but are not limited to, the eBay Partner Network.
Anyone have an idea of how to repair Antenna Motor Assembly?
Hello Folks!
I'm speculating I'll have to replace the antenna motor , but hoping someone might have already learned how to repair it?
I fixed the servo motors by adjusting the shim on the corkscrew gear that I read on this forum, so I'm wondering if anyone found the common break point and fix for these antenna motors? I'm thinking its corrosion from water and maybe fixed with sanding and grease? Hopefully, it won't require any soldering solutions (since I don't yet have a soldering iron).
I'll report anything I see....I'm going in!!!
Need more info. Does the motor run, can you hear it running when you turn on/off the radio. Typically what has happened is that the aerial extend/retrieve cable has snapped inside the motor housing.
Hi ricco750! Thanks for replying. No there's no motor sound. And yes the antenna cable broke but it broke at least at one visible location which is at the exterior silver nut. The mast is snapped there too.
OK. Well, it's time to take things apart, and for sure there is some of that plastic cable inside the motor. You need to first pull the motor out. Undo the mast nut, and pull the rest of the antenna out. Then start with the interior right rear quarter panel trim so that you can get to the motor. I overhauled mine sitting on the back floor with the thick black cable still attached to the motor. Open the motor up and pull out the sheared cable, clean and relube the gears with lithium grease, reassemble, reattach to get a good ground, and turn on the radio to see if you get any motor noise. If so, all you need is a new antenna (OEM only). If the motor still does not run, you need a new unit (OEM only). I rebuilt mine a couple of years ago, and it ran better than it ever had, I got it in '09. BTW, I assume you've checked for a blown fuse.
Hi ricco750! Hey thanks again! Yup, fuses are OK. And I do get a motor noise, but it seems to only last a short while, not long enough to extend an antenna fully, I'd think. (When I turn the radio on, I always had the volume up -so I never heard it.) I took the rear quarter panel out and looked at the motor assembly - no wires were in it, (I guess I must have pulled it out years ago).
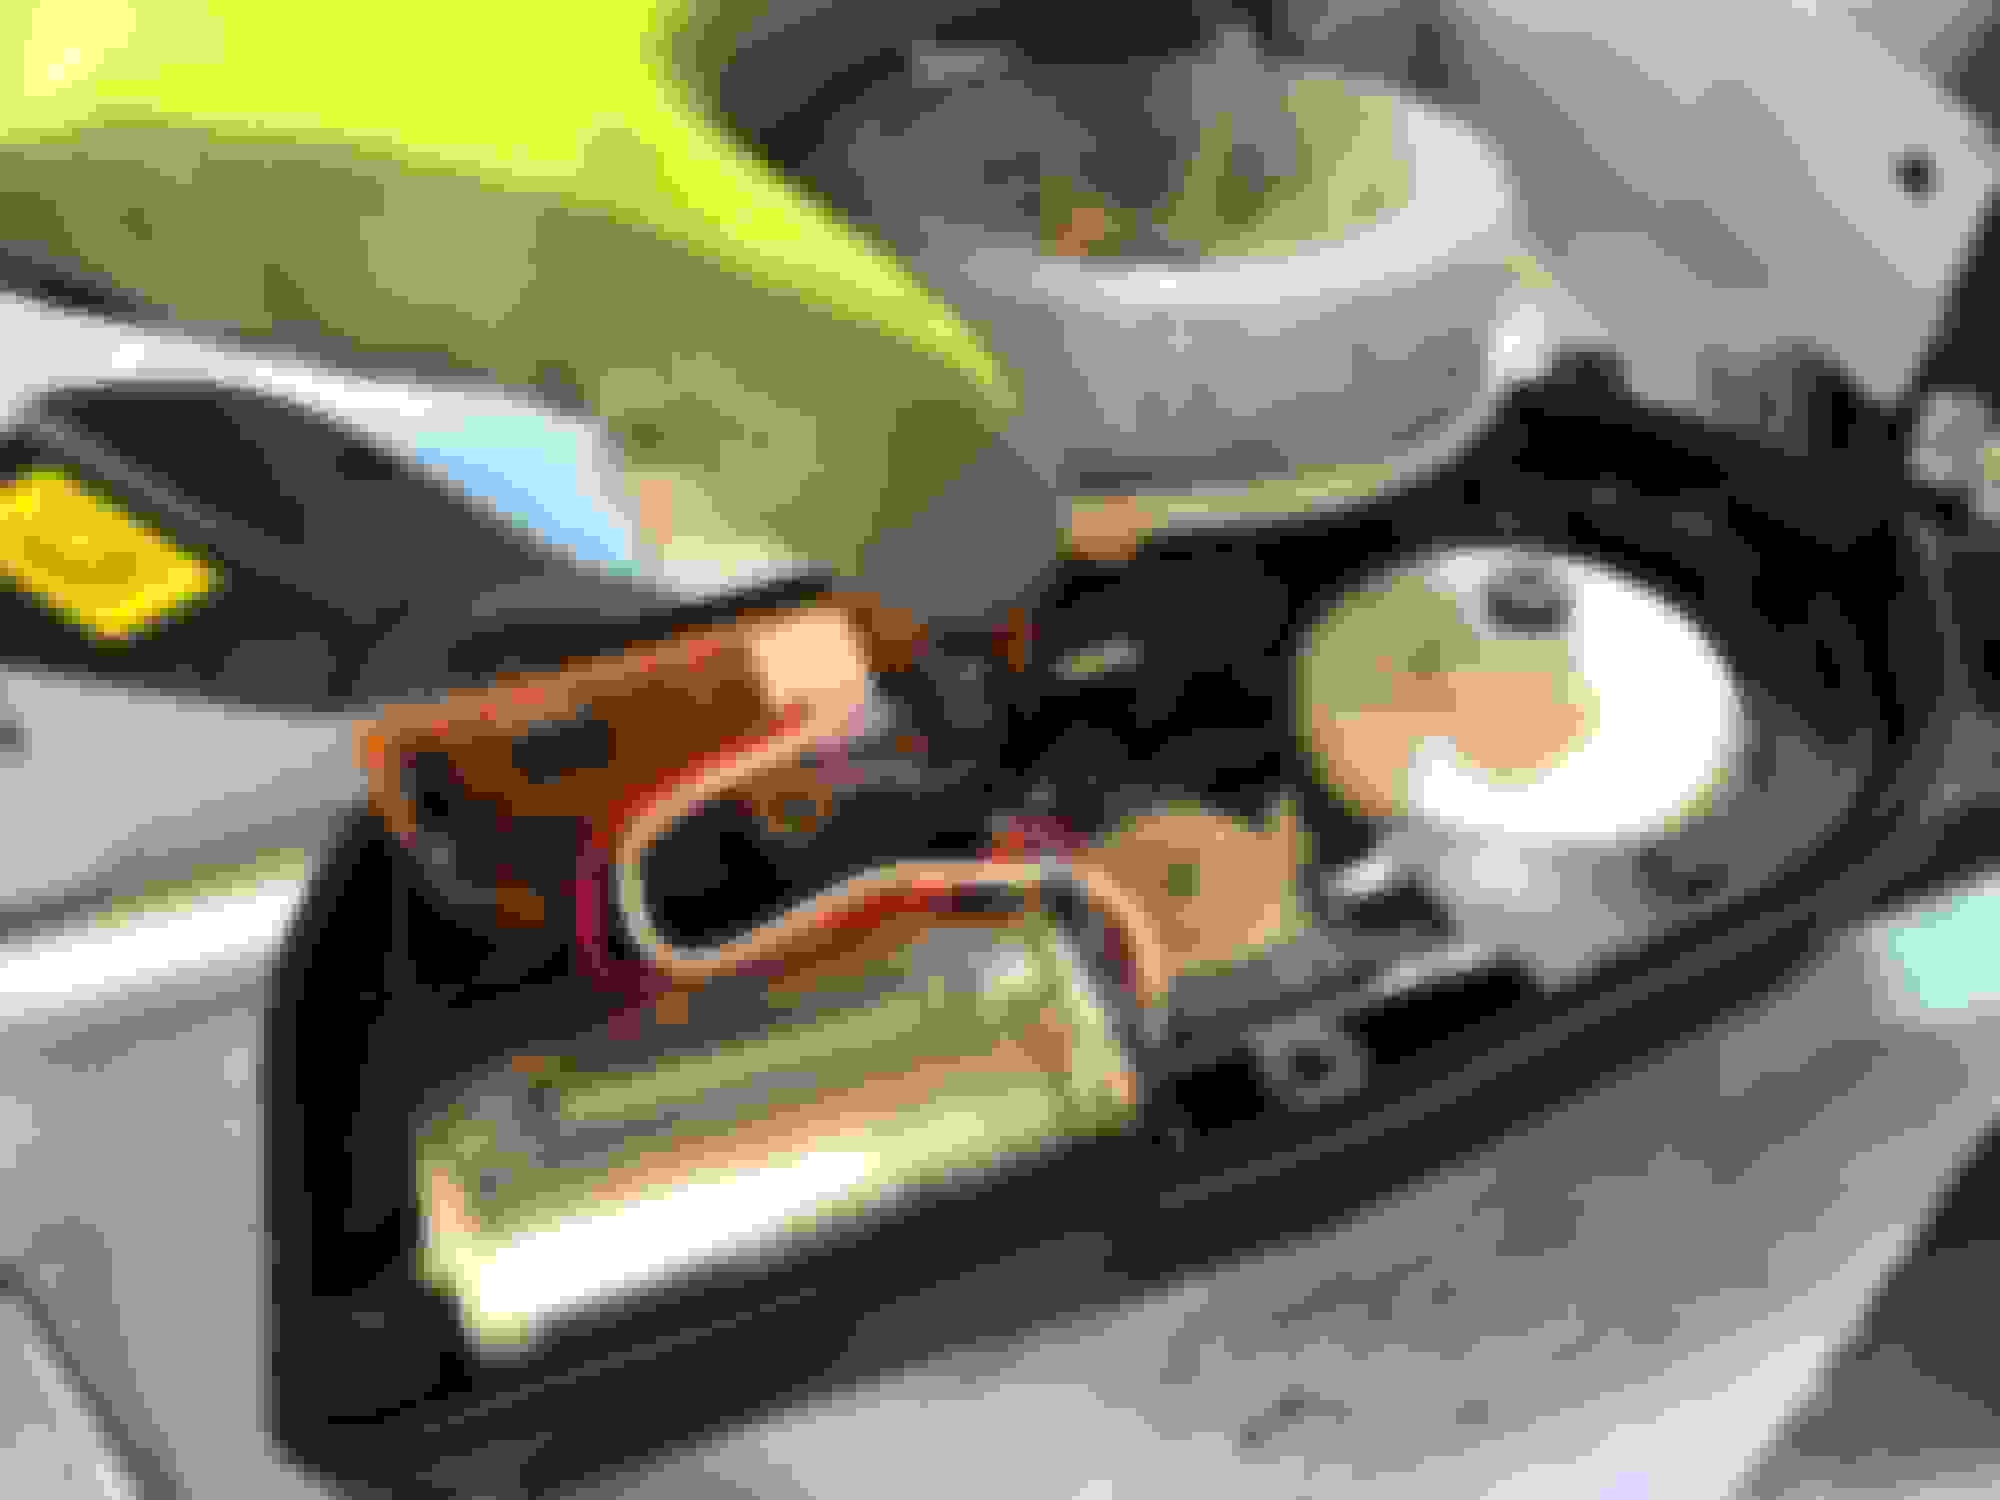
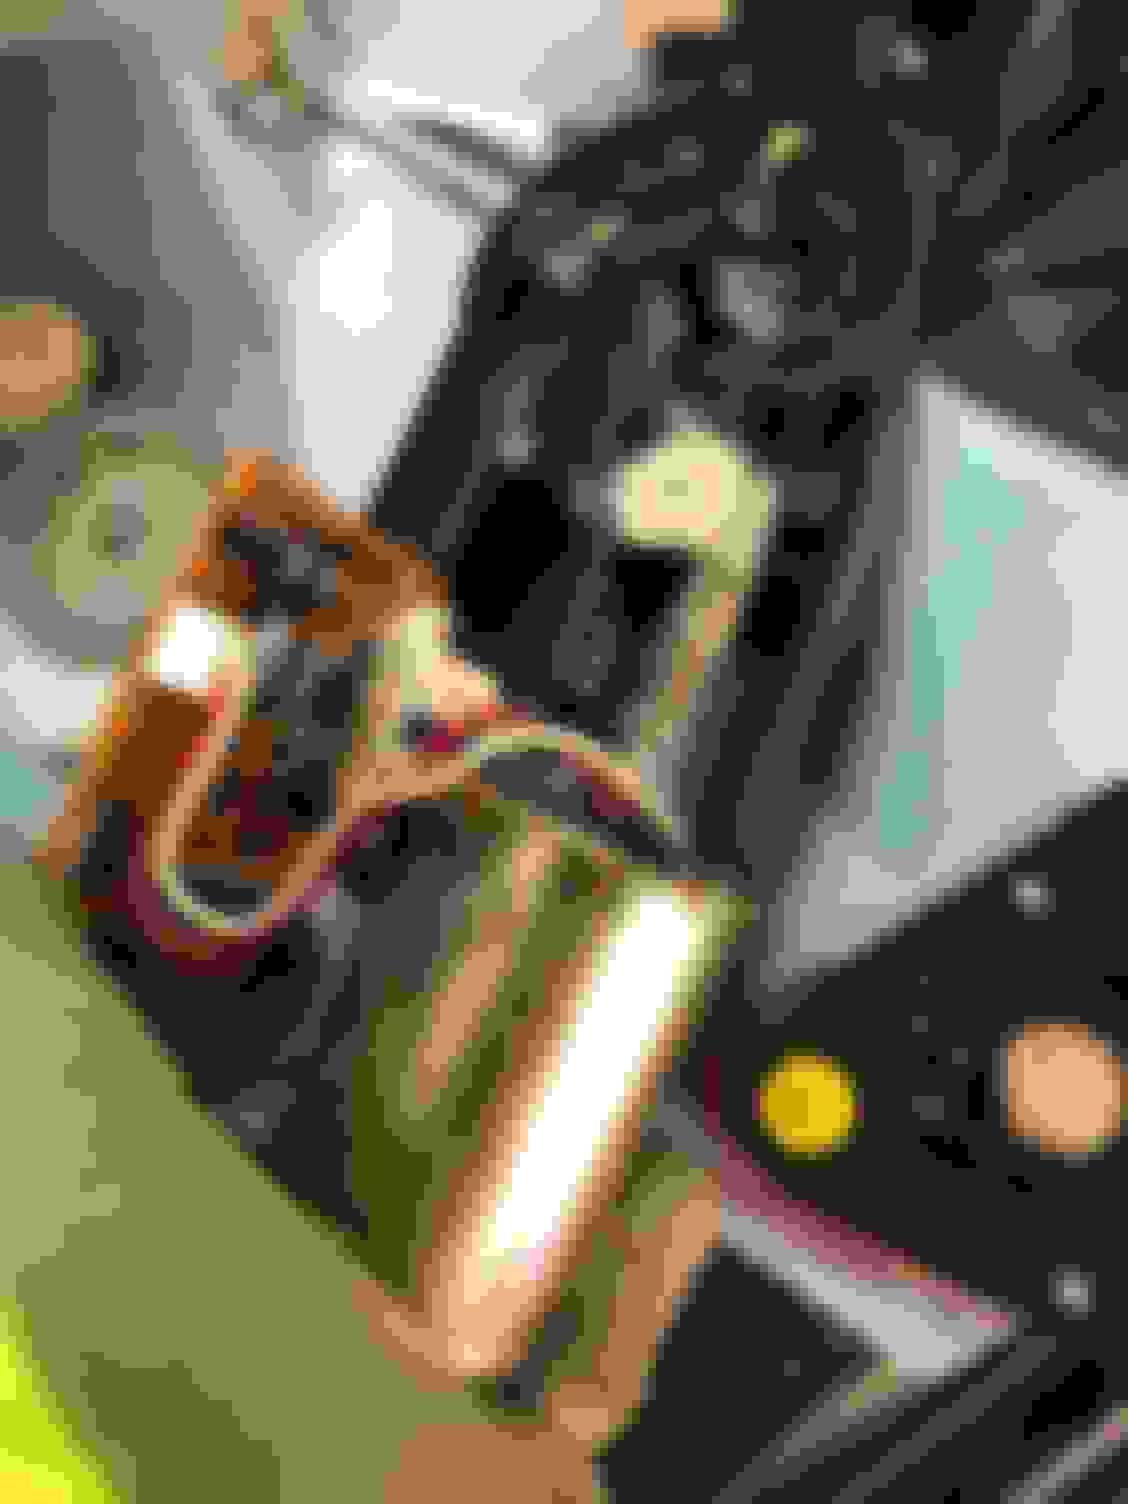
The motor assembly looked pretty clean and it did turn the gears when the radio was turned on and off, but again it turned for just a few seconds. Perhaps that's normal without any cable. I ordered the antenna. I put everything back together. I hope when the antenna arrives in a few days, that I can just feed the cable down from the exterior and that will work! Crossing fingers. Otherwise, I'll have to go back in the rear quarter panel . I'll attach photos shortly, just FYI only. I'll post my results once I get the antenna. Thank you, ricco750 Rear quarter panel open with antenna assembly hanging from connector, drain plug also attached and antenna jack unplugged, mounting nuts removed of course. Same as previous photo with close-up of antenna assembly. Fetching broken mast antenna with angled tip pick. Open antenna assembly and removing cable housing from top of large gear set. Removing larger gear set with small pick. Dirty grease on upper larger gear only. Looking at removed motor and circuit board- looks ok to me, but I don't know!
Last edited by BeeKind; 08-11-20 at 09:55 PM.
Reason: Add photos
Nice Pics! I should have done that when I fixed mine, but was too lazy. Anyway, it appears to be a design feature that the motor only runs a few seconds even if no antenna is attached, probably a fire prevention feature. But it appears you're almost done, and you'll find it an easy process to load the antenna tail, just remembering the direction the take-up reel rotates and how it engages the plastic teeth on the tail. I also put a liberal amount of silicone spray on the new antenna and cycled it by hand several times. I put some Meguires "Back to Black" restorer on the plastic fitting that the antenna nut screws down on, made it look brand new.
Nice Pics! I should have done that when I fixed mine, but was too lazy. Anyway, it appears to be a design feature that the motor only runs a few seconds even if no antenna is attached, probably a fire prevention feature. But it appears you're almost done, and you'll find it an easy process to load the antenna tail, just remembering the direction the take-up reel rotates and how it engages the plastic teeth on the tail. I also put a liberal amount of silicone spray on the new antenna and cycled it by hand several times. I put some Meguires "Back to Black" restorer on the plastic fitting that the antenna nut screws down on, made it look brand new.
Hi ricco750, I think the teeth will face forward. We'll see! I wondered what would be a good lubricant for the antenna mast! I think I'll get the "back to black" restorer, too! I'll use it on similar parts of the car. Thanks!
I think my circuit board is the culprit!
I installed my new antenna mast with lots of cable coaxing. The motor only spins for a few seconds to wind the cable down into and out of the assembly. Mast only move up and down a few inches.
After I thoroughly cleaned and greased the assembly (gears, housing, and tube), I tested both the mechanical and electrical operations (including motor connector and wire harness), from service manual -see attached photos (video too large). The motor spins easily but stops after 1 or 2 seconds. So, now I'm thinking there's a bad part in the circuit board, like a resistor or something, because it times out too soon. I read some where it's suppose to go for about 6 seconds -just long enough for the expected length of the cable to go up and down.
I can't find anymore info about this circuit board, but I bet its a simple fix with the right electronic parts swap ...using a soldering iron, (which I now have an iron to replace two window switches).
The only label on the circuit board is "M12 Timer3". Would anyone have any ideas or leads where I can search further for a solution?
A new antenna assembly is about $200, although I hate to give up just yet! Circuit Board marking "M12 Timer3" Where can I get a replacement or more info about common faults? This is the test instruction I used from service manual. Initial test setup from instruction: black ground on pin 6 and simultaneously power to pins 2,3,4 and 5!
Red lead clipped to back of connector on pins 2 and 5 only. Still need to attach pins 3 and 4, see next photo. Same as previous photo but added pins 3 and 4 by using power probe lead and attaching red alligator clip to it that is connected to pins 2 and 5, simultaneously! I bet there's an easier way or tool to do this. Applied power results in spinning motor for a second or two (you might see it spinning by the blurred worm gear)
Hey BK, did you ever solve your antenna motor problem? I never would have gone as far as you did, I simply would have chucked down the $200 for a new motor assembly, so you're ahead of me
Depending on level of interest, you can swap out the circuit board with one from a salvage yard.
I would give the board and components a through look-over. Anything overheated, breaks in the board (very unlikely). Swollen di-electric caps, burn out diodes etc.
Personally I think the likelihood of electronics going bad are low. I would have suspected motor drive and the cable system lot more. There are no relays here [electromechanical] items fail lot more frequently.
So if I was in hurry to put things back, just purchase the whole motor-mast assembly from salvage yard. The down side is, you would not be able to predict the life, but maybe you can swap components.
 08-09-20, 02:36 PM

 , but hoping someone might have already learned how to repair it?
 , so I'm wondering if anyone found the common break point and fix for these antenna motors? I'm thinking its corrosion from water and maybe fixed with sanding and grease
") ? Hopefully, it won't require any soldering solutions (since I don't yet have a soldering iron).
? Hopefully, it won't require any soldering solutions (since I don't yet have a soldering iron). Thanks In Advance Er'body!


 I took the rear quarter panel out and looked at the motor assembly - no wires were in it, (I guess I must have pulled it out years ago).
 . I'll attach photos shortly, just FYI only. I'll post my results once I get the antenna. Thank you, ricco750


 I read some where it's suppose to go for about 6 seconds -just long enough for the expected length of the cable to go up and down.