When you click on links to various merchants on this site and make a purchase, this can result in this site earning a commission. Affiliate programs and affiliations include, but are not limited to, the eBay Partner Network.
Sure as shoot - alternator fuse blown. Can�t say if it was there from the start of this excapade and I overlooked it or if I blew during diagnostics. But it�s blown.
Pulled it. Calling Lexus tomorrow for a replacement.
I couldn�t find an RX300 1st gen specific write-up for removing that fuse. It wasn�t trivial. You have to separate the upperfrom the lower engine fuse box housing, and then use a flat-head screwdriver to push the plastic tabs that release the sub-section that has the alternator fuse from the rest of the lower fuse box housing. Then you get access to the bolts for the fuse wiring to remove the fuse.
I took pics, where could I post a fuller write-up if not this thread?
140 amp fuse part number: 90982-08286
Takes about 15-20 minutes.
Remove the battery completely.
You�ll need some toothpicks, three flat-head screwdrivers, a socket wrench and one phillips head screwdriver.
Remove both bolts holding the fuse box to the car. This is the bolt hole closer to the passenger cabin.. Second bolt hole towards the front of the car. Reach over the driver-side quarterpanel on the far side of the fuse box, toward the front of the car and where the lower and upper fuse boxes meet, and use a toothpick to pry open this clip at my fingertip Same thing by my thumb, reaching over drivers side quarterpanel but near the passenger cabin. This is the upper housing separated from the lower housing, as seen from the drivers side quarter panel towards the front of the car. There is another clip to deal with as seen betwwen the two housings at the upper left of the picture, in order to separate the housings. The wire cable run at the front side of the fuse box has a small plastic removable shield.
Shield removed. This will give you more room to manuever the main cabeling. Be gentle.
Alternator fuse has been removed already in this pic. Two fingers and my thumb showing the three tabs where to put flat-head scredrivers to remove sub-assmebly that has alternator fuse from upper fuse box housing.
The alternator fuse is already removed in this pic. Put a flat-head screw driver in the clip slot at the tip of my finger on the upper right of the picture. Do the same for the point of my finger in the lower left. Put another screwdriver where my finger is on the left.
Using one screwdriver at a time, supress a tab while gently pushing the sub-assembly apart from the upper housing. Took me more than one rotation of suppressing and pushing, until the sub-assembly came free. Upper fuse box housing with sub-assembly removed. Alternator fuse connection, same on the other side.
Feel free to start a new thread or add on to existing alternator/fuse thread.
We have a DIY sticky .. which is an index to the DIY. Pleaser do not post the DIY there. Once you have the DIY, please add a link to your fresh post in the DIY index.
Salim
Dang, did the how-to here. Well now I know how to make an edited post now, so I�ll re-post.
Thanks for your effort! How on earth did you ever find the fuse in the first place? Any idea as to why it blew?
Was starting to think about which fuses to pull to chase down what I thought was a voltage leak. When I opened the engine fuse box, I naturally went to the alternator fuse since that was my going suspicion as far as a mechanical/part issue. But it looks like the blown alt fuse was a casualty of another cause, probably me, because today I replaced it and it only restored partial functionality.
I still can�t unroll any other windows from the driver�s master side switches except the driver window, although each window switch operates it�s own window. Several dash warning lights don�t light, and the engine coolant temp indicator in the dash doesn�t move on warmup. The ECT Snow button doesn�t light the dash, and the cabin lights don�t light.
These are basically the same symptoms as the first day of these issues appearing. It�s likely I fried the alt fuse during diagnosis.
Next step for me is back to square one of diagnosis. After replacing fuse I am get 14 volts any way I check. Battery without car running is at 12.45 volts. Will check in the morning to see if there is a voltage drop. Then check each fuse again. Then go from there...
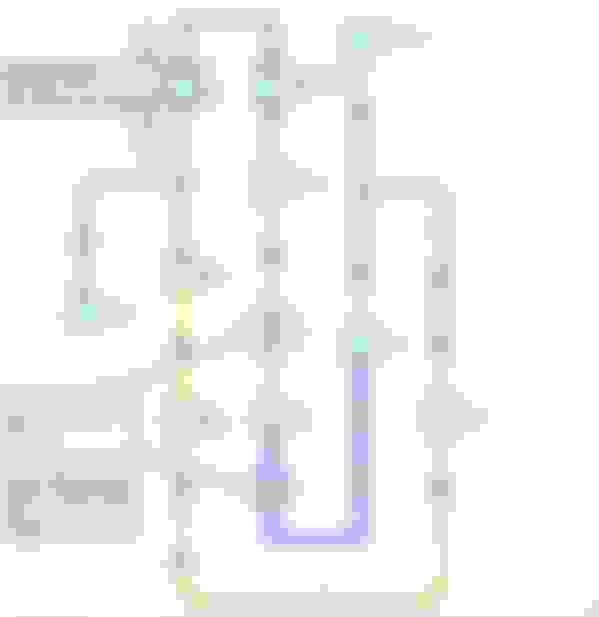
It appears the multiplex data communication wire runs from the Driver Door Master Switch/ECU thru the IC1 junction(in your pic) to the Combination Meter ECU(dash cluster) and then to Instrument Control Panel ECU, etc. Other Body ECU wires may also be running thru here but the data wire connecting the ECU's together is critical for data integrity and communication and can cause multiple system/ecu failure.
PS- You saved yourself a fortune diagnosing this yourself since intermittent electrical problems are the most difficult kind to track down. Multiple trips to the repair shop at $100+ per hour is what happens to most people.
Here is the path connecting the ECU's to the Body ECU and special attention to junction IC1.
Location of the junction IC1 plug.
Hi Margate - Can I ask where you get the wiring diagrams? Is there a reuptable source where I can buy access to these and other types, if not a whole vehicle?
I still can�t unroll any other windows from the driver�s master side switches except the driver window, although each window switch operates it�s own window. .
Nice job on the walkthru on the Alt fuse replacement.
Ok dumb question but on the RX330 a window initialization is required when unhooking the battery or the windows won't operate from driver's switches and this is normal until the procedure is done.
Not sure if the RX300 requires this but if it does that will make the rest easier to figure out and eliminate some problems from the equation.
PS- what year is your car and I will see if I have any info on it.
I don�t think the 300�s have that or at peast it�s never been a problem when unhooking battery before.
I�ve got an 02 RX300.
221K miles and God willing she�s good for at least another 100K.
There is the fuse box directly under the front pillar. Water intrusion can cause all the instrument cluster to act up.
Note position of each fuse, pull them out. Get a hair dryer and use low heat to dry out the box, Wipe each fuse terminal and apply electrical grease and re-seat the fuses after giving enough time to air dry.
Salim
Is this the fusebox behind the coin drawer on the driver�s side, or is there another?
If the interior lights still don't work there is a part of the lighting circuit that does not involve the Body ECU system(such as dash cluster info) to keep things more simple.
However, part of the circuit does go to the dash cluster lights using Dome Fuse, J3/J4 harness junction, and Junction Block #5. (Should have power at Dome Fuse first).
The Body wiring is a spaghetti mess and to add more confusion is all the modules communicating too, so trying to find a common vector between symptoms to start a diagnosis can be difficult.
Here the power runs from the Dome Fuse and then the power splits thru the J3-J4 harness junction and then thru Junction Block #5 to the interior lights shown below.
This should be an easy circuit to see what's going on.
Under discussion is the fuse box behind the coin holder by the drivers left knee. Drawings are of the same area.
But i thought the problem has been traced to a flaky connector.
Salim
I have the same symptoms as OldSurfer did and followed his steps as well. The female-fenale junction that he found corrosion was perfectly clean for me, same for all my plugs in that area behind the molding in the drivers foot well.
Part of me has to believe that since my symptoms are identical to OldSurfer, the most likely culprit is still some aspect of the wiring that runs through that female-female coupling.
If the interior lights still don't work there is a part of the lighting circuit that does not involve the Body ECU system(such as dash cluster info) to keep things more simple.
However, part of the circuit does go to the dash cluster lights using Dome Fuse, J3/J4 harness junction, and Junction Block #5. (Should have power at Dome Fuse first).
The Body wiring is a spaghetti mess and to add more confusion is all the modules communicating too, so trying to find a common vector between symptoms to start a diagnosis can be difficult.
Here the power runs from the Dome Fuse and then the power splits thru the J3-J4 harness junction and then thru Junction Block #5 to the interior lights shown below.
This should be an easy circuit to see what's going on.
The dash cluster lights share a similar path.
Junction Block #5
Good Luck!
Thanks Margate. I got myself a light circuit tester. Will try to make sense of the wiring / diagrams and start poking around.
Moving up from the blue connector in my first photo, there is a female to female union in the image below. It's not marked but I circled it. It's also open in each end to possible intrusion, I found green crusties joining two of the terminals. The RX is operating again fine, but I've been down a couple rabbit holes, so am just waiting to see.
Thanks all.
the pins inside, corrosion had grown betw 2 of them
We will see. Thanks
OldSurfer - Do you remember which pins or pin slots were corroded together? Was it on the upper or lower part of the connection, and was it on the male side or female side?

 02-28-21, 01:24 PM