When you click on links to various merchants on this site and make a purchase, this can result in this site earning a commission. Affiliate programs and affiliations include, but are not limited to, the eBay Partner Network.
Hybrid TechnologyUnique topics related to the 2004 -2009 RX400H model hybrid drivetrain and other features/options found only on the RX400H. Please use the main forum for discussion about shared components with other second generation RX models.
I'm going to edit this post as I find time to add details. I picked a RX400h up from a local shop a few weeks ago ( customer decided it wasn't worth repairing). My intention is to fix it, then beat it into the ground further over the next few years. Hopefully it lasts that long
It was listed as having:
1. a hybrid battery code
2. Catalytic converter codes
3. a healthy oil leak from the engine
4. Salvage title minor rear fender damage with broken tail light lens.
It did run and drive when purchasing it. The hybrid code when cleared would reappear almost immediately. My test drive consisted of doing 30 foot left hand circles in a parking lot. After a little negotiating I took a gamble on it ( price was right) Truth be told purchasing a car from a shop that specializes in doing repairs didn't seem like the wisest decision.
Hybrid battery repair: I will likely have to repair this again in the future. It is my goal to save some time by having all of this info in one spot. This is not a guide, don't kill yourself!
I started by using the dr prius app and techstream. After about 10 minutes it became clear one or 2 of the 30 hybrid modules was bad. The voltage of that one module would drop a few volts below the other modules simply by putting the car into drive. I tried to kinda deep cycle the hybrid battery by leaving the car in neutral then recharging while in drive. It didn't help so I started gaining access to the hybrid battery. I'm not going into detail on the process but these are the links that helped me. ( see post 2 ). Safety precautions have been beaten to death in other threads so I'm not going to elaborate on those. As a general rule I consider all wires hot at all times. I don't consider the battery packs safe to handle without gloves until all the buss bars are off.
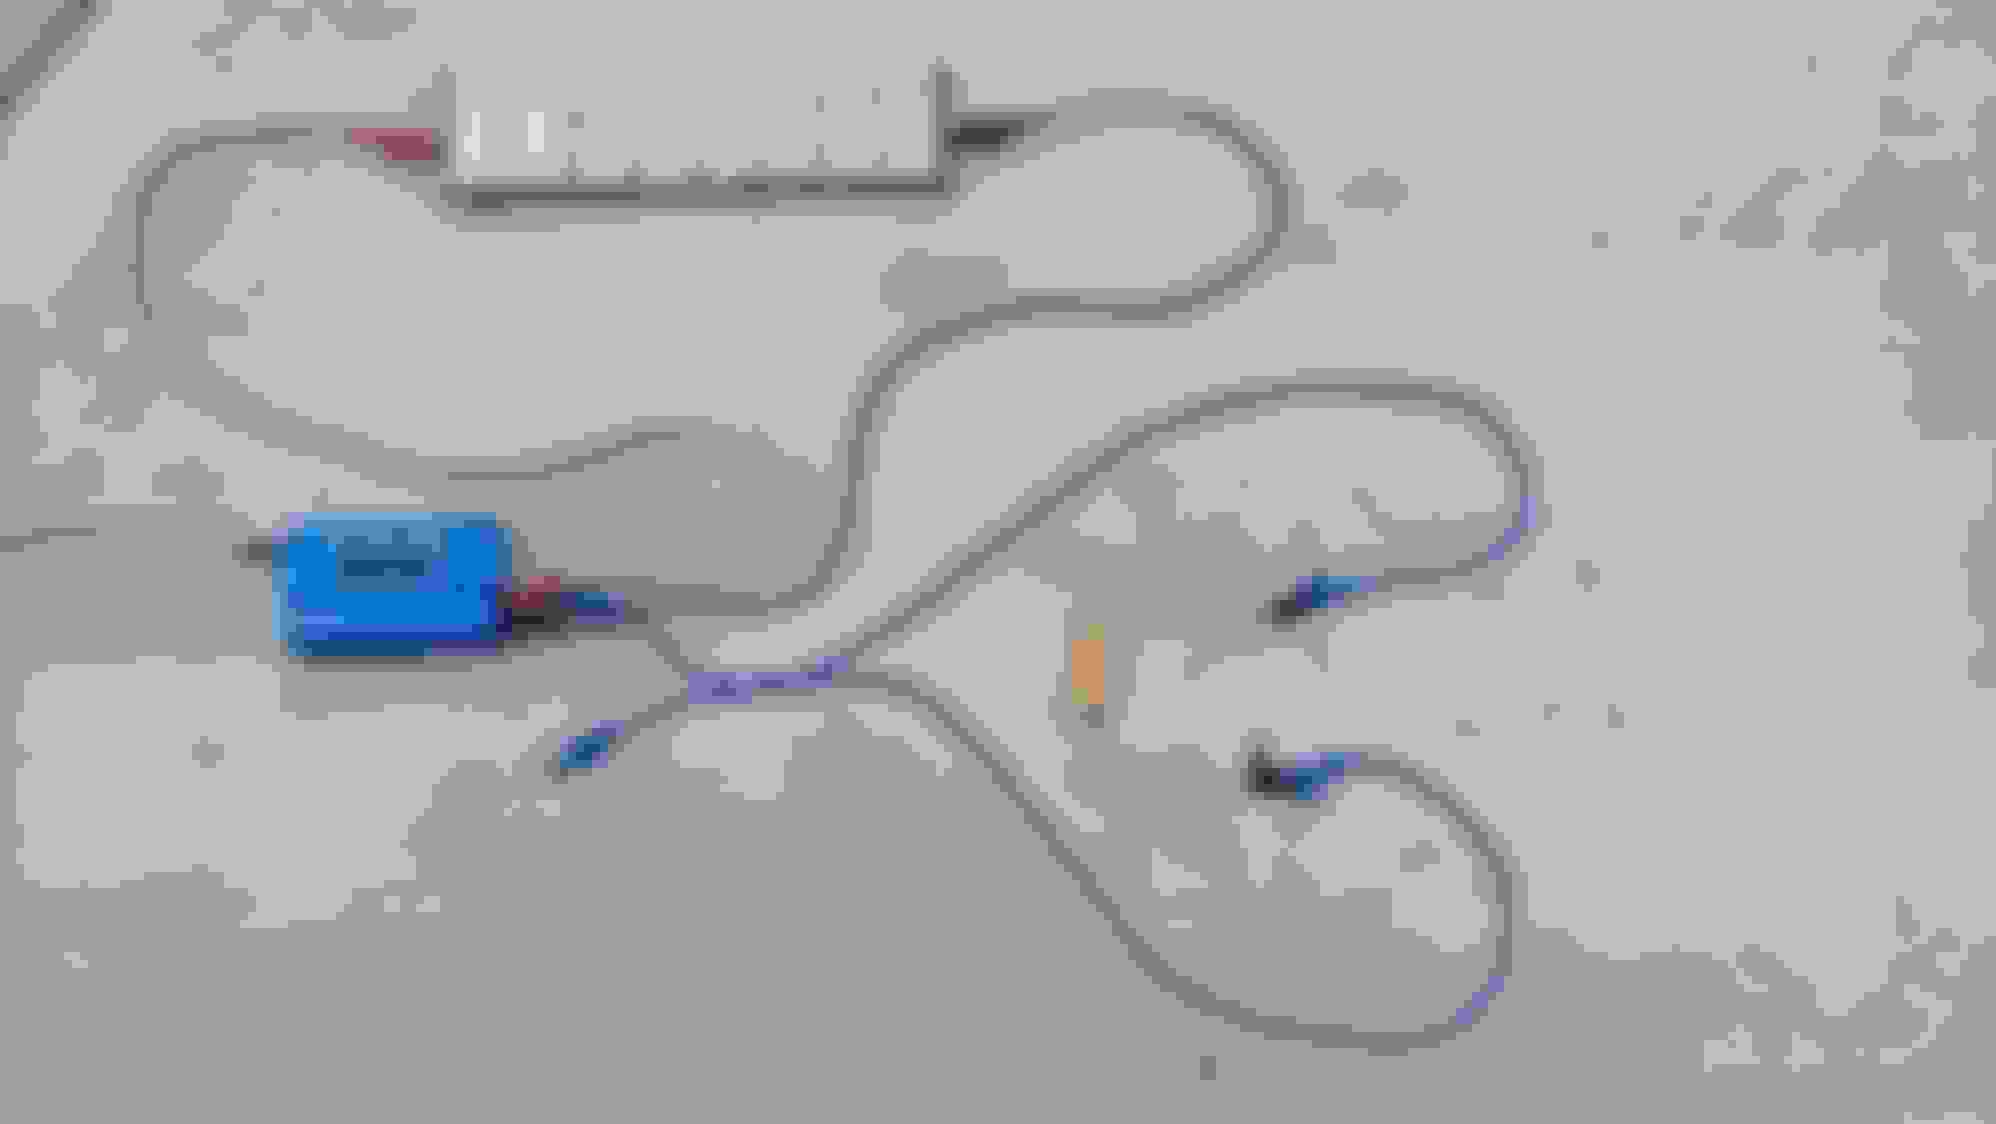
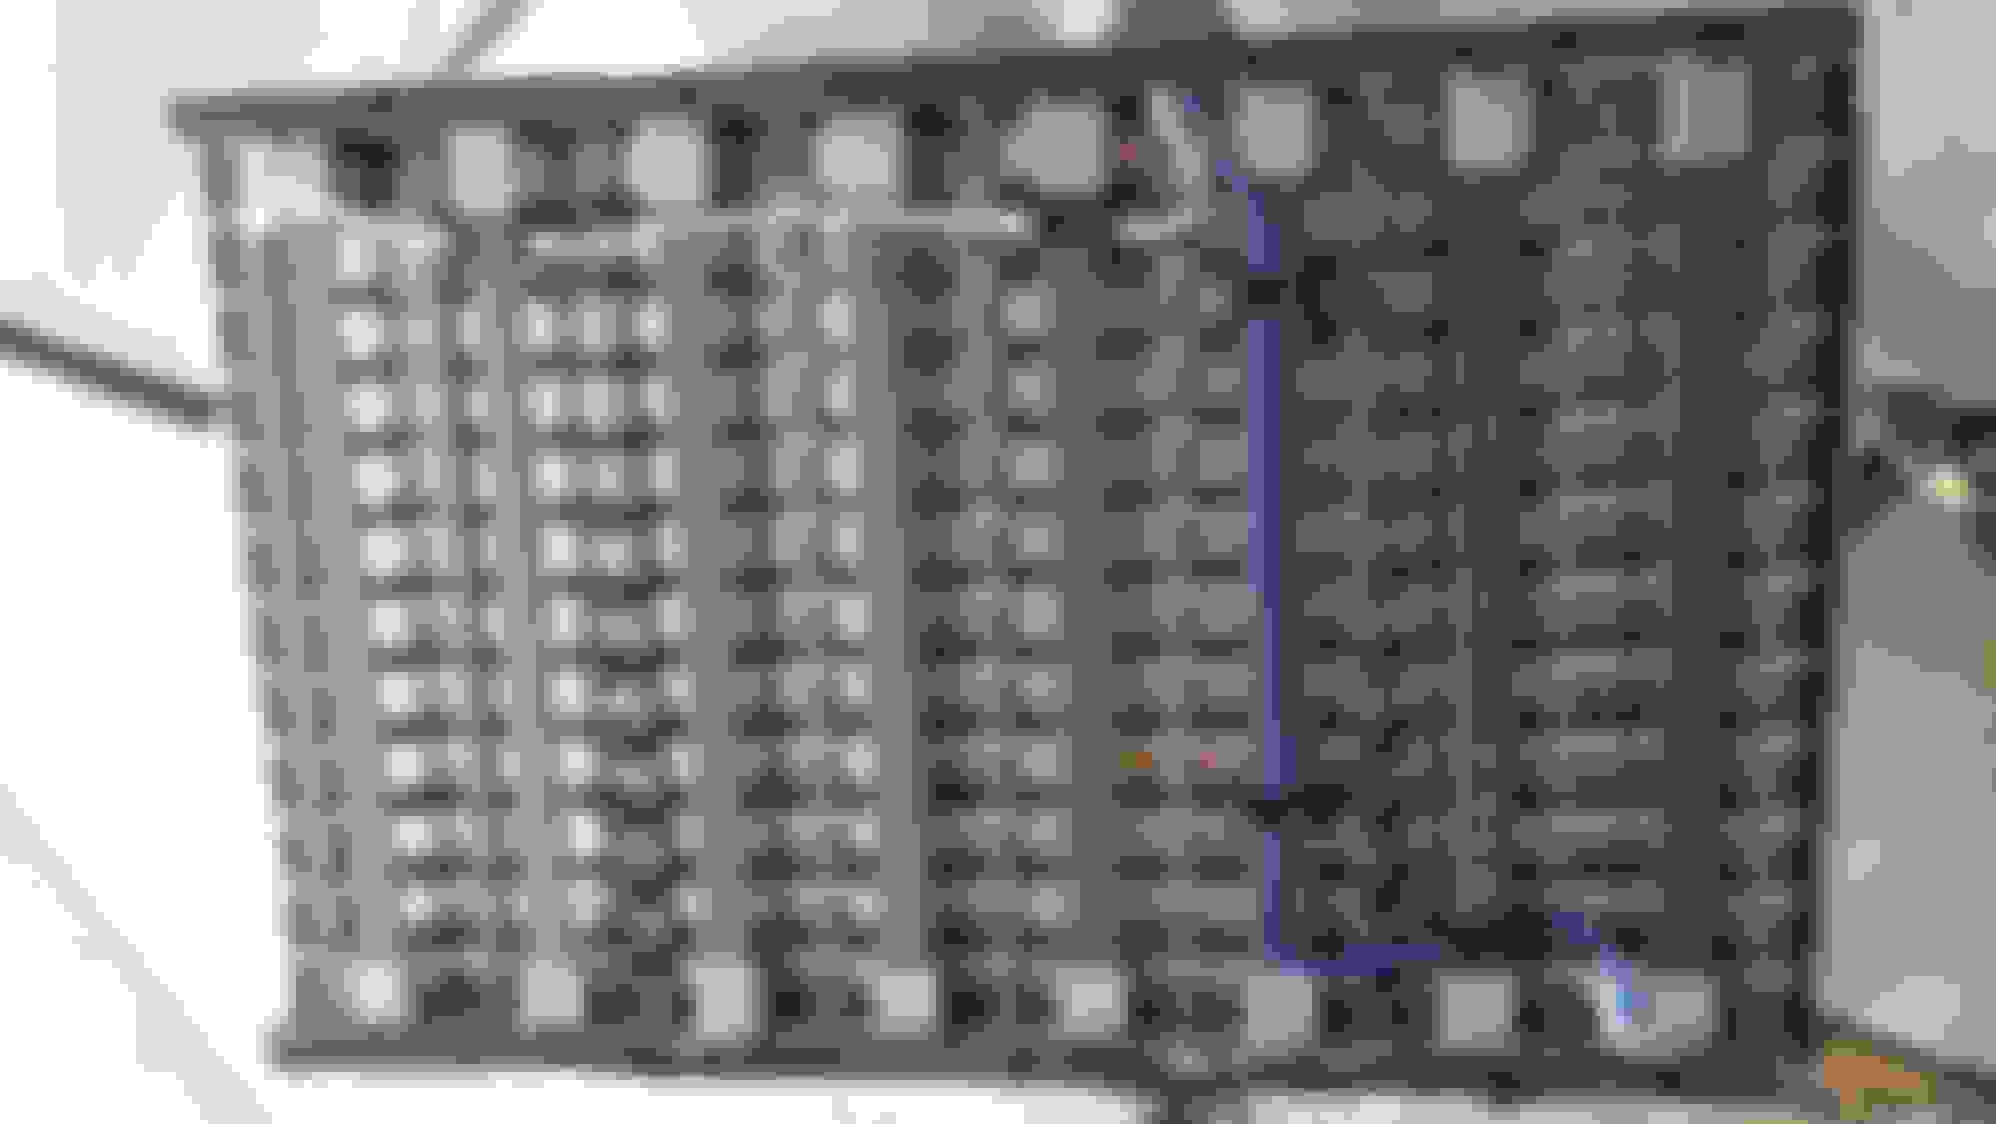
I didn't see a need to remove the entire pack as a whole. The pack consists of 3 sections all under the rear seats. The metal cover is held down by a bunch of bolts and nuts. It weighs practically nothing ( couple pounds). I lifted it off and set it aside. Once it's off the 3 sections of the pack are visible. The left and right section each consist of 12 modules. The center section is 6 modules. The 12 section modules each weigh about 50 lbs. Heavy but not terrible. Don't do as the video shows and tear all the plastic covers off the 3 sections. If you look closely when prying the plastic off you will see small clips. With a small pic they are easy to unclip. If you rip and tear as in the video the clips will break. ( He doesn't reuse the pack in the video). There are a number of electrical plugs for each battery section ( temperature sensors and voltage sensors). Using a marker I labeled each plug. After disconnecting the electrical connectors I was able to lift the sections out. I also insulated any exposed wires left in the car.
After marking and disconnecting all the buss bars I labeled each module 1-12 on both sides. It's important to point out there are TWO different modules the packs are constructed of. The modules are not simply flipped around to make positive on one side and negative on another. One type has a vent on the negative side. The other type has a vent on the positive side. When ordering a replacement module you need to specify which one you need positive vent or negative vent.
I was able to identify the bad module by putting a small load on it. I compared the voltage drop under load to the other modules. It was easy to locate the bad one. I purchased a used module for $50 on ebay. The capacity of the used ebay module I tested at around 4500mah.
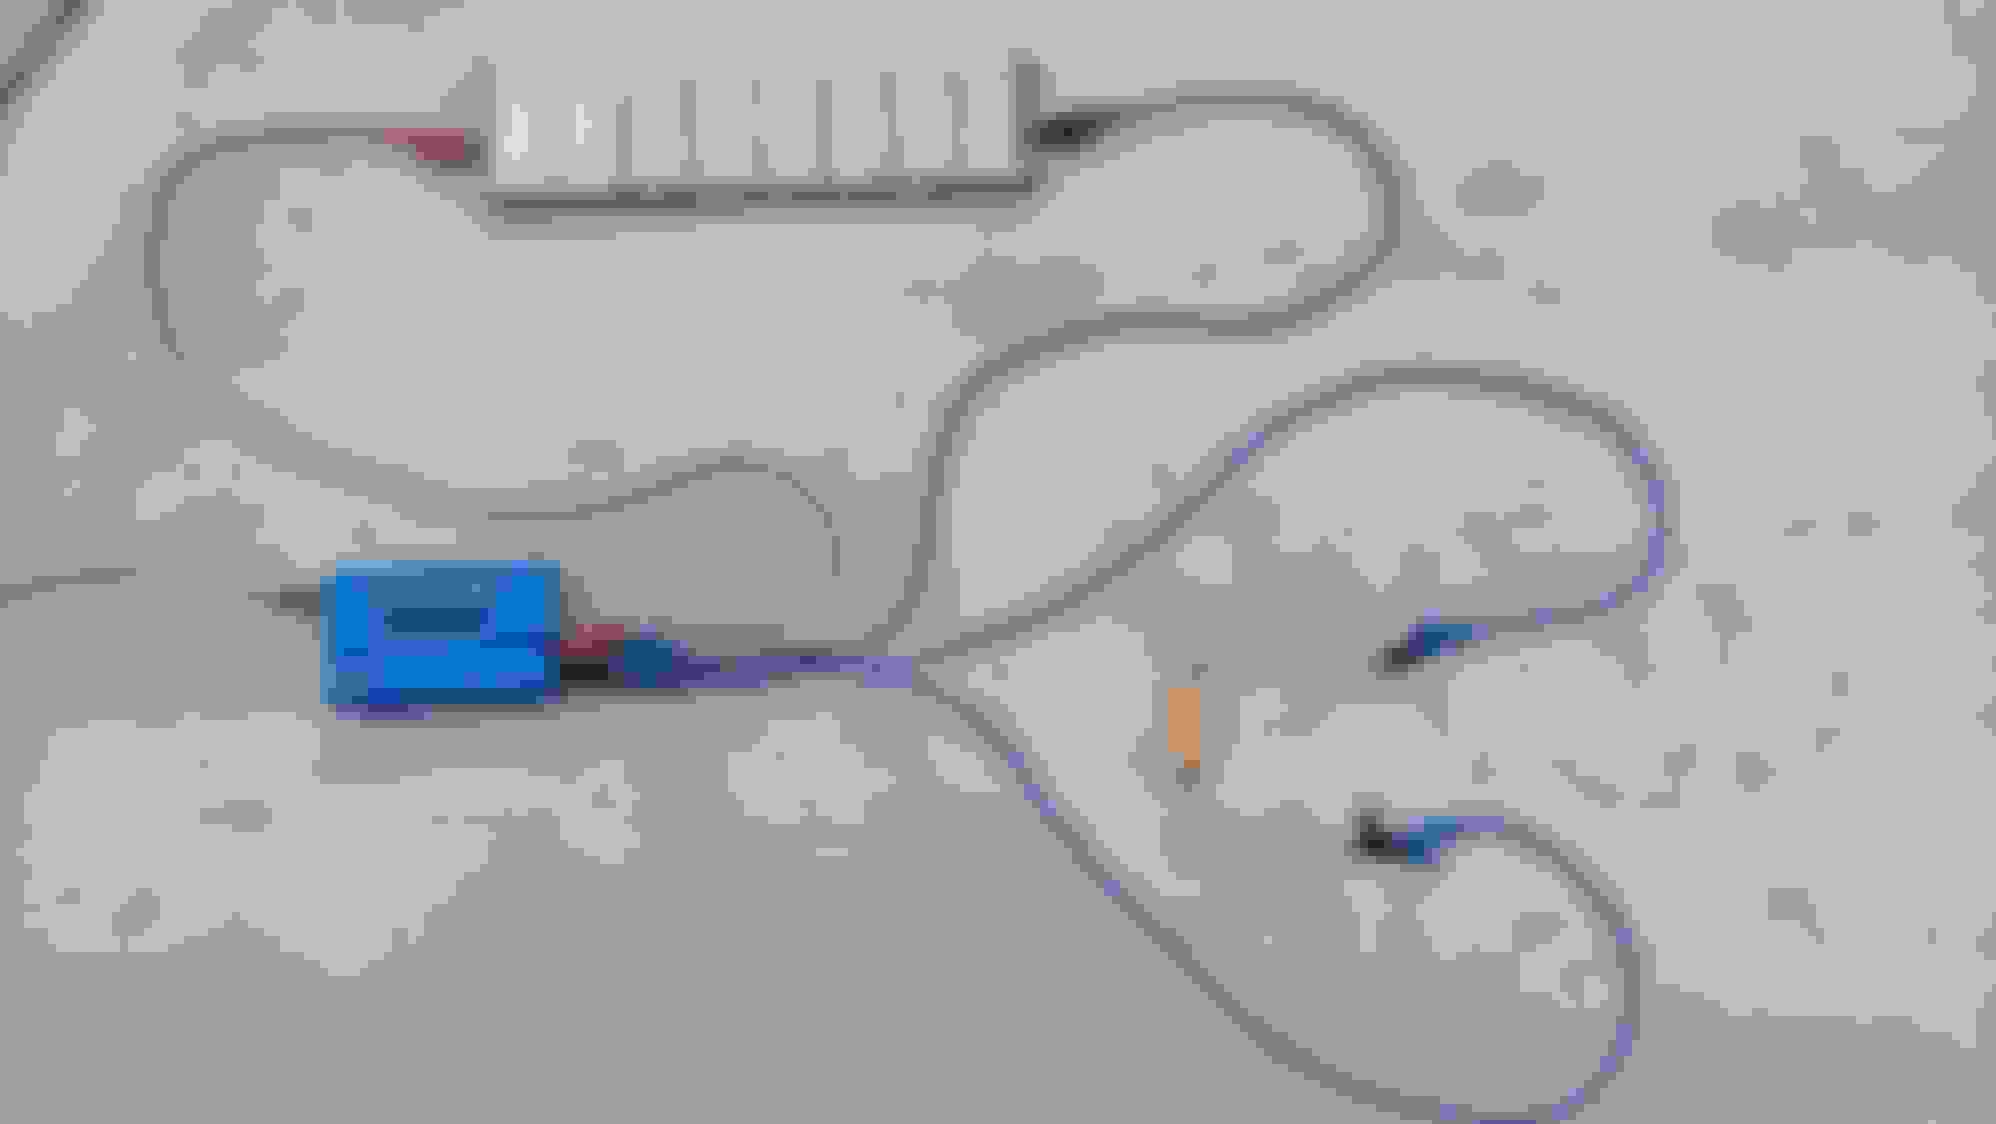
Using 6 of these chargers ( $20 each on amazon ). I cycled all of the modules over the course of a week. The discharge is limited to a max of 5watts per charger. To speed the discharge up from 12 hours to 2 hours I manually plugged in a 50 watt resistor during each discharge cycle. These leads while pricey made the process very easy. During the charge cycle I simply unplugged one of the 50 watt resistor leads where it plugged into the battery lead on the charger.
Most of my modules had a capacity around 4500mah. I think when new they have around 7500mah. There were around 6 modules that were considerably less at around 2500-3000mah. After cycling the individual modules I think some of the weaker ones did increase. I'm not going to post by how much simply because the chargers are wildly inaccurate. One of the weakest ones had a resting charged voltage difference of .5v After cycling it was only .15-.2v difference. ( when compared to the other modules)
Often times the chargers wouldn't stop charging on their own. I found peak detection of 2mv to be the most reliable. If I let a mostly charged module rest over night then in the morning if I attempted to charge the pack the peak detection feature seemed to work 90 percent of the time. Regardless I never charged them unattended. Whenever they approached a full charge I also monitored the modules temperature with an inferred thermometer. Typically on each charge I would shut off the charger around 11.5 volts if the voltage stopped increasing. Sometimes the peak detection wouldn't shut off until 11.8v. Other times peak detection shut off early at 11.3v. During the final charge before reassembling the pack I did my best to make sure each module was topped off. I did this by letting the modules rest charged but unhooked over night. Then peak charged them again in the morning. After letting the pack sit for a few hours the voltages of each module were very close. Generally within .01v. I had one module that was .2v off. If the .2v module had been in the same section as the bad module I would have replaced it. I didn't feel like spending the time drilling the rivets on a separate pack to replace another module that may last another year.
To add some stress our state won't let you transfer title until it passes emissions. A bad hybrid battery throws a cel which is an automatic emissions fail. I wasn't too concerned with the longevity of my battery repair. I simply wanted it to pass so I could title it. My hack attempt to repair the battery seems to have worked. I've managed to pass emissions and put over 100 miles on the car without any other codes. I took a couple screen shots. .1v difference is pretty darn good imo. While flooring it the voltage difference does increase a lot but still well under the threshold to throw a cel. I think 1.25v will cause a code but there is probably a time component involved in order to throw that code too.
Starting the disassembly.
This flap folds back.
I found some change!
The old crunchy cheerios , yummm.
I tucked the carpet up against the front seats. There is no need to remove it further. The metal battery cover is light but it will slice you up. It has plenty of sharp edges.
3 battery sections exposed.
The 3 fans have to be unbolted to remove the battery connections. I left the fans plugged in, just unbolted the 3 nuts holding each one down.
See the shoe lace strings.
The white and orange connectors get unplugged. I marked each one with a marker to be safe. I seem to remember them being different sizes so this might not matter.
Labeled both sides of each module 1-12.
This is my 25 year old charger. It has a 3 amp max discharge. I used to to measure a few modules to verify things were working as I cycled the packs. I wish I had 6 of these chargers! I only used this on a few modules to check capacity. No additional resistor was needed with this charger. During discharge cycle the capacity readout was fairly accurate.
Yeah, not the best location for this. I moved this hot mess outside a short while later.
I used marker on the buss bars to identify their location for reassembly. ( yellow mark)
This is what everything looked like when cycling them.
These are the 6 chargers I bought.
You cannot charge these modules as pictured. They MUST be clamped tightly in a pack. This is just a demo pic of how the circuit looks. This is during charge 50 watt resistor is unplugged ( blue wire)
You cannot charge these modules as pictured. They MUST be clamped tightly in a pack. This is just a demo pic of how the circuit looks. This is during discharge Resistor is plugged in ( blue wire). This is what's going on with the chargers on the glass table. The 50 watt gold resistors are a few dollars each. Their intended use is to stop led blinker flicker. I purchased the resistors, chargers, and leads from amazon.
Module replacement. In order to replace a module in a RX400h pack you must remove 16 steel rivets. I used a dremel tool with a metal cutting bit. I simply ground the top of the rivet off. This method takes 5 minutes. 1st rivet head is removed in this picture.
All rivet heads removed.
Each rivet shank is still stuck in the plate.
Grabbing the shank with pliers and pulling / twisting is the easiest way to remove them. You'll notice due to the shape of the metal bracket you cannot simply punch the shank out of the hole it has nowhere to go (when the pack is assembled).
Take note where each temperature sensor goes. I only removed one. I only pulled 4 modules out to access my bad module.
Modules 1,2,3, and bad 4.
This is the easy part.
A plastic tray goes between each module.
A strong set of clamps is required to squeeze everything into alignment.
These top rivets were fairly easy to pop. The 8 on the bottom of the pack had a plastic piece which didn't allow my rivet gun to fit flush.
I used this rivet gun from harbor freight.
These plastic half moons caused some issues when popping the rivets.
I modified the rivet gun by grinding this angle on the end. Then it was able to pop the rivets around the plastic half moons without any issues.
Both of these size rivets worked. The 1/4" long rivet was my preferred length even though it was a hair too long. The 1\8" rivet if not pushed close to the battery while popping will be too short. Both of these are available at home depot.
All reassembled.
Single module for size comparison.
Screen shot of the repaired pack. .62 voltage difference during charging.
Screen shot of the repaired pack. .1 voltage difference. During slight discharge. Next time I have a second person in the car I'll try to get some screen shots during max acceleration and deceleration.
Oil leak repair...
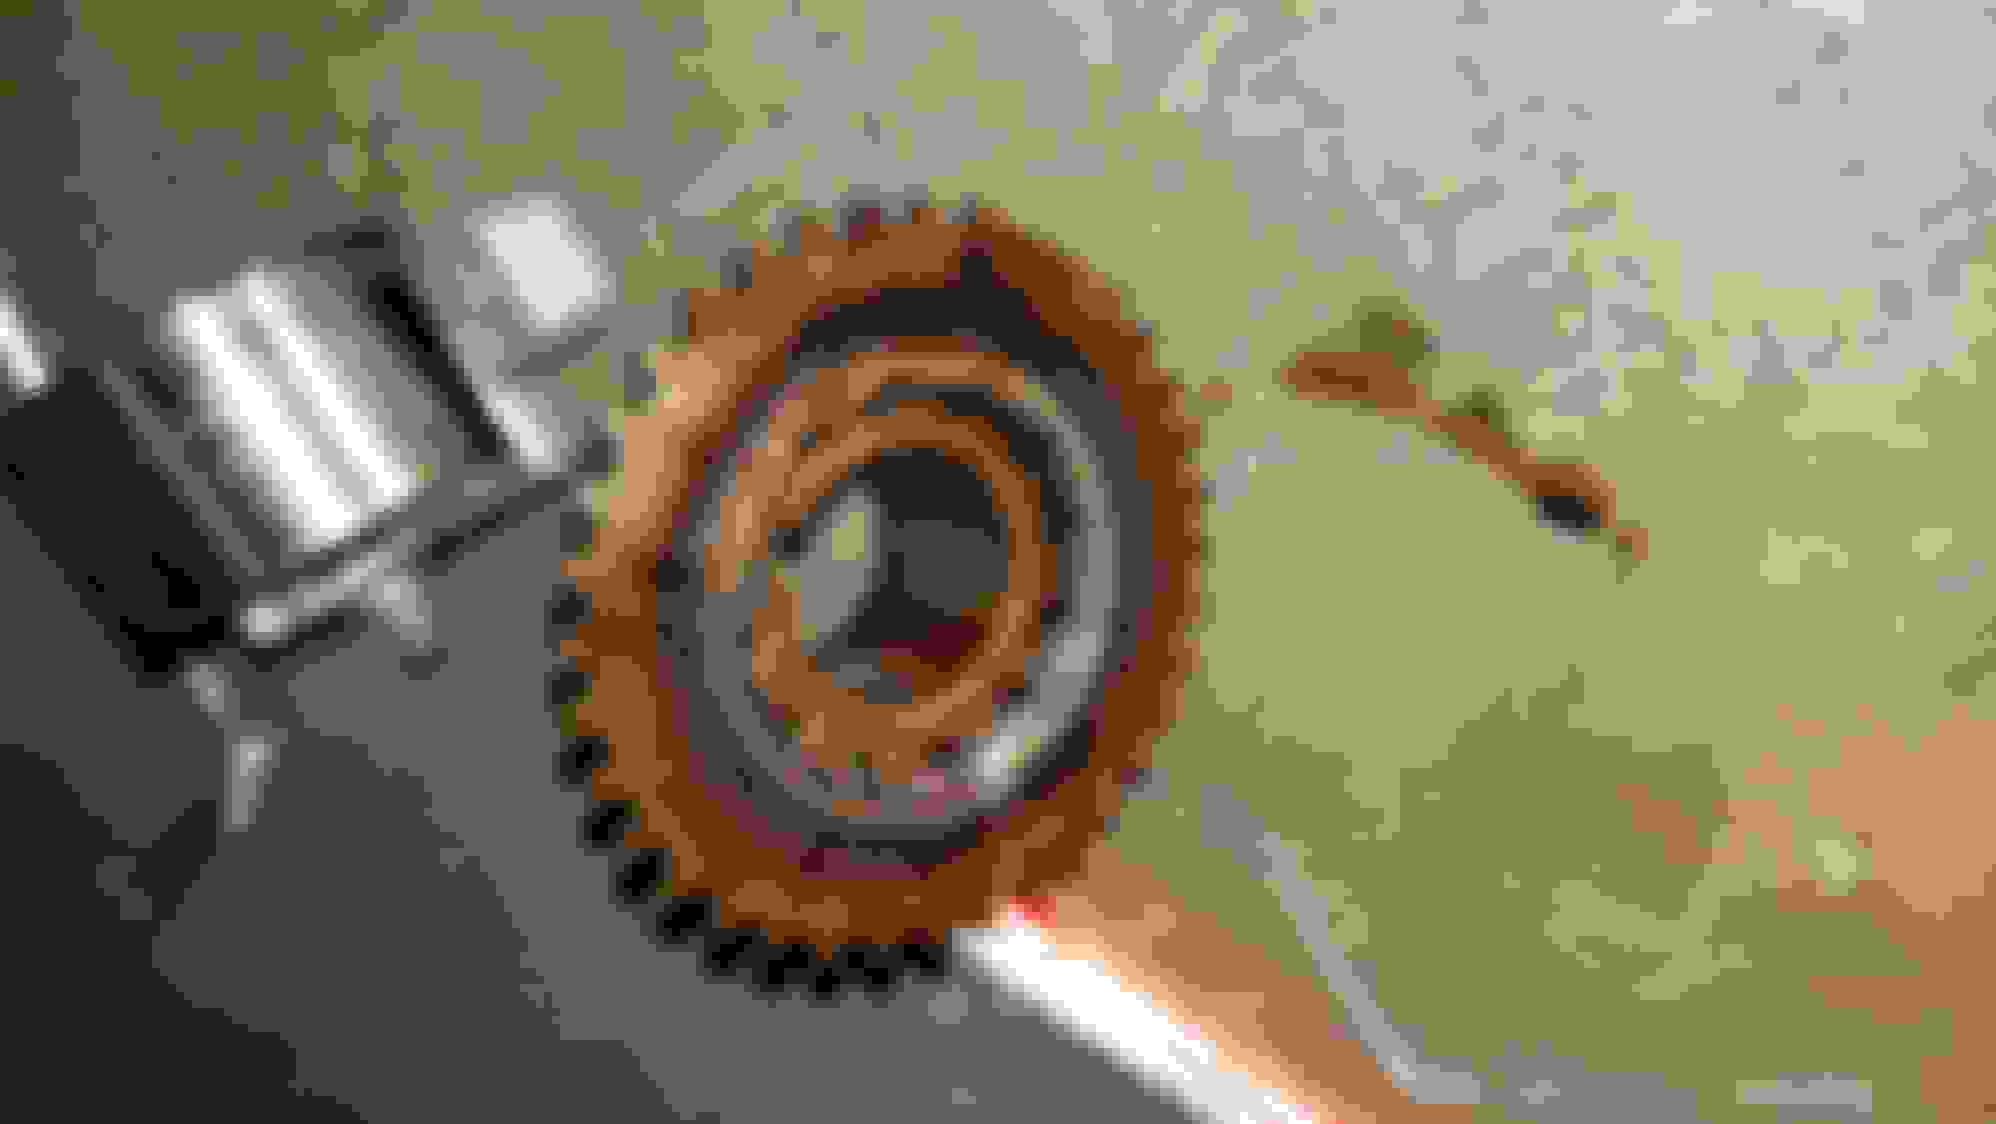
The oil leak was caused from the crankshaft seal rubbing on the timing gear. I'm not sure what caused the seal to walk out. The last timing belt replacement was 8 years and 100k miles ago. It now has a new crank seal, timing belt, and pulleys. No more 6" oil puddles lol.
The wear mark on the oil seal is visible as a light metal ring.
Nasty in there.
The timing gear also had some wear from rubbing on the seal.
Cleaned it up.
Oil seal is heavily worn, except toward the top.
Before installing the new seal.
The new seal is seated farther in. I doubt it'll rub again.
New T-belt. I'm saving the cam seals and water pump for a later date.
~1 year update. The hybrid battery continues to perform perfectly. Current mileage is about 216k
Since purchasing the car I've had an intermittent check engine light. By intermittent I mean it hardly ever turned off. Over a month ago I replaced these emission control vacuum lines. I removed the entire metal line and test port. I replaced it with a single hose ( less chance of a leak). I like the saying " when in doubt, cut it out!" The suv has been our daily driver for the past month. I'm happy to report the check engine light has remained off.
It seems odd all of these codes were due to the emission system leaks.
I replaced these brittle lines too.
That long black line goes back behind the engine. It's not fun to access. I removed this entire piece to reduce chances of future leaks.
The only item left to fix is a series of loud pops or clicks during full left slow turn ( sound seems to come from the left front ). The pop is sometimes 1 loud pop or 2 or 3. It only makes the noise when moving forward. I've replaced both front struts, left lower A arm, left cv axle ( was leaking), plus new sway bar end links. My plan now is to install new outer steering tie rod ends and inner steering tie rod end on the left side. I'm also wondering if the rack is bad or the mount bushings in the rack are the culprit?
The previous owner was in a fairly substantial crash involving the left side. That's why I suspect a possible bad steering rack. My friend seemed to think the noise could be from a part of the frame that may be damaged, possibly a broken weld somewhere.
The left engine mount is shot. Unfortunately the threaded mount stud is seized in the transaxle. I'm unable to swap the mount out due to the stuck stud. I don't think the noise is from the mount but I suppose it's a possibility.
~1 year update. The hybrid battery continues to perform perfectly. Current mileage is about 216k
Since purchasing the car I've had an intermittent check engine light. By intermittent I mean it hardly ever turned off. Over a month ago I replaced these emission control vacuum lines. I removed the entire metal line and test port. I replaced it with a single hose ( less chance of a leak). I like the saying " when in doubt, cut it out!" The suv has been our daily driver for the past month. I'm happy to report the check engine light has remained off.
It seems odd all of these codes were due to the emission system leaks. I replaced these brittle lines too. That long black line goes back behind the engine. It's not fun to access. I removed this entire piece to reduce chances of future leaks.
The only item left to fix is a series of loud pops or clicks during full left slow turn ( sound seems to come from the left front ). The pop is sometimes 1 loud pop or 2 or 3. It only makes the noise when moving forward. I've replaced both front struts, ....
I would double check the spring installation.
Did you replace strut mounts? They should be only OEM.
Codes...
Thanks for the link. I know there are a few more lines under the car. The diagrams will be helpful in the future if the codes return.
Noises...
I should have been more specific i replaced the entire strut and spring as an assembly it's all new including the mounts. The original setup was oem. The one I installed is aftermarket. Popping noise was the same with both. I've tightened the bolts multiple times to verify nothing is loose.
It's very possible the aftermarket assembly is defective. If it still pops after swapping the steering tie rods I'll try to get a recording of it.
how are the bushings on your lower control arms? At that mileage, you might see some �rips.� I noticed mine to have rips/cracks recently at 194k. Just thinking how to tackle this in the near future. Right now, only a sensitive person can feel it at almost full turn of wheel.
I replaced the lower A arm on the left side it came with new bushings. It is sort of a pia to replace. The engine mount has to be unbolted to remove the lower arm bolts. In my case the mount is seized to the engine so I had to jack the entire engine with mount attached high enough for the A arm bolts to come out. It was a really tight fit.
The new inner and outer steering tie rods on the left side did not help. It still has a few loud clicks. While setting it down off the jack I did hear a similar pop / click. It seemed to be coming from the upper part of the shock / strut. Since it only happens briefly it's difficult to pinpoint the location. My friend and I jacked it up and set it down repeatedly we both got winded before we could get it to happen again. It consistently does it for a second in a left sharp slow turn.
My wife told me to leave it alone but it bugs me lol. I have an old cell phone charging to get an audio clip.
Last edited by miket000; 01-26-24 at 04:20 PM.
Reason: grammer
 04-04-23, 09:35 PM