When you click on links to various merchants on this site and make a purchase, this can result in this site earning a commission. Affiliate programs and affiliations include, but are not limited to, the eBay Partner Network.
Hi friends, so many great posts in this thread +1!
Getting ready to replace my passenger engine mount and decided while I was in there to knock out the control arm why not- driver side will be another day.
Never ordered from Rock auto before but got the parts fast and here is what I ordered.
Moog PN: RK620334 Right (Conrol arms complete with ball joint)
Moog PN: RK620333 Left " "
Toyota PN: 12362-0A040 Engine mount
Car: 2004 RX330 FWD @ 151k miles
>> Have no idea how the new Moog ball joints will hold up but have to be better than what I got.
Great move, I'd swap out both A-arms if your doing one. You'll want to have your toe set via 4 way alignment. btw, IDK you had a fwd version.
Thank You for sure no doubt- doing struts front and back after I get the driver side control arm/mount done and then do alignment.
>> Here are some pics and notes to help anyone DIY trying to be successful with doing Passenger Side Lower Control Arm & Engine Mount.
PS- If all original and because of age- expect possible stuck hub & stuck suspension bolts & CV axle boot tearing(if already dried out and old).
]I was able to do the ball joint without taking the axle apart.
I'm trying to understand how you got the tool to work for you. That's exactly what Im trying to accomplish, remove the ball joint without removing the axle.
Originally Posted by rlopez1024
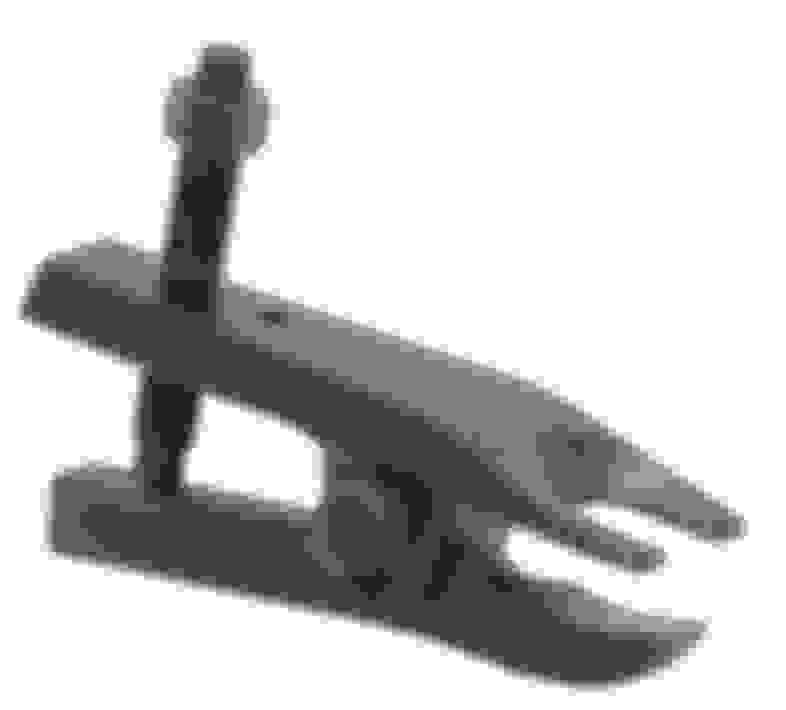
I finally got a perfect fit by using the bottom piece from one and the top piece from the other.
Are you referring to the ball joint separator in your write up?. Picture below?.
I'll most likely be doing this replacement this weekend. Does the engine have some lift points available from the top? I have an engine hoist and if there's a way to hook up the engine it would make things a bit easier than jacking it from the bottom.
sparkplugg, It is possible, however I think the main issue for this is the castle nut will just dig into the cv housing without creating enough pressure against the ball joint bolt. One thing we tried is to loosen the castle nut a few turns then try to use a device between CV housing and ball joint bolt to try and pop the ball joint free. The problem is there is no room to work between the two.
I would suggest you try what you mentioned but don't get carried away. The last thing you want to do is to have to get the torch out. Please report back.
this gives me a good idea of whats involved as my front lca bushing is 30 percent torn. Im not looking forward to when it gets to the point where it totally needs to be replaced as thats gonna be $$$$$. I am not a service tech by any stretch so i have to leave the big heavy duty stuff to my shop down the street. But when that point does come i probably should do both fronts instead of just the one since its gonna be torn apart anyways.
Dang- loving the swivel socket extensions in this video and now I want some.
PS- are you serious, lol I didn't think there was enough clearance to muscle the control arm out without pulling the hub/cv axle out of the way first and the guy in the video just made this job a whole lot easier since I did it the hard way. wow
.. I didn't think there was enough clearance to muscle the control arm out without pulling the hub/cv axle out of the way first and the guy in the video just made this job a whole lot easier.
PS: Addition for lifting of engine at 400h
1. Open hood!!!
2. Just remove nuts for mounts that circled with red (below).
3. Lift driver's side very carefully - radiator pipes could start to leak.
Don't unmount part #1 in black circle because you need to remove small strut #2 first. So, just remove nuts for part #3.
Unmounting of part in blue can be very difficult since of bad access. It's easier to do point 2 above.
@alchemist For the procedure to replace the ball joint, would you think it is possible to use a reciprocating saw with a steel metal blade to cut the castle nut off and replace with the ball joint with the castle nut head shaved off? This is so that I dont have to take the CV axle off. What do you think?
I actually did something similar on the first ball joint. I used a Dremel tool and cut the nut off. That helped but the hardest part was getting the ball joint to separate. I used a ball joint separator but I could not get the right angle. I tried 3 different brands and eventually got a good angle by using the top piece from one brand with the bottom piece of a second brand. I had to tighten the ball joint with a lot of force until it broke free, The second one was way easier since I knew the technique, On the second one I loosened the castle nut and then used the ball joint separator I had pieced together from 2 brands. This time I tapped the outside of the joint after every few turns and on one of the taps it popped free. With the castle nut just loosened and not completely off I heard the pop when it broke free but it didn't all come apart so that was a bit nicer to deal with. From there I could just loosen the castle nut the rest of the way and the ball joint slipped down as I did that so the castle nut was easy to remove without taking the axle apart.

 01-07-15, 12:32 PM