When you click on links to various merchants on this site and make a purchase, this can result in this site earning a commission. Affiliate programs and affiliations include, but are not limited to, the eBay Partner Network.
See post# 2 below for finished Navigation Delete DIY pics.
See post# 5 below DIY step by step wiring.
For those wondering- it is NOT plug-and-play.
What is needed: Non-Nav unit with plug.
Update 01/18/2019: Everything has been working perfectly since the install on 04/2019.
Also, I had no problem selling the Navigation Multi-display, Nav DVD ECU, Camera ECU, Factory Radio and Amplifier-
went fast like a week or two and paid for my new stereo upgrade and backup camera and everything!
Hi friends,
I have finished the Nav delete. See post #5 for the DIY in detail.
Here is the before:
And here is the after:
Everything is wired in.
What it took- extra non-nav climate control(with plug) unit on ebay used for $100.
*Get a good one with perfect working vents and buttons and includes the plug- be picky if you can lol
It took many hours testing and pouring over schematics and chasing wires but
now that everything is working it can be done easily in an hour with simple splicing.
PS- Honestly I like it better with the non-nav and I'm installing new back up camera and radio tomorrow.
i wish China would make an android replacement. Seems like there�s enough 2nd gen RXs in the world to make it worthy.
What an excellent idea.
If they would make a kit for the non-nav version(most popular), the folks with nav would only need to run 2 wires under dash to gateway module to pin4(mpx+) and pin 11(mpx-) (which is a very easy splice) and they could use the aftermarket kit too.
One kit for both- nav and non-nav units have all other needed wires in the harness plugs- just different wiring hookup.
Job is finished. Everything went well.
Here is the finished work and how it worked on my car.
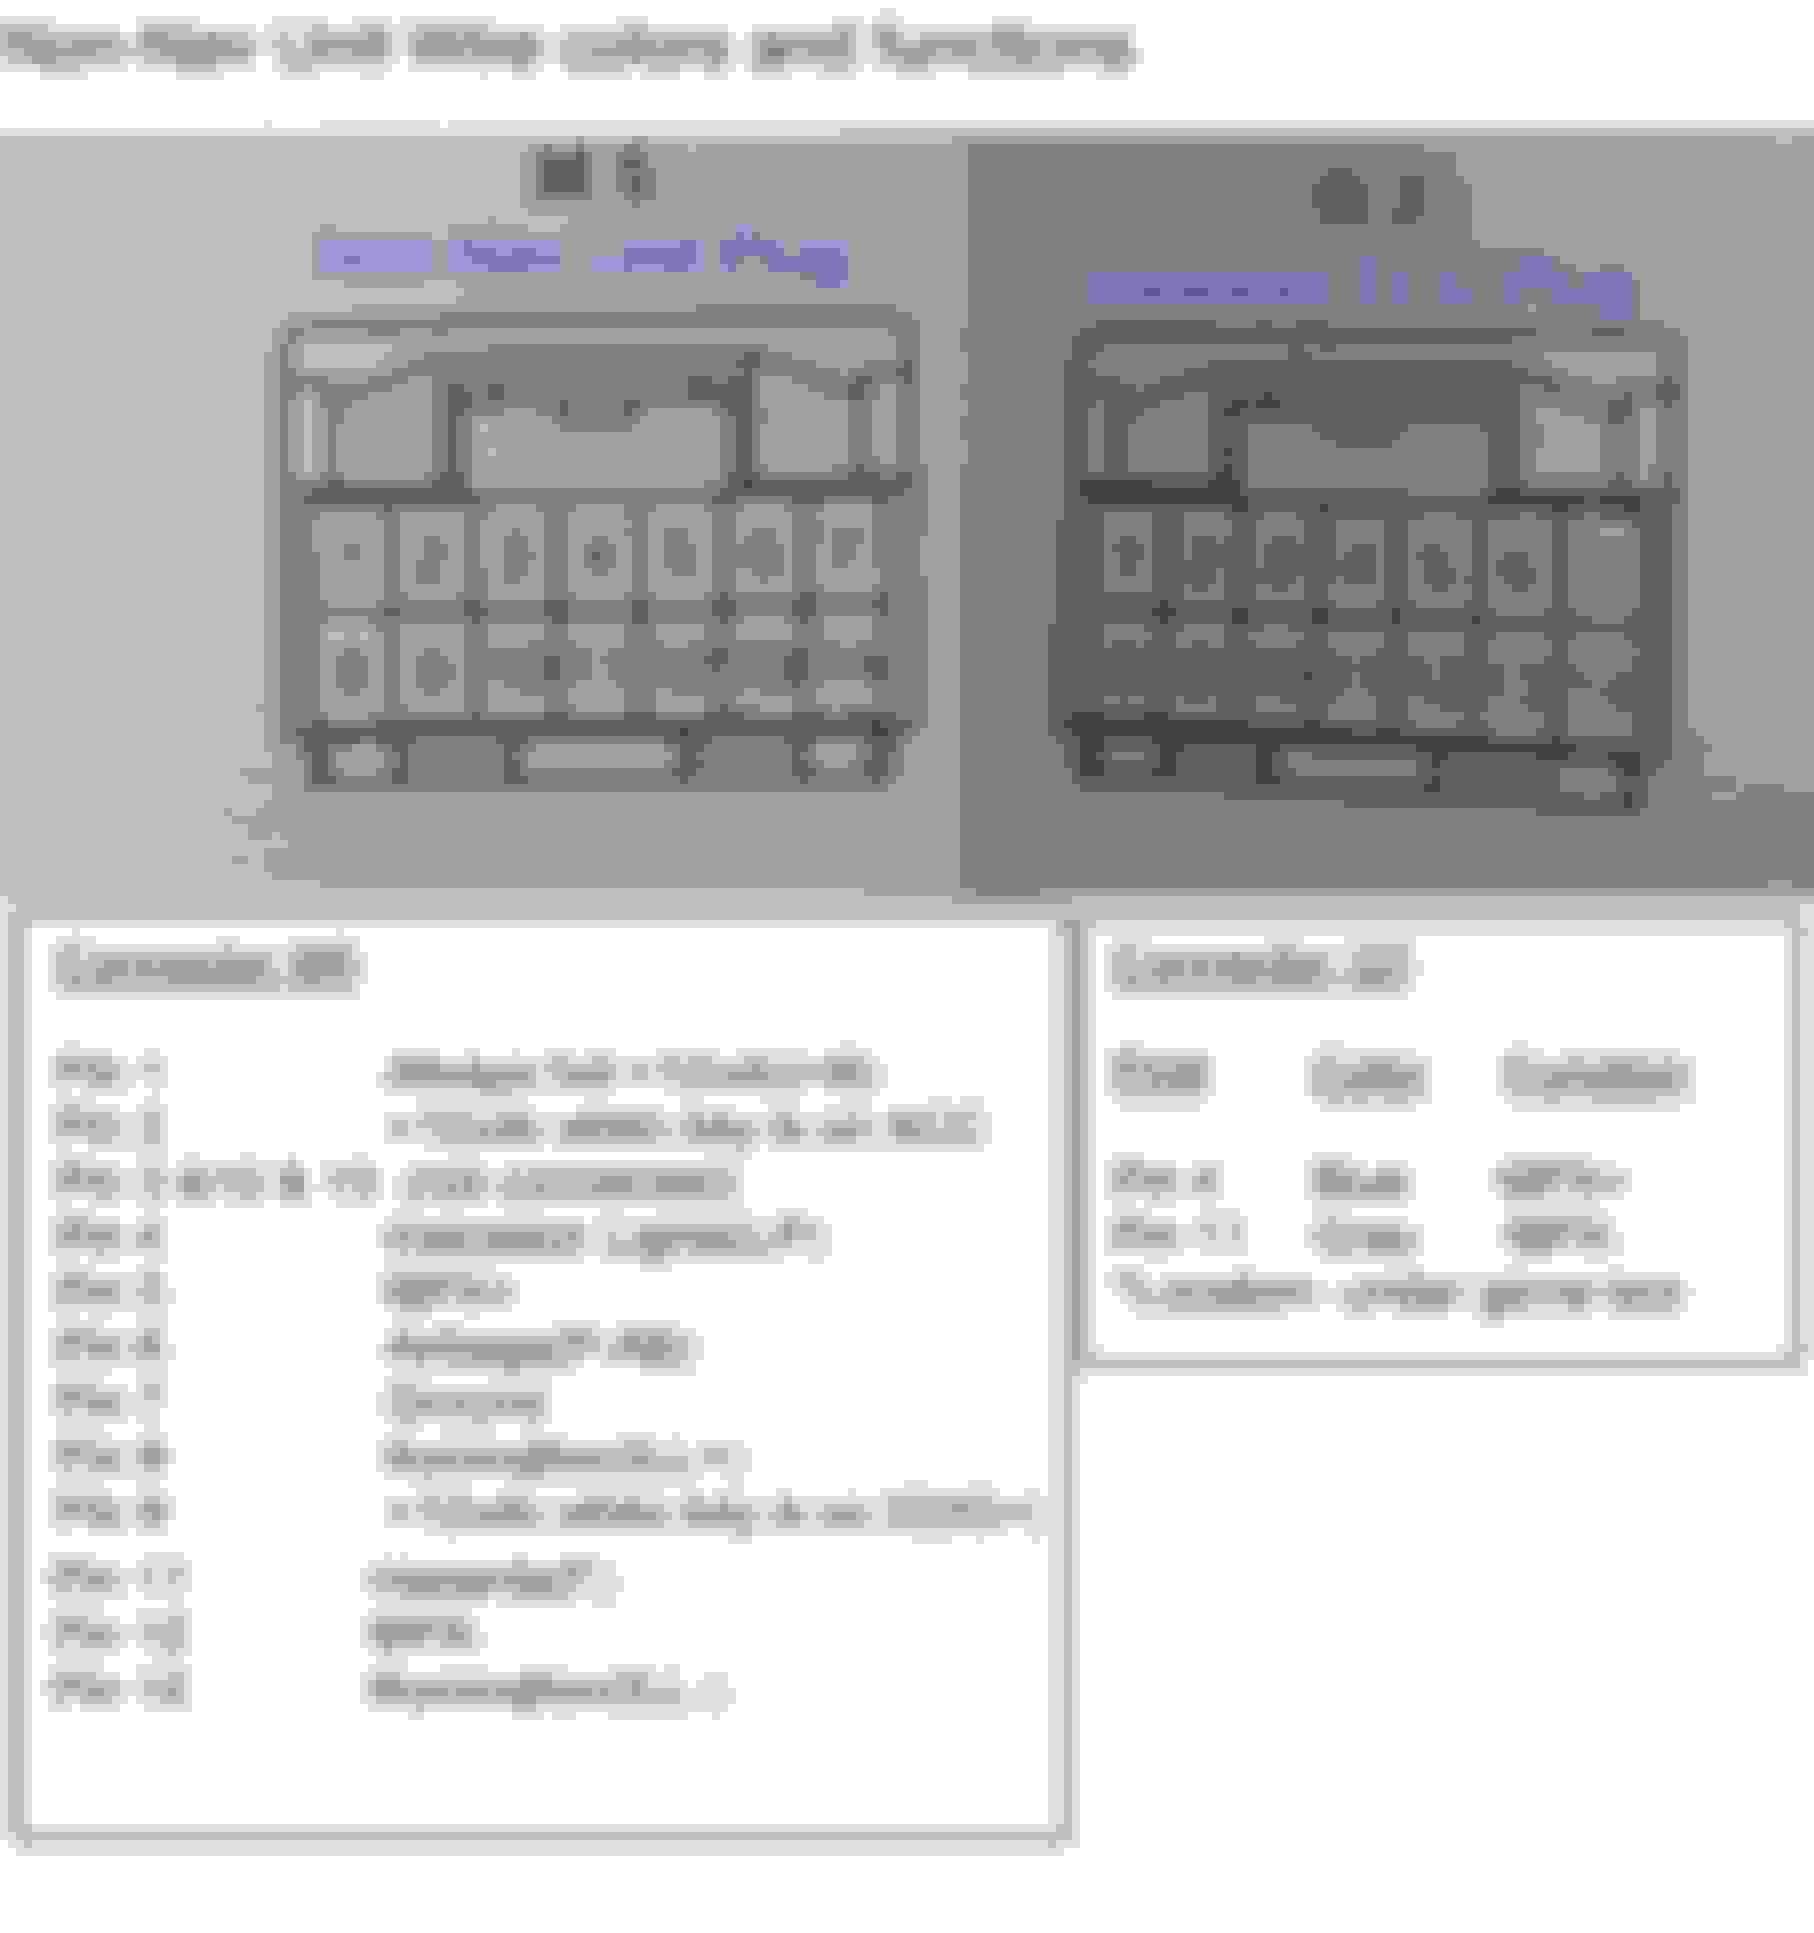
*Update- note- this is for 2004 RX330. In 2005+ some wire colors changed and they added a PAON wire for the air bags circuit. Around 2007 some of the wire colors changed again. So, for newer models after 2004 plz compare the plugs and wire colors for your year to a schematic but the info below shows what is needed to make it work with the possible addition of the Airbag PAON wire for newer models 2005+.
Also, the Center Cluster Info Display has a MFG date sticker on the back of the unit. Get one for your year preferrably with plug/wires for easier installation and if you can't do that only get a 2004 for year 2004 because of the change and 2005+ may all be compatible but not 100% sure.
One more thing, plz observe saftey precautions dealing with Airbag wires as per the manual to prevent problems. See below step #4.
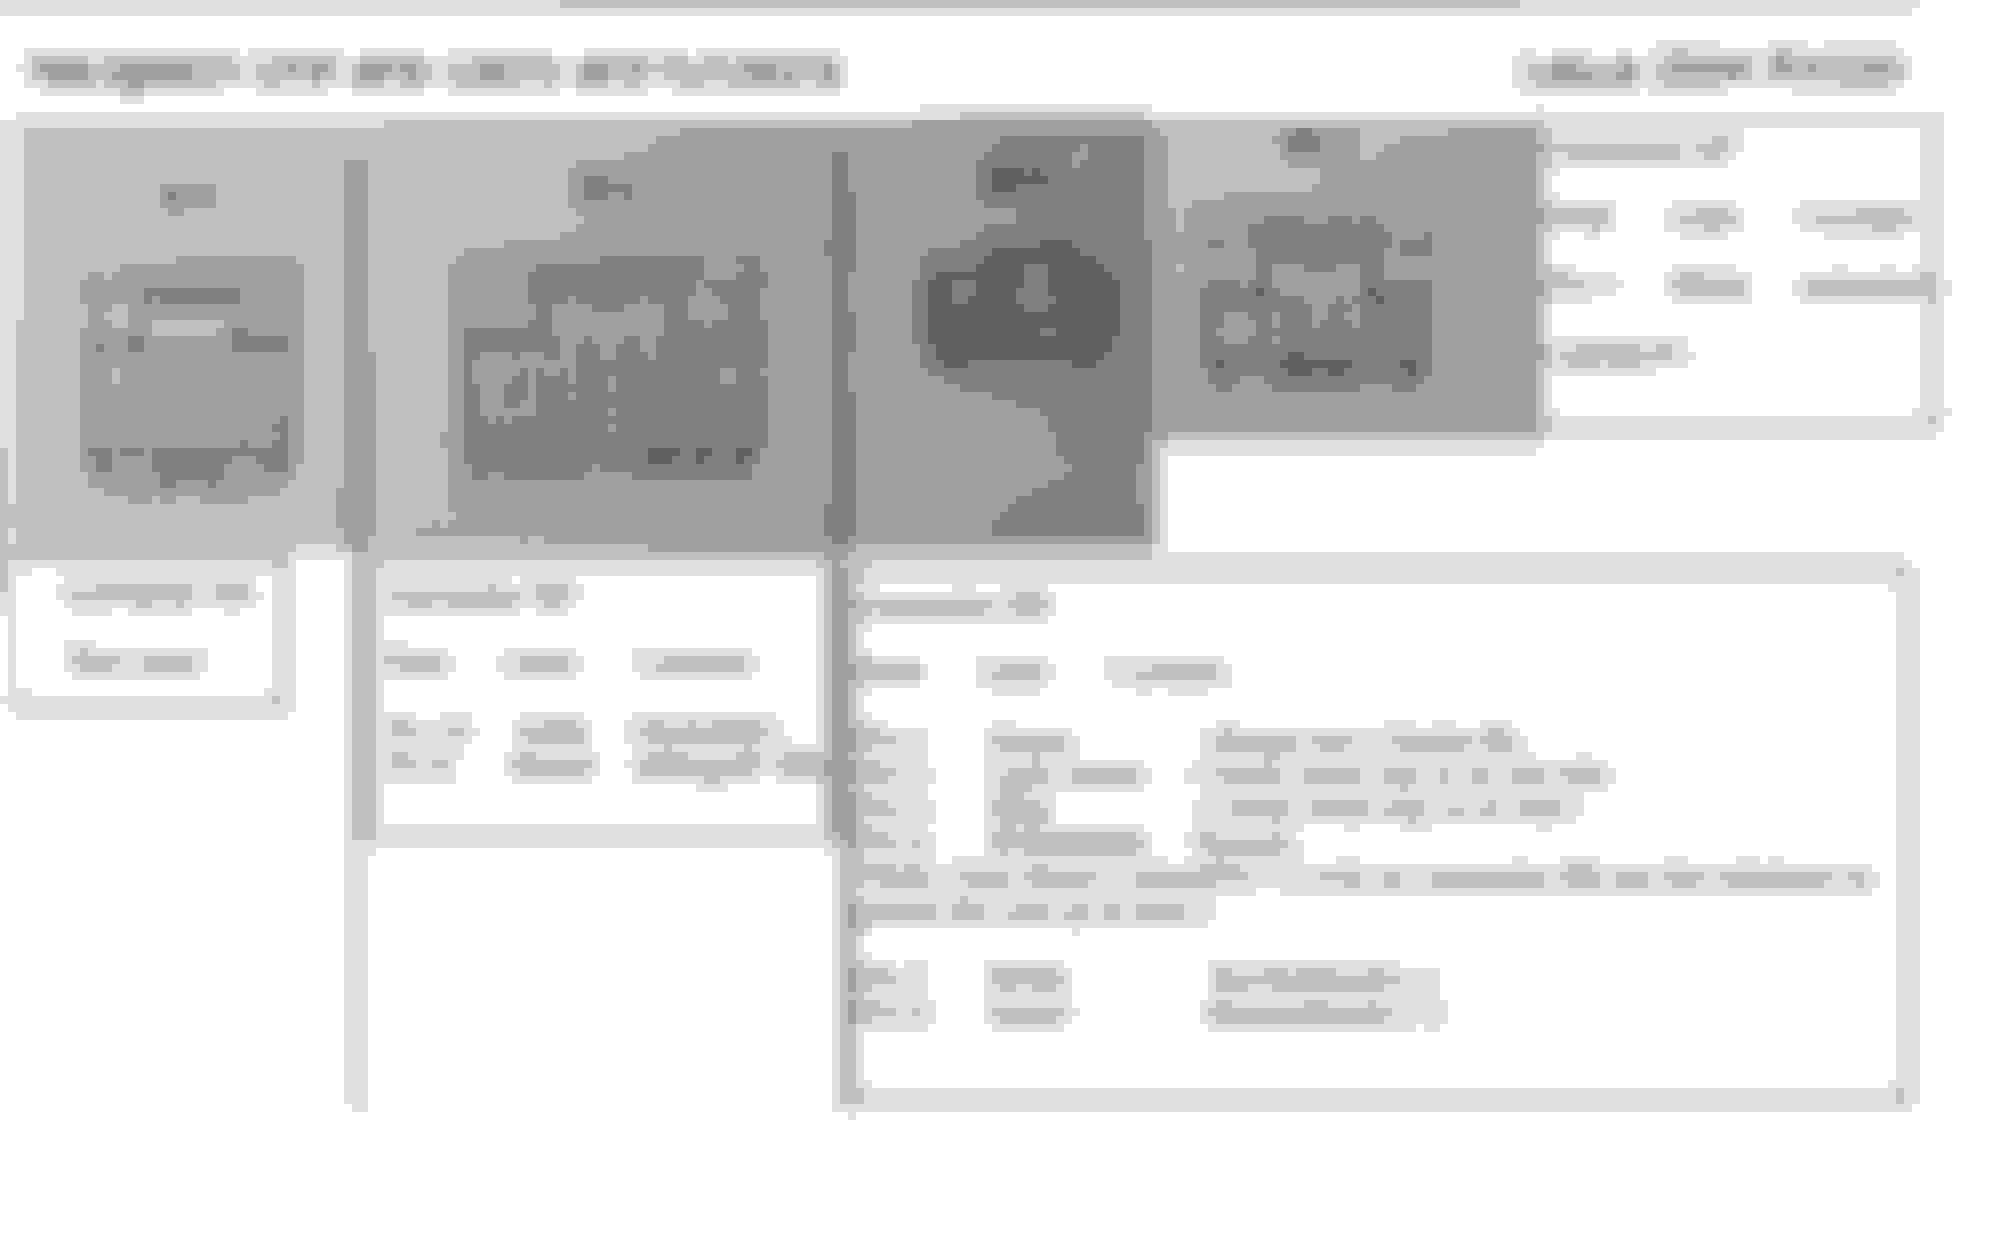
First pic below is my existing Nav harness plugs and the colors and functions of the wires I needed,
Next pic below is how I wired in the non-nav unit.
Order of steps I took.
Step #1: First I put the new non-nav climate control unit on the work bench bench and powered it up to make sure my power wires were correct using the +B, ACC, IG, and Ground wires shown.
When I saw it power up properly I unplugged the battery and spliced in the wires just mentioned and then hooked the battery back up and turned key on and watched the unit power up.
*Note- After completing this step I had no AC controls or Data or Temp on screen. Airbag light was lit in instrument cluster(speedo) and hazard lights not working.
Step #2: Next I removed the glovebox to get access to the Gateway ECU. Then I unhooked the battery and waited a few mins. Then I got under the glove box looking upward in the dash with a flashlight and located the Gateway ECU(a small box the size of a pack of ciggs and says "Gateway" on it). I disconnected the only 14 pin plug by squeezing the tab and pulling it out. Next ran 2 wires approx 2' long from the climate control unit carefully thru to the Gateway ECU and spliced in the MPX+ and MPX- wires as shown. Then I secured the wires up and out of the way so they can never be pulled or messed with. Next I hooked the battery back up and turned the key and started the car. Now the A/C controls were working properly and the data was on the display(temp, mpg, etc). Without jacking into the gateway the climate control display will do nothing.
*Note- After finishing this step Airbag light was still lit in instrument cluster(speedometer) and hazard lights not working.
**If anyone is wondering- the old Navigation unit also goes to the Gateway ECU to get its AC control and data but it goes to different pins on the ECU- thus the reason to run the 2 wires as shown.
Step #3: Next I unplugged the battery for a few mins and spliced in my LP(lamps?) wire. Then I spliced in my F(hazzard) wires. Then I hooked up the battery and turned the key. Now my red security LED was blinking as normal and hazard lights worked,
*Note- After finishing this step Airbag light was still lit by speedo but everything else was working good.
Step#4: This step made me very nervous. There is a warning in the Lexus Electrical manual that says no tampering, touching, or disrupting airbag stuff for 90 seconds after disconnecting battery for danger of setting off an airbag. It was my best educated guess as to the placement of this wire but I wasn't absolutely sure but I really didn't want to set off my airbag by sending a wrong signal to it by wiring it wrong... So next I disconnected the battery and took an extra extra long smoke break. lol This wire is important because it goes directly to the airbag sensor under the passenger seat so I gave extra time after unhooking battery, After waiting what I felt was long enough I spliced in the P-AB(airbag) wire as shown above. Then I started the car and after a few seconds the airbag light went off in the instrument cluster(speedometer) and everything was well.
*Note- After finishing this step everything was working properly. I took it for a drive, scanned for codes and no problems.
Step #5: Next I unhooked the battery again just to be safe. At this step somewhere in the illumination section in the electrical manual I saw 2 wires ILL+ and ILL-. I am not sure what these wires are for except for dimming purposes but not sure but I wanted everything I can find hooked up. so, next I spliced in ILL+ and ILL- wires. Then I started the car and drove it around and ran my errands. Came home and ran scanner and found no codes. Everything is working perfect.
*Note- Every time I've ever unhooked the battery and restarted the car it always ran a little different for a while. This is normal while the ECU resets and does it's thing.
That's it folks... lol It worked for me and I am just showing how I did it to help others.
Anyone who chooses to use my work do so at your own risk I am not responsible.
Good Luck Peace
Hi woody,
Just a courtesy reply to let you know there are much better options to get what you want.
It absolutely can be done but the time, and expense would not be cost effective and there is big potentetial for failure if you do not have a walk thru and done by a dc electric expert.
Just out of curiosity, why did you downgrade to non-nav?
It's funny because I was just researching if I could upgrade to a nav unit.
Mine came without nav, I'm using a bluetooth/SD/USB dongle that has been working great, but would love to have the extra additional vehicle info you get from the screen.
Hi Crz95.
A couple things led to my decision to downgrade.
#1)
My A/C temp control buttons broke while on holiday on passenger side(wife's side). lol
Then a couple weeks later the buttons on driver side broke too so I couldn't control my A/C or heat temps anymore.
To make it worse, my A/C vents had broken and missing slats and looked bad.
The Nav units were expensive at the time on ebay so I bought a Non-nav unit to rob the button modules and vents for approx $100.
When I took it apart I realized the button modules were not compatible. Yikes.
#2)
Then I got to rationalizing, if I do the Nav down grade I could put in a new double DIN stereo and an upgraded backup camera that has nicer resolution. Thinking it would look dumb to have 2 big screens in the dash and 2 backup cameras kinda sealed the deal for me do commit to the project.
Yanking out all the Nav components can be done in a hour with my walk thru above but going from Non-nav to Nav is a whole other ball game. I could do it no problem but would be a lot of wires to run and a lot of parts to buy.
If I get another RX model in the future I will be ordering it without NAV.
Makes complete sense. I probably would have done the same if I were in your place.
I'm perfectly happy with mine and the bluetooth kit I installed works great ("Yatour" brand) - just wanted that extra info you get with the nav screen. I've noticed that they look pretty outdated though, so I'll stick with the clean look of the non-nav.

 04-12-19, 08:14 PM