
Lexus 3500Ib tow hitch
 09-07-05 | 10:22 PM
#1
Thread Starter
Rookie
Joined: Feb 2004
Posts: 59
Likes: 2
From: Florida
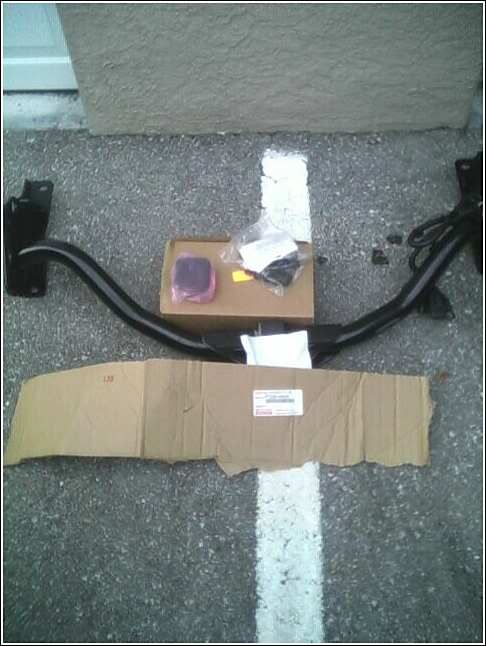
Today I finally got it.
The part# PT228-48045

It comes with mounting bolts, brackets, and the wiring harness. No tow ball.
Cost from Lexus in Fort Myers, Fl. $265 + tax.
Going to install tonight.
The part# PT228-48045
It comes with mounting bolts, brackets, and the wiring harness. No tow ball.
Cost from Lexus in Fort Myers, Fl. $265 + tax.
Going to install tonight.
09-09-05 | 06:07 PM
#2

Driver School Candidate
Joined: Aug 2005
Posts: 29
Likes: 0
From: fl
I installed mine last night. After running the wire for the lights, where did you mount the bracket that holds the plug in wire for the trailer?
Thanks, I used black zip ties to mount it on the bracket close to the receiver.
Joe
Thanks, I used black zip ties to mount it on the bracket close to the receiver.
Joe
09-09-05 | 08:44 PM
#3
Thread Starter
Rookie
Joined: Feb 2004
Posts: 59
Likes: 2
From: Florida
Originally Posted by mrfuni
I installed mine last night. After running the wire for the lights, where did you mount the bracket that holds the plug in wire for the trailer?
Thanks, I used black zip ties to mount it on the bracket close to the receiver.
Joe
Thanks, I used black zip ties to mount it on the bracket close to the receiver.
Joe
Did you buy the harness seperately?
09-10-05 | 05:00 AM
#4
Driver School Candidate
Joined: Aug 2005
Posts: 29
Likes: 0
From: fl
Did you buy the harness seperately?
Got the harness from Lexus of Naples and ordered the hitch online. Installed both as they were obviously not attached. Just wondering Where you attached the bracket that holds the trailer wire, or if its attached, what did you do with the wire?
Got the harness from Lexus of Naples and ordered the hitch online. Installed both as they were obviously not attached. Just wondering Where you attached the bracket that holds the trailer wire, or if its attached, what did you do with the wire?
09-10-05 | 05:39 AM
#5
Thread Starter
Rookie
Joined: Feb 2004
Posts: 59
Likes: 2
From: Florida
Originally Posted by mrfuni
Did you buy the harness seperately?
Got the harness from Lexus of Naples and ordered the hitch online. Installed both as they were obviously not attached. Just wondering Where you attached the bracket that holds the trailer wire, or if its attached, what did you do with the wire?
Got the harness from Lexus of Naples and ordered the hitch online. Installed both as they were obviously not attached. Just wondering Where you attached the bracket that holds the trailer wire, or if its attached, what did you do with the wire?
09-10-05 | 02:59 PM
#7
Thread Starter
Rookie
Joined: Feb 2004
Posts: 59
Likes: 2
From: Florida
Originally Posted by mrfuni
No. I ordered a "Curt" hitch. Looks nice and came to $150 with shipping. Got the wire harness from Lexus.
If you don't mind me asking, but how much did the harness cost you?
The info might help others choose between the Curt or Lexus OEM.
Also, could you post some pics of your curtis. I'll post some of the mine.
It would be nice to see how they look. I'm VERY happy with the Lexus hitch. Very clean.
Also, is the curt rated for 3500Ib?
Trending Topics
09-11-05 | 04:16 AM
#8
Driver School Candidate
Joined: Aug 2005
Posts: 29
Likes: 0
From: fl
wire harness from the Lexus dealer about $50. Hitch on the net $150 including shipping. Rated 3500 LBS. I'll see if I can get my son with his digital camera to take a picture and post. You're asking for something way beyond my technological expertise. 
09-11-05 | 09:53 AM
#9
Driver School Candidate
Joined: Aug 2005
Posts: 29
Likes: 0
From: fl


The info might help others choose between the Curt or Lexus OEM.
Also, could you post some pics of your curtis. I'll post some of the mine.
Here's the Curtis Hitch with the delaer's wire harness...
Joe
09-12-05 | 01:06 PM
#10

Driver School Candidate
Joined: Sep 2005
Posts: 21
Likes: 0
From: TN
Glad to see the picture of your curt hitch. I have been rocking back and forth on aftermarket vs. OEM and I finally saw a picture on another post of the Lexus factory hitch. I am going to fork over a few extra $$ for the OEM and have gotten up the nerve to install the wiring harness myself.


 09-12-05 | 02:06 PM
#12
Thread Starter
Rookie
Joined: Feb 2004
Posts: 59
Likes: 2
From: Florida
A word for those worried about the wiring harness.
It's not hard if you have the OEM instructions. It does seem like a lot of things to take out, but it all comes out very easy.
Tools needed are:
Flat head screw driver.
12mm deep socket or wrench. The socket has to be deep for 2 of 4 nuts/bolts that hold the left compartment door. You can just use a wrench if you dont have a deep scocket.
I'll do a write up if someone wants.
It truely isn't bad. Don't be discouraged.
The following users liked this post:
casey008 (05-06-18)
09-12-05 | 07:04 PM
#13
Driver School Candidate
Joined: Sep 2005
Posts: 21
Likes: 0
From: TN
Thanks for the extra pics of the factory hitch. Did you have to remove both compartment doors or just the left one? And does the tray holding the jack and accessories have to be removed as well? I ordered mine today and it is scheduled in this Wed. Thanks.
09-12-05 | 08:58 PM
#14
Thread Starter
Rookie
Joined: Feb 2004
Posts: 59
Likes: 2
From: Florida
Originally Posted by jjudd
Thanks for the extra pics of the factory hitch. Did you have to remove both compartment doors or just the left one? And does the tray holding the jack and accessories have to be removed as well? I ordered mine today and it is scheduled in this Wed. Thanks.
Here is some instruction.
1. Start at the back of the carpet liner/board from the edge of the back seats. There are 2 small flaps on the ends held by velcro. Peal them up and then start to lift the board, working to the center. There are 5 clips that just pop out with the board once you start pulling up. Once up, you will see 2 black 12mm bolts under the board near the wheel wells. These hold the hinges for the large lid that covers the jack. Undo those and pull out the whole lid/board.
2. At the front of the jack tray are 2 round plastic clips. Use a flat screw driver to gently pry up one side then stick your finger in there and pry the other side. Use you finger to stop that side going back down when prying the other side. You'll know what I mean when you try it. They are just push in/pull out clips. Now lift the entire jack tray out. Don't get your hopes up when you lift the jack tray and see a gromet to the left. It's not the one. The gromet you want is right under the left storage bin.
3. Next, push the 2 buttons to lift the lids for the front large tray. You should see 2 more black push clips. They are towards the sides. Remove those and the large tray should pull right out.
4. Only remove the left front tray lid. You will see 2 black 12mm bolts in the front and 2 gold 12mm nuts in the back. Use a deep 12mm or wrench for the back 2 nuts. Remove lid.
4. Next, pull up the plastic lip that has the 2 buttons for the storage lids and also hides the rear door latch reciever thingy. I think (I cant remember) there are 2 black clips on the sides. Remove those. It is also held by 5 or 6 of the clips like on the rear liner you first removed. Start from one side working to the other. Use many fingers to evenly destribute lifting pressure. As you move along, and clips pop up, you will need to push the big square black buttons that pull in the storage bin lid latches. The latches will get in the way of lifting the plastic piece out. Remove piece.
5. Now the last piece. The left storage bin has a black push clip near where the jack tray corner was . Next, you'll see a black nut at the bottom of the tray. First, remove the pull handle for the manual fuel door release and velcro it back up on the carpet on the side. Then just using your hand, twist and pull the black plastic nut counter-clockwise. Use tools gently on it if you need. I think it's a 12 mm, but don't quote me. It's really just a fancy push nut that you should be able to pull right off. Remove tray.
6. You should be able to see the groment that you need. Push it through if you haven't done it from the bottom yet. Pull the harness up and flex the new gromet like a semi circle to get it inside. Then push it back through part way and fiddle with it to get it seated in the hole. Make sure it is not crimped or pushed through too far.
7. You should see a white plug coming from the car's harness right above the groment. This is the plug you want. Make sure your plug clicks into place correctly. You don't want to go through this again if the plug pops out, do you???
8. Test the trailer hitch plug if you can. I didn't, but I have faith. If you can you probably should.
9. When putting everything back together, keep it in the reverse sequence you pulled it out. The plastic nut that lives at the bottom of the left storage bin just pushes on. When reinstalling the back plastic lip piece, try to get it under the black rubber seal before pushing down on it. If any of the seal is caught under it use a flat head screw driver to gently pry it out. If it is caught really well under there, I'd just lift the piece and try it again.
10. Reverse order is:
Left tray, black plastic nut, 1 black clip, reattach fuel door handle.
Rear plastic lid piece, push down all snaps, 2 black clips
Left lid, 2 black bolts front, 2 gold nuts rear.
Front large tray, 2 black clips.
Jack tray, 2 black clips.
Jack tray lid, 2 black bolts.
Fold back board/liner and push down on clips and velcro ends.
Your done. Not hard at all.
If any of the info is incorrect please let me know and I'll edit it, thanks.
Hope it helps.
Last edited by Campbell; 12-06-05 at 08:57 PM.
09-12-05 | 09:09 PM
#15
Thread Starter
Rookie
Joined: Feb 2004
Posts: 59
Likes: 2
From: Florida
I borrowed these pics from redgs400. It should help with gromet and plug location.
Also, looking at his first photo and instructions, it does not appear he removed the rear plastic lip piece. If you can get the left storage bin out undamaged without removing this piece it would make things even easier. Have a look before you remove it and see what you find. If you get it out but not back in then just remove the piece.
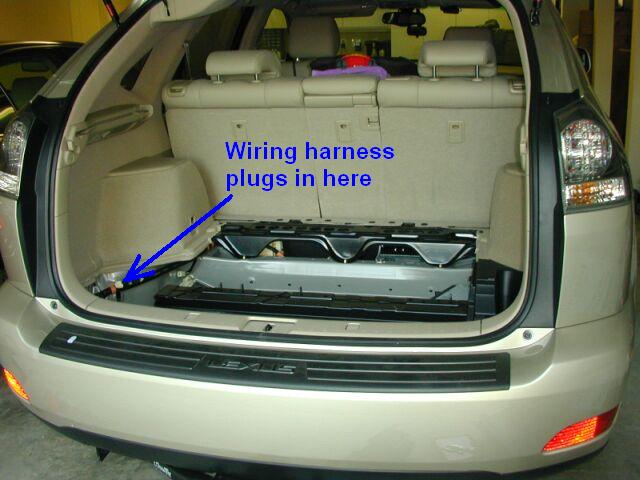
In the photo below, notice the slot in the carpet. There is a tab/s on the left storage bin that slides in that slot/s. Get the tab in there first.

Also, looking at his first photo and instructions, it does not appear he removed the rear plastic lip piece. If you can get the left storage bin out undamaged without removing this piece it would make things even easier. Have a look before you remove it and see what you find. If you get it out but not back in then just remove the piece.
In the photo below, notice the slot in the carpet. There is a tab/s on the left storage bin that slides in that slot/s. Get the tab in there first.
Last edited by Campbell; 09-12-05 at 09:45 PM.