I am Jinxed! Painted Center Console
 10-28-05, 05:43 PM
#1
Lexus Champion
Thread Starter
Ok guys, here's the deal. EVERY project that I start always seems to have something bad happen. Tonights project is no different.
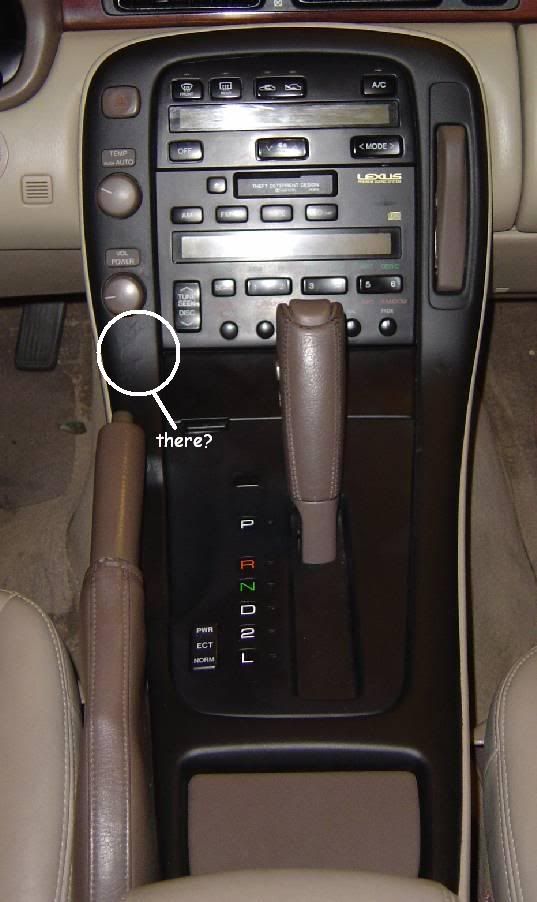
My center console's paint was peeling (that factory stuff), so I decided to take it out, sand it down, and paint it black.
Welllllllllll. Everything was going wonderfully! I had removed it with no problems, taken all electronics off (with no problems), sanded it (again with no problems), and was on my second coat of paint when I decided to let it dry for a bit and put clothes in the dryer as well.
1 minute later, upon returning to my garage I notice a moth had decided to land on my freshly painted center consol. Well the poor little fellow was stuck in the paint and trying to work his flacky a** self free (with little success)... My needle nose pliers assisted in his evacuation from said painted console... Well he was SOOO happy to be free that he left me a going away present.. HIS WINGS!!! ARGH!!!!.... So I've been spending the last hour removing the paint from that section, trying to sand it and paint it.... Finally it's done (and noticable if you look hard enough)...

whatcha think?
WHAT I USED
-150 Fine grit (at first I thought this was too gritty but found that it was perfect for this job)
-handheld power sander (Don't try and do this job without one, these things are only $20 bucks)
-Flat Black Paint. (pictured)
-Paint Surface Prep Chemicals (got at walmart for about $10 bucks to wipe the area down before painting)
It now matches the Airconditioning vents above almost PERFECTLY...
This paint rocks! I first spayed my old center consol shifter piece (that I don't use anymore) and let it dry.. I couldn't scrape it off with my fingernail.. it is on there VERY well.
This whole project would have only taken 30 minutes if the damn moth didn't do his thing.
The effected area is under and slightly above the volume **** and can be seen from the picture. The little dot about 2" below the cup holder is from when I tighted the screw for the ash ttray a little too tight. I was able to sand most of it out.


My center console's paint was peeling (that factory stuff), so I decided to take it out, sand it down, and paint it black.
Welllllllllll. Everything was going wonderfully! I had removed it with no problems, taken all electronics off (with no problems), sanded it (again with no problems), and was on my second coat of paint when I decided to let it dry for a bit and put clothes in the dryer as well.
1 minute later, upon returning to my garage I notice a moth had decided to land on my freshly painted center consol. Well the poor little fellow was stuck in the paint and trying to work his flacky a** self free (with little success)... My needle nose pliers assisted in his evacuation from said painted console... Well he was SOOO happy to be free that he left me a going away present.. HIS WINGS!!! ARGH!!!!.... So I've been spending the last hour removing the paint from that section, trying to sand it and paint it.... Finally it's done (and noticable if you look hard enough)...
whatcha think?
WHAT I USED
-150 Fine grit (at first I thought this was too gritty but found that it was perfect for this job)
-handheld power sander (Don't try and do this job without one, these things are only $20 bucks)
-Flat Black Paint. (pictured)
-Paint Surface Prep Chemicals (got at walmart for about $10 bucks to wipe the area down before painting)
It now matches the Airconditioning vents above almost PERFECTLY...
This paint rocks! I first spayed my old center consol shifter piece (that I don't use anymore) and let it dry.. I couldn't scrape it off with my fingernail.. it is on there VERY well.
This whole project would have only taken 30 minutes if the damn moth didn't do his thing.
The effected area is under and slightly above the volume **** and can be seen from the picture. The little dot about 2" below the cup holder is from when I tighted the screw for the ash ttray a little too tight. I was able to sand most of it out.
Last edited by IronCobra; 10-28-05 at 11:54 PM.

 i dont see anything wrong with it!

Trending Topics

 10-28-05, 11:47 PM
#9
Lexus Champion
Thread Starter
yep, but I had to removed almost fresh paint from all around the area including above the volume ****. I tried my best to sand it smooth but it is still pretty visible to me.
It's not too bad I guess Little things like that bother the heck out of me. I might resand the entire thing and do it again later. I'll have to see what it looks like in the daylight.
It's not too bad I guess
Little things like that bother the heck out of me. I might resand the entire thing and do it again later. I'll have to see what it looks like in the daylight.
10-29-05, 05:47 AM
#10
Pole Position
I like it!!!
 10-29-05, 12:22 PM
#12
Lexus Champion
Thread Starter
Originally Posted by prjctSC300
was there a special type of paint you used??? or just some parts store spray can stuff??

 10-31-05, 04:51 PM
#15
Lexus Champion

might as well paint the pillar mounts, glove box, window trims, lower center consol,
and all plastic trims below the dash in "black".........to make a decent match.
heck, that's what i did and a lot of work.........i miss my car!!
and all plastic trims below the dash in "black".........to make a decent match.
heck, that's what i did and a lot of work.........i miss my car!!