
My try at clear tailights (sorta)


Trending Topics

 05-27-06, 12:50 PM
#10
Lead Lap
Thread Starter
Day Shot

Thanks for the props!
I've always loved the 92-94 tail lights and wanted them cleared out (BTW I'm working on a real cleared out set as we speak, I'm running into some problems though, I'll keep you updated)
I stumbled across this website Sticker City and click on vinyl sheets and click on simulated frosted sparkly. It's actually made for glass windows but It was only like $25.00 bucks/5 feet, I found out that this can cover 2 tail lights, so you really need $15.00/3 feet (What a deal!)
It's basically a strechy sticker, they even included instructions and a squeegee (not bad for $25.00)
I used a rubbing alcohol and water mixture and It's kind of like putting on tints:
1) Clean tail lights
2) Spray tail light with alcohol/water mixture
3) Place sticker on tail light
4) Trim to fit
5) Peel sticker backing
6) Spray solution on the sticker
7) Place sticker on the tail light
8) Squeegee out all water and air bubbles
9) Use a hair dryer to heat up sticker to help drying (especially on the corners)
10) Enjoy!
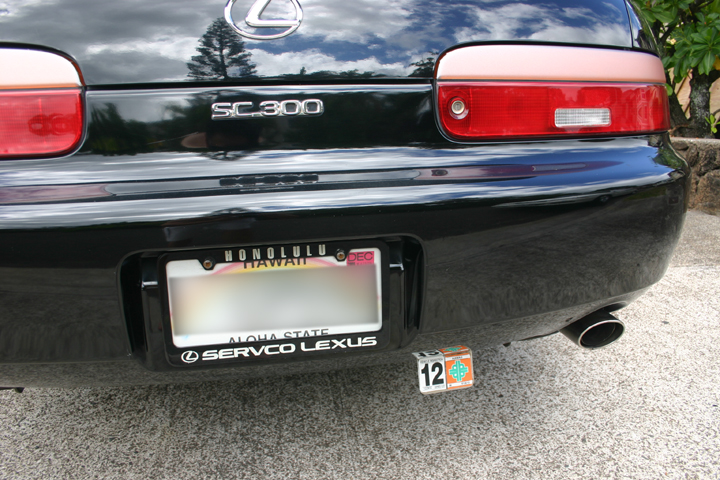
You can still see some orange through the tints but I like it...for $25.00, can't go wrong.
I'm not sure how long it'll stay on but the sticker is a high quality sticker, so it should be fine, plus it was only $25.00.
It's a safety check sticker and there's a company that makes brackets here in hawaii, they sell a couple of different styles, I think it's like $20.00, It comes with double stick tape but I would recommend that you screw it in.
Let me know if anyone's interested, I can get them and ship them to you.

Thanks for the props!
I've always loved the 92-94 tail lights and wanted them cleared out (BTW I'm working on a real cleared out set as we speak, I'm running into some problems though, I'll keep you updated)
I stumbled across this website Sticker City and click on vinyl sheets and click on simulated frosted sparkly. It's actually made for glass windows but It was only like $25.00 bucks/5 feet, I found out that this can cover 2 tail lights, so you really need $15.00/3 feet (What a deal!)
It's basically a strechy sticker, they even included instructions and a squeegee (not bad for $25.00)
I used a rubbing alcohol and water mixture and It's kind of like putting on tints:
1) Clean tail lights
2) Spray tail light with alcohol/water mixture
3) Place sticker on tail light
4) Trim to fit
5) Peel sticker backing
6) Spray solution on the sticker
7) Place sticker on the tail light
8) Squeegee out all water and air bubbles
9) Use a hair dryer to heat up sticker to help drying (especially on the corners)
10) Enjoy!
You can still see some orange through the tints but I like it...for $25.00, can't go wrong.
I'm not sure how long it'll stay on but the sticker is a high quality sticker, so it should be fine, plus it was only $25.00.
What's that "12" thing under your plate, and how is it attached?
Let me know if anyone's interested, I can get them and ship them to you.
 05-28-06, 09:15 AM
#14
Keeper of the light
iTrader: (17)
Originally Posted by slammed
i think it would be clean if you painted the reverse light part all red. here how it would look sorta.
but either way looks good! for a DIY
but either way looks good! for a DIY

