D.I.Y. clearing out '92 Tail lights

 12-24-11, 06:42 PM
#62
Lead Lap
iTrader: (28)
Join Date: Sep 2011
Location: az
Posts: 707
Likes: 0
Received 0 Likes
on
0 Posts
oh man theres a ton of parts missing in between. ive just completed my first attempt: which fell and cracked the acrylic so im going to remake a set once i get MOOOOOOOOOOOORE 92 tails. I'll probably make one set and sell it, and one set to keep for myself to cover the costs of materials and stuff.
anyways ill post the missing steps
12-24-11, 07:12 PM
#63
Lead Lap
iTrader: (28)
Join Date: Sep 2011
Location: az
Posts: 707
Likes: 0
Received 0 Likes
on
0 Posts
so this is the first time ive completed this, im ULLLLLLLLLLLLLLTRA unhappy with the result but so far non enthusiasts who see them like them and dont pay close enough attention to know theyre not oem.
ill definitely be redoing them until i get the OEM look.
this is to show you the missing steps as well as show you where i've went wrong (major ahem ...masking tape)
materials needed:
acrylic/ lexan plexiglass
self etching primer (would have made this much easier)
PC7 epoxy part A + B or any water resistant slow curing epoxy
body filler
rubbing alcohol (for clean up)
plastic weld or any 5 minute clear epoxy ( aim for 1000lbs strenght + imo)
masking tape (GET THE GOOD STUFF...this ruiiiiiiiiiiined me)
something to spread body work materials ( this is another step i skimped on ...because of my accident)
some sort of polishing compound
tools :
a REALLY REALLY good dremel. youll be using it alot
fiberglass cut off wheel
metal cut off wheels
TONS of sanding discs / sanding bands
cylindrical grinding stone for corners
electric sander of sorts
hand sander
high temp oven
- low temp oven (would speed the process up so that you could complete it in one day or less)
as he mentioned: first step is baking them apart ( i did 300 degrees at six minutes

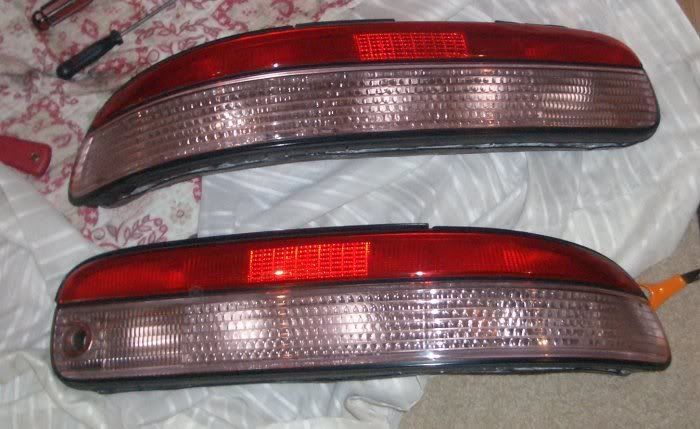
then you cut out all the front facing orange material, dont cut out any of the curvatures or else you will have a harder time filling the housing. I used a dremel with a fiber glass cut off wheel here

reseat the headlights and then the hard stuff starts

(notice that the amber outers are still in tact (this is how youd want to cut them)

mask the inner and outershell off:

seal holes between inner and outer shell with plastic weld or clear epoxy (form edges together to make sure there arent any spaces as you go)

let that dry lightly if its extremely uneven, if its not noticeable from half a foot away youre ok because youll be applying two more layers on top of it

spread pc7 epoxy over it. spread as thingly and as evenly as possible (youll notice a pretty big difference between my body work pre and post crack lol. sorry) after it dries for 24 hours (or 2 hours if you have a low temp 100 degree oven) stand sanding the highs for a smoother surface

next up is body filler: besure to use far less then enough hardener rather than to use too much. itll chunk up. If you use too little youll just have to wait a longer time but have more time to smooth it out. be sure to spread this as thing and evenly as possible. I used too much hardner and body filler....

sand the hell out of this. (one tip of advice which i didnt realize until its too late) after spreading thingly and sanding thoroughly you should probably be able to see at least layer of epoxy and the body filler as they should form an even surface..if you dont youll turn out fairly uneven. anyways after doing so spray paint a light guide coat. itll show you where you need more sanding

once youre done sanding, use a really wide fiber glass cutoff wheel and delicately trim off the edges youve overlayed and masked off..... or if you have good masking tape that wont drip and leave you out to dry... just peel it off.... then, its time for the Pain in the f'ing *** part. the acrylic.

ill definitely be redoing them until i get the OEM look.
this is to show you the missing steps as well as show you where i've went wrong (major ahem ...masking tape)
materials needed:
acrylic/ lexan plexiglass
self etching primer (would have made this much easier)
PC7 epoxy part A + B or any water resistant slow curing epoxy
body filler
rubbing alcohol (for clean up)
plastic weld or any 5 minute clear epoxy ( aim for 1000lbs strenght + imo)
masking tape (GET THE GOOD STUFF...this ruiiiiiiiiiiined me)
something to spread body work materials ( this is another step i skimped on ...because of my accident)
some sort of polishing compound
tools :
a REALLY REALLY good dremel. youll be using it alot
fiberglass cut off wheel
metal cut off wheels
TONS of sanding discs / sanding bands
cylindrical grinding stone for corners
electric sander of sorts
hand sander
high temp oven
- low temp oven (would speed the process up so that you could complete it in one day or less)
as he mentioned: first step is baking them apart ( i did 300 degrees at six minutes
then you cut out all the front facing orange material, dont cut out any of the curvatures or else you will have a harder time filling the housing. I used a dremel with a fiber glass cut off wheel here
reseat the headlights and then the hard stuff starts
(notice that the amber outers are still in tact (this is how youd want to cut them)
mask the inner and outershell off:
seal holes between inner and outer shell with plastic weld or clear epoxy (form edges together to make sure there arent any spaces as you go)
let that dry lightly if its extremely uneven, if its not noticeable from half a foot away youre ok because youll be applying two more layers on top of it
spread pc7 epoxy over it. spread as thingly and as evenly as possible (youll notice a pretty big difference between my body work pre and post crack lol. sorry) after it dries for 24 hours (or 2 hours if you have a low temp 100 degree oven) stand sanding the highs for a smoother surface
next up is body filler: besure to use far less then enough hardener rather than to use too much. itll chunk up. If you use too little youll just have to wait a longer time but have more time to smooth it out. be sure to spread this as thing and evenly as possible. I used too much hardner and body filler....
sand the hell out of this. (one tip of advice which i didnt realize until its too late) after spreading thingly and sanding thoroughly you should probably be able to see at least layer of epoxy and the body filler as they should form an even surface..if you dont youll turn out fairly uneven. anyways after doing so spray paint a light guide coat. itll show you where you need more sanding
once youre done sanding, use a really wide fiber glass cutoff wheel and delicately trim off the edges youve overlayed and masked off..... or if you have good masking tape that wont drip and leave you out to dry... just peel it off.... then, its time for the Pain in the f'ing *** part. the acrylic.
12-24-11, 07:41 PM
#64
Lead Lap
iTrader: (28)
Join Date: Sep 2011
Location: az
Posts: 707
Likes: 0
Received 0 Likes
on
0 Posts

heres a pic of my masking tape causing me massive grief:

congratulations! if youre not super hard core or willing to "sell out" youre done!.. your lights will look Awesome besides not being flush. but youll have really thing black lines which will compensate aesthetically
!

if youre die hard. prepare to get bruce willis'd (unless youre awesome at body work, this is where it becomes ...still pretty hard) dealing with plexiglass is a PITA
so first tape the plexiglass over the headlight and score/ permanent mark over the outer edge of the housing (like so) ... we'll make more precise outlines later


then its time to cut. I tried the core and snap method first. as well as fiberglass cut off wheel. all came out CRAPPY , as seen below ( good enough for what we were doing though.)

then place both over again, this time mark the inside lining. we'll but cutting once again...
this time using a metal cut off wheel that actually works!


as this will be your last chance to touch the inside, finish up, do any resprays or sanding you need to get done once again:

then its the permanent marker to the rough edges that you need to trim before heat gunning and mounting:
tape the edges down so the other side doesnt lift while you heat gun it into place. be sure not to apply too much heat to one section of the glass at the same time ir ot will warp

NOWWWWWWWW for the most annoying part of the whole process.. plastic welding or clear epoxying the glass to the housing: apply a small amount to the out of place surfaces, then hold until dries lol... five minutes is a lie.

then do the flush services... be sure to fill any gaps you have also here fellas


now you see what it could look like if you have virtually no heavy black lines obstructing the glass

from five feet away or so theyll look pretty awesome

but the worst part is yet to start.
this is the same process as earlier. so ill skimp. apply the pc7 as smooth and thinly as possible.

use a DRY spong eto clean up if you smudge too far out


let it cure for however long you need it to.
sand as best you can. I kinda gave up from this point because something randomly cracked both of my lenses, not sure if it magically dropped at some point or the wasnt heated into shape enough and the friction force from removing the masking tape was too much or what... anyways
sand..

body filler then sand.
use a dry sponge to clean up edges (as seen before) if you miss any edges before they dry ( i missed tons because i tried to do both at the same time since i kinda didnt care anymore and would have to redo them) use a razor to trim out edges

mask off and primer. this will show you where you need work

you have options of doing said work or calling it quits.
as ill be redoing some once i get a few more sets of 92s .. i called it quits
12-24-11, 07:43 PM
#65
Lead Lap
iTrader: (28)
Join Date: Sep 2011
Location: az
Posts: 707
Likes: 0
Received 0 Likes
on
0 Posts
then fight to remove your cheap masking tape (youll see the cracks)


use an actual paint brush if youd like to finish edges if you still havent learned by now that you should use quality masking tape lol...
and youll end up with abomination:

I'm extremely unhappy with the turn out, but considering it took the op about three tries to get it right... we'll see if i can follow in the same foot steps!
thanks sc400on20s for being the innovator and saving me 2770$ from clear corners rolf....or several days searching on yahoo japan since i cant read kanji for ****.
from three feet away they look.. gross


from five feet away i own a body shop lolololololol

anyways happy spoon feeding. I posted the original method. I'll be doing much cleaner versions up coming and i have some idea on how to speed up and make the process much less tedious.
edit oh yea, go back and clean up everything with rubbing alcohol, then light sand any red sections you messed up with high grit of your choice. then polish them..
use an actual paint brush if youd like to finish edges if you still havent learned by now that you should use quality masking tape lol...
and youll end up with abomination:
I'm extremely unhappy with the turn out, but considering it took the op about three tries to get it right... we'll see if i can follow in the same foot steps!
thanks sc400on20s for being the innovator and saving me 2770$ from clear corners rolf....or several days searching on yahoo japan since i cant read kanji for ****.
from three feet away they look.. gross
from five feet away i own a body shop lolololololol
anyways happy spoon feeding. I posted the original method. I'll be doing much cleaner versions up coming and i have some idea on how to speed up and make the process much less tedious.
edit oh yea, go back and clean up everything with rubbing alcohol, then light sand any red sections you messed up with high grit of your choice. then polish them..
12-25-11, 01:50 AM
#67
Lead Lap
iTrader: (28)
Join Date: Sep 2011
Location: az
Posts: 707
Likes: 0
Received 0 Likes
on
0 Posts
WAYYYYYYYYYY more costly and twice the resources. plus i never take the easy way out. if i ever encounter some 97s with destroyed innards or 95s with destroyed outer ill do that though!
until then............ brute force until i die!
until then............ brute force until i die!
12-25-11, 03:56 AM
#69
Lead Lap
iTrader: (28)
Join Date: Sep 2011
Location: az
Posts: 707
Likes: 0
Received 0 Likes
on
0 Posts
It was his third attempt but I'm not quitting until I make a perfect set!
edit:
i REALLLLLLLLLLYlike how these look on the car. I REALLY cant wait to make a good looking set... i think i like them so much im gonna have to remove all the coloring from the front end to make it match/ flow

they clash pretty bad

edit:
i REALLLLLLLLLLYlike how these look on the car. I REALLY cant wait to make a good looking set... i think i like them so much im gonna have to remove all the coloring from the front end to make it match/ flow
they clash pretty bad
Last edited by greens14; 12-25-11 at 08:02 AM.
12-25-11, 03:11 PM
#70
Since you're planning to do all black on light housing up front, perhaps you should've simply used one of those tail light spray to change the amber portion to black/grey to match.
And if you're concerned with budget, you also have an option to do 95-96 red/clear tails like this:
95-96 tails doesn't fetch premium price as 97+ do and all it takes is a few dollars worth of material from Home Depot to do. Here's a thread on How-to if interested:
https://www.clublexus.com/forums/sc-...-96-tails.html
12-25-11, 06:46 PM
#71
Lead Lap
iTrader: (28)
Join Date: Sep 2011
Location: az
Posts: 707
Likes: 0
Received 0 Likes
on
0 Posts
those look okay too (oh i definitely check out ALLLLLLLLLLLLL the tail light options) but i prefer the reverse clear. i usually see 95 tails going for 150-200. I pick up 92s for 50 bucks after taxes at a scrap yard. Plus i dont ever quit. to be honest i like the challenge, its gives me a chance to better my skills as well as reduce the chance of being similar to everyone else.
as for smoking, the plan is to tint these bad ones. when i make a good set ill leave those in clear in case i should ever want to go back to bright chrome housing or something.
which tails are you running btw?
as for smoking, the plan is to tint these bad ones. when i make a good set ill leave those in clear in case i should ever want to go back to bright chrome housing or something.
which tails are you running btw?
Last edited by greens14; 12-25-11 at 06:57 PM.
12-25-11, 06:57 PM
#72
Lead Lap
iTrader: (28)
Join Date: Sep 2011
Location: az
Posts: 707
Likes: 0
Received 0 Likes
on
0 Posts
actuallyyyyyyyyyyyyyyyy thats a good idea too! if i do get my hands on some 95s....after i get enough practice on 92s i might take some 95s and make a set of these with red running light bulbs. cant wait for the holidays to be over to make some more progress!
12-25-11, 07:03 PM
#73
Driver School Candidate
iTrader: (4)
Join Date: Dec 2011
Location: modesto,ca
Posts: 36
Likes: 0
Received 0 Likes
on
0 Posts
looks great i just upgraded from a 92 t0 a 95 tailight i might be interested but one question is the plexi thick *** the orange one u cut off i mean is durable
12-25-11, 07:12 PM
#74
Lead Lap
iTrader: (28)
Join Date: Sep 2011
Location: az
Posts: 707
Likes: 0
Received 0 Likes
on
0 Posts
theres acryllc and lexan. the lexan is WAY stronger but at the home depot i went to, it wouldve had to been purchased at like an 8ft by 6ft wall size because the next smallest size down wasnt long enough to cover the entire light
the plexiglass is fairly strong, its my fault for not heating it to a better mold which left stress on the bends which made it crack easily. but otherwise.... yea the lexan is amazing, the guy took a hammer to some in the store and it didnt even crack. i tested some spare acrylic at home which didnt go as well ( minor cracks)
the plexiglass is fairly strong, its my fault for not heating it to a better mold which left stress on the bends which made it crack easily. but otherwise.... yea the lexan is amazing, the guy took a hammer to some in the store and it didnt even crack. i tested some spare acrylic at home which didnt go as well ( minor cracks)

Thread
Thread Starter
Forum
Replies
Last Post