
Project Retro Interior.. ohh yeah this will be a long one.


 lol
lol
 03-08-09, 09:23 PM
#79
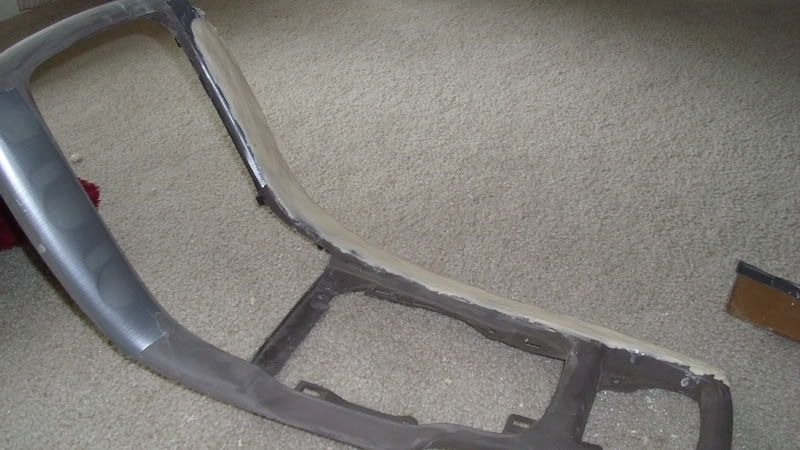
alright, i've never fiberglassed before so i'm sure this will be a fun experience. Here is the write up that i made for the process of how i am going to mold the dash.
(P1)For Clay
Ingredience
-1 cup flour
-1/2 cup salt
-1/2 cup water
Directions
1. Mix dry ingredience while slowly adding in water
2. Kneed Mixture for 10 minutes
3. Roll out to 1/4inch
4. Store extra in ziplock baggies(up to 3 weeks!)
5a. Leave clay out to dry for 48 hours in dry breezy place
OR
5b. Preheat oven to 300, then put clay in for 30minutes or until light brown
(P2) Prep
1.Cover Parts with tin foil or plastic wrap
2.make cardboard boarders to restrict morphing during shape process
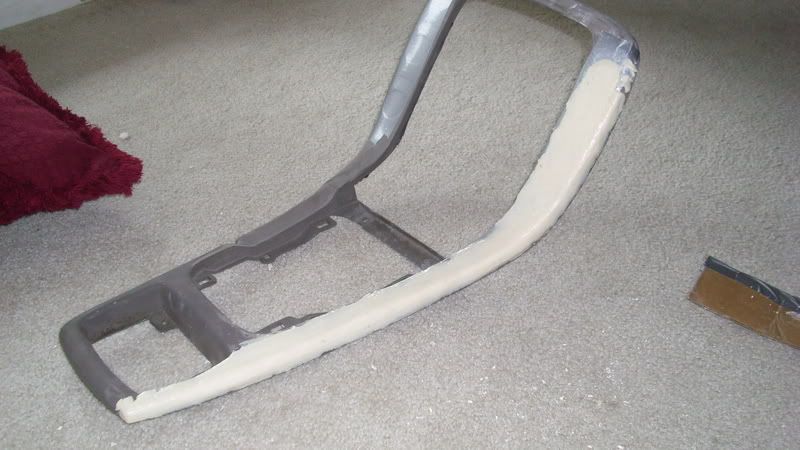
3.Tightly pack clay and fondle(lol) to desired shape
4.Once shap is done do steps (P1)5a or 5b
5.Once dry, tape to part(s)
6.Replastic wrap everything as one
7.Begin Fiberglassing
(P3)
1.Apply Resin(make sure only on the clay area)
2.Lay light grade 225g
3.Rip material not cut
4.Apply Resin(make sure only on the clay area)
5.roll out bubbles
6.Lay heavier grad 600g
7.Maybe repeat 4-6 If not sturdy enough
8.Allow to dry overnight
9.Remove fiberglass, clay, and plastic wrap.
10.Apply fiberglass resin to parts
11.lay mold onto parts(this is why i said(make sure only on the clay area))
12.Apply resin to needed areas of fiberglass
13.Repeat steps 4-7 if needed
14.wait overnight for everything to dry
15.Bondo(The regular stuff??? or fiberglass stuff???)
16.Sand everything smooth
17.repeat 14-15 until satisfied
18.Primer
19.Take it to a place to get upholstered
(P1)For Clay
Ingredience
-1 cup flour
-1/2 cup salt
-1/2 cup water
Directions
1. Mix dry ingredience while slowly adding in water
2. Kneed Mixture for 10 minutes
3. Roll out to 1/4inch
4. Store extra in ziplock baggies(up to 3 weeks!)
5a. Leave clay out to dry for 48 hours in dry breezy place
OR
5b. Preheat oven to 300, then put clay in for 30minutes or until light brown
(P2) Prep
1.Cover Parts with tin foil or plastic wrap
2.make cardboard boarders to restrict morphing during shape process
3.Tightly pack clay and fondle(lol) to desired shape
4.Once shap is done do steps (P1)5a or 5b
5.Once dry, tape to part(s)
6.Replastic wrap everything as one
7.Begin Fiberglassing
(P3)
1.Apply Resin(make sure only on the clay area)
2.Lay light grade 225g
3.Rip material not cut
4.Apply Resin(make sure only on the clay area)
5.roll out bubbles
6.Lay heavier grad 600g
7.Maybe repeat 4-6 If not sturdy enough
8.Allow to dry overnight
9.Remove fiberglass, clay, and plastic wrap.
10.Apply fiberglass resin to parts
11.lay mold onto parts(this is why i said(make sure only on the clay area))
12.Apply resin to needed areas of fiberglass
13.Repeat steps 4-7 if needed
14.wait overnight for everything to dry
15.Bondo(The regular stuff??? or fiberglass stuff???)
16.Sand everything smooth
17.repeat 14-15 until satisfied
18.Primer
19.Take it to a place to get upholstered
03-09-09, 07:42 PM
#80
Lexus Champion

It is easy but takes some practice to get good. You be real good when this is over lol. Cant wait to see the progress.
03-09-09, 09:34 PM
#82
Lexus Champion
Hrmm ok
I use small disposable rollers and brushes, not the foam kind (they just melt)
If you mix the fiberglass hot for one layer, let it offgas and cool before starting another.
Dont mix it so hot that it turns brown or purple.
Use whatever you want,(I use small disposable spatulas) but make sure you get all the air bubbles and pockets out of the mix and also when you put the resin down on the mat.
On smaller areas like interior center consoles, one thing I like to do is to rip up the fiberglass mat into small 2" sections. I do this for the first few layers.
When I get to the last layer(s) I use the woven mat. For the fine tuning I use duraglass for the first layer and then a few of the other evercoat filler products to smooth it out, then primer or sealer.
 03-10-09, 05:50 PM
#86
Driver
Join Date: Sep 2007
Location: Vancouver, British Columbia
Posts: 116
Likes: 0
Received 0 Likes
on
0 Posts
After you square the edges, i suggest wrapping it with leather to achieve the updated look. Use the left over leather to wrap the centre gauge pod as well. Just a suggestion.

