DIY Push Button Ignition
#1
Hi, I posted my new push button ignition earlier today and it has gotten alot of responses. and alot of people requesting a DIY, so here it is.
I'll start with what products and tools I used to do this. Then I will explain in the best detail i can how I installed and wired my setup which is on a 97 SC300. Lastly i will briefly explain some other options for instalation per requests.
Here is the Push Button Starter i used.
Ignited Performance
I purchased mine several years ago and had it on another car, that i have since gotten rid of, and the switch has been sitting in a box in my attic.
This is one of the best switches i have seen, there are several others i have seen that cost much more look harder to install and wire.
Some other things you will need are:
-Approx. 15 feet of 8 awg wire. (You might want to get extra just in case, depending on how you run you wires. I used 8 awg audio wire that I had laying around, but 10 would be fine)
-About a foot of 18 awg wire preferably some in black and some in red.
-Some electrical connectors (eye connector for the ground and possibly on for the power if you have to go to the battery, and aslo some butt connectors))
-Electrical tape
Recomended tools:
-Dremel with cut off wheels and sanding stone
-Possibly a soldering gun and solder
-Wire cutters/strippers
-#2 Phillips Screwdriver
-also a very small screwdriver, like one for eyeglasses
No I don't have any pictures for the first part of the install so you should have some basic understanding of your car, and where things are. But I am going to try and give as much detail as I can
I recomend Disconnecting you battery before beginning this project.
1. The first thing I did was unplug the starter wire. The wire clips in, do not unbolt the main power wire. Its on the intake side of the motor
2. Once uplugged you should be able to pull it up to where you can see it better, you might have to remove a clip or tie down. I cut it off about 3 inches from the plug. By doing this you will no longer be able to start the car with your key. Make sure to wrap the end still connected to the harness with electrical tape and ziptie it out of the way.
3. Once the plug is in your hand, strip the end and the end of the thick wire.
I used a butt connector here because the thick wires are difficult to solder and take quite a while, but if you can i suggest soldering the wires together.
4. Next, go ahead and remove your center console plastics. then proceed to run the wire into the cockpit. (two if you are going to use your battery as the pwer source) I used the hole that leads to the tire well, then went through the rubber seal that bolts to the firewall behind the tire well liner. Once inside the car, route your wires to the center console or wherever you want to mount you starter button.
You should also know that I already had a wire coming from my batter for my amp in the trunk, I simply tapped into this for my power supply.
5. Remove the temp and volume *****. on the back there are three screws attaching a black box where the temperature and volume ***** are. After removing the unit, use a small flathead screewdriver to remove the back cover (its clipped in, be carefull not to break it and don't pull on the wires, the top is reused)
Next use the very small screwdriver to remove the (I believe 6) small screws holding in the circuit board, after removing the circuit board, remove the two clear pieces (The top one will be put back in durring reassembly). Remove the lower two light bulbs, these will not be reused.
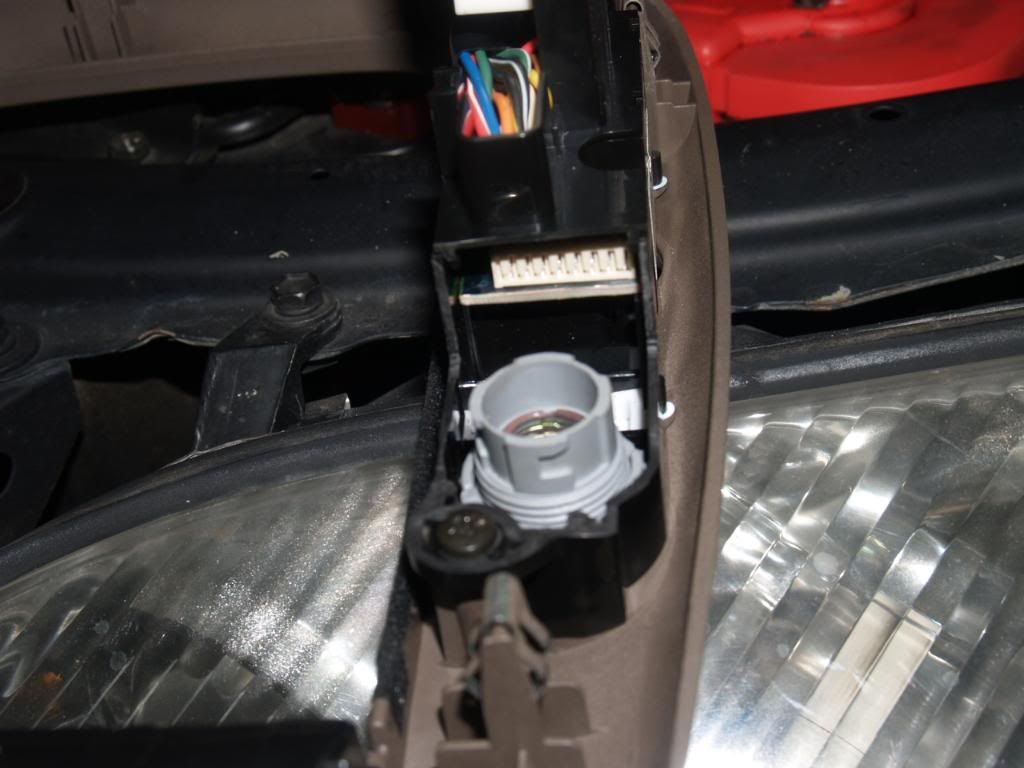
6. Use the Dremel to cut the circuit board right below where the two harnesses plug in and right above the two holes for the lights
Then Carefully dremel the sides of the box ont the bottom half, and the bottom half of the back that clips in. Study the pictures carefully to see where I cut. when doing the cutting alwasy do a little less. you can go back over it, but you can't put plastic back on if you cut to much.
I also used a sanding stone and made the whole slightly larger on the black box so I could position it better. I would put the button in first and see where it lines up in the hole in the console, then remove it and dremel the hole in the box to let you adjust it. I tried to center mine as best I could
after everything is cut, and reassembled, it should look like this:

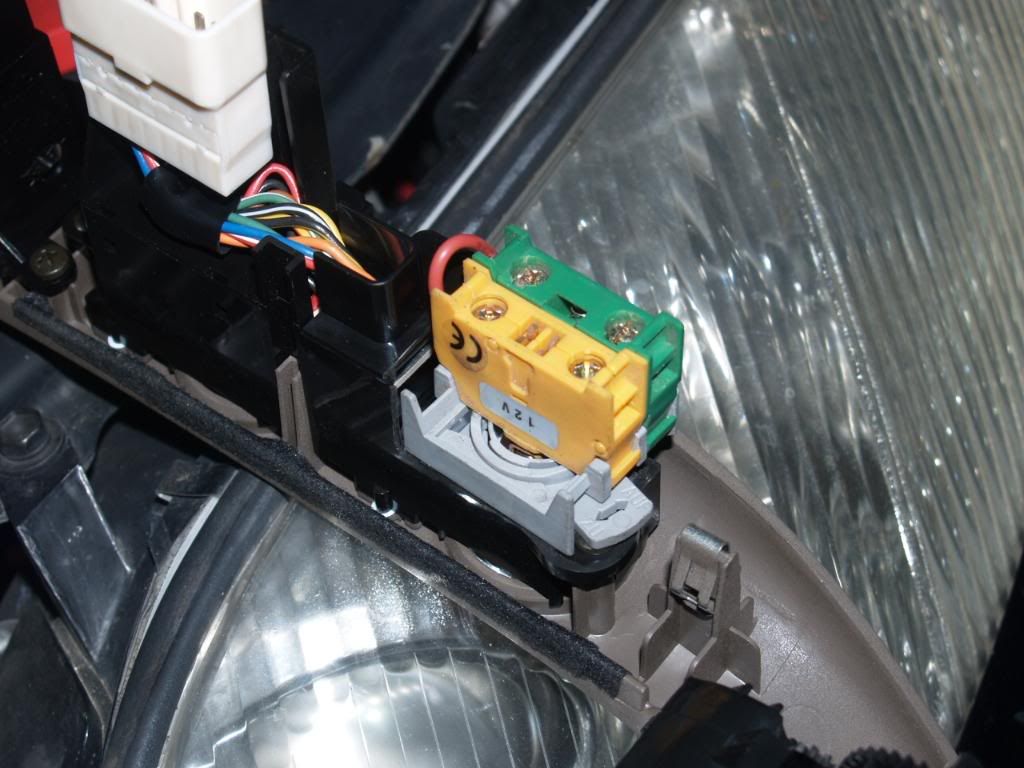
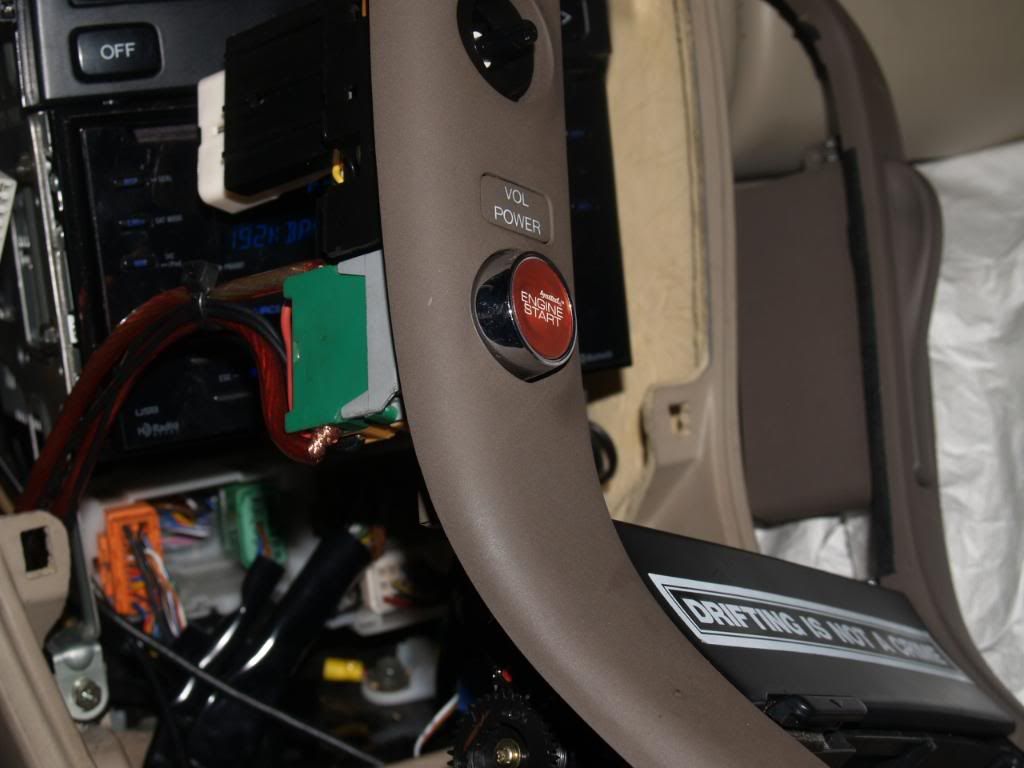
7. After that just put in the wires according to the diagram for the switch. I ran a ground to one of the grounds under the radio, and gave the illumination power from the switch output. that way it just lights when pressed.
You can wire the illumination to your cig lighter so it comes on with your car, but I didn't want mine always on when i was driving because its kind of bright.
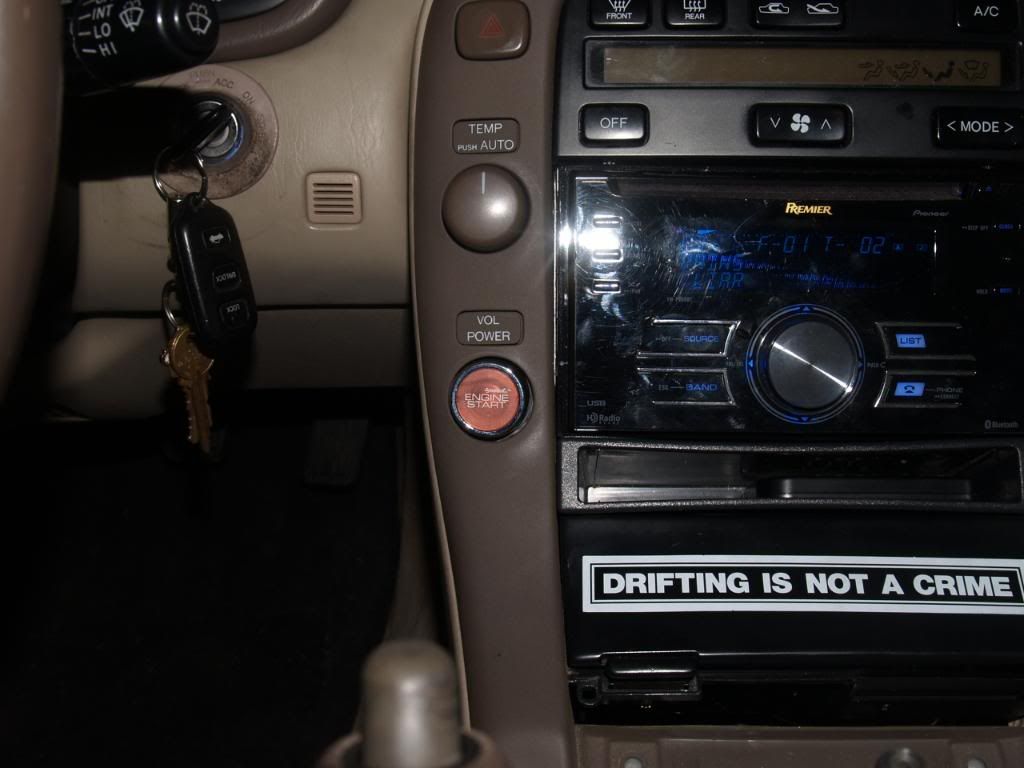
Here are some pics of my finished product

VIdeo Demonstraion
You should also know that using this method on a 5 speed can be dangerous if your not careful. the clutch will not have to be depressed to activate the starter, and anytime you hit the button it will turn over the motor even while in gear. which will move the car forward, and lunge it if the key is turned on.
Some other ways you could install and wire the switch are:
Installing a relay that is activated by the key switch that give the switch power and/or illumination.
You could even remove the dash under panel to gain access to the back of the key switch and using a test light figure out which wire sends the signal to the starter and route that wire to the starter button.
You could install where the cig lighter is so that the door can be shut over it
You could tap into the starter wire instead of cutting it so that the key can still be used
and I'm Sure there are other ways, just be creative.
I also had several request for how to be able to use the starter button to crank the car wthout the key.
I am going to strongly advise against this method.
It can be made somewhat secure, but would be much easier to steal.
I'll start of with what your would lose.
Most Importantly, you would have to remove the steering wheel lock permenatly. you would also mostl likely no longer have the ACC function.
To do this the lower part of the dash, steering column covers and possibly the gauge cluster will have to be removed.
you would have to use a chisel to remove the breakoff bolts that attatch the key mechanism to the steering column.
After removing that you will need to figure out what wire wires are given power when the key is turned to ON (easiest way would be to use a test light and turn the key to different possitions) these wires would need to be wired to a toggle switch somewhere (just tap wires don't cut). You could use a Keyed switch to help with anti theft they can be found at any real electrical shop. auto parts stores and even radioshack might have one. It will be a switch that uses a key (usually the round security keys) to toggle on and off.
You would probably have to fabricate a bracket to mount the starter button in the factory key hole
and the factory key switch would still have to have a key in it (as in key that would start the car would have to be left in the key hole permenantly) and could be wrapped up and ziptied up somewhere under the dash
I did do this on a 95 Toyota Celica once, but only because it was a race car that was not driven on the street
Thanks for looking and let me know if anyone has any problems.
I'll start with what products and tools I used to do this. Then I will explain in the best detail i can how I installed and wired my setup which is on a 97 SC300. Lastly i will briefly explain some other options for instalation per requests.
Here is the Push Button Starter i used.
Ignited Performance
I purchased mine several years ago and had it on another car, that i have since gotten rid of, and the switch has been sitting in a box in my attic.
This is one of the best switches i have seen, there are several others i have seen that cost much more look harder to install and wire.
Some other things you will need are:
-Approx. 15 feet of 8 awg wire. (You might want to get extra just in case, depending on how you run you wires. I used 8 awg audio wire that I had laying around, but 10 would be fine)
-About a foot of 18 awg wire preferably some in black and some in red.
-Some electrical connectors (eye connector for the ground and possibly on for the power if you have to go to the battery, and aslo some butt connectors))
-Electrical tape
Recomended tools:
-Dremel with cut off wheels and sanding stone
-Possibly a soldering gun and solder
-Wire cutters/strippers
-#2 Phillips Screwdriver
-also a very small screwdriver, like one for eyeglasses
No I don't have any pictures for the first part of the install so you should have some basic understanding of your car, and where things are. But I am going to try and give as much detail as I can
I recomend Disconnecting you battery before beginning this project.
1. The first thing I did was unplug the starter wire. The wire clips in, do not unbolt the main power wire. Its on the intake side of the motor
2. Once uplugged you should be able to pull it up to where you can see it better, you might have to remove a clip or tie down. I cut it off about 3 inches from the plug. By doing this you will no longer be able to start the car with your key. Make sure to wrap the end still connected to the harness with electrical tape and ziptie it out of the way.
3. Once the plug is in your hand, strip the end and the end of the thick wire.
I used a butt connector here because the thick wires are difficult to solder and take quite a while, but if you can i suggest soldering the wires together.
4. Next, go ahead and remove your center console plastics. then proceed to run the wire into the cockpit. (two if you are going to use your battery as the pwer source) I used the hole that leads to the tire well, then went through the rubber seal that bolts to the firewall behind the tire well liner. Once inside the car, route your wires to the center console or wherever you want to mount you starter button.
You should also know that I already had a wire coming from my batter for my amp in the trunk, I simply tapped into this for my power supply.
5. Remove the temp and volume *****. on the back there are three screws attaching a black box where the temperature and volume ***** are. After removing the unit, use a small flathead screewdriver to remove the back cover (its clipped in, be carefull not to break it and don't pull on the wires, the top is reused)
Next use the very small screwdriver to remove the (I believe 6) small screws holding in the circuit board, after removing the circuit board, remove the two clear pieces (The top one will be put back in durring reassembly). Remove the lower two light bulbs, these will not be reused.
6. Use the Dremel to cut the circuit board right below where the two harnesses plug in and right above the two holes for the lights
Then Carefully dremel the sides of the box ont the bottom half, and the bottom half of the back that clips in. Study the pictures carefully to see where I cut. when doing the cutting alwasy do a little less. you can go back over it, but you can't put plastic back on if you cut to much.
I also used a sanding stone and made the whole slightly larger on the black box so I could position it better. I would put the button in first and see where it lines up in the hole in the console, then remove it and dremel the hole in the box to let you adjust it. I tried to center mine as best I could
after everything is cut, and reassembled, it should look like this:


7. After that just put in the wires according to the diagram for the switch. I ran a ground to one of the grounds under the radio, and gave the illumination power from the switch output. that way it just lights when pressed.
You can wire the illumination to your cig lighter so it comes on with your car, but I didn't want mine always on when i was driving because its kind of bright.
Here are some pics of my finished product


VIdeo Demonstraion
You should also know that using this method on a 5 speed can be dangerous if your not careful. the clutch will not have to be depressed to activate the starter, and anytime you hit the button it will turn over the motor even while in gear. which will move the car forward, and lunge it if the key is turned on.
Some other ways you could install and wire the switch are:
Installing a relay that is activated by the key switch that give the switch power and/or illumination.
You could even remove the dash under panel to gain access to the back of the key switch and using a test light figure out which wire sends the signal to the starter and route that wire to the starter button.
You could install where the cig lighter is so that the door can be shut over it
You could tap into the starter wire instead of cutting it so that the key can still be used
and I'm Sure there are other ways, just be creative.
I also had several request for how to be able to use the starter button to crank the car wthout the key.
I am going to strongly advise against this method.
It can be made somewhat secure, but would be much easier to steal.
I'll start of with what your would lose.
Most Importantly, you would have to remove the steering wheel lock permenatly. you would also mostl likely no longer have the ACC function.
To do this the lower part of the dash, steering column covers and possibly the gauge cluster will have to be removed.
you would have to use a chisel to remove the breakoff bolts that attatch the key mechanism to the steering column.
After removing that you will need to figure out what wire wires are given power when the key is turned to ON (easiest way would be to use a test light and turn the key to different possitions) these wires would need to be wired to a toggle switch somewhere (just tap wires don't cut). You could use a Keyed switch to help with anti theft they can be found at any real electrical shop. auto parts stores and even radioshack might have one. It will be a switch that uses a key (usually the round security keys) to toggle on and off.
You would probably have to fabricate a bracket to mount the starter button in the factory key hole
and the factory key switch would still have to have a key in it (as in key that would start the car would have to be left in the key hole permenantly) and could be wrapped up and ziptied up somewhere under the dash
I did do this on a 95 Toyota Celica once, but only because it was a race car that was not driven on the street
Thanks for looking and let me know if anyone has any problems.
Last edited by Dustin2JZ; 03-18-10 at 11:17 PM.
Trending Topics
#8
I think imma go with one of these once i get my swap complete.
http://www.alibaba.com/product-gs/23..._RFID_car.html
has everthing you need to be like the newer cars. problem solved
http://www.alibaba.com/product-gs/23..._RFID_car.html
has everthing you need to be like the newer cars. problem solved

#13
#14
#15
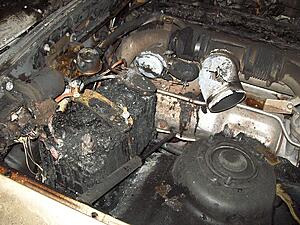
Nice write up and that looks like it works well. let me put a little input in though please, if you do reroute the starter solenoid wire in-to the car please use a fuse at the battery or risk your car looking like this.
(same mod, no fuse somehow the wire grounded out)

(same mod, no fuse somehow the wire grounded out)


