My SC300ĺs progression. LONG W/LOTS OF PICS!!!
 09-08-12, 02:36 AM
#1
Driver
Thread Starter

Join Date: Oct 2010
Location: AR
Posts: 105
Likes: 0
Received 0 Likes
on
0 Posts
This is going to be a pretty lengthy thread with LOTS of pictures lol
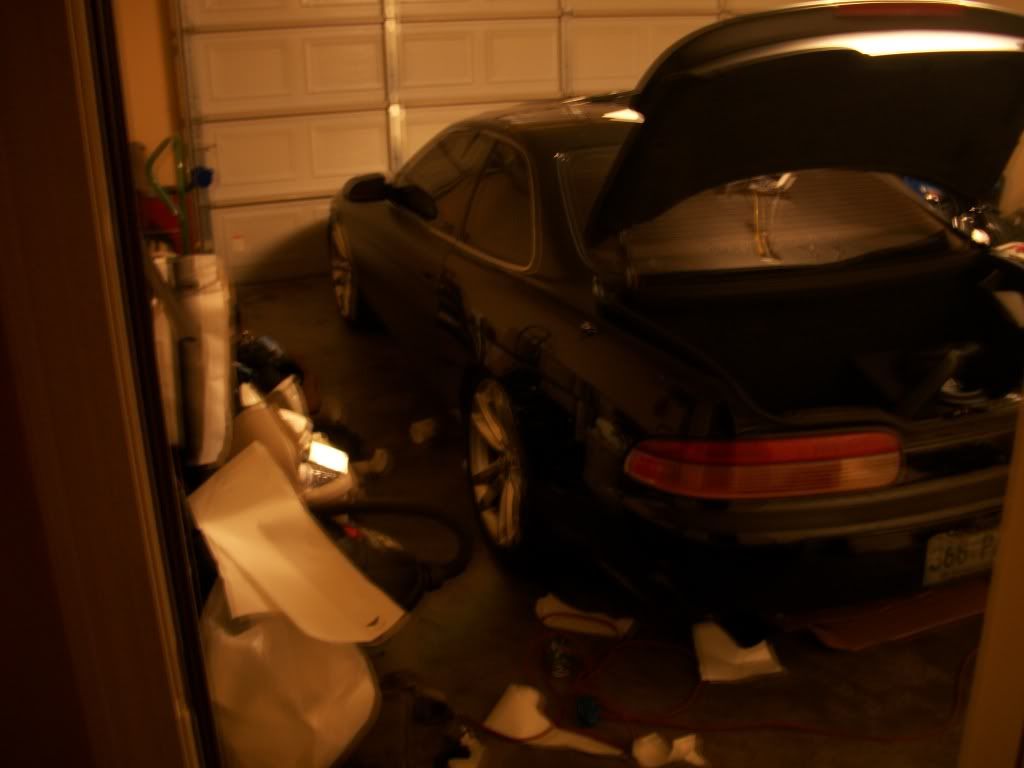
I guess we will start off with when I picked up the car. This was almost 1.5 years ago I guess lol. I picked the car up from a friend of mine that was stationed in OK with the Air Force. He didnĺt have it very long and was kind of scared of the car and its maintenance. It was an NA-T setup that consisted of a Dave-H turbo kit with a TE45a turbo (67mm), Tial 44mm WG, Trust side mount intercooler, DSM BOV, Devils Own water methanol setup, AEM EMS, TT auto LSD, Boost Logic built trans with PI stall converter, Volk SE37aĺs, ectů ectů.
The car needed a retune pretty bad and put down about 400 whp with a VERY lean tune. Was not very safe at all lol. Had a bad injector and another one that was weak so I swapped out the 550ĺs for some PTE 1000ĺs. Retuned and left the boost at 12 psi (WG setting) and put down a nice smooth/safe 380 whp. I would later add a TruBoost and also run it with quite a bit of boost (24 psi) but never got a chance to dyno it again. It hauled tail PLENTY good lol.
 09-08-12, 02:37 AM
#2
Driver
Thread Starter
Join Date: Oct 2010
Location: AR
Posts: 105
Likes: 0
Received 0 Likes
on
0 Posts
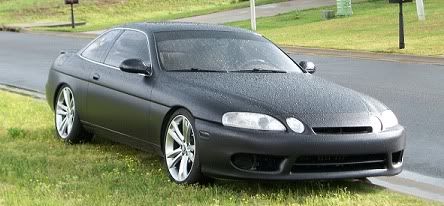
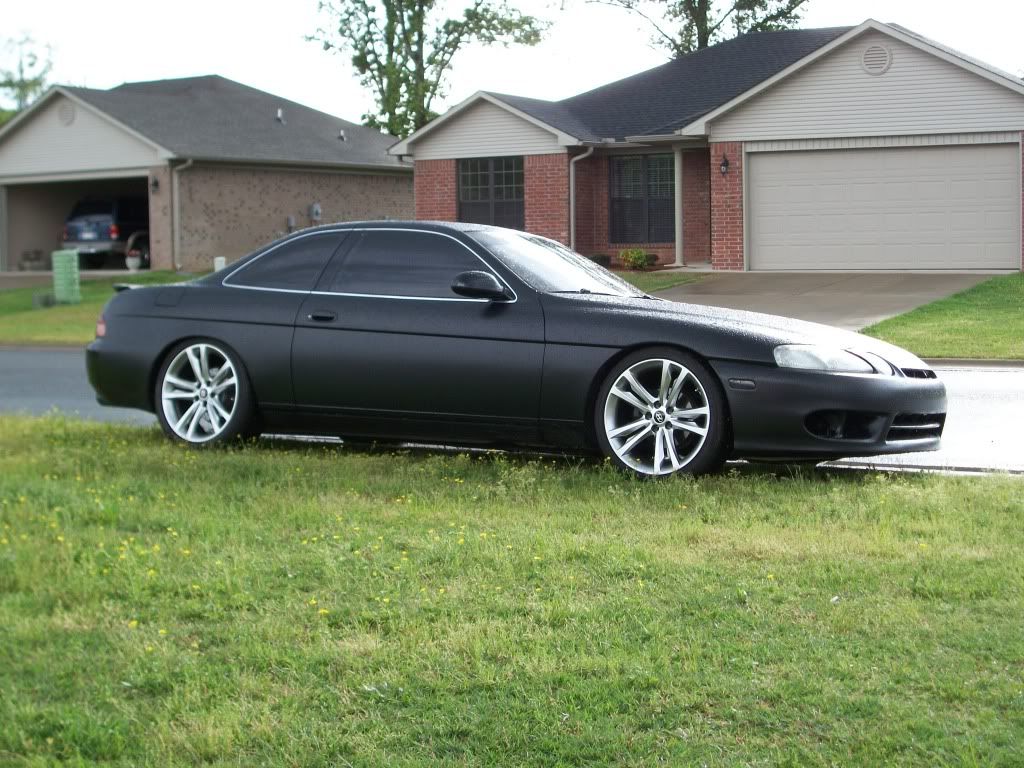
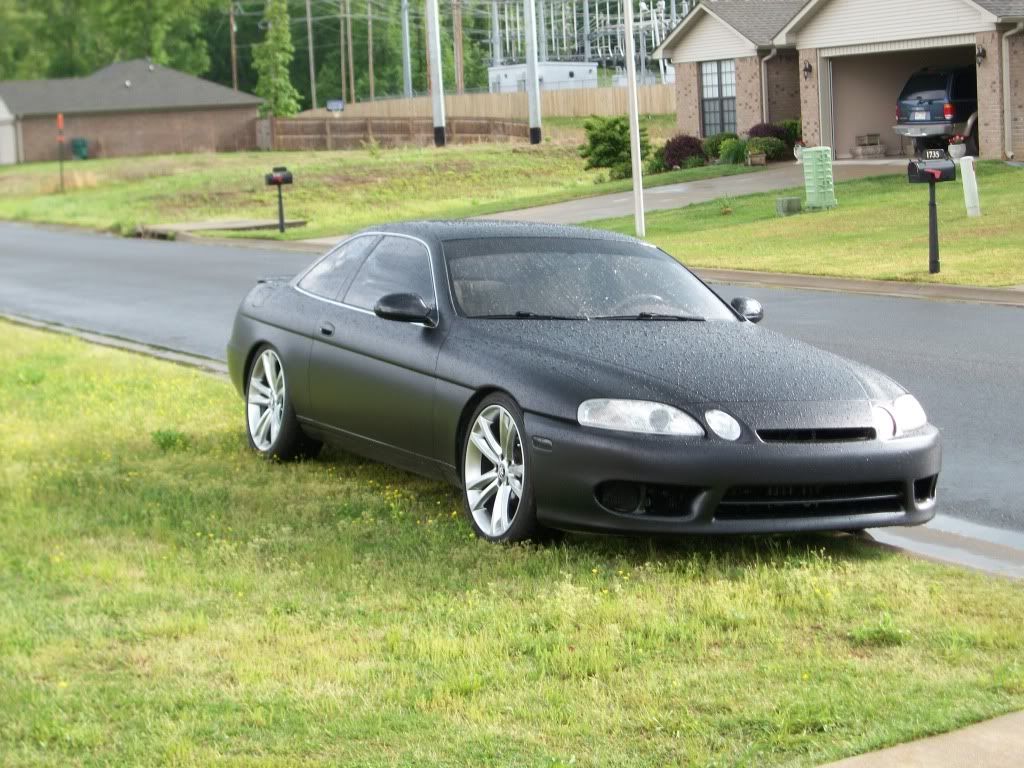
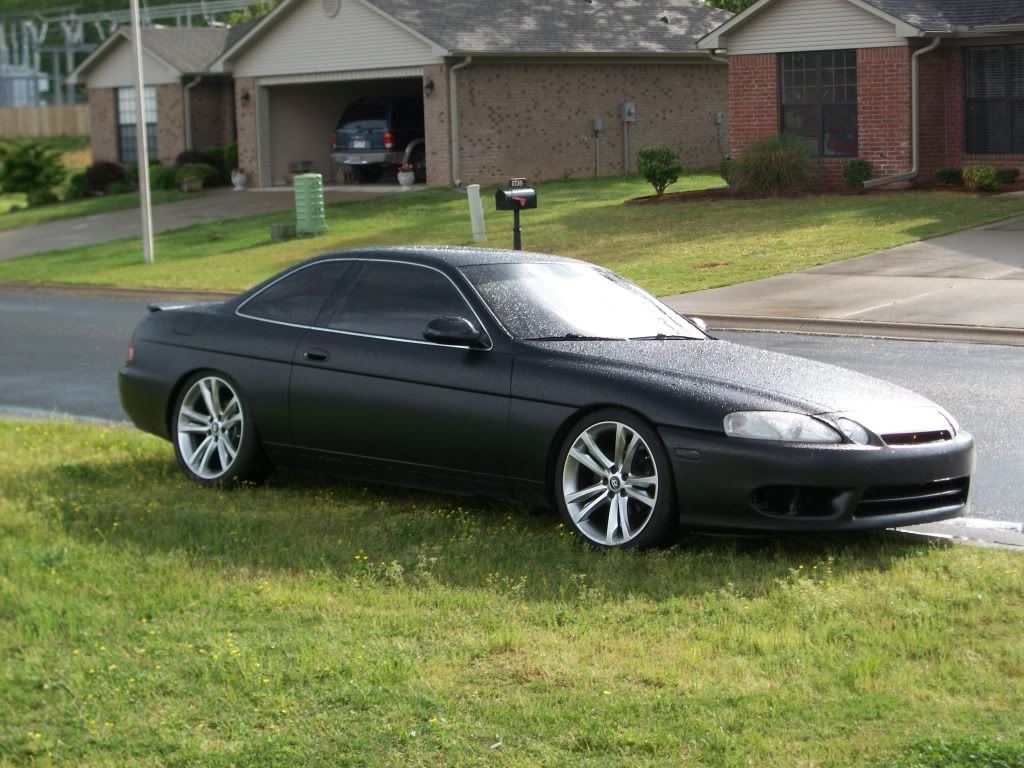
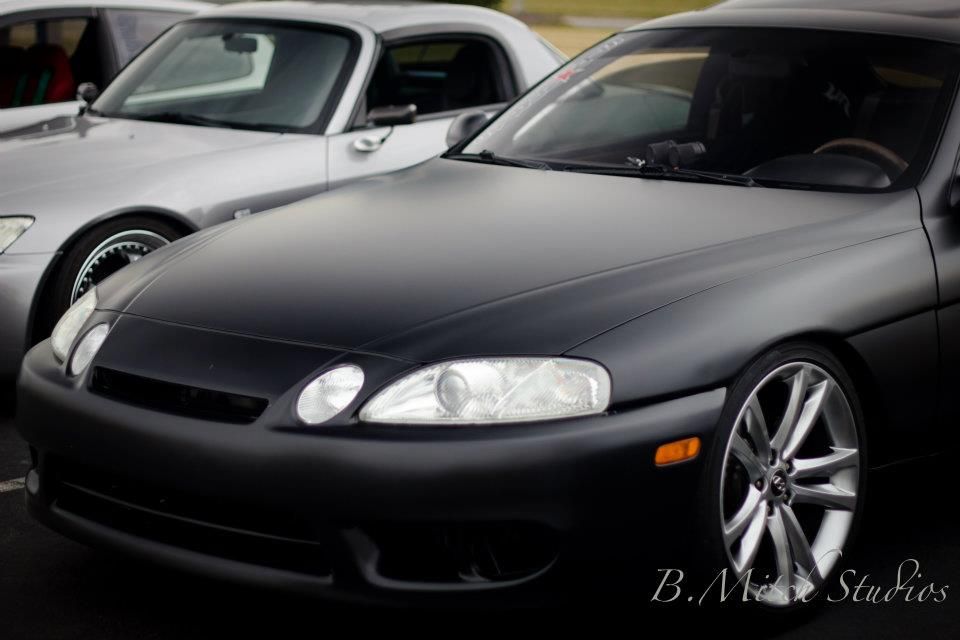
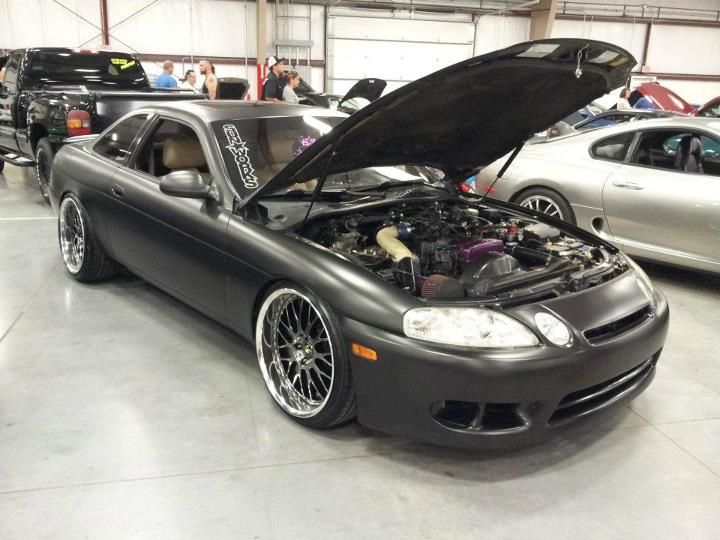
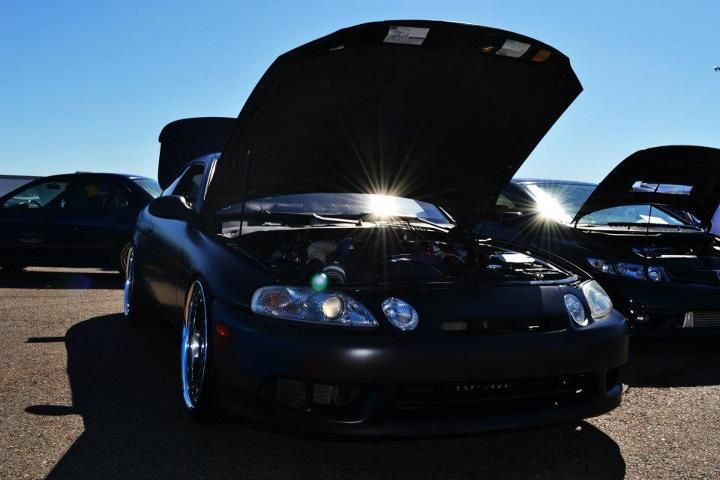
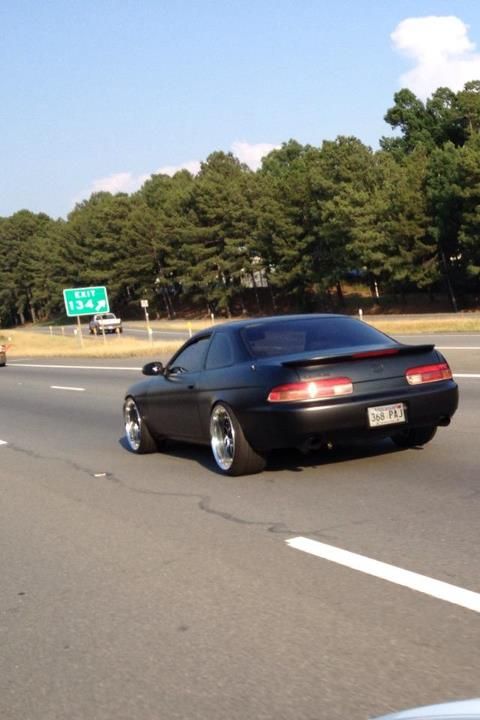
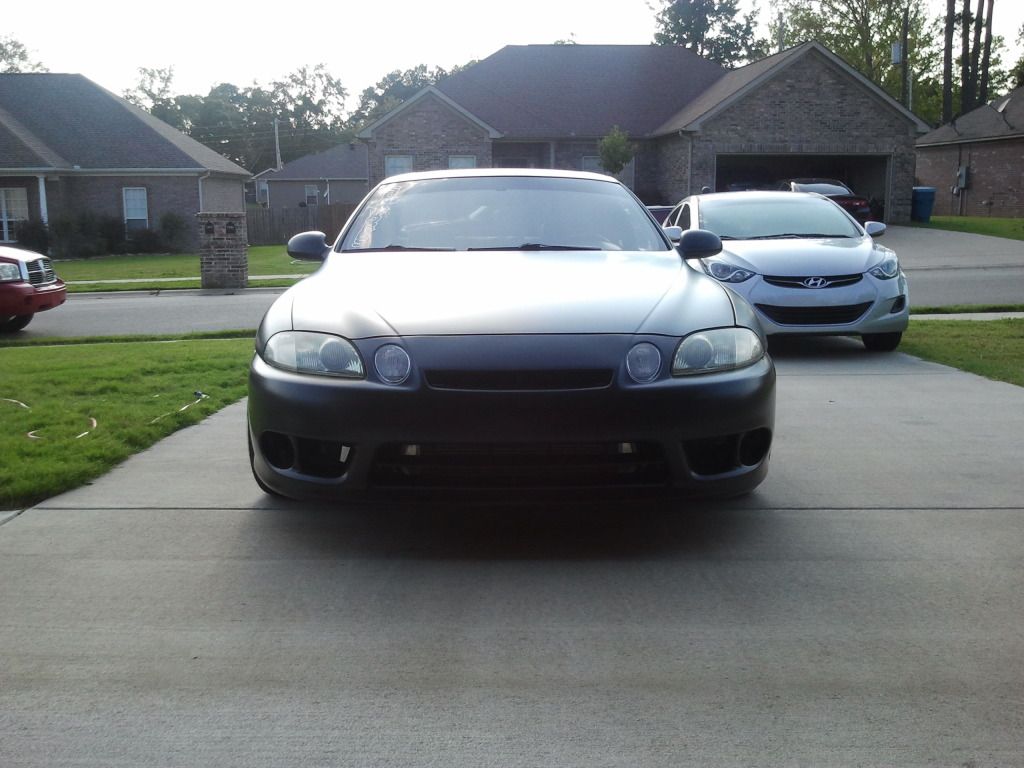
I enjoyed this setup for quite a while and started to focus on other areas of the car. First up was the exterior. In most pictures the paint looks good and at a distance it looked good lol. It had a lot of “touch up paint” spots on it, scratches, and the clear coat was fading. I thought about just doing a respray and decided I would much rather have a different finish, that at the time I hadn’t seen another sc with… and still hadn’t … well not the exact same as mine. Lol. Sooo this is when the wrapping project started. I chose to go with the brand ORACAL b/c they were the only ones that offered a matte black that is more akin to a satin finish instead of the dry (I think ashy and rattle canned) look of the flat blacks available. This was the first vehicle I had ever wrapped. First thing I had ever wrapped at all really lol. But I have experience with vinyl graphics and window tint so I figured I would give it a try.
Sorry I seem to have lost a lot of pics from the wrap job.
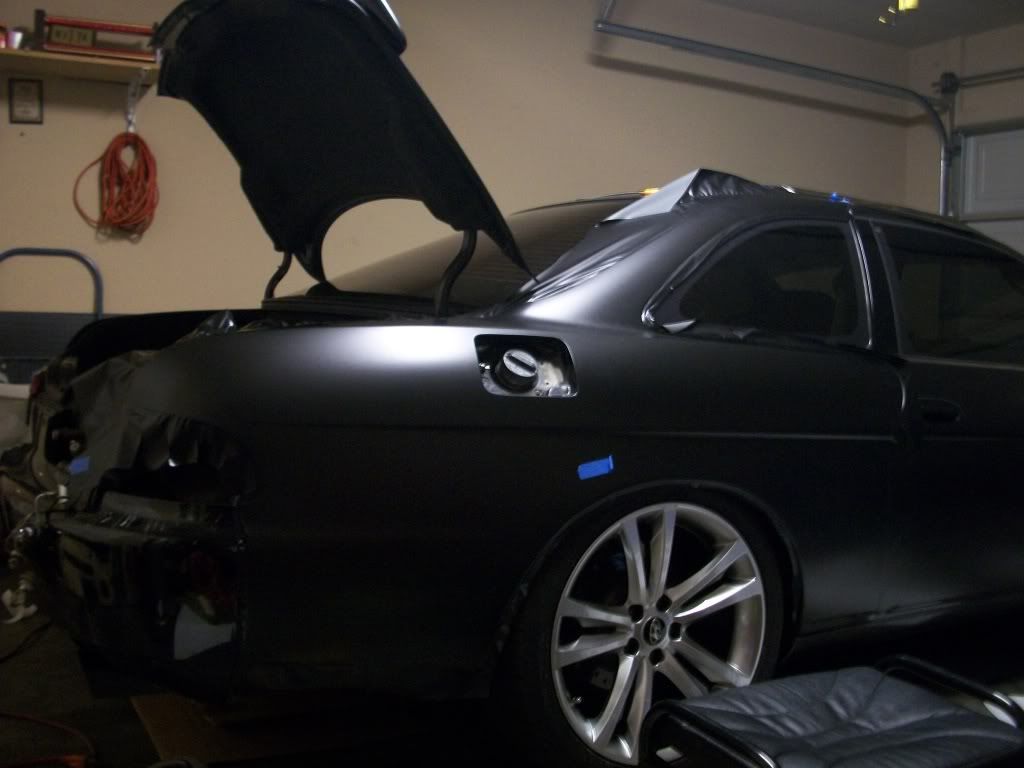
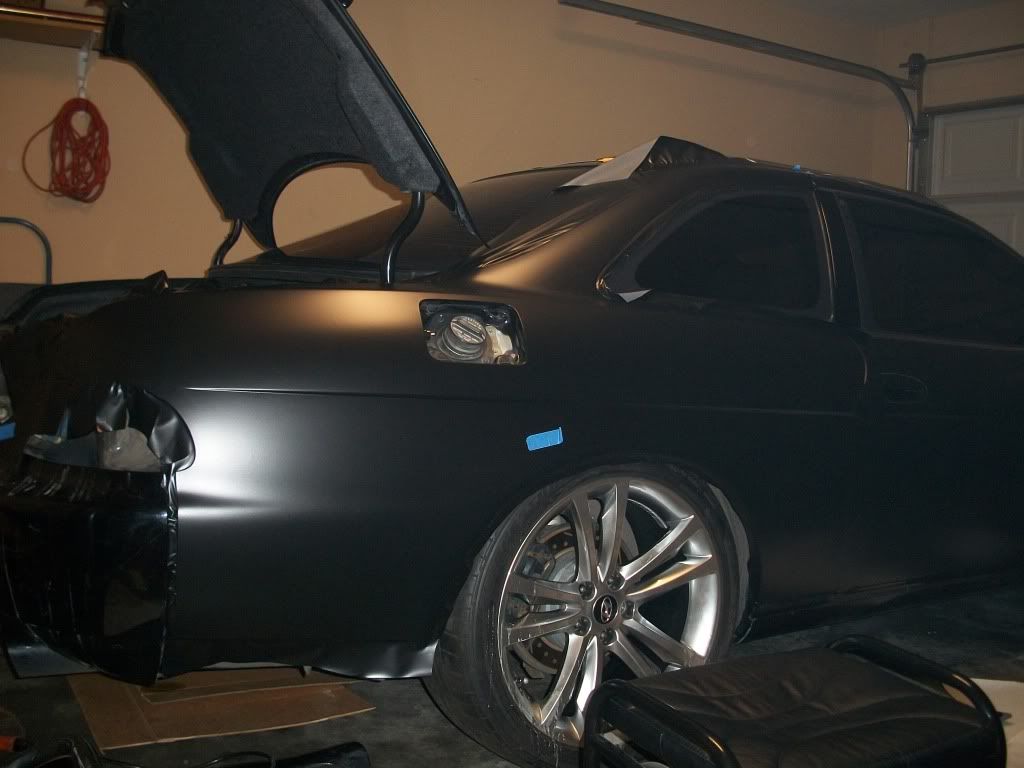
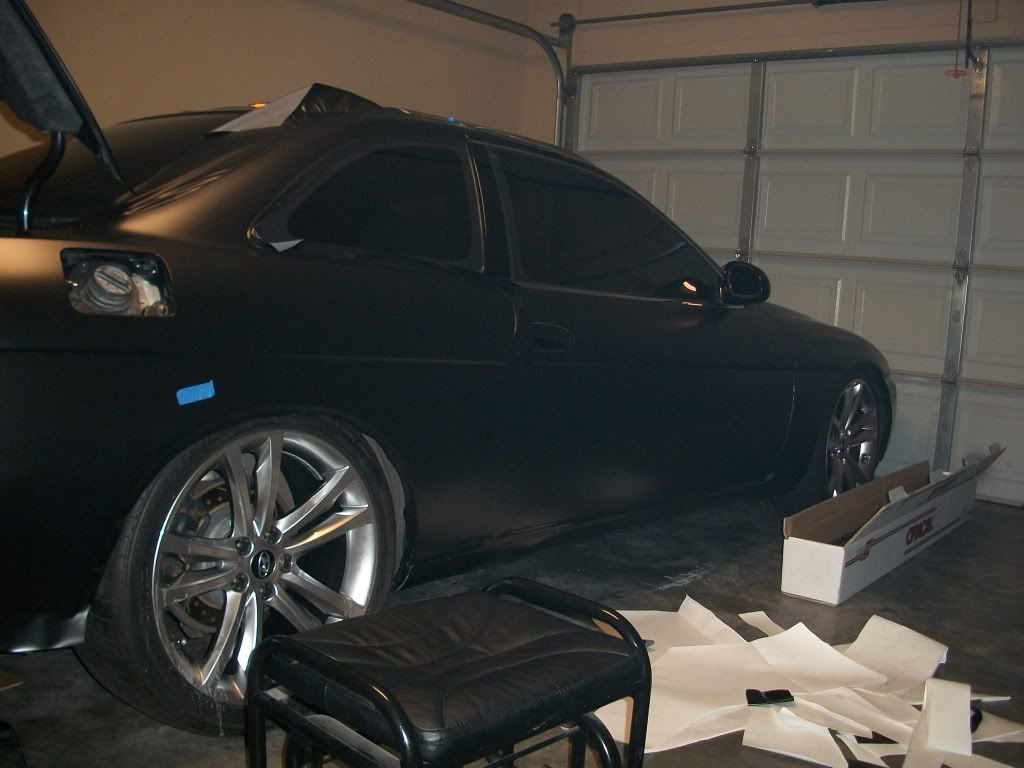
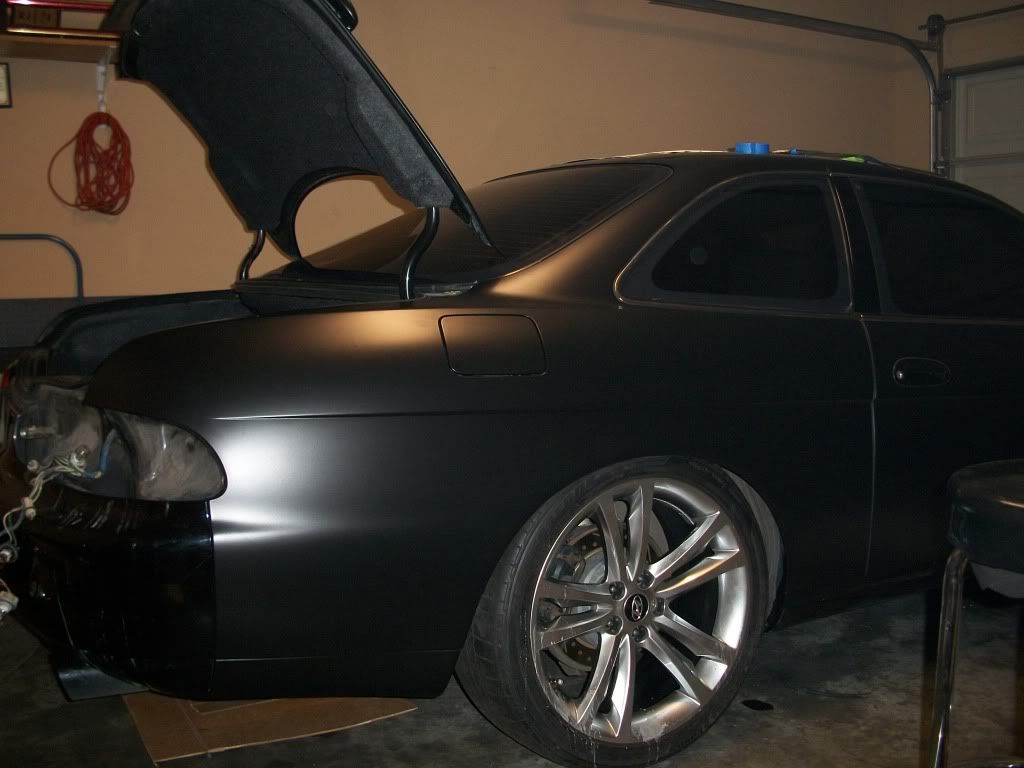

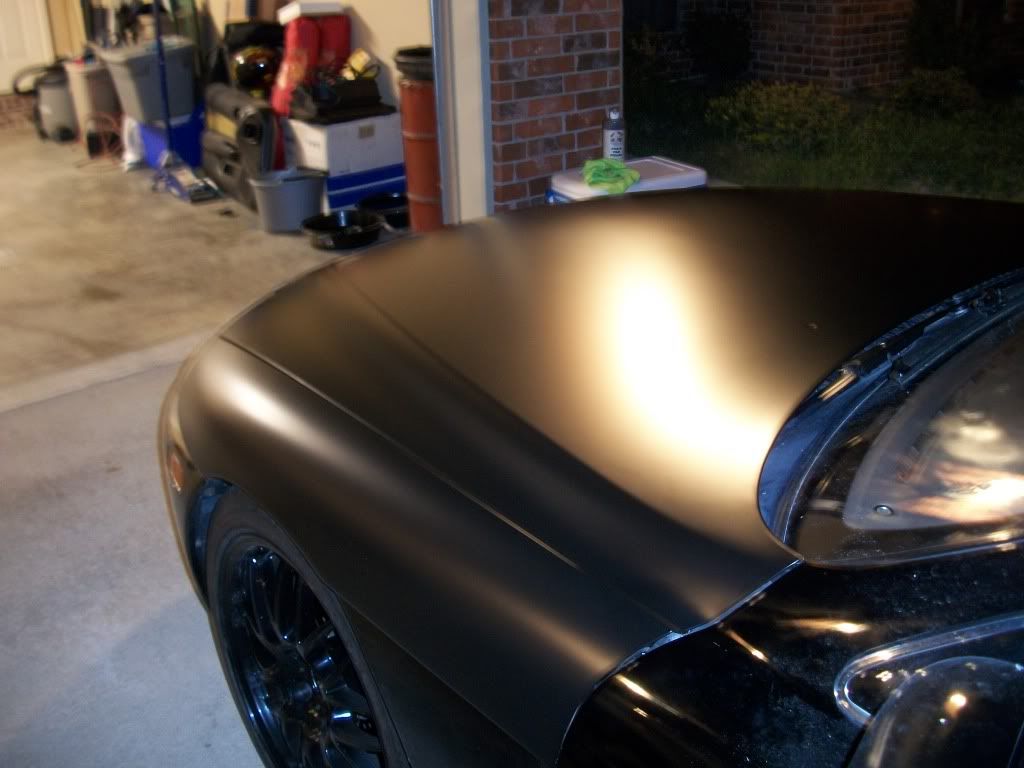
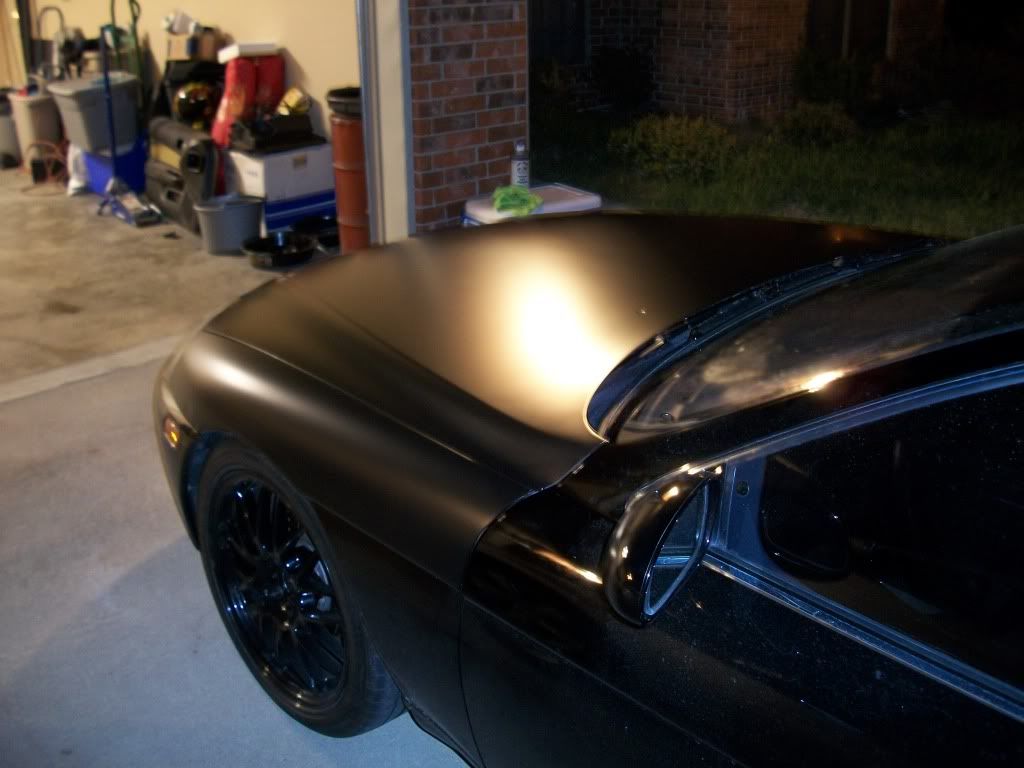
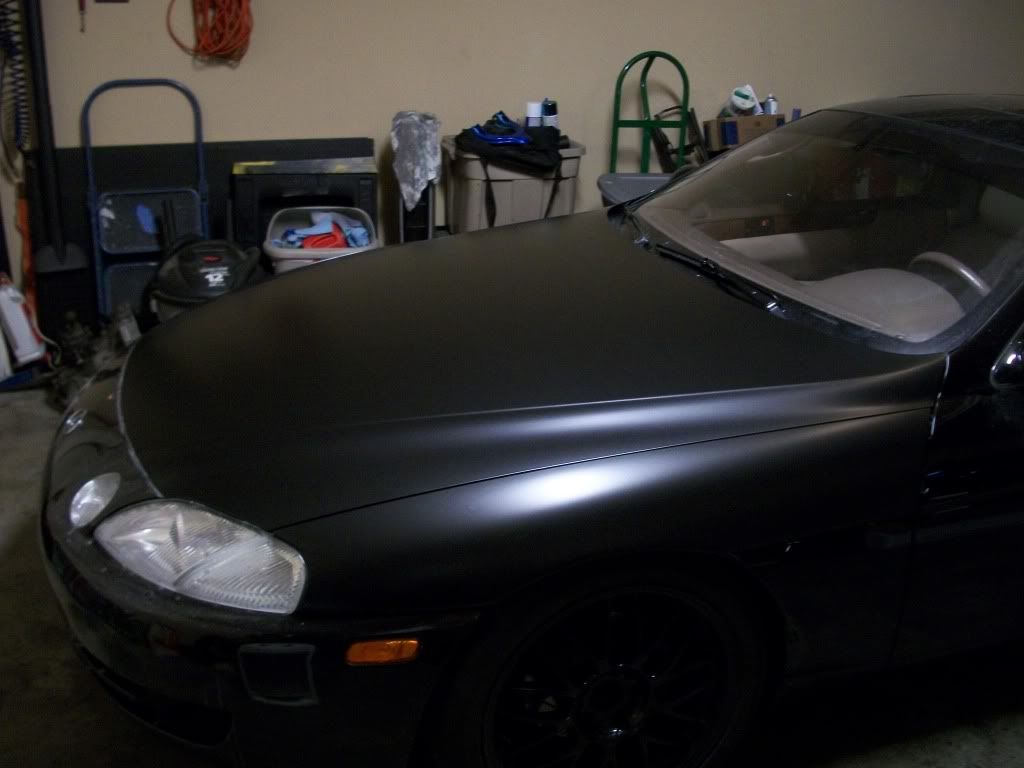
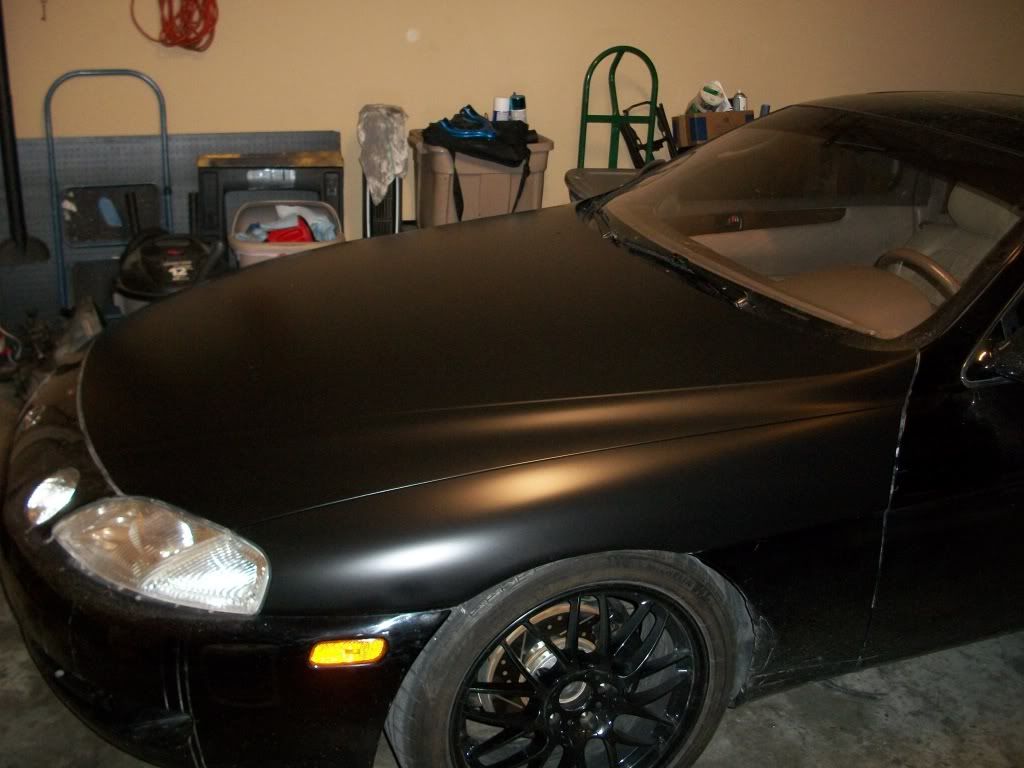
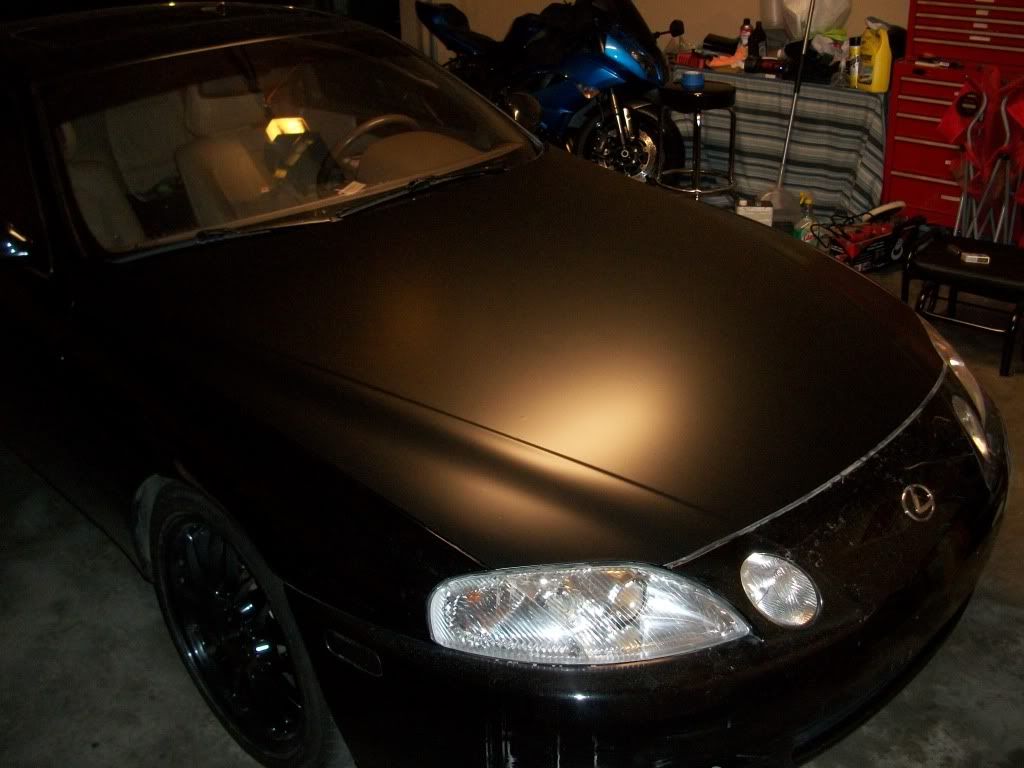
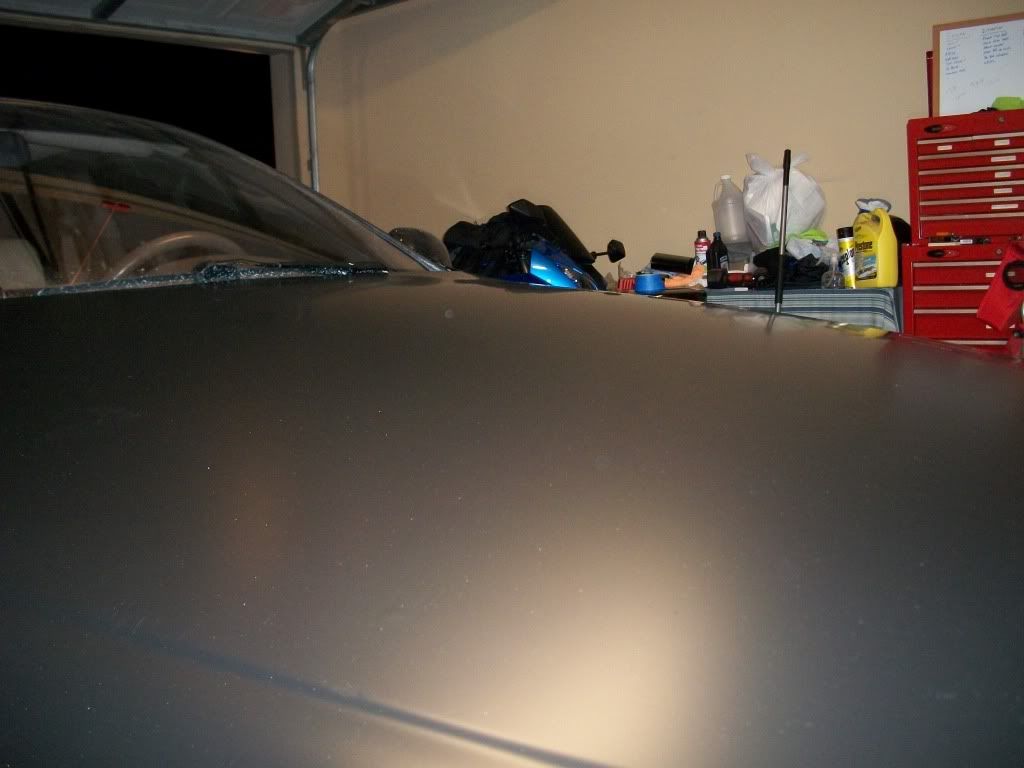
Very pleased with the outcome of the finish/texture. Pics were with my winter/spare wheels (gen coupe track 19’s while the Volks were getting powder coated)
Sorry I seem to have lost a lot of pics from the wrap job.
Very pleased with the outcome of the finish/texture. Pics were with my winter/spare wheels (gen coupe track 19’s while the Volks were getting powder coated)
09-08-12, 02:38 AM
#3
Driver
Thread Starter
Join Date: Oct 2010
Location: AR
Posts: 105
Likes: 0
Received 0 Likes
on
0 Posts
Next Up was the spring/strut combo. The car was on Supra struts with Falken springs. Gave the car a very nice drop on the 18ĺs, but I wanted more adjustability. So I picked up a set of BC Racing BR coilovers. Have a friend that is a dealer for them and I got them at a very good price. Also figured I would change up the wheels a little bit too so I had the Volks powder coated a candy teal. Love this color!! Lol.
I donĺt seem to have very many pics of when it was on the candy teal wheels before I sold them. This is really the only daytime pic I can find that shows the true color of the wheels. The rest were taken at night and show more blue than anything b/c of the lighting.
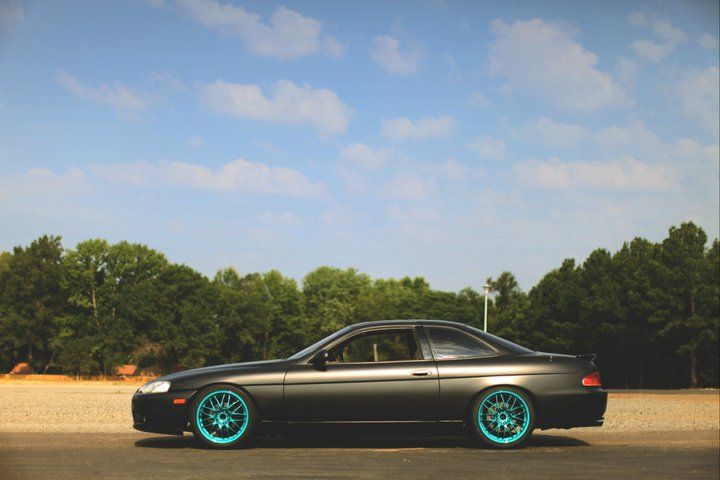
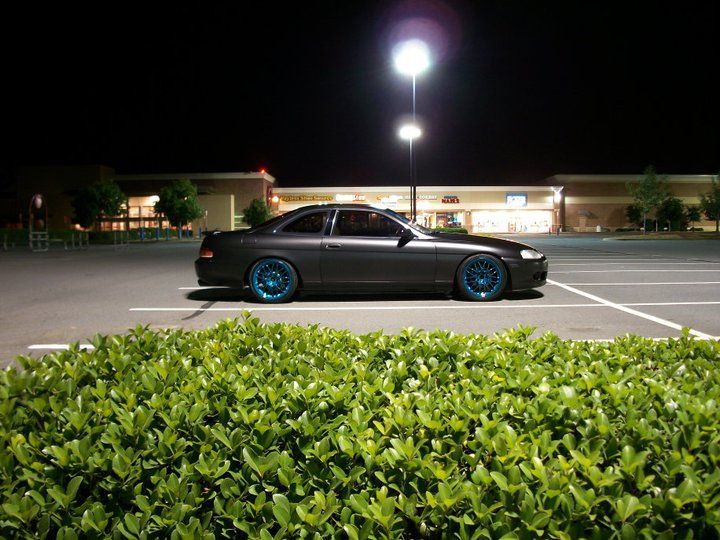
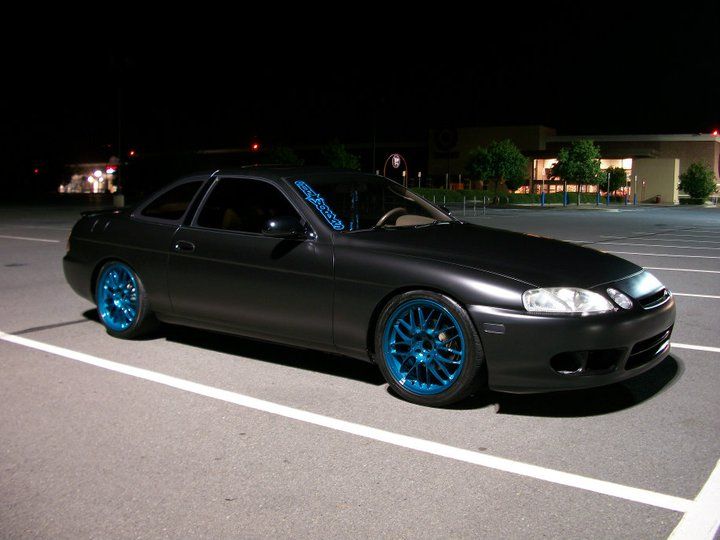
I donĺt seem to have very many pics of when it was on the candy teal wheels before I sold them. This is really the only daytime pic I can find that shows the true color of the wheels. The rest were taken at night and show more blue than anything b/c of the lighting.
09-08-12, 02:39 AM
#4
Driver
Thread Starter
Join Date: Oct 2010
Location: AR
Posts: 105
Likes: 0
Received 0 Likes
on
0 Posts
Now it was time to turn to the interior. I wasn’t much of a fan of the tan interior. Got a good deal on an almost complete black interior setup for like $500 so I jumped on it. Just lacked front seats and a couple odd and ends. Time to gut the interior J
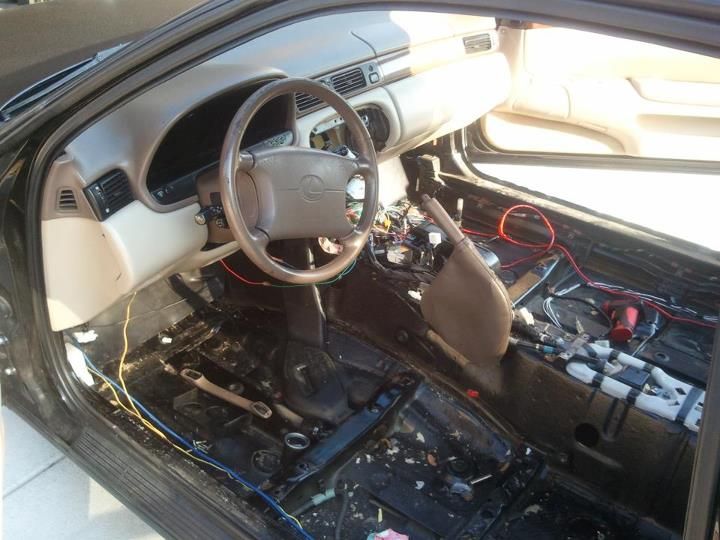
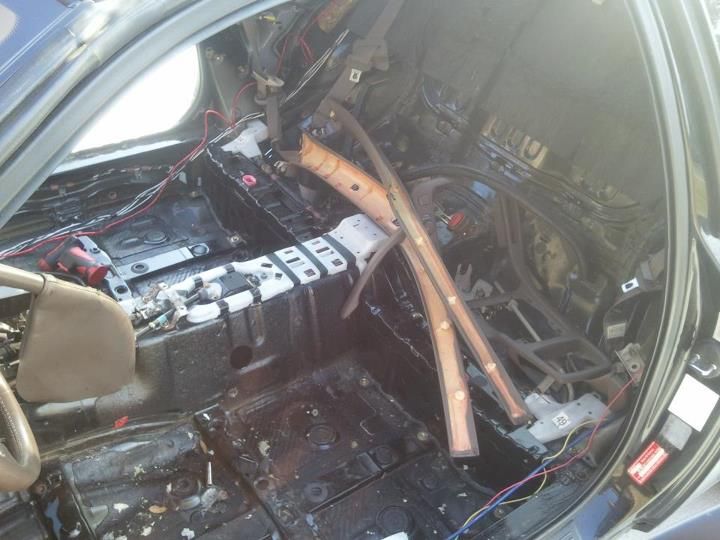
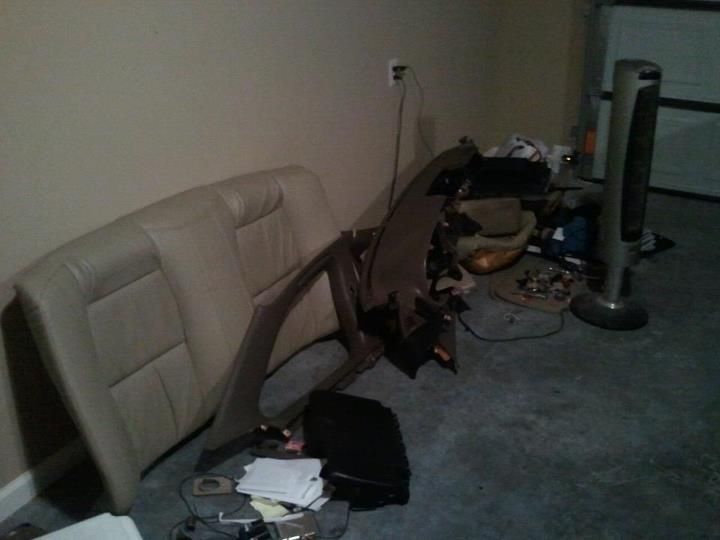
Only “partially done” pic I could find.
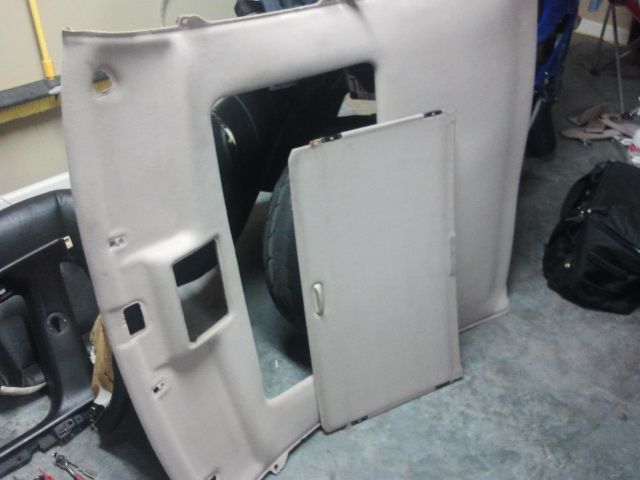
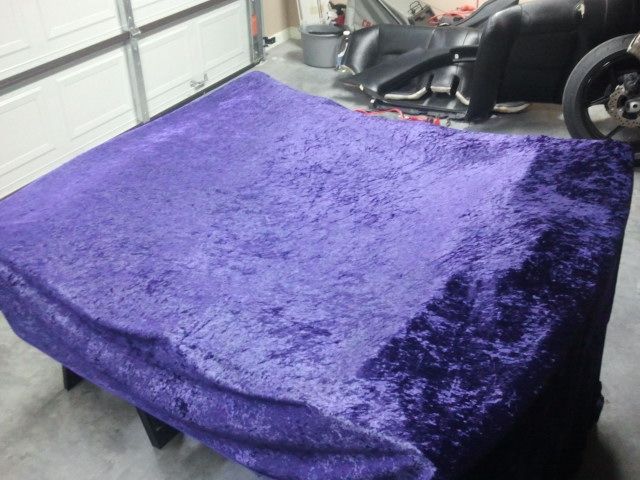
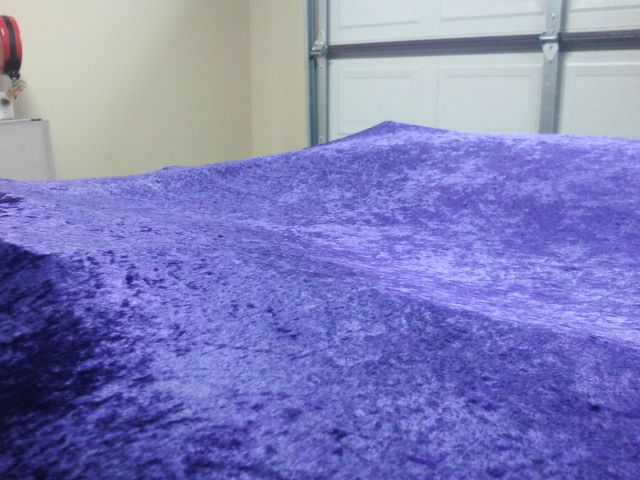
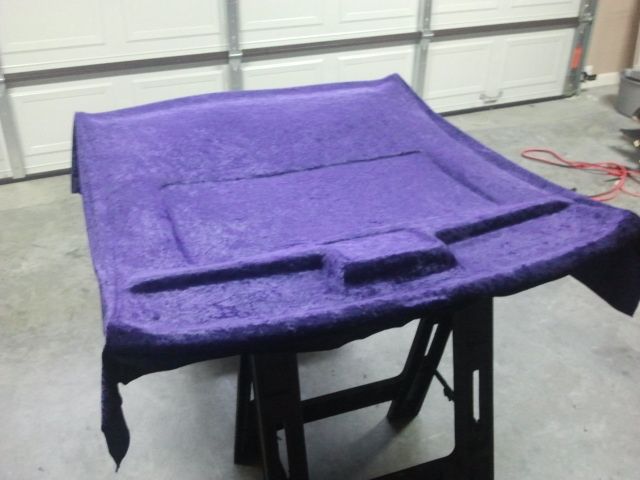
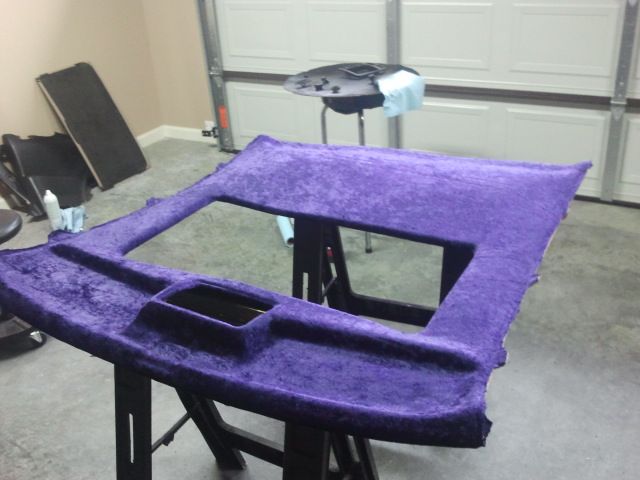
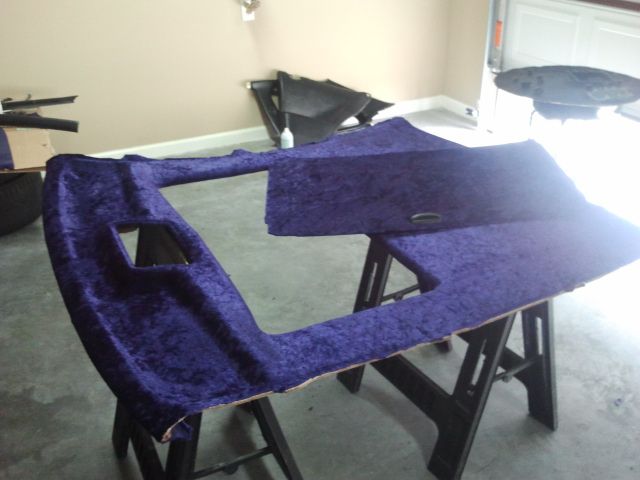
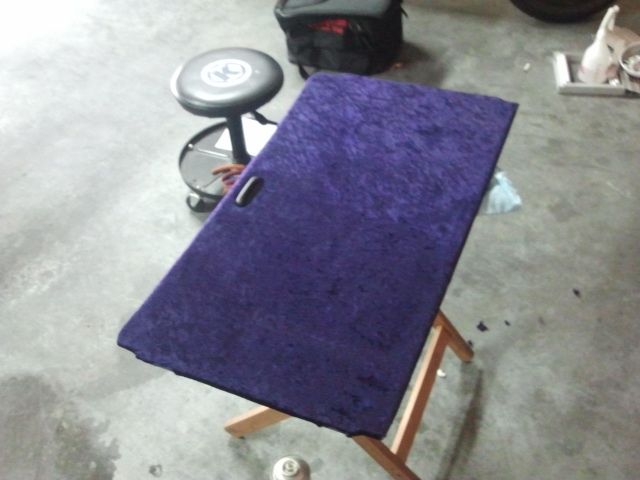
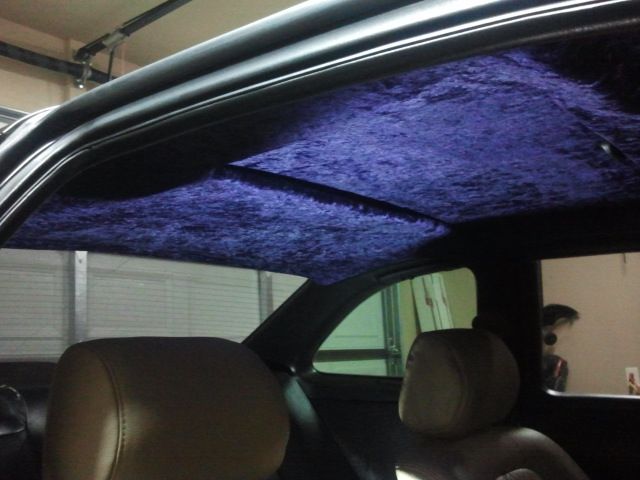
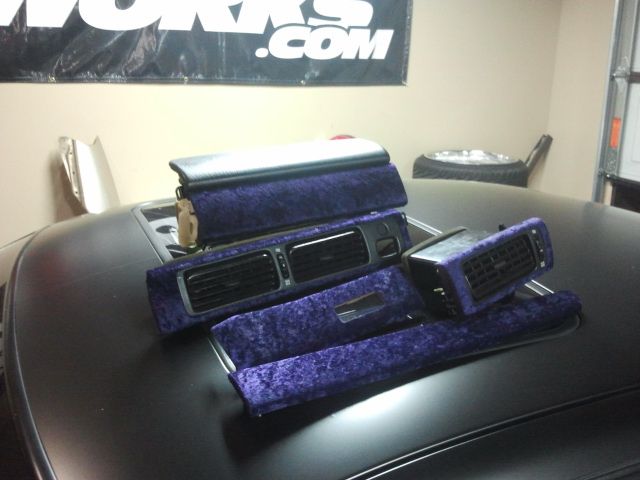
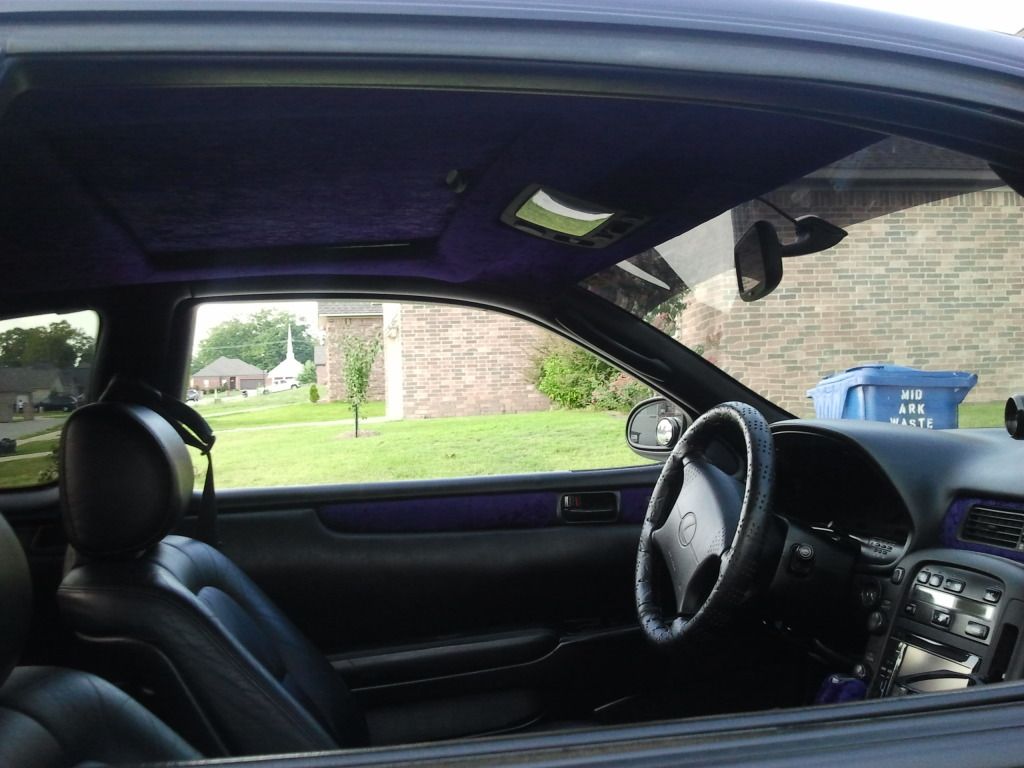
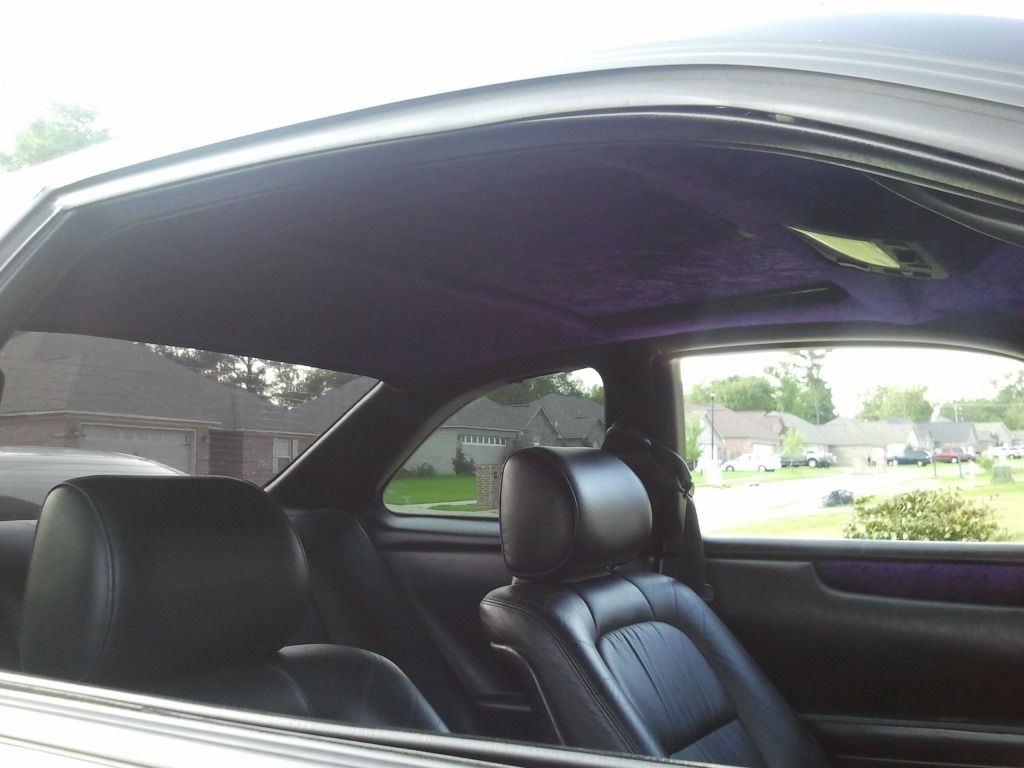
I also decided that I wanted to do something different with the wood trim and the headliner. I now had two complete sets of wood trim so I just went for it! So after chewing on the idea of different vinyl materials I could use, I decided to go with something a little more “plush” and “fluffy” lololol. Picked up some stretch purple crushed velour fabric and got started. Here are the pics of the headliner process and the and wood trim completed. Word of advice to anyone who plans to do a headliner… not that hard to do, quite easy actually. The hard part is the sun shade for the sunroof if you have one. THAT THING is a total pain in the rear to get in and out lol. At least it was for me. Anyway here are the pics.
Headliner work

Only “partially done” pic I could find.
I also decided that I wanted to do something different with the wood trim and the headliner. I now had two complete sets of wood trim so I just went for it! So after chewing on the idea of different vinyl materials I could use, I decided to go with something a little more “plush” and “fluffy” lololol. Picked up some stretch purple crushed velour fabric and got started. Here are the pics of the headliner process and the and wood trim completed. Word of advice to anyone who plans to do a headliner… not that hard to do, quite easy actually. The hard part is the sun shade for the sunroof if you have one. THAT THING is a total pain in the rear to get in and out lol. At least it was for me. Anyway here are the pics.
Headliner work
09-08-12, 02:40 AM
#5
Driver
Thread Starter
Join Date: Oct 2010
Location: AR
Posts: 105
Likes: 0
Received 0 Likes
on
0 Posts
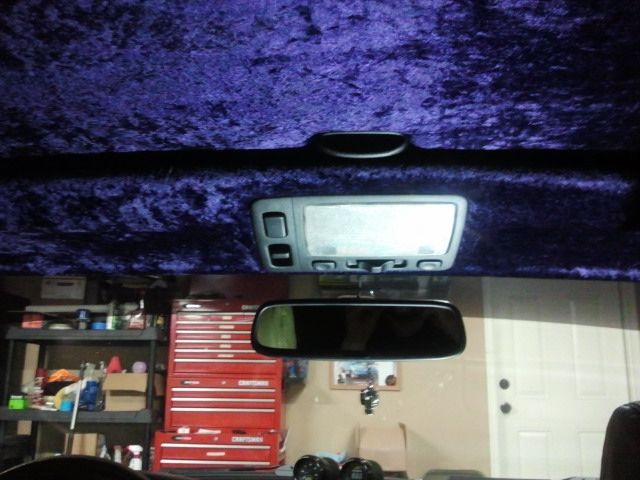
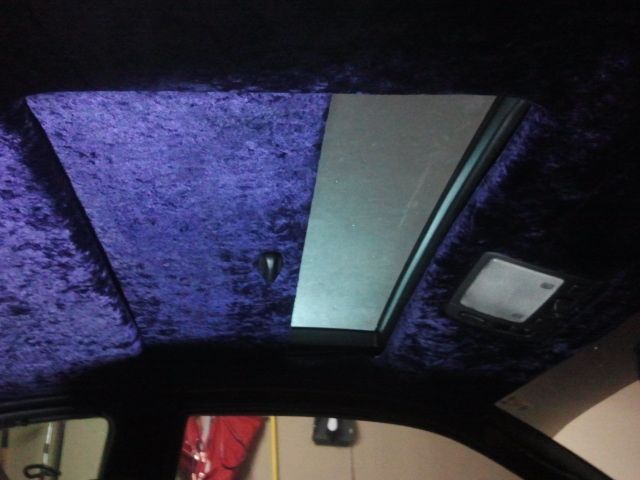
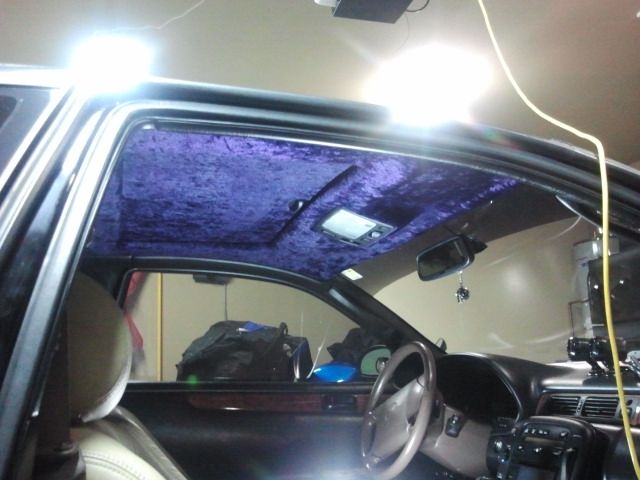
Installed back in the car
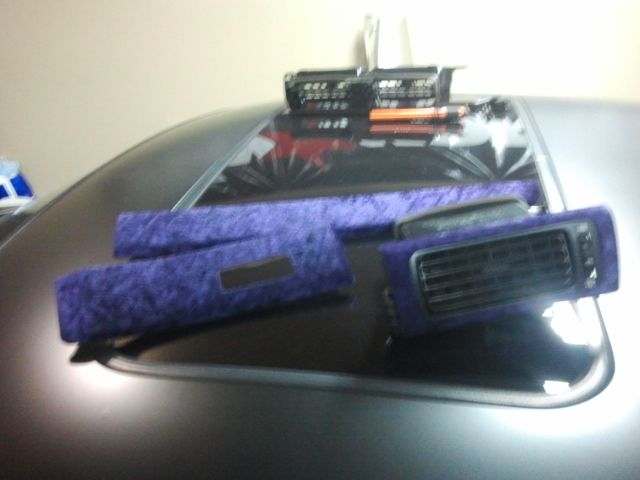
The covered wood trim pieces
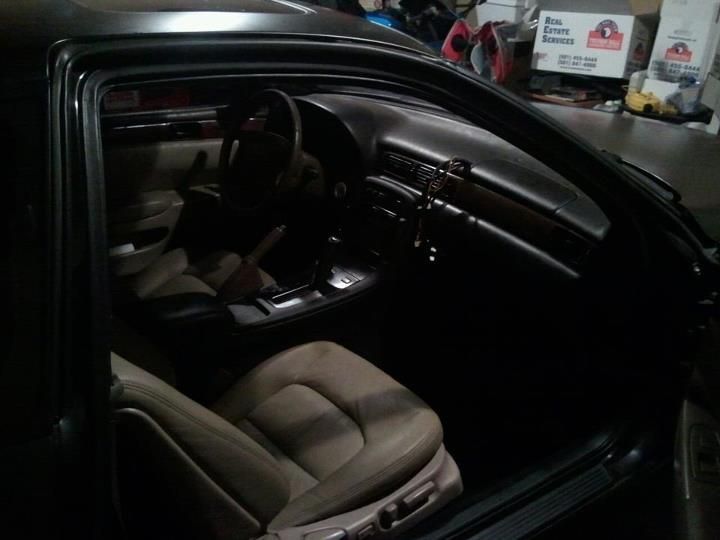
Here are some pics with everything in. These pics are also recent and have my 99% complete black interior now (got seats, and seat belts finally lol)
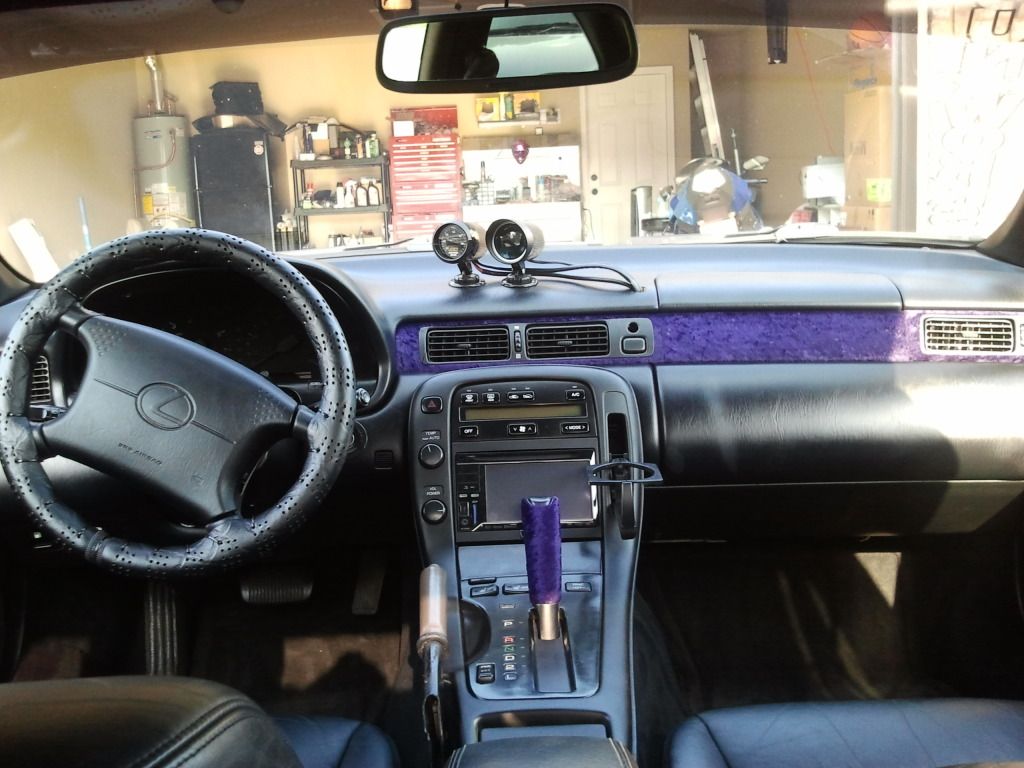
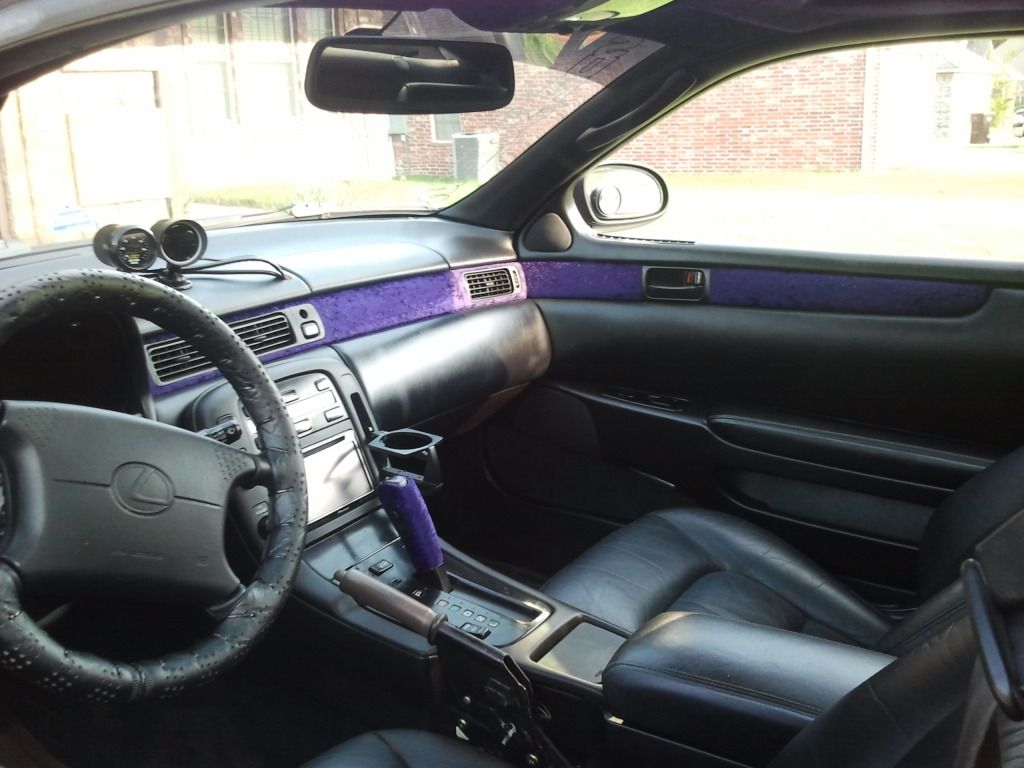
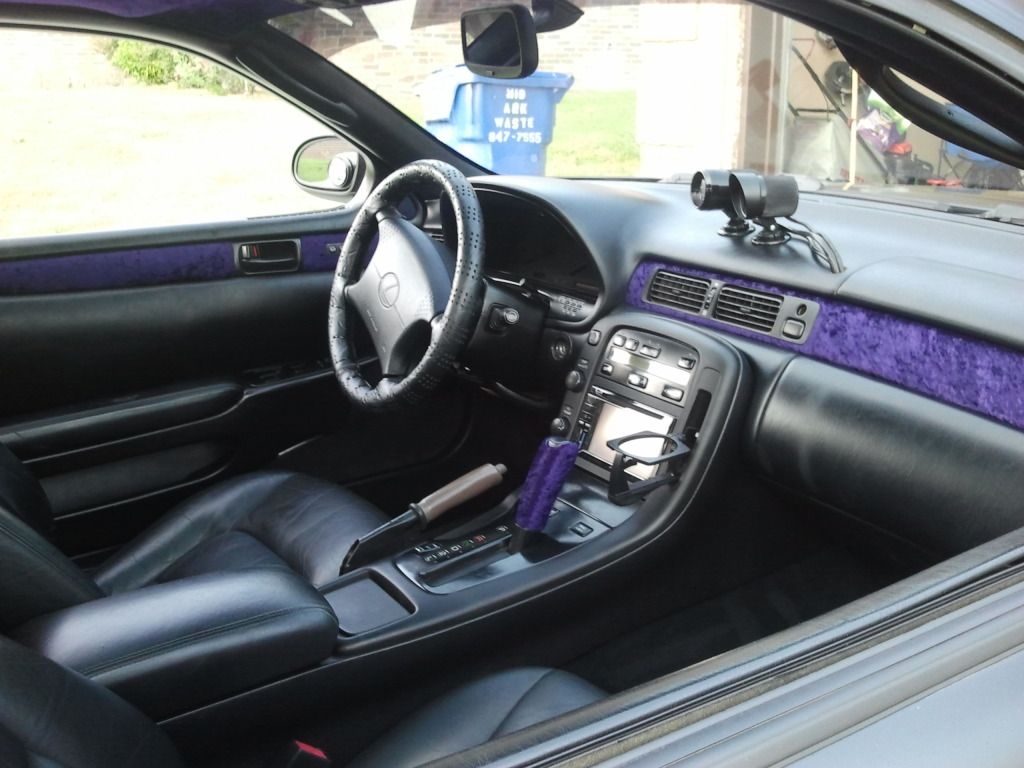
Updated note… just got my black e-brake handle and boot in the mail today (9/8/12) so those will be going in this weekend and the black conversion part of my interior will be done. Only thing I want to do next in the interior is add a grip royal wheel (they have a nice one with black leather and matte black spokes that I think will fit my cars theme just right) and maybe some seat covers from Clazzio that are black with purple diamond stitch. Will look good with my interior and also protect my OEM leather J
The covered wood trim pieces
Here are some pics with everything in. These pics are also recent and have my 99% complete black interior now (got seats, and seat belts finally lol)
Updated note… just got my black e-brake handle and boot in the mail today (9/8/12) so those will be going in this weekend and the black conversion part of my interior will be done. Only thing I want to do next in the interior is add a grip royal wheel (they have a nice one with black leather and matte black spokes that I think will fit my cars theme just right) and maybe some seat covers from Clazzio that are black with purple diamond stitch. Will look good with my interior and also protect my OEM leather J
09-08-12, 02:41 AM
#6
Driver
Thread Starter
Join Date: Oct 2010
Location: AR
Posts: 105
Likes: 0
Received 0 Likes
on
0 Posts
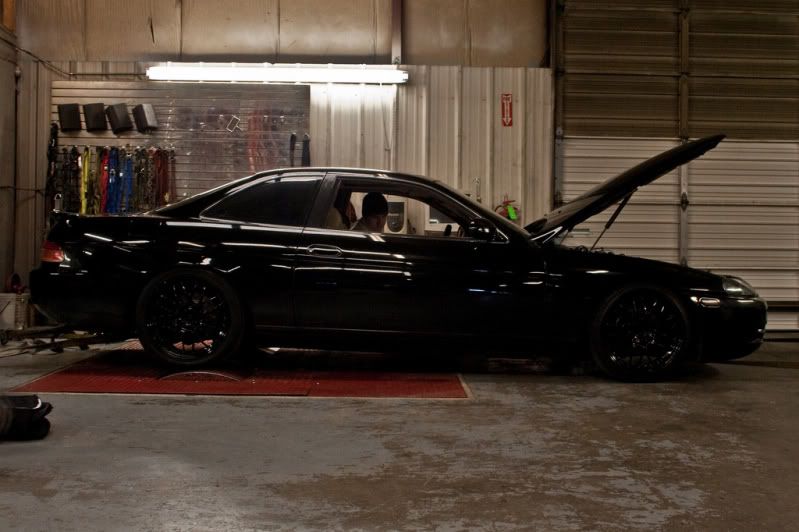
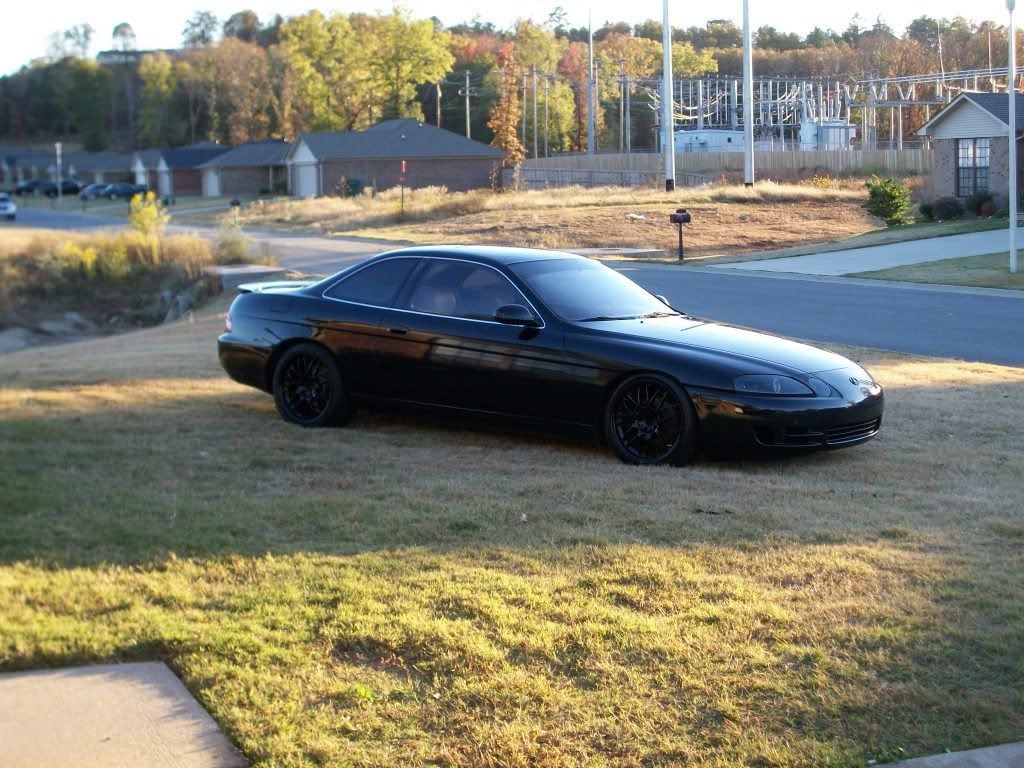
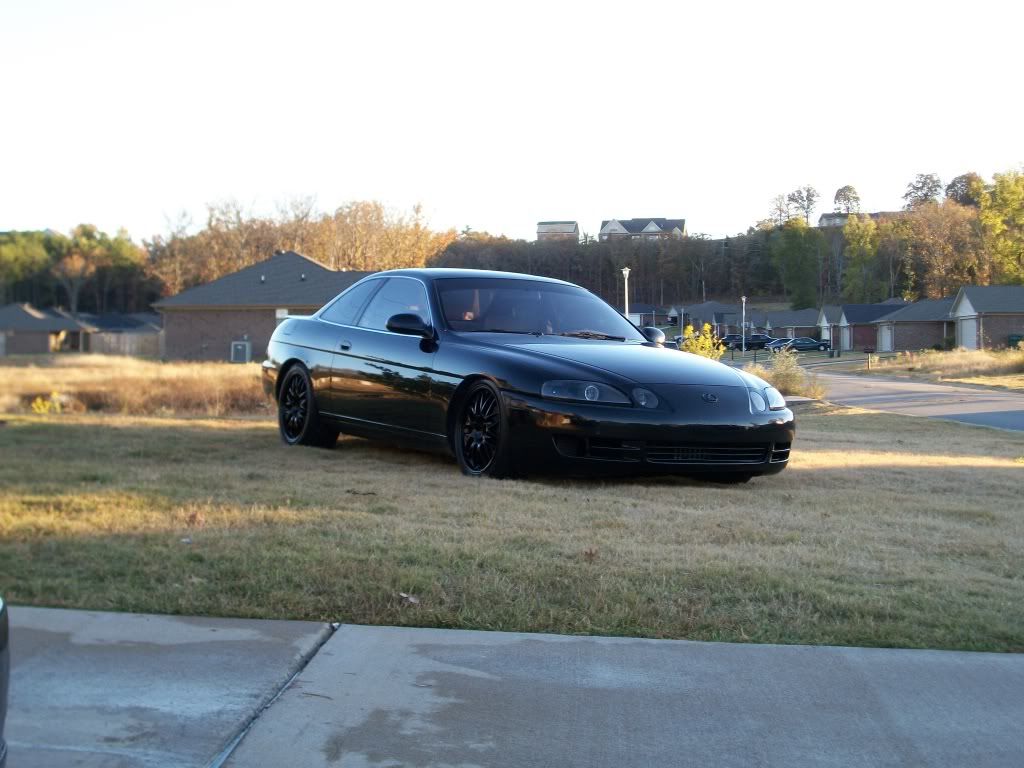
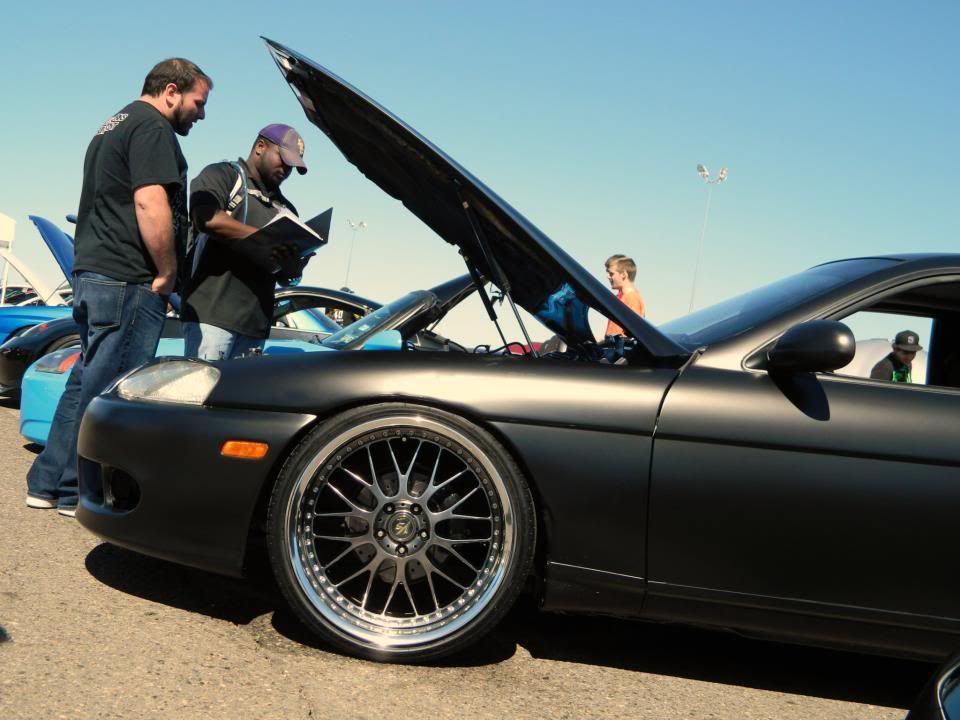
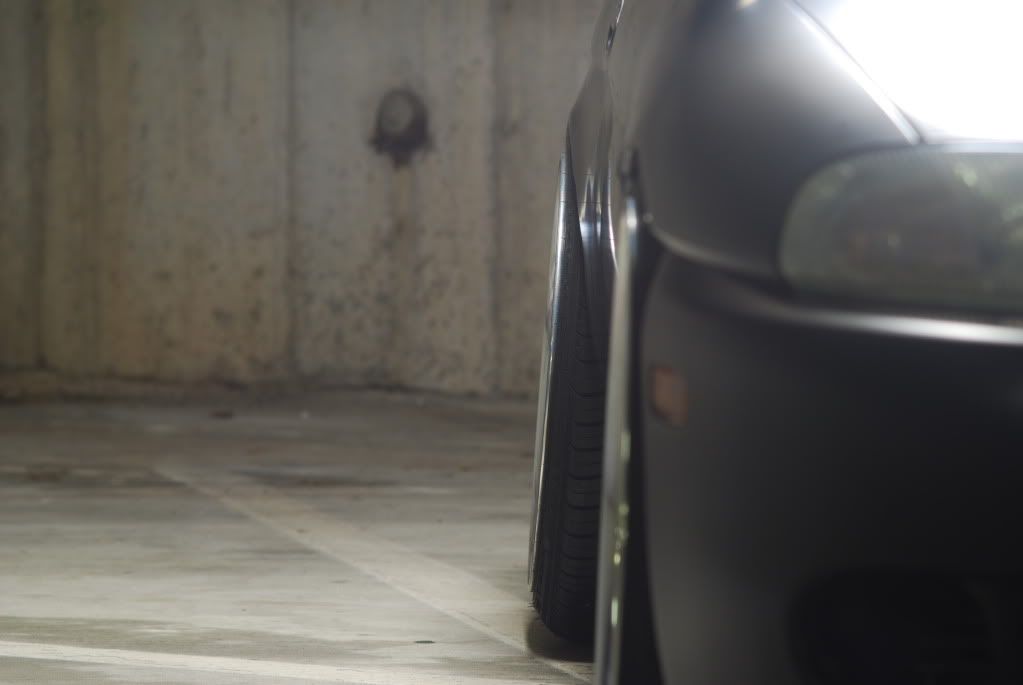
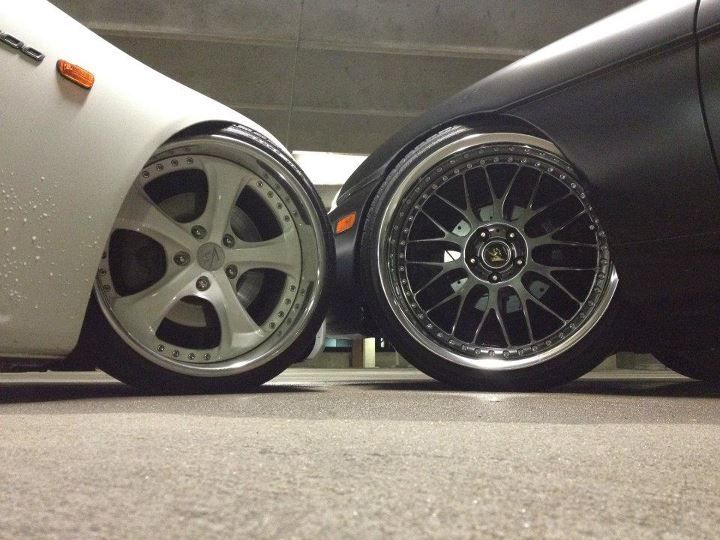
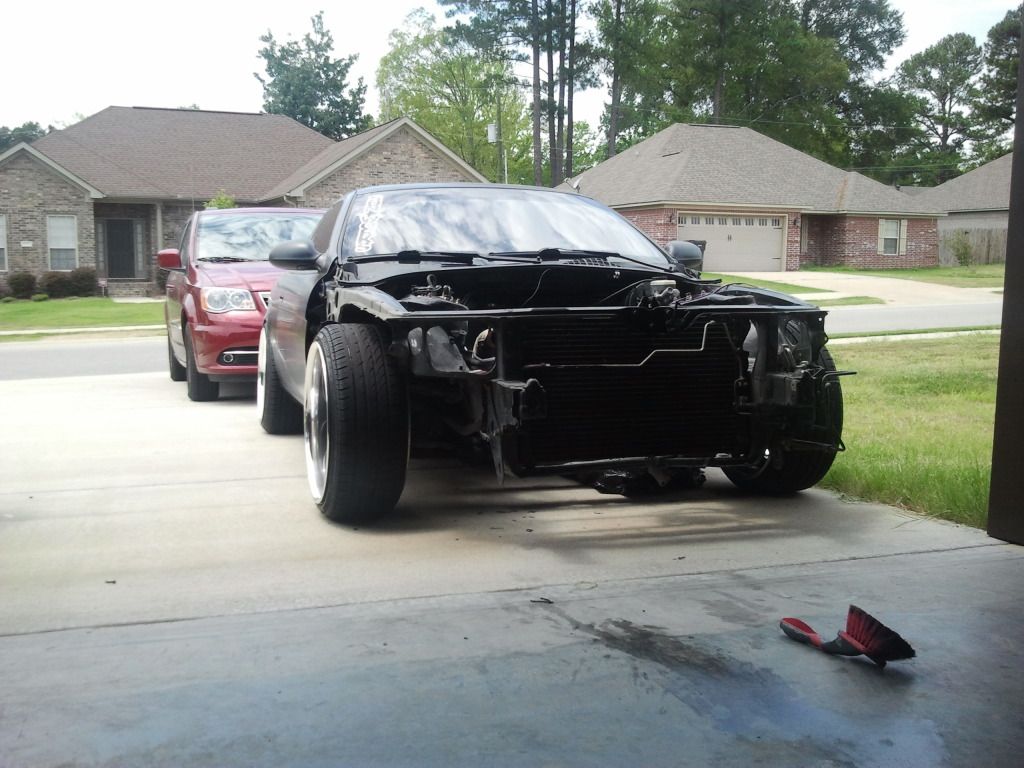
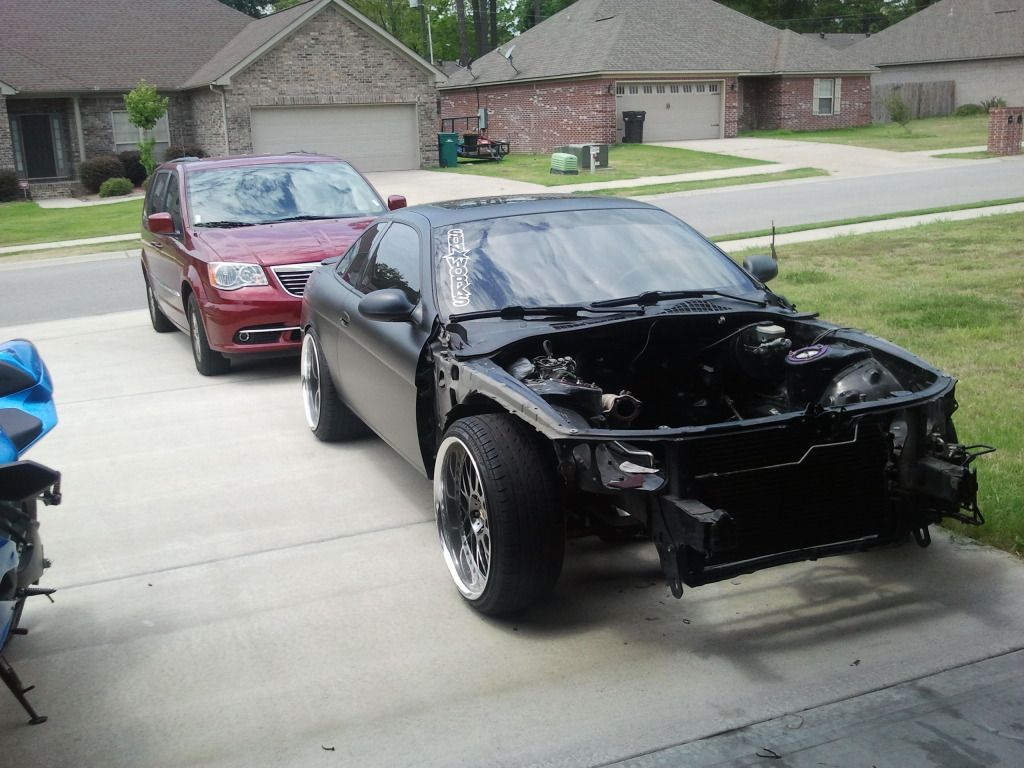
At this time I started looking into other wheels and sold the Volks and picked up some Work VS-XX in burning black. I could have gone the easier route and picked up something easier to fitů but I like a good challenge and wanted to fill the wheel wells up a little more as fare as the front and rear space around each wheel. So the Works I picked up were 20x9.5 + 12 in the front and 20x11 + 18 in the rear. I managed to fit these with a roll in the front and a roll + pull in the rear. I could have probably fit these with just a roll in the rear if I wanted to run more camber, but I opted to pull more so I could run less (4deg) of camber in the back. This left me with 80% of the tire touching the ground lol.
09-08-12, 02:42 AM
#7
Driver
Thread Starter
Join Date: Oct 2010
Location: AR
Posts: 105
Likes: 0
Received 0 Likes
on
0 Posts
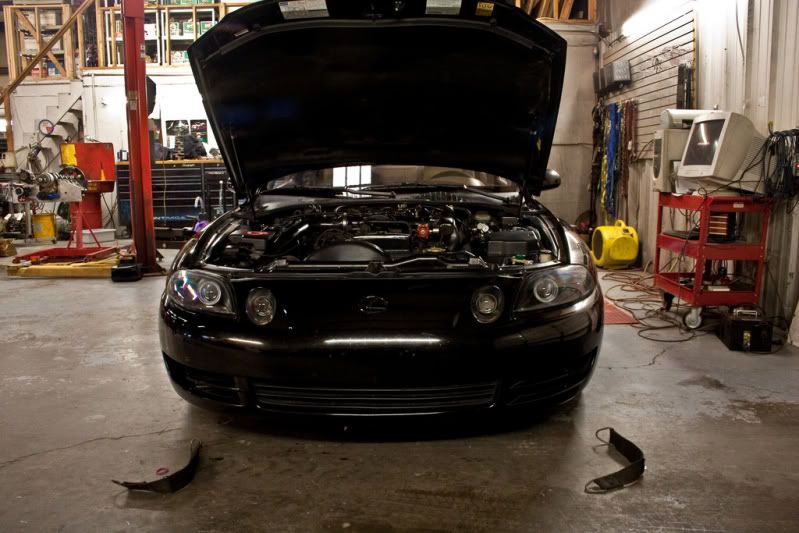
Well now fast forward to about 2 months ago. Noticed the car was turning over VERY fast when it was starting (almost like one starts with a snapped timing belt) and was smoking out of my catch can at idle. Low and behold it was low on compression. Now Iĺm not going to complainů this motor has been a champ and held up to a LOT of boost and being daily driven. Timing was just very crappy b/c I didnĺt have time to financially plan for this. The decision was made due to many variables (namely being .. Leaking trans, wiring issues, gas mileage, and the ôcleanlinessö of the engine bay) That a swap would be done. I made the decision that if I was going to keep the car I wanted to gut everything engine related and start over again fresh. That way I know everything that was done and that no short cuts would be made. So I ordered an Aristo 2jzgte swap from JDM Engine Corp. out of Richardson TX. Great people to deal with. They gave me a great deal on my setup (engine, trans, completely uncut harness, ecu, igniter). They shipped it on a Monday and I had a truck in front of my house to deliver on Tuesday!!! Got next day shipping and didnĺt have to pay for it lol.
Here is the engine when I got it. Non VVT-I 2jzgte.
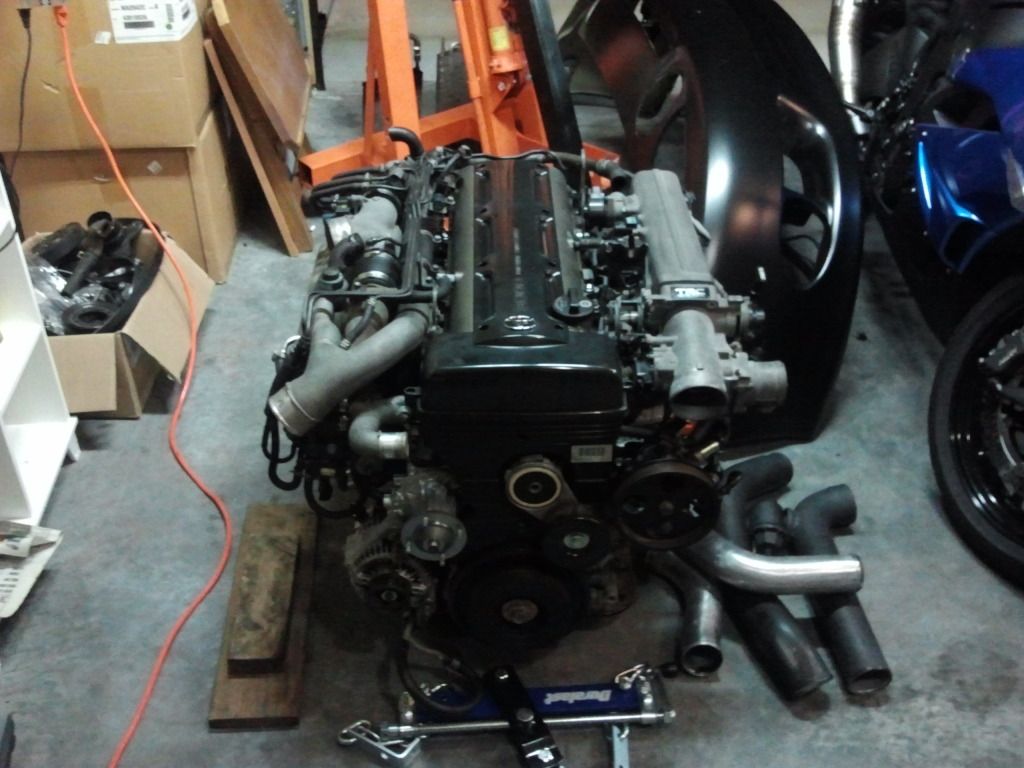
Here is the engine when I got it. Non VVT-I 2jzgte.
Trending Topics
09-08-12, 02:43 AM
#8
Driver
Thread Starter
Join Date: Oct 2010
Location: AR
Posts: 105
Likes: 0
Received 0 Likes
on
0 Posts
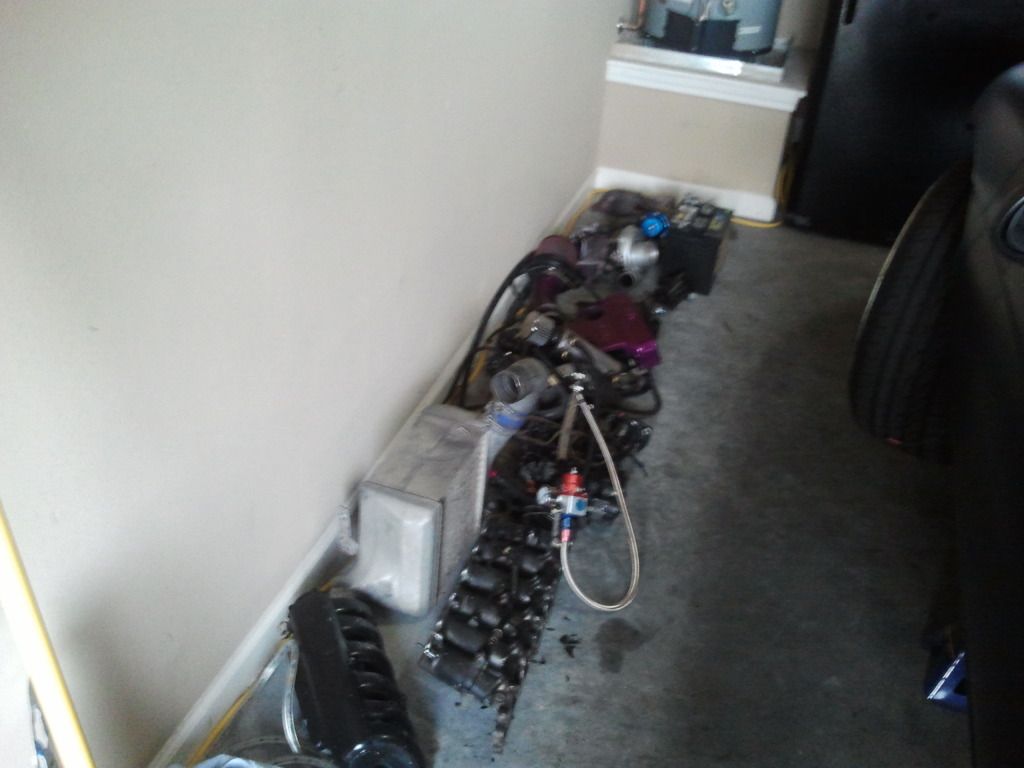
Now its time to get the old setup out of the car J
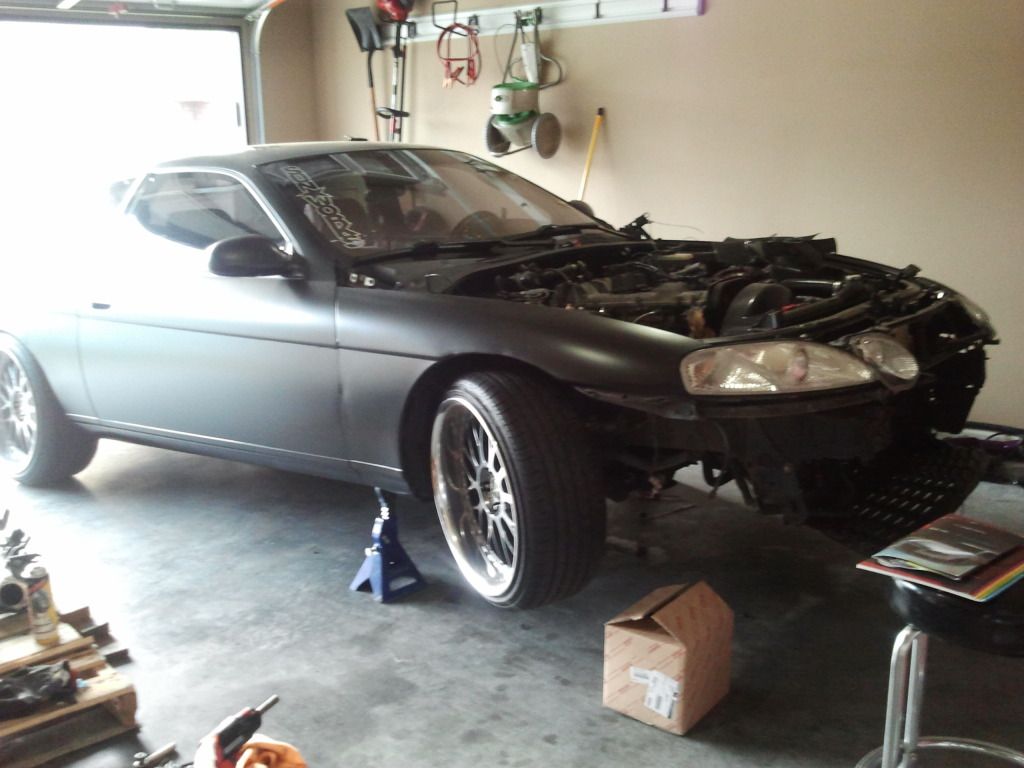
Lots of parts from the old NA-T lol
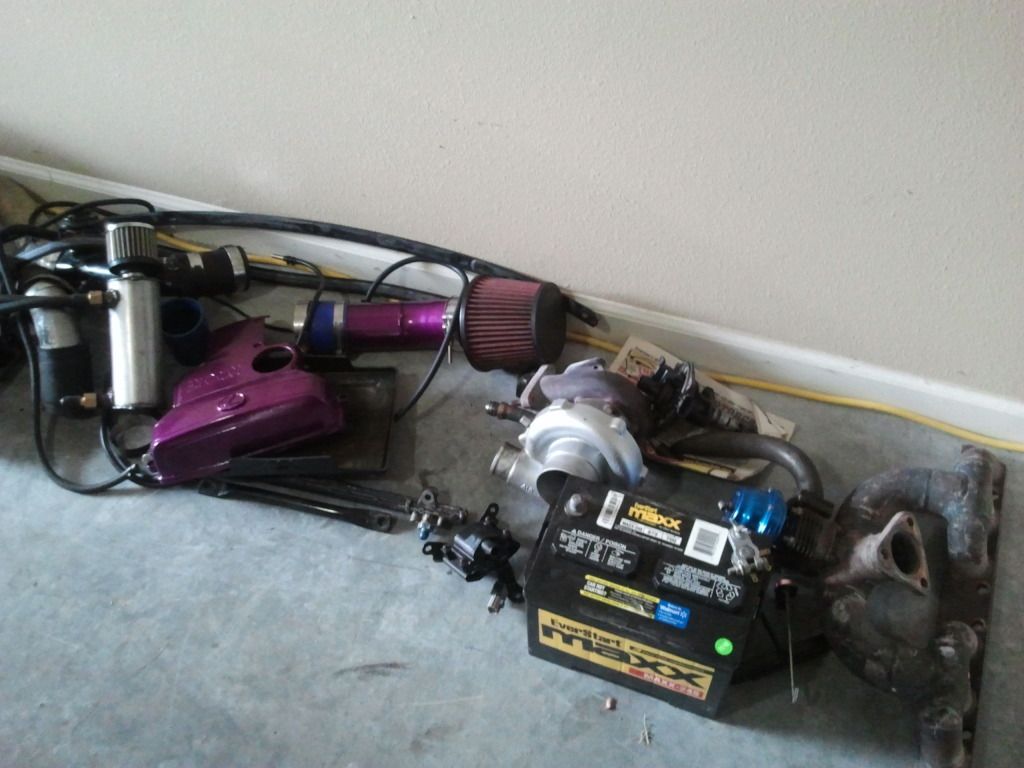
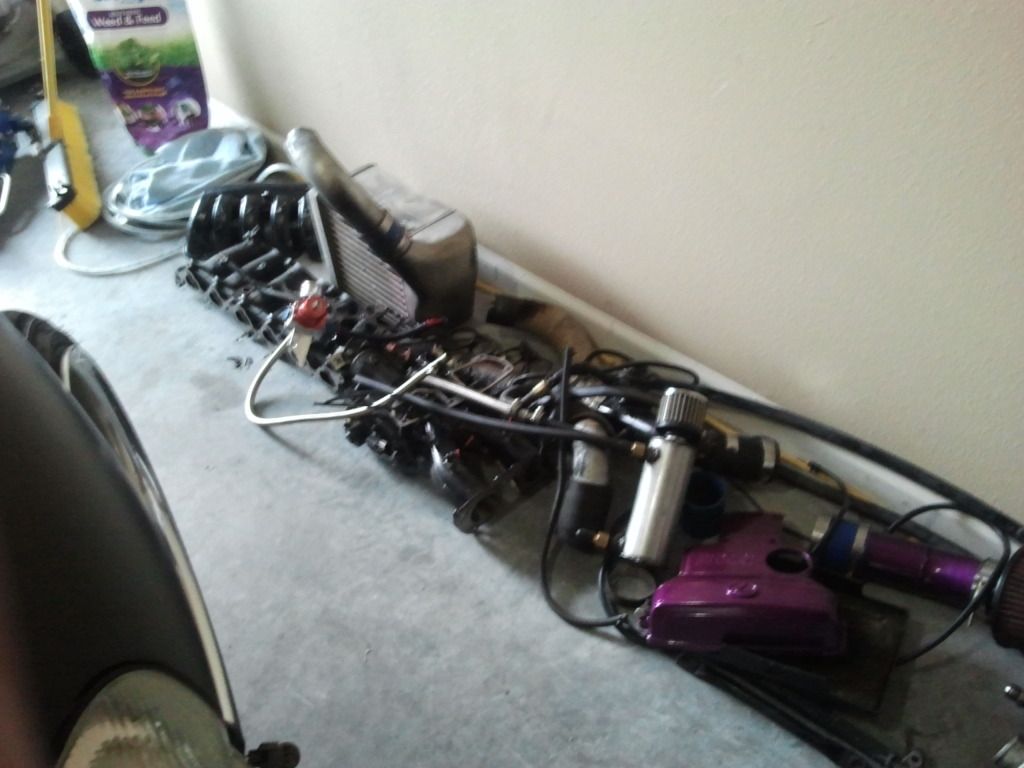
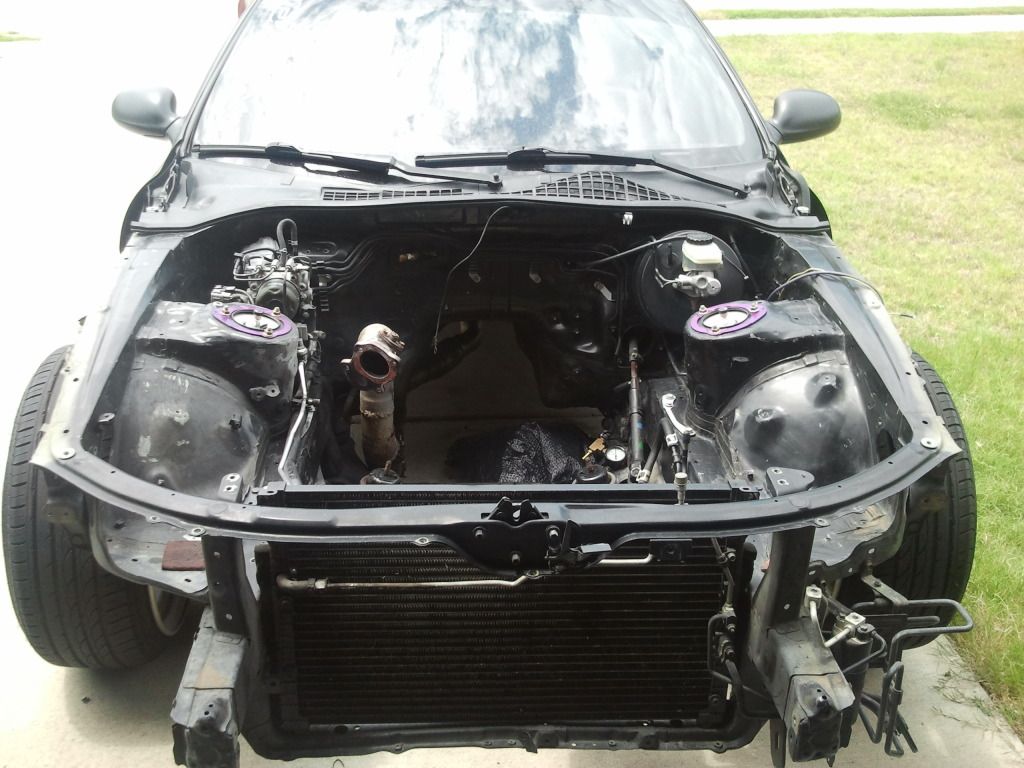
VERY nasty/dirty engine bay in much need of a degreasing and cleaning!!!
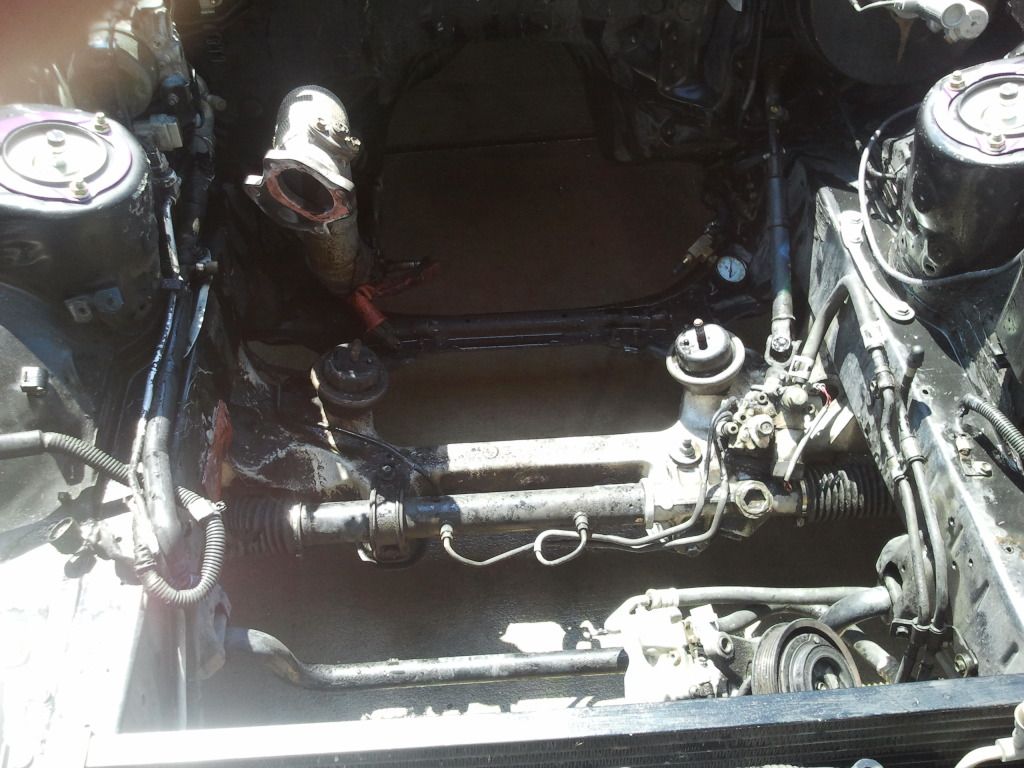
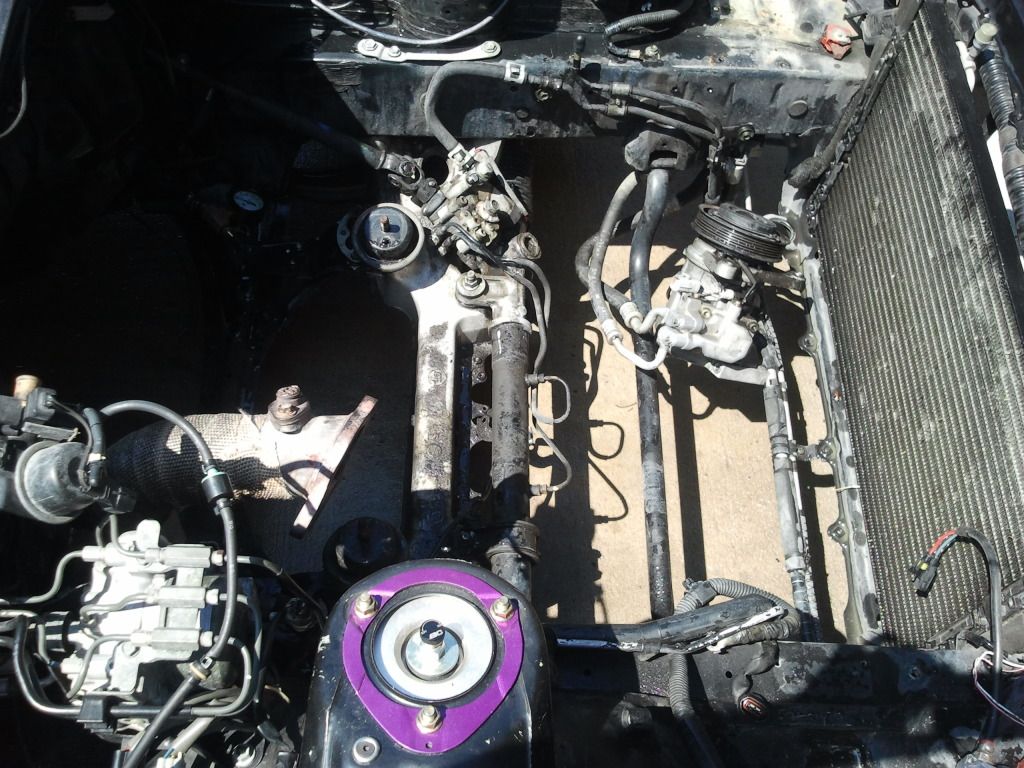
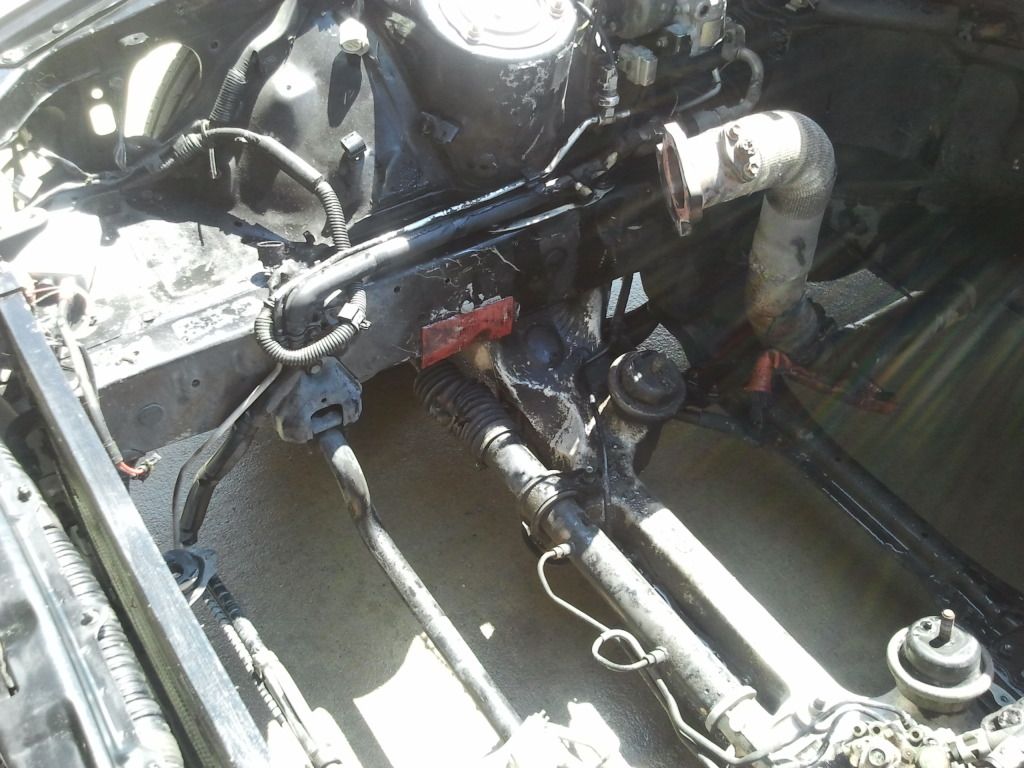
Cleaned, then cleaned again, then cleaned again lol.
Lots of parts from the old NA-T lol
VERY nasty/dirty engine bay in much need of a degreasing and cleaning!!!
Cleaned, then cleaned again, then cleaned again lol.
09-08-12, 02:44 AM
#9
Driver
Thread Starter
Join Date: Oct 2010
Location: AR
Posts: 105
Likes: 0
Received 0 Likes
on
0 Posts
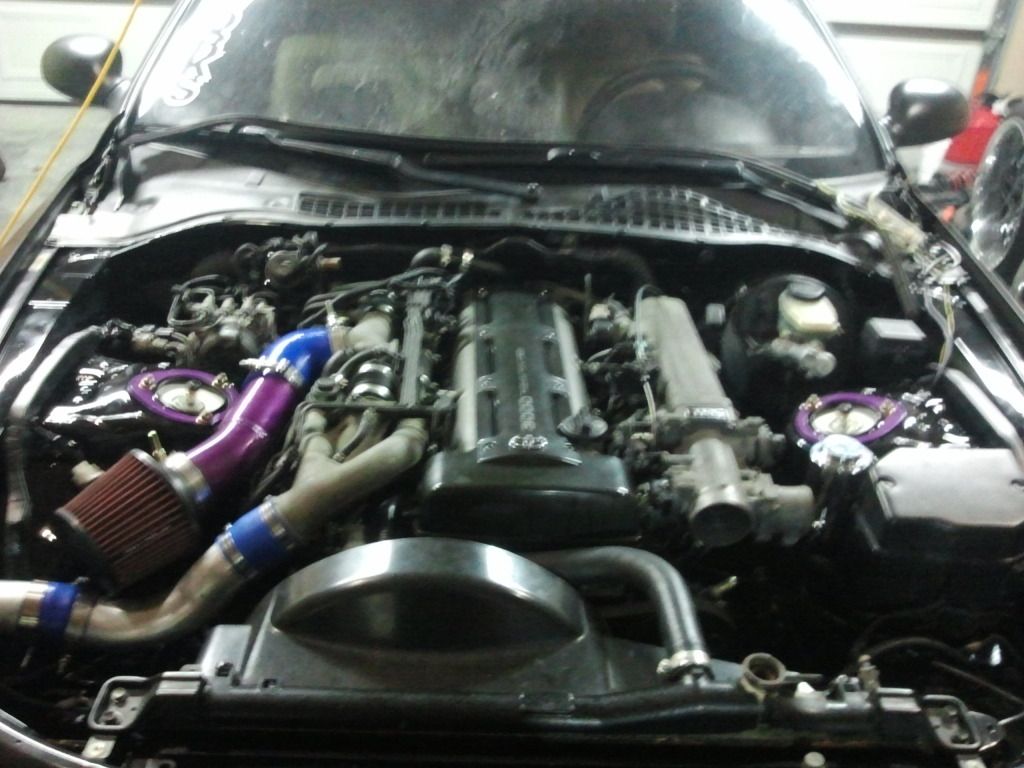
After thinking it over for a day or two I decided that it was pretty much now or never to paint the engine bay. So I cleaned some more.. Then cleaned some more.. And then started sanding and prepping the bay for paint. I have a good friend that works at a paint shop less than a mile from my house so we put the car on a trailer and took it over there and used the booth one night so we could get good coverage and be able to bake it. Went with a jet black base coat/clear coat set up. I was going to use single stage but I actually was able to get enough paint for BC/CC cheaper than the cost of material for single stage by getting it through his works mixing station. I LOVE cool bosses J Here are some pics of the engine bay paint process.
Sanded and prepped
Masked off ready to start!!
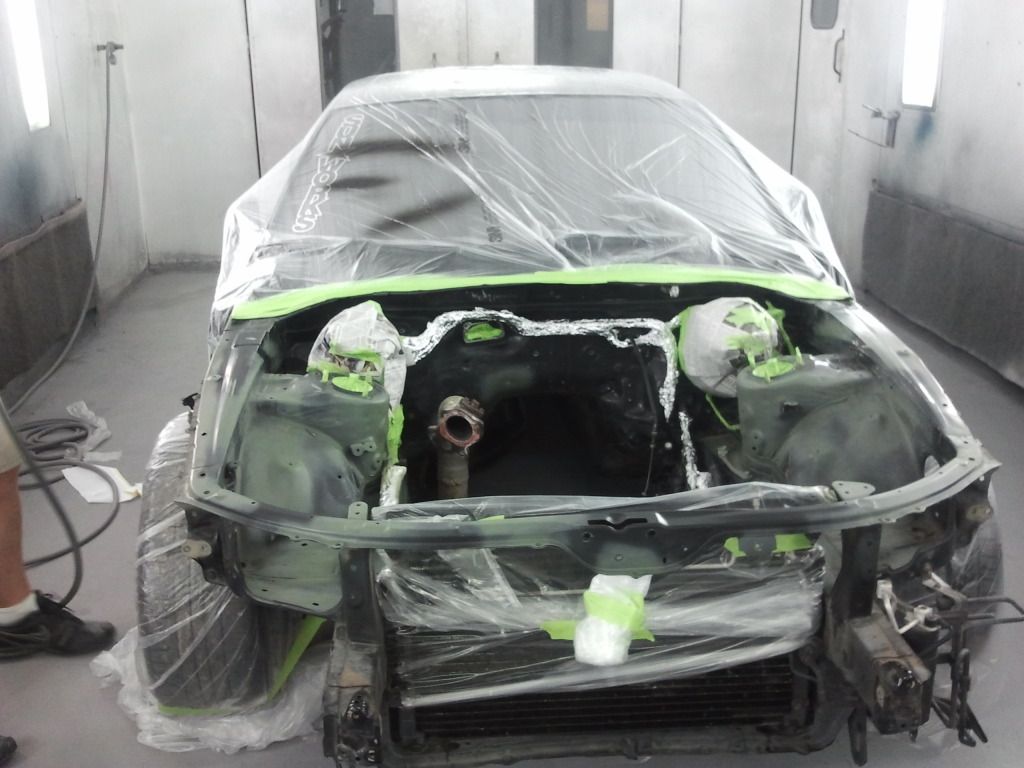
Base coat on
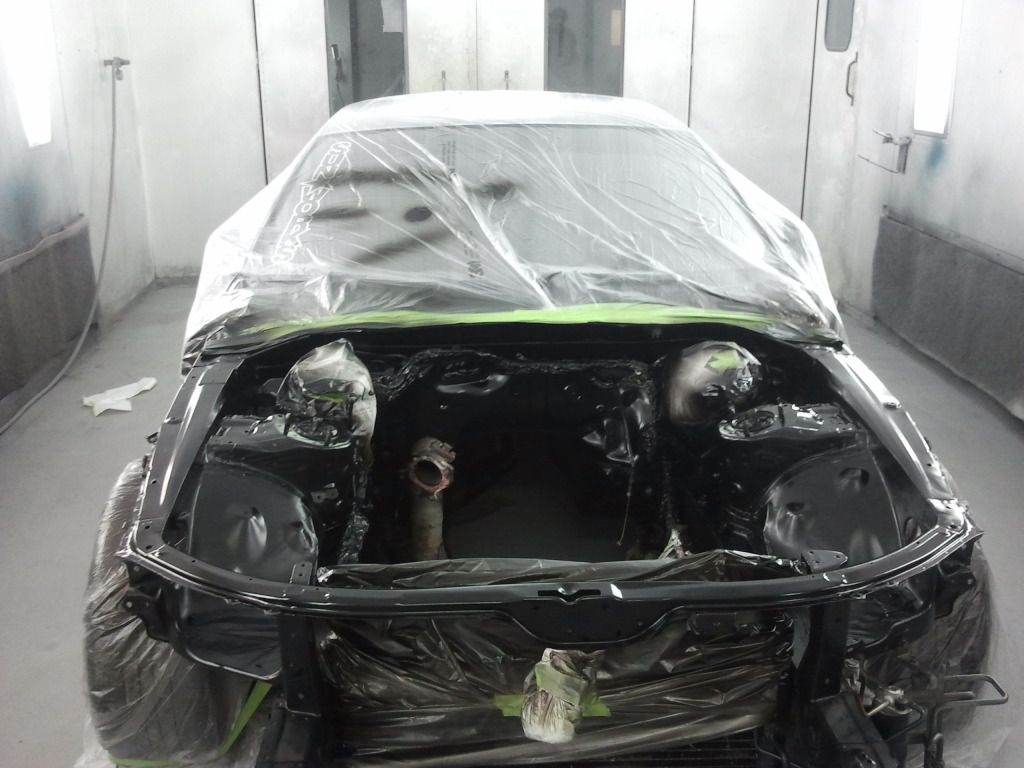
Bay finished and back at home. Didn’t get a chance to get a pic of it done in the booth with the good lighting b/c it was getting late and we wanted to go home lol
Now back to the GTE.. Needed to get some things ordered for it so I went ahead and got that taken care of while I was doing the engine bay prep and paint.
Things I needed to order that I KNEW I would need from the dealer.
USDM TT water pump and fan blade
Timing belt
Timing belt tensioner
Rear main seal
Radiator hoses
Thermostat
USDM turbo oil drain flange and hoses
New acc drive belt
Valve cover gaskets
Valve cover vent hoses
Power steering line crush washers
New oxygen sensor
New plugs
Fluids
Also had some things that I would need from places other than the dealer
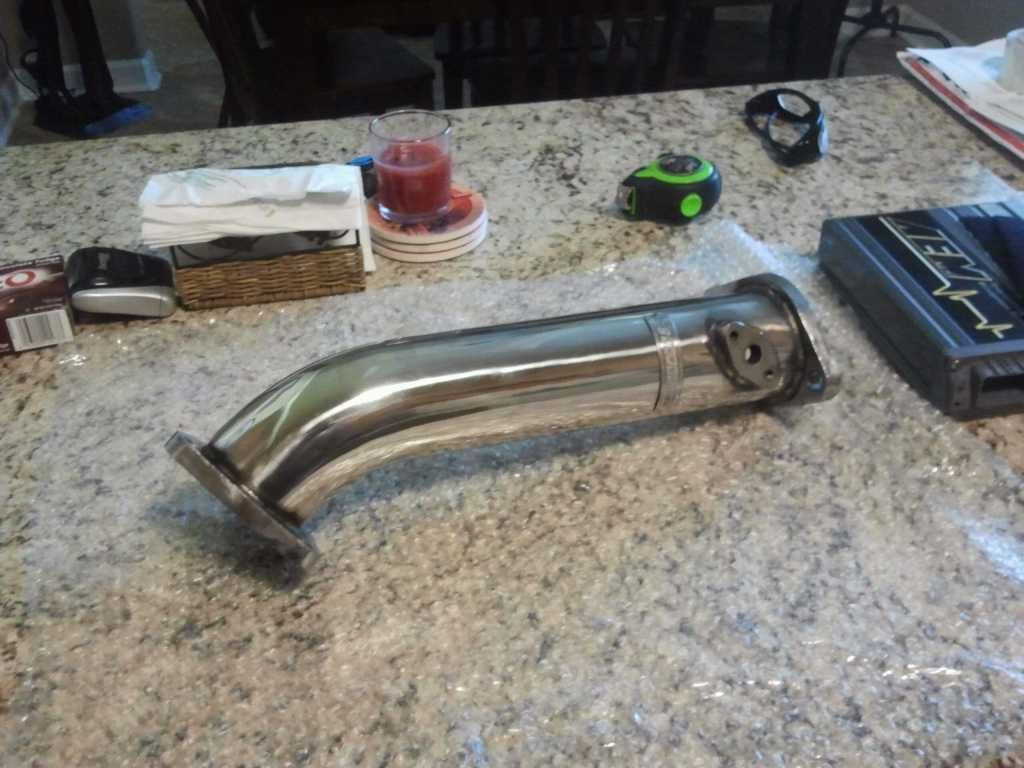
Downpipe that fit’s the JDM twins. Autobahhn 88 on eBay is the one you need.
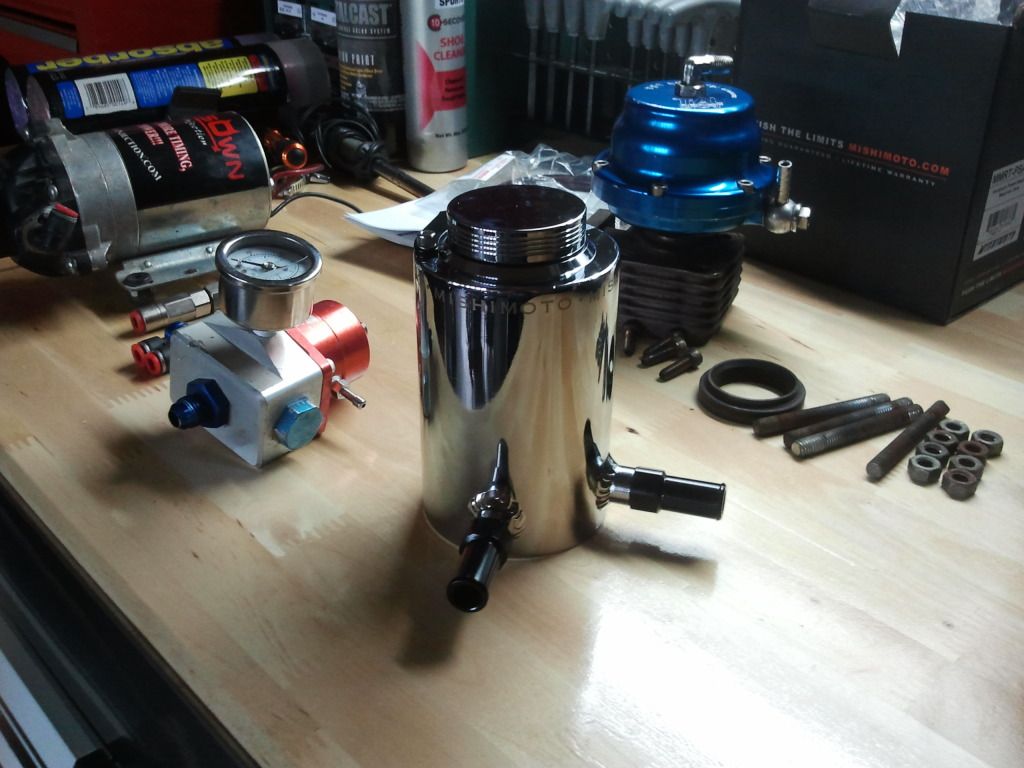
I needed to figure out what I was going to do for a power steering reservoir…. Was NOT liking the prices I was seeing for an OEM one so I started looking elsewhere. Most of the universal ones I found were setup for AN style lines. I did not want to convert everything to AN fitting and line so looked into the Mishimoto one which used “hose over” type fittings. Nice unit, well built, looks great, and only cost me $48 shipped J
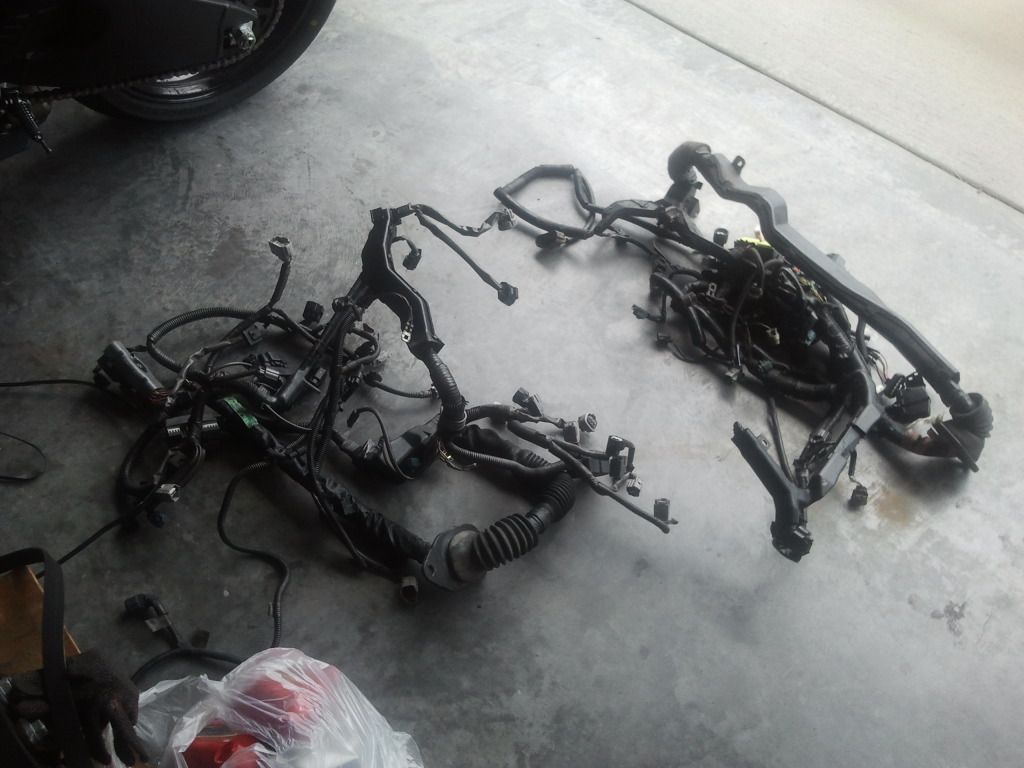
I was also going to need a wiring conversion. I am quite mechanically inclined and posses a good amount of patience (must have for doing vehicle wraps lol), but wiring is one thing I just don’t have the patience for lol. After looking around and checking with a lot of people and places I contacted a guy on here by the name of Accounts2x. We worked out a price and turn around time so I shipped him both of my harnesses to merge them into the one I needed for a plug and play setup. If you are in need of such services… I HIGHLY recommend this guy!!! Turnaround was good, customer service was excellent, and price was FANTASTIC!! I couldn’t be happier with the transaction. Like an idiot I didn’t take a picture of the completed harness b/c I was waiting on it to drop the motor in. Had a deadline I was trying to make so the day it showed up the motor got dropped in lol. Here are the two harnessed I sent to him.
I also want to say that Emil (accounts2x) also took the time to use the large plastic piece that mounts to the firewall and boot for the harness pass through to inside the cab from the sc harness and used the boot for wrapping around the intake side of the head and mounts (back of mani and under mani) from the Aristo set up. Cant even tell I has been redone. He also replaced any broken or damaged harness clips with new Toyota ones for me. Very happy.
I would also need an SC400 drive shaft. Got VERY lucky and found one in a local salvage yard. Im in Arkansas and this 400 was the ONLY SCX00 in the entire state as far as salvage yards are concerned. Called the yard and told them I would be by within the next 2 days to pick it up and see if they would go ahead and pull it for me. Showed up 2 days later and they told me they didn’t have it anymore!! I was seriously freaking at this time, worried about my deadline lol. I decided to walk the yard and see for myself and sure enough it was still there. So I walked back in the office and told him it was there and that I needed it. He had quoted me $65 for it and I asked him if he would pull it for that. I think he felt bad for misinforming me so he said yes. I also thing he figured it would be and easy task … LOL… so an hour and a half later I got the drive shaft, cushions, and companion flanges for $65 out the door haha. I was a happy camper.
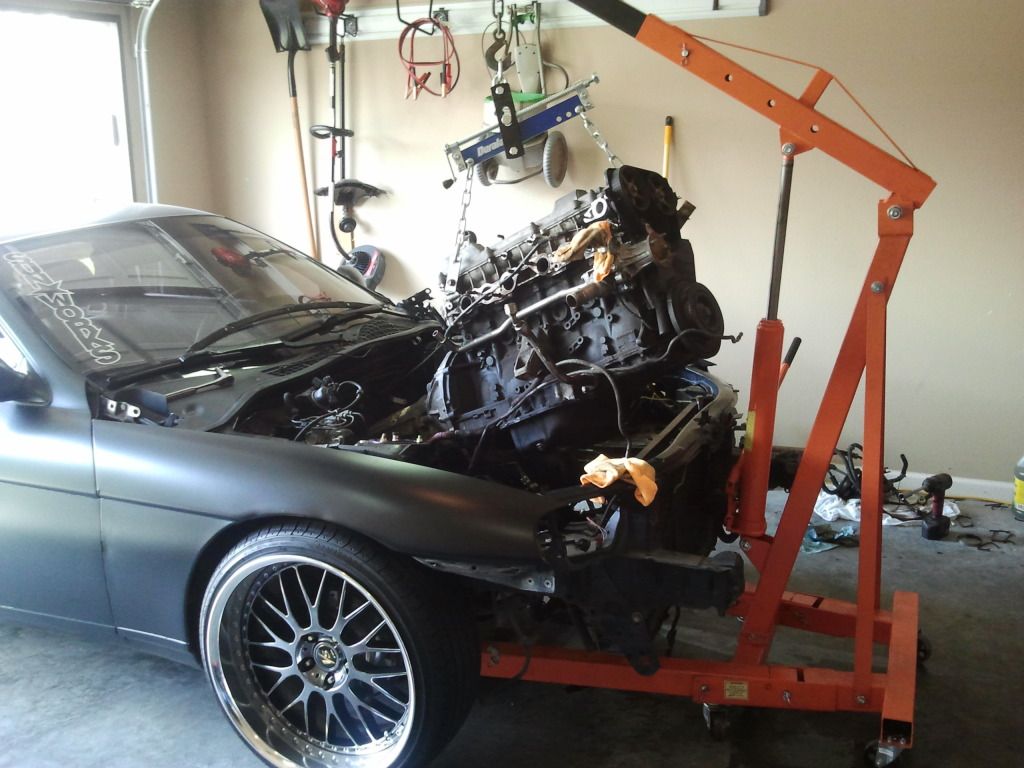
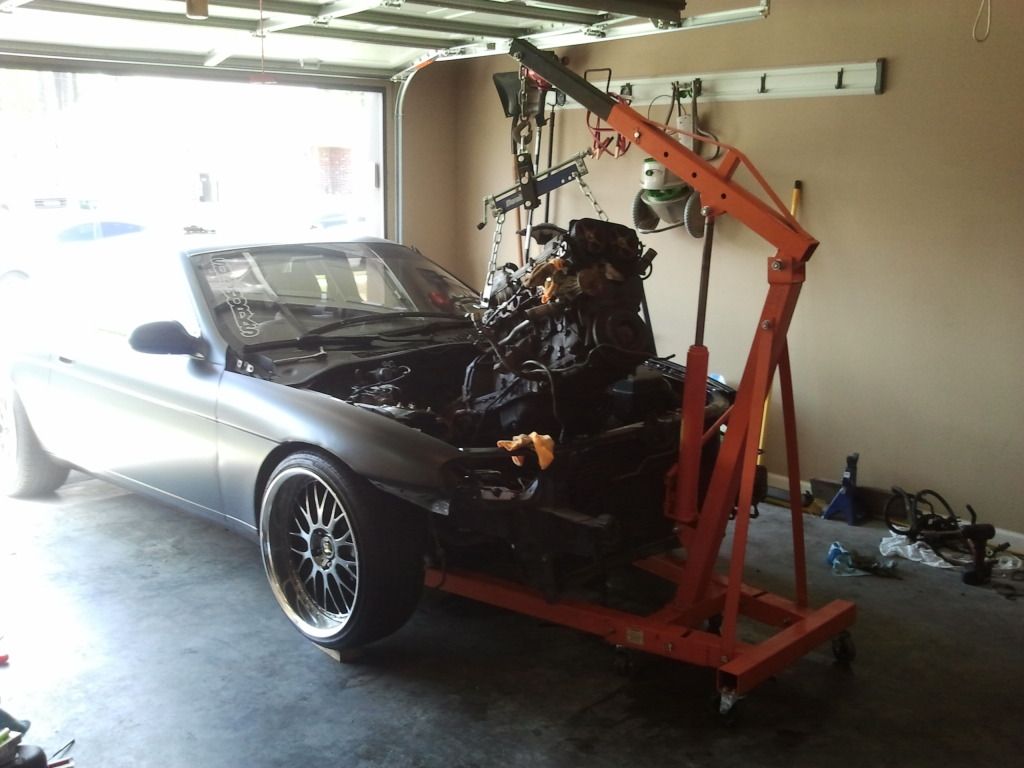
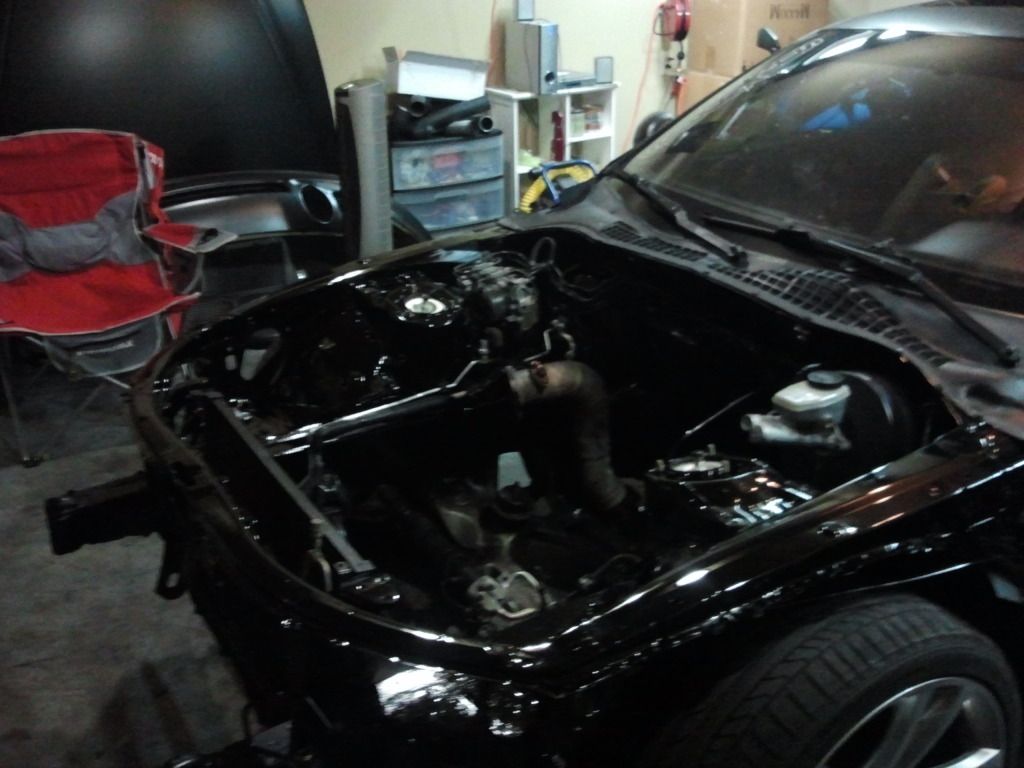
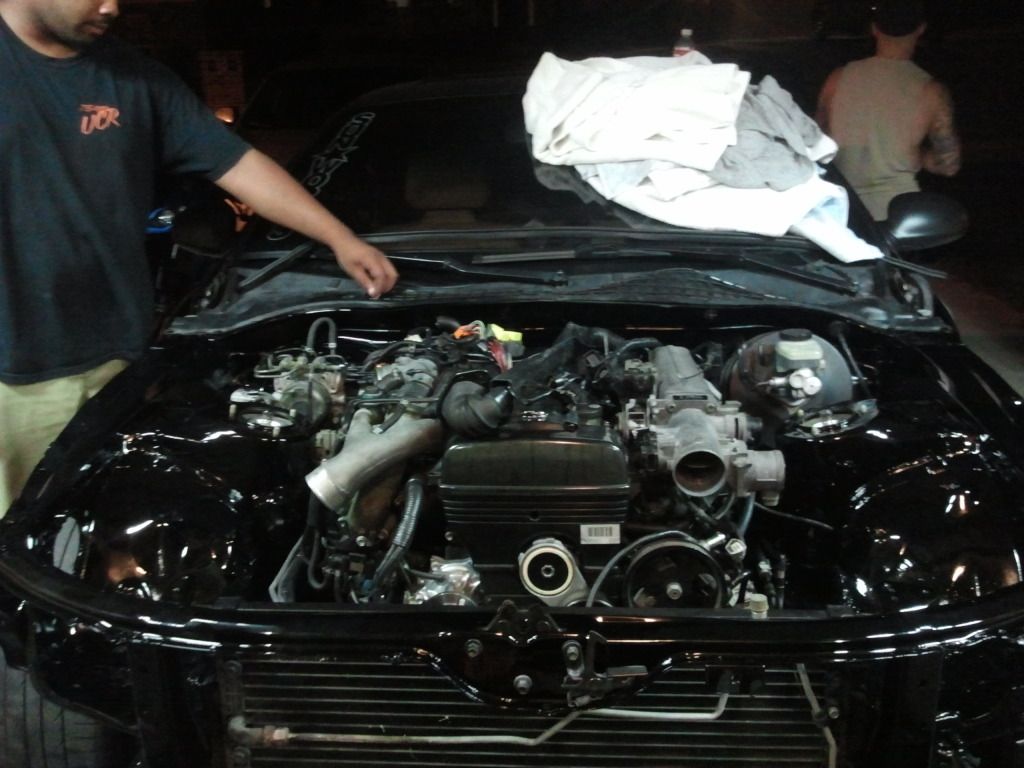
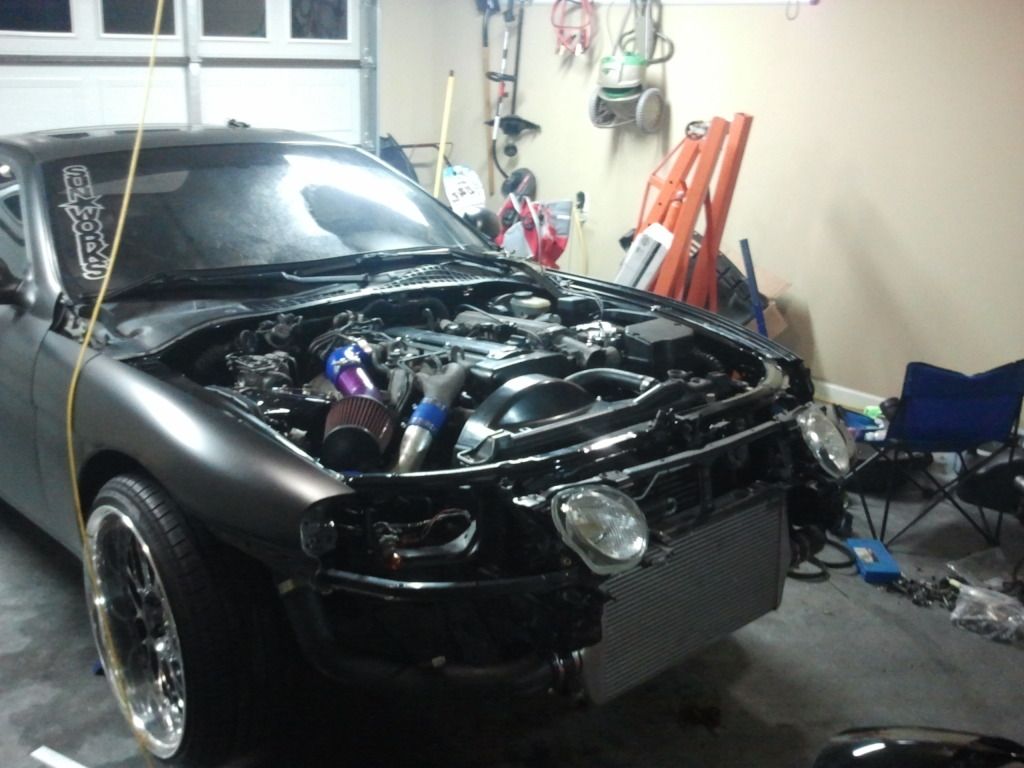
So at this point it was that time to drop the motor in. A large amount of towels were used to protect the engine bay from scratches!!. Went in without any riff raff. Had the motor in and motor mounts and trans mounts bolted up in about 30 mins.
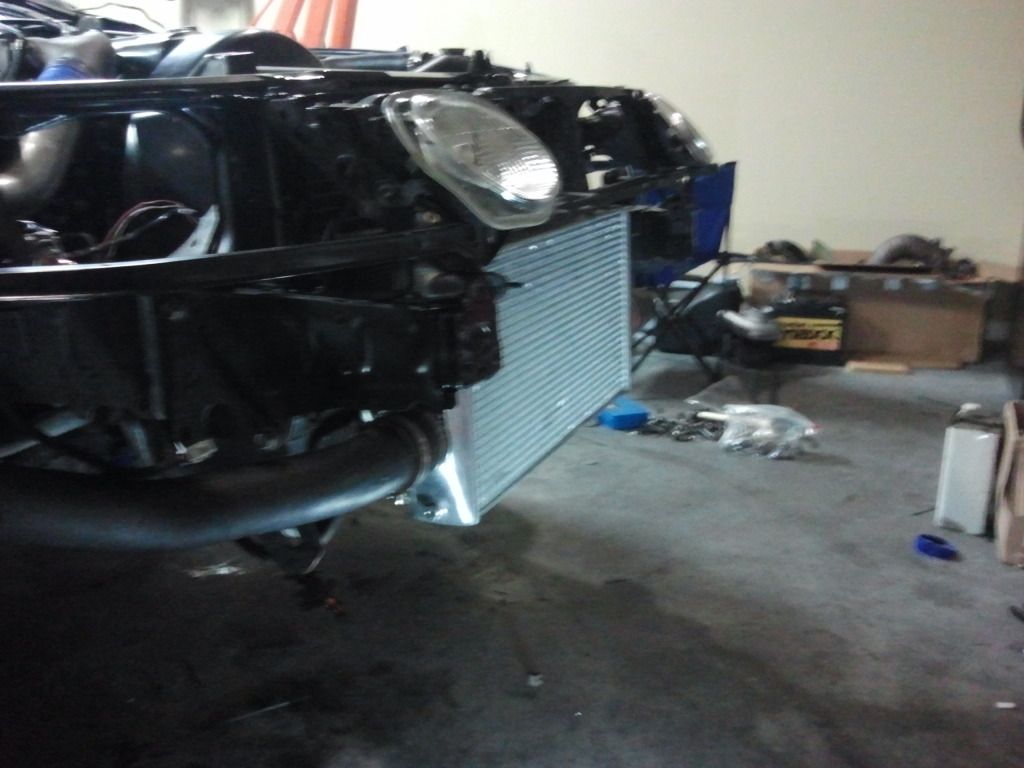
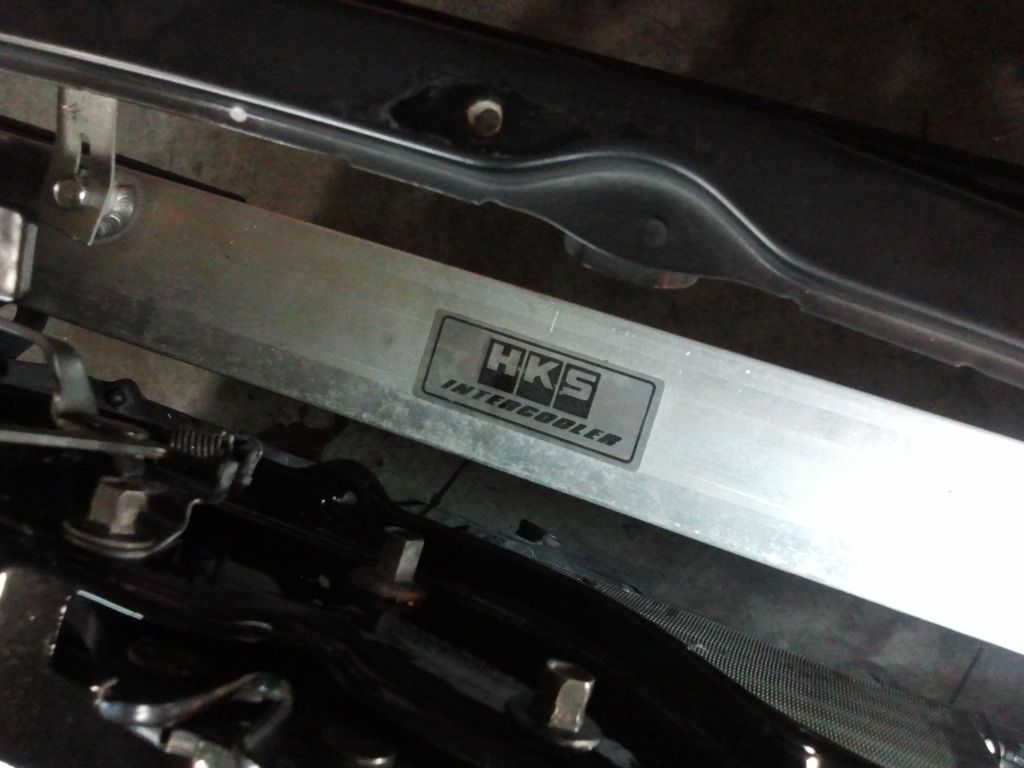
Earlier in the planning process I had decided to switch to a front mount for easier pipe routing. I was able to score an HKS type S from Supraforums for a good price shipped so I had that waiting to go on.
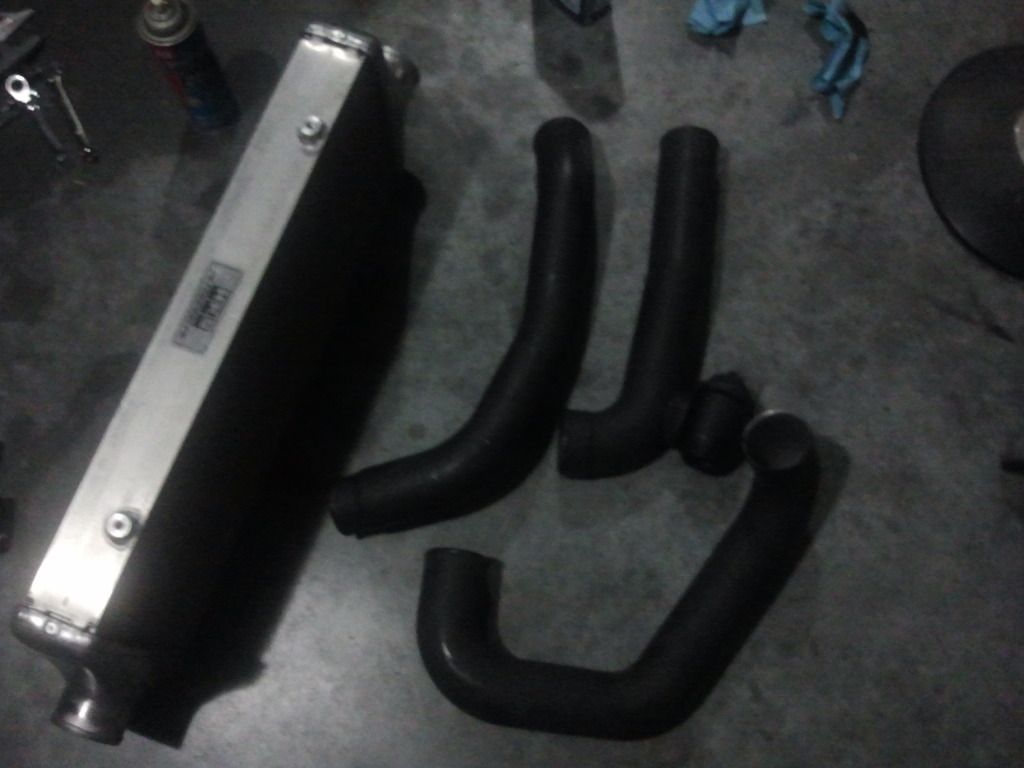
Got the FMIC mocked up and mounted where I wanted it
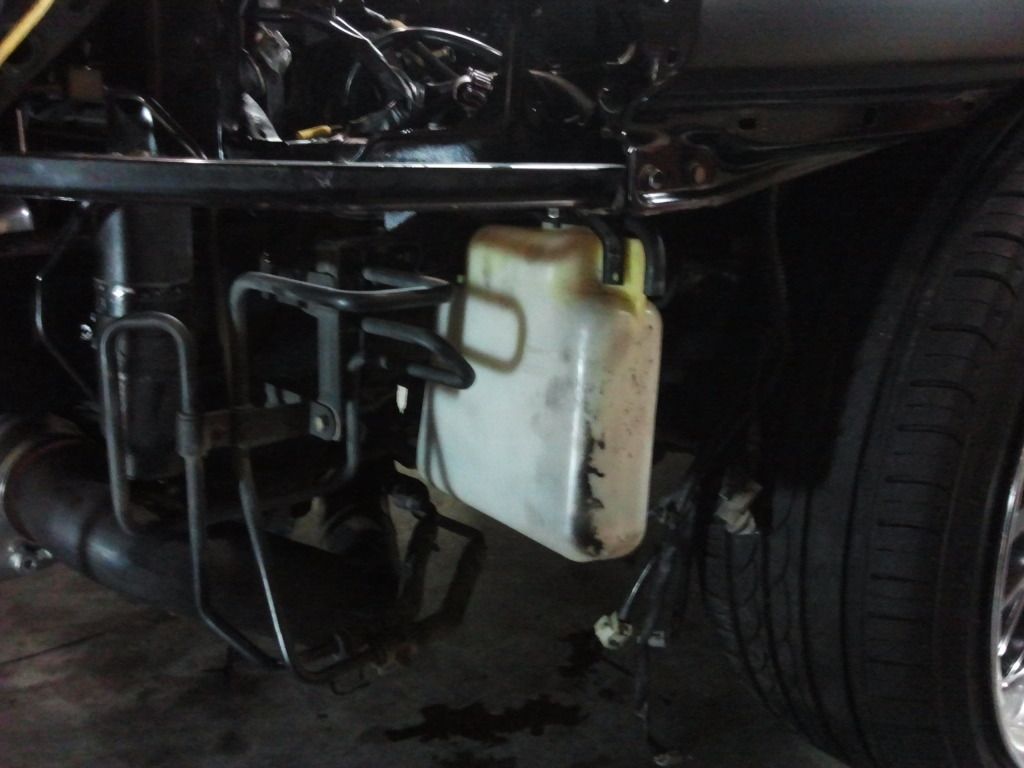
Had to relocate the coolant over flow tank.. didn’t want to get an aftermarket one just yet so I mounted it under the drivers side headlight area
Got everything else bolted up to get a first start and try to make my deadline (car meet lol). Everything works great. Got the Radio Shack resistor and the A/C works just as it should. Now that everything is in the car I can concentrate on engine bay dress up. I want to chrome the intake manifold, throttle body and valve covers. Powder coat the intercooler pipes, and order black couplers. Then make the spark cover satin black like the exterior. Next years plans are to do a 350Z 6 speed swap and go single!! Between now and then I just want to make some changes to the exhaust and pick up a Shine Auto Project kit for the car (next purchase without a doubt lol).
Almost all the pics are with a camera phone. As soon as I get a chance I will get some pics with a real camera.
Thank you guys for taking the time to read my very LONG and probably “all over the place” thread lol. I will update it as things progress J
Any thoughts and criticism are always welcome!
Sanded and prepped
Masked off ready to start!!
Base coat on
Bay finished and back at home. Didn’t get a chance to get a pic of it done in the booth with the good lighting b/c it was getting late and we wanted to go home lol
Now back to the GTE.. Needed to get some things ordered for it so I went ahead and got that taken care of while I was doing the engine bay prep and paint.
Things I needed to order that I KNEW I would need from the dealer.
USDM TT water pump and fan blade
Timing belt
Timing belt tensioner
Rear main seal
Radiator hoses
Thermostat
USDM turbo oil drain flange and hoses
New acc drive belt
Valve cover gaskets
Valve cover vent hoses
Power steering line crush washers
New oxygen sensor
New plugs
Fluids
Also had some things that I would need from places other than the dealer
Downpipe that fit’s the JDM twins. Autobahhn 88 on eBay is the one you need.
I needed to figure out what I was going to do for a power steering reservoir…. Was NOT liking the prices I was seeing for an OEM one so I started looking elsewhere. Most of the universal ones I found were setup for AN style lines. I did not want to convert everything to AN fitting and line so looked into the Mishimoto one which used “hose over” type fittings. Nice unit, well built, looks great, and only cost me $48 shipped J
I was also going to need a wiring conversion. I am quite mechanically inclined and posses a good amount of patience (must have for doing vehicle wraps lol), but wiring is one thing I just don’t have the patience for lol. After looking around and checking with a lot of people and places I contacted a guy on here by the name of Accounts2x. We worked out a price and turn around time so I shipped him both of my harnesses to merge them into the one I needed for a plug and play setup. If you are in need of such services… I HIGHLY recommend this guy!!! Turnaround was good, customer service was excellent, and price was FANTASTIC!! I couldn’t be happier with the transaction. Like an idiot I didn’t take a picture of the completed harness b/c I was waiting on it to drop the motor in. Had a deadline I was trying to make so the day it showed up the motor got dropped in lol. Here are the two harnessed I sent to him.
I also want to say that Emil (accounts2x) also took the time to use the large plastic piece that mounts to the firewall and boot for the harness pass through to inside the cab from the sc harness and used the boot for wrapping around the intake side of the head and mounts (back of mani and under mani) from the Aristo set up. Cant even tell I has been redone. He also replaced any broken or damaged harness clips with new Toyota ones for me. Very happy.
I would also need an SC400 drive shaft. Got VERY lucky and found one in a local salvage yard. Im in Arkansas and this 400 was the ONLY SCX00 in the entire state as far as salvage yards are concerned. Called the yard and told them I would be by within the next 2 days to pick it up and see if they would go ahead and pull it for me. Showed up 2 days later and they told me they didn’t have it anymore!! I was seriously freaking at this time, worried about my deadline lol. I decided to walk the yard and see for myself and sure enough it was still there. So I walked back in the office and told him it was there and that I needed it. He had quoted me $65 for it and I asked him if he would pull it for that. I think he felt bad for misinforming me so he said yes. I also thing he figured it would be and easy task … LOL… so an hour and a half later I got the drive shaft, cushions, and companion flanges for $65 out the door haha. I was a happy camper.
So at this point it was that time to drop the motor in. A large amount of towels were used to protect the engine bay from scratches!!. Went in without any riff raff. Had the motor in and motor mounts and trans mounts bolted up in about 30 mins.
Earlier in the planning process I had decided to switch to a front mount for easier pipe routing. I was able to score an HKS type S from Supraforums for a good price shipped so I had that waiting to go on.
Got the FMIC mocked up and mounted where I wanted it
Had to relocate the coolant over flow tank.. didn’t want to get an aftermarket one just yet so I mounted it under the drivers side headlight area
Got everything else bolted up to get a first start and try to make my deadline (car meet lol). Everything works great. Got the Radio Shack resistor and the A/C works just as it should. Now that everything is in the car I can concentrate on engine bay dress up. I want to chrome the intake manifold, throttle body and valve covers. Powder coat the intercooler pipes, and order black couplers. Then make the spark cover satin black like the exterior. Next years plans are to do a 350Z 6 speed swap and go single!! Between now and then I just want to make some changes to the exhaust and pick up a Shine Auto Project kit for the car (next purchase without a doubt lol).
Almost all the pics are with a camera phone. As soon as I get a chance I will get some pics with a real camera.
Thank you guys for taking the time to read my very LONG and probably “all over the place” thread lol. I will update it as things progress J
Any thoughts and criticism are always welcome!
 09-08-12, 01:46 PM
#12
Driver
Thread Starter
Join Date: Oct 2010
Location: AR
Posts: 105
Likes: 0
Received 0 Likes
on
0 Posts
maceugood... i met a lot of new ppl that day lol. Are you the guy with the black SC400? It has went through many changes lol. There are going to be many more too.
LilSCsteve.. Thanks man. Wasnt really sure any one would even take the time to read a long post haha.
LilSCsteve.. Thanks man. Wasnt really sure any one would even take the time to read a long post haha.

 very nice