When you click on links to various merchants on this site and make a purchase, this can result in this site earning a commission. Affiliate programs and affiliations include, but are not limited to, the eBay Partner Network.
haha thanks guys, very flattering. I think Halon is pretty much caught up and about to pass me soon, have been slacking lol.
So this isn't a Cad file but a PCB I wrote up for a combined boost cut and speed cut, this is probably the best place for it.
all the parts are labeled so you just need to order them and plug solder things in. Unfortunately I never tested it so its not 100% verified but I think its right.
remove the ".txt" at the end of the file and open it in PCB express. there are lots of places that will produce them if you send them the file.
The speed cut circuit in there on the right side operated by a 4 pin switch (turn on or off or just jumper to always on) which are powered by the same power wires and ground as the main circuit, so its a 2 in 1 function where you could flip on or off the speed cut, or just leave it on with a manual transmission. basically it cuts the speed signal in half (can also do quarter and eights if desired), so you can go double the limiter. not sure how this affects auto's hence the switch one could wire in or just jumper if manual, or leave disconnected if you don't want the speed cut circuit. manual trans can normally just pull the speed wire, but you need it on auto's so this supposedly helps It was shared on the internet already I just put it all into on circuit on a switch.
Thought I'd share a project I recently finished working on.
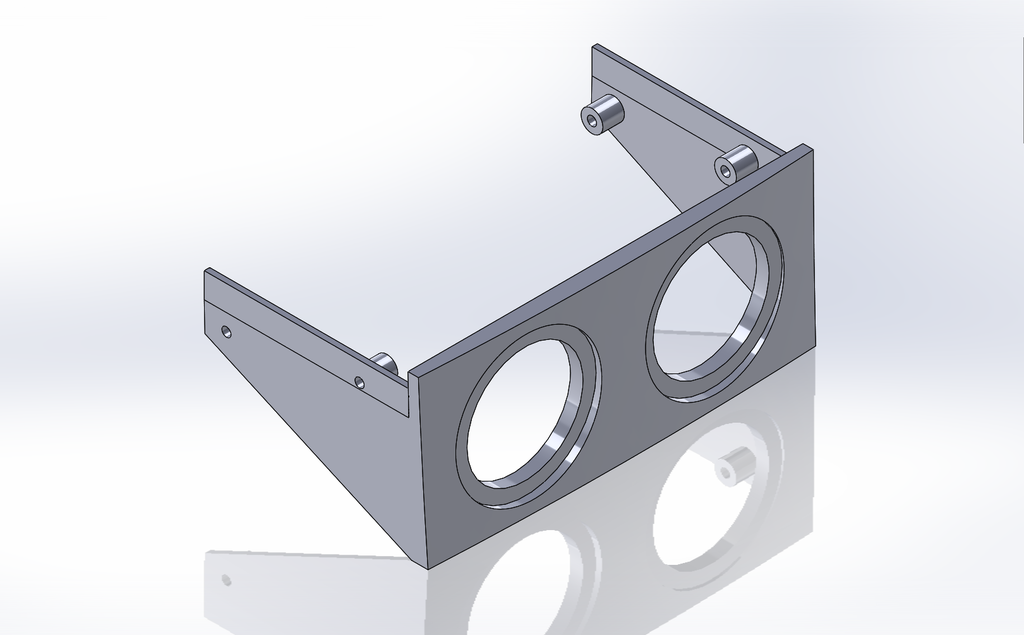
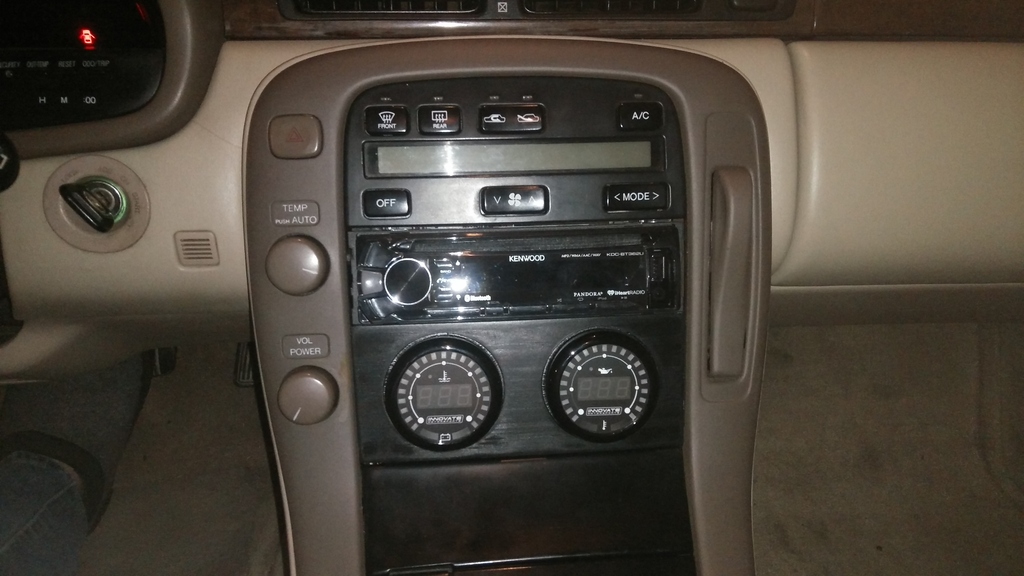
This a 3D printed dual gauge panel for when you switch to a single DIN head unit. I originally bought the Metra single DIN brackets but didn't like their construction. I also knew I wanted to add some gauges for monitoring my SC but it didn't seem the Metra kit left enough room below the radio to fit them. The factory radio is held in by eight screws (four per side). I noticed that my new head unit had mounting holes which lined up with the upper two mounting holes. Mounting the head unit via these upper holes raised the radio compared to the Metra kit and gave me room to fit two gauges underneath. This panel mounts via the remaining four holes. I did my best to replicate the curves of the factory radio so this is not just a flat filler panel.
Thought I'd share a project I recently finished working on.
This a 3D printed dual gauge panel for when you switch to a single DIN head unit. I originally bought the Metra single DIN brackets but didn't like their construction. I also knew I wanted to add some gauges for monitoring my SC but it didn't seem the Metra kit left enough room below the radio to fit them. The factory radio is held in by eight screws (four per side). I noticed that my new head unit had mounting holes which lined up with the upper two mounting holes. Mounting the head unit via these upper holes raised the radio compared to the Metra kit and gave me room to fit two gauges underneath. This panel mounts via the remaining four holes. I did my best to replicate the curves of the factory radio so this is not just a flat filler panel.
I've attached both my Solidworks model and a STEP model. Just remove the .txt extension after downloading. Or get them from the following Google Drive links.
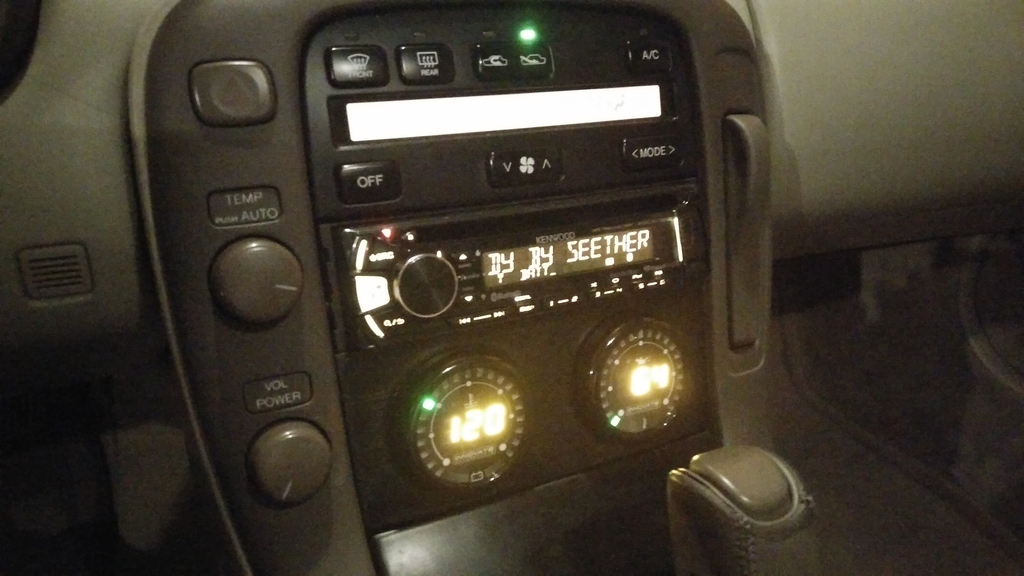
How do you like those innovative water and oil temp gauges....I have been looking at the same set.....where did you put the temp sensors at for signal to the gauges.....
Agreed, that's good stuff. MLeopard, you should consider doing a version with a cubby in place of gauge holders, maybe a 2.5 DIN version, get a vendor account, and push Metra out of the SC market!
MLeopard, that is awesome!! I agree that there is a lot to improve on the Metra 2-DIN stereo panel kit but looking at this I wonder how it would be to extend a small surround to the upper area (like Metra) for a 1-DIN head unit but while retaining the lower gauge section.
Could those spaces also be made to take 2 1/16" (52mm) gauges? Particularly VDOs?
Thanks for the compliments guys. I am pretty pleased with how it turned out.
Originally Posted by t2d2
Agreed, that's good stuff. MLeopard, you should consider doing a version with a cubby in place of gauge holders, maybe a 2.5 DIN version, get a vendor account, and push Metra out of the SC market!
It should be possible to do a version with a larger cubby. It would probably be a two piece design though because printing it all as a single piece would require lots of filler that was difficult to remove. Unless you used a printer that can print the dissolvable support material.
I don't have any aspirations for selling these though haha. That's why I'm sharing the files. You should be able to get this made using one of the online 3D printing services.
Originally Posted by KahnBB6
MLeopard, that is awesome!! I agree that there is a lot to improve on the Metra 2-DIN stereo panel kit but looking at this I wonder how it would be to extend a small surround to the upper area (like Metra) for a 1-DIN head unit but while retaining the lower gauge section.
Could those spaces also be made to take 2 1/16" (52mm) gauges? Particularly VDOs?
This is some brilliant work!!
Kahn, what I originally printed had a surround around the radio. That was my intent. What I hadn't noticed, though, was that the outer bezel of the radio is actually already flush with the climate control and my panel. In order to cover those gaps I would have needed a raised portion around the radio. If someone were to open my SLDPRT file and unsupress the last cut I made they could see the bezel I had. I decided I was happy with what I had.
The gauges I have are 2 1/16". My hope was to be able to fit three in the panel and I could have if I didn't have to account for the outer bezel too, which measures ~2.55". I would think that most 2 1/16" gauges will fit unless they just have an unusually large outer bezel.
You really have done an excellent job with this! This CAD design and 3D printing of custom car parts are in their infancy but I think this will become a bigger aspect of owning a classic car in coming years.
Originally Posted by MLeopard
Kahn, what I originally printed had a surround around the radio. That was my intent. What I hadn't noticed, though, was that the outer bezel of the radio is actually already flush with the climate control and my panel. In order to cover those gaps I would have needed a raised portion around the radio. If someone were to open my SLDPRT file and unsupress the last cut I made they could see the bezel I had. I decided I was happy with what I had.
The gauges I have are 2 1/16". My hope was to be able to fit three in the panel and I could have if I didn't have to account for the outer bezel too, which measures ~2.55". I would think that most 2 1/16" gauges will fit unless they just have an unusually large outer bezel.
I see, so it really does depend on the outer bezel of the 1-DIN radio being used?
I can see three 2 & 1/16" gauges as being quite a bit more work to accommodate and I like the detail you put into the bevel for seating with just two gauges.
But it will depend on the bezel surround each gauge has, yes. This is why I was thinking of some VDO's (their "Vision Series") in that size which can sit flush in a panel.
I am wondering now, can your CAD design's existing two bevels be modified to allow for flush mounted gauges in the same diameter you have specified?
Like these:
And for those of us who do not own 3D printing equipment, are there companies that offer to print whatever data file is sent to them? I'd love to try out this and some of the designs people post here.
I did like you said and hid your last cut to show the upper portion so people can see.
If you look at the image, the hole itself is 53mm diameter (for a 52mm gauge and 1mm of clearance). The recess for the bezel is 65mm.in diameter. So I think to answer your question Kahn, the diameter of the bezel on those VDO gauges would need to be known. Then yes anyone with SW should be able to edit it for you.
As for fitting 3 gauges. I'm not sure I see how you'd fit 3. The shoulders/stand-off's you have for the mouting it to the car, the two that are closest two the holes would be an interference. I see roughly 153mm between those shoulders, so not enough room for three 52mm gauges. Unless you shrink those shoulders, or do some fancy hole placement I haven't tried.
Played around at lunch today with your part MLeopard Replaced on gauge with a cubby hole, and an embossed gauge label.
Not sure if it does it on your computer too, but for some reason the 3 dimensional shading isn't working very well on this part on my computer. Wonder if I have a setting that's goofed up.
You're making me want to possibly ditch my double din stereo for a single din. This would be outstanding for my new single CAN-BUS gauge I need to mount somewhere
You really have done an excellent job with this! This CAD design and 3D printing of custom car parts are in their infancy but I think this will become a bigger aspect of owning a classic car in coming years.
I agree. I think it'll be a great avenues for those of us with more niche cars especially.
Originally Posted by KahnBB6
I see, so it really does depend on the outer bezel of the 1-DIN radio being used?
I can see three 2 & 1/16" gauges as being quite a bit more work to accommodate and I like the detail you put into the bevel for seating with just two gauges.
But it will depend on the bezel surround each gauge has, yes. This is why I was thinking of some VDO's (their "Vision Series") in that size which can sit flush in a panel.
I am wondering now, can your CAD design's existing two bevels be modified to allow for flush mounted gauges in the same diameter you have specified?
I wasn't aware of the VDO Vision gauges. Luckily VDO has some good dimensioned drawings so I could see if they would fit. Here's what I got. I had to offset the gauges to get them where I thought they would fit and it's still quite tight.
Originally Posted by KahnBB6
And for those of us who do not own 3D printing equipment, are there companies that offer to print whatever data file is sent to them? I'd love to try out this and some of the designs people post here.
There are companies who offer those kinds of services although I have never dealt with any of them. Just search online 3D printing.
As for fitting 3 gauges. I'm not sure I see how you'd fit 3. The shoulders/stand-off's you have for the mouting it to the car, the two that are closest two the holes would be an interference. I see roughly 153mm between those shoulders, so not enough room for three 52mm gauges. Unless you shrink those shoulders, or do some fancy hole placement I haven't tried.
The mounting lugs in my original model were really larger than necessary so I've cut them down in the reworked models. Also, some may want to note that the factory mounting screws are M5s.
Originally Posted by Halon
Not sure if it does it on your computer too, but for some reason the 3 dimensional shading isn't working very well on this part on my computer. Wonder if I have a setting that's goofed up.
Part appearances are rarely something I deal with so it could very well be originating with me.
Originally Posted by Halon
Played around at lunch today with your part MLeopard Replaced on gauge with a cubby hole, and an embossed gauge label.
You're making me want to possibly ditch my double din stereo for a single din. This would be outstanding for my new single CAN-BUS gauge I need to mount somewhere
Y'all have me working now haha. I messed around with my models some more this morning. So now there's a 2 guage version, 3 guage version (VDO Vision guages), blank panel version and a cubby version. Note that the cubby version is two pieces, frame and the cubby. I have all the files here: https://drive.google.com/drive/folde...UNwdkdCUVJ5azg
If you open the main SC_gauge_panel.SLDPRT I have the various versions as different configurations of the part.
Last edited by MLeopard; 02-03-17 at 04:53 PM.
Reason: Added note about configurations. Corrected link.
Played around at lunch today with your part MLeopard Replaced on gauge with a cubby hole, and an embossed gauge label.
You're making me want to possibly ditch my double din stereo for a single din. This would be outstanding for my new single CAN-BUS gauge I need to mount somewhere
Haha. Glad I can muddy your car plans. Mine are always changing based on what I see you guys doing to your cars.
Ha, I'm just glad there are others willing and able to add and contribute to this thread. It'd be great if in a few years there's a handful of different things people share on here for others to benefit from. I think you are right that 3D printing has a ton if potential in cases like this to have a significant impact on how we mod or cars. I think it's still in its infancy, and printing car parts like this (especially interior) might become a normal thing in say 5 years.

 09-12-16, 12:37 PM


 Replaced on gauge with a cubby hole, and an embossed gauge label.


