
Window regulator fix for Sc models
 09-16-03 | 10:56 PM
#1
Thread Starter
Keeper of the light
iTrader: (17)
Joined: Feb 2003
Posts: 34,106
Likes: 363
From: My little world

Due to both my driver side window regulator and passenger side regulator breaking in the same week, you are now about to learn how to fix your regulator with 5 bucks worth of materials and get an understanding of how this unit works.

Below is the start of images to come and detailed instructions on how to fix and understand what is going on inside your door. Kiss that $100.00 charge goodbye to replace it. I don't play that

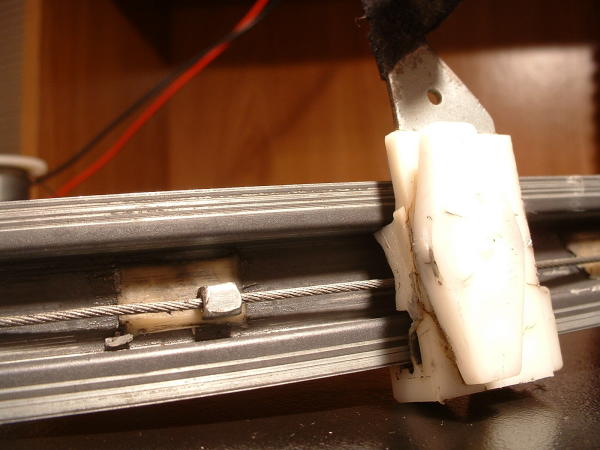
First, the part that breaks is the plastic coupling that rides on the tracks wire which is wound around a spool attached to a motor. When the part breaks, the small metal block breaks through the plastic and the window drops. As the wire and block continue to go up and down, it now is seperated from the plastic coupling that the window is attached to.
As we progress, we will learn how to fix this plastic piece back to "good as new" strength and make our regulator functional again without spending $100 bucks for a new one, when our old one works fine.
The first picture shows the spool that the wire circles on. The second picture shows the track and the faulty plastic that breaks as the regulator fails. Notice the metal block, this is what is supposed to be inside the plastic. The relevance of the spool is that it must be released and unwound to get the wire out of the regulator.

Last edited by O. L. T.; 09-17-03 at 12:35 AM.
09-16-03 | 11:21 PM
#2
Thread Starter
Keeper of the light
iTrader: (17)
Joined: Feb 2003
Posts: 34,106
Likes: 363
From: My little world
After unwinding the spool, proceed to the following.
The first horrible truth to this operation is that because of the way the plastic arms mount, there is no way around it.... you have to bend the regulator. When the factory built the unit, they first slid the plastic onto the rail then proceeded to rivet the pulley wheels in place . In this picture, the regulator has been bent using vice grips. although the picture doesn't show the vert well, the side has been bent up at a 90 degree angle facing strait up so when the plastic slides past it, the arms will simply lift strait out and the coupling will be free from the track.
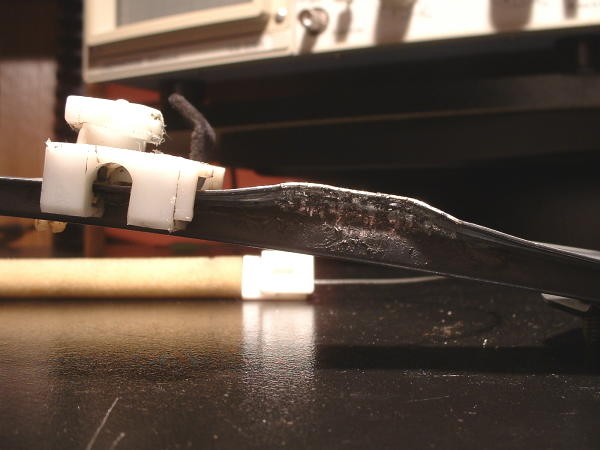
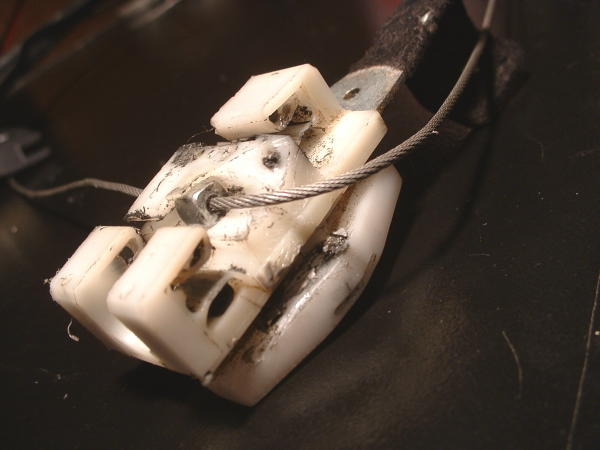
Once you have removed the coupling, the wire and the coupling should be free from the unit and you can now assemble them back properly as seen below. as you can see, when they break, they loose a lot of the plastic that holds the unit in place. place the piece back into it's respective position and proceed with the reforming of the plastic. (coming shortly)
The first horrible truth to this operation is that because of the way the plastic arms mount, there is no way around it.... you have to bend the regulator. When the factory built the unit, they first slid the plastic onto the rail then proceeded to rivet the pulley wheels in place
. In this picture, the regulator has been bent using vice grips. although the picture doesn't show the vert well, the side has been bent up at a 90 degree angle facing strait up so when the plastic slides past it, the arms will simply lift strait out and the coupling will be free from the track. Once you have removed the coupling, the wire and the coupling should be free from the unit and you can now assemble them back properly as seen below. as you can see, when they break, they loose a lot of the plastic that holds the unit in place. place the piece back into it's respective position and proceed with the reforming of the plastic. (coming shortly)
Last edited by O. L. T.; 09-16-03 at 11:58 PM.
09-16-03 | 11:51 PM
#3
Thread Starter
Keeper of the light
iTrader: (17)
Joined: Feb 2003
Posts: 34,106
Likes: 363
From: My little world
Now we come to the part where we are going to fix what is broken. I am choosing to use a company that has been around longer than i have. We will be using the original formula JB Weld. First i cleaned the surface of the plastic to remove all the old grease from within the center where we will be applying the mixture. Then i scruffed up the slick plastic with some sandpaper to allow the mix to get a good grip on the plastic. Finally i applied some aluminum foil to keep the mix from running into the track area on the side because this stuff turns into a rock when it dries. Then i have applied the first coat of the mixture to the wire and coupling. Don't worry about it being a little messy on the coupling, you will have to do a little light sanding to perfect it later.


 09-17-03 | 09:09 AM
#6

Rookie
Joined: Mar 2003
Posts: 74
Likes: 0
From: California
Wish I would have had somehting like this 6 months ago... My buddy had the same problem with his 92 es300... He took it to a lexus service specialist who was going to charge him almost $200 to fix it.. I took mine to lexus and they wanted to charge me $100 just to look at it... I found a place to do it for $113 bucks...
Tom
Tom

Trending Topics


 09-21-03 | 10:56 PM
#11
Great info ! I just replaced my regulator a few weeks ago. Managed to get a used regulator for $150. Well atleast i'll have this info if the other window regulator decides to let go.
05-05-04 | 04:00 PM
#14
Pole Position
Joined: Dec 2003
Posts: 310
Likes: 0
From: OrlandHO, FL
In the process of trying to get this regulator out, since the same thing just happened to me today.
Scared the crap out of me. I was just sitting in the drivethru for some fast food, and I heard this loud *POP*. I thought someone threw a rock at my window or a bird ran into my window. Come to find out the same thing happened to the plastic piece as well. It will catch and have no problem going down, but on the way up nothing.
Question is: What is the trick in getting the whole assembly out, or just removing that plastic piece from the actual window itself? I'm not seeing the solution yet. Any help is greatly appreciated, as the rain likes to pour here in Orlando.
05-05-04 | 04:19 PM
#15

Pole Position
Joined: Aug 2003
Posts: 319
Likes: 0
From: California
Originally posted by advan7
Question is: What is the trick in getting the whole assembly out, or just removing that plastic piece from the actual window itself?
Question is: What is the trick in getting the whole assembly out, or just removing that plastic piece from the actual window itself?