
SC300 Custom high power LED clear Tails DIY
 06-12-09 | 08:47 AM
#1

Thread Starter
Driver
Joined: Oct 2008
Posts: 166
Likes: 1
From: Ky
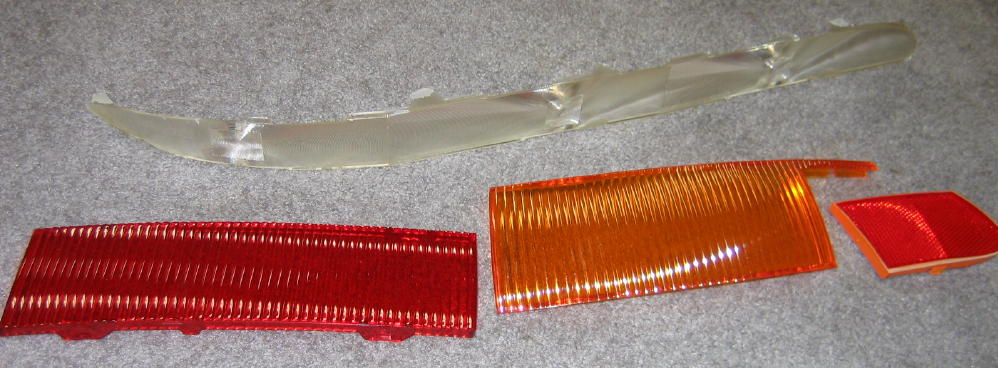
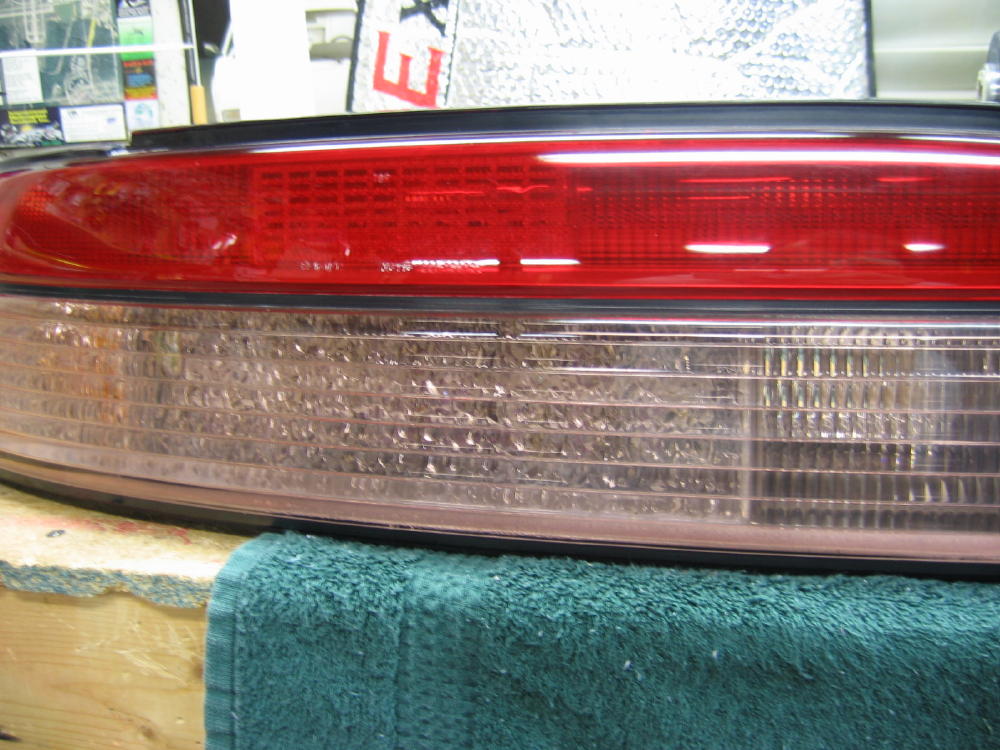
I've been researching this topic since I bought the car and since there just isn't much out there I decided to build my own. After reading the "clear" tail light threads, I became fond of the '95-96 style (I have a '94) This thread is very helpful on how to take them apart https://www.clublexus.com/forums/sc-...-96-tails.html so I'll just concentrate on the LED mods. I started by removing the colored lenses including the diffuser over the parking light bulbs.
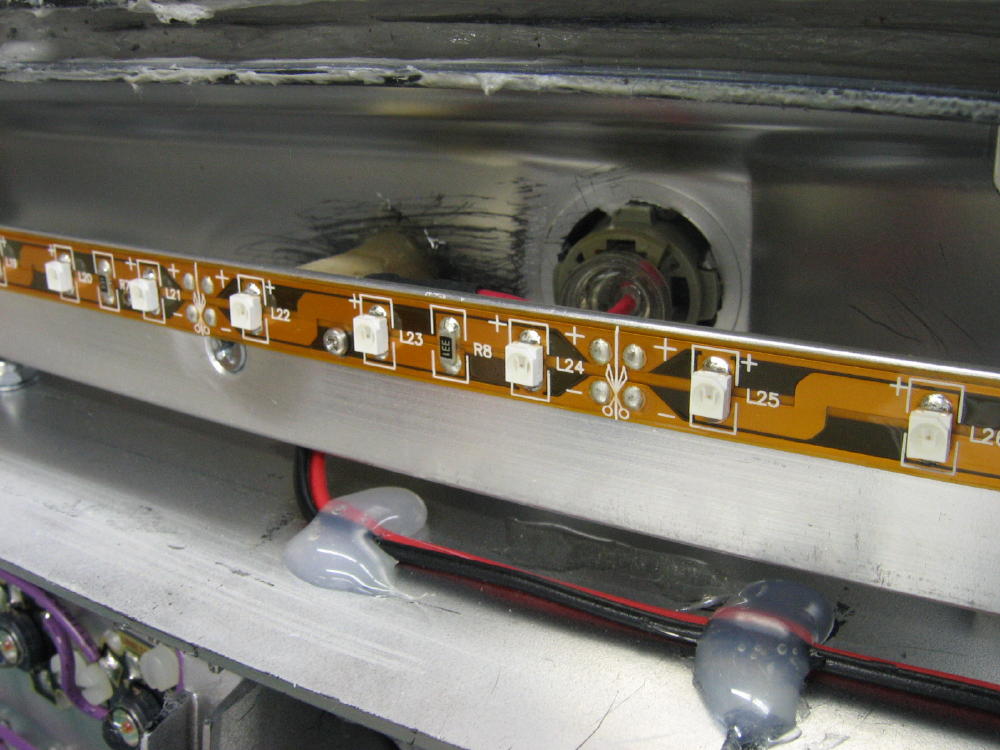
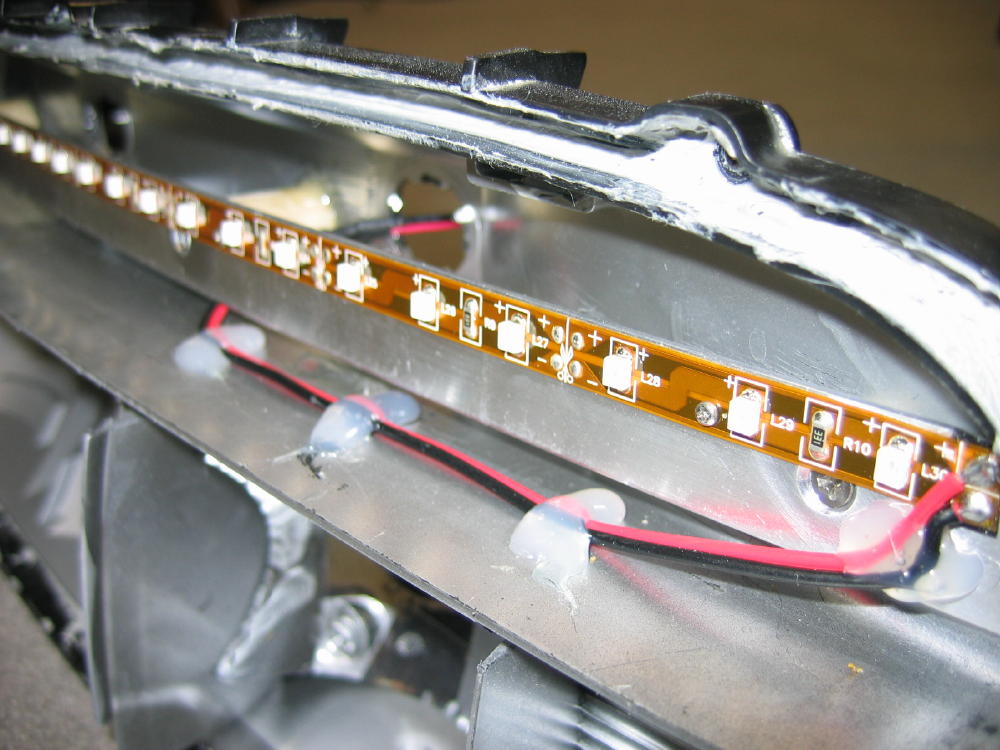
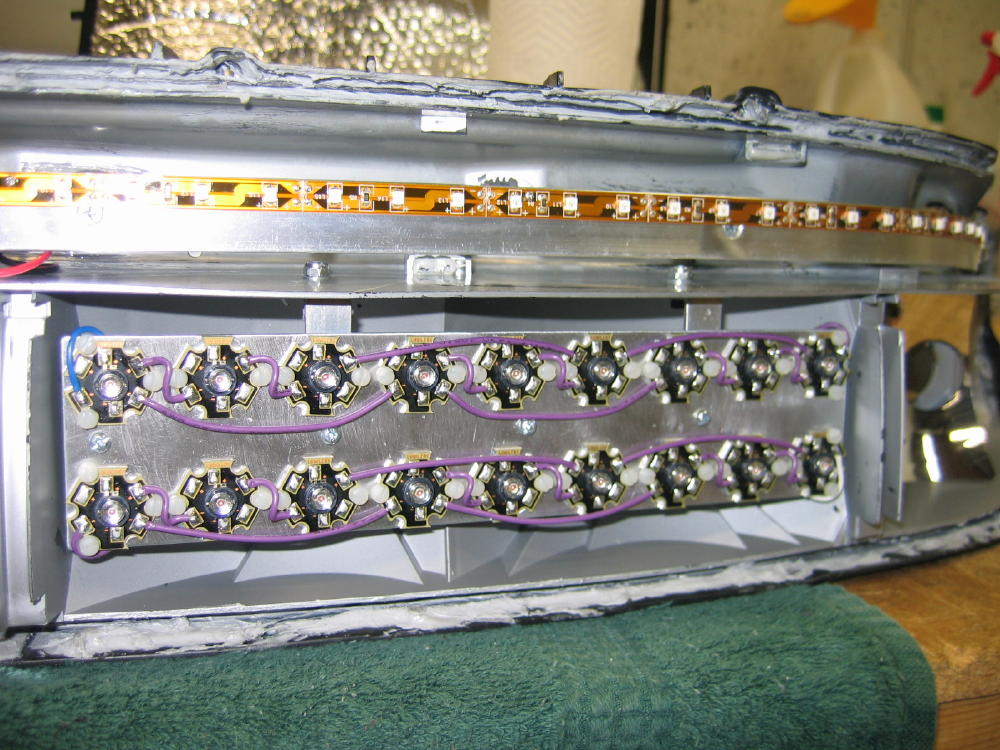
I used a self adhesive LED strip for the tail lights, mounted to a piece of 1/16" aluminum. I curved the mount to follow the contour of the lens, and tapered it at the end where it wraps around the corner. It's bolted to the housing through different length wooden standoffs to maintain an equal distance from the lens. This new mount is roughly in the same position as the original diffuser was.

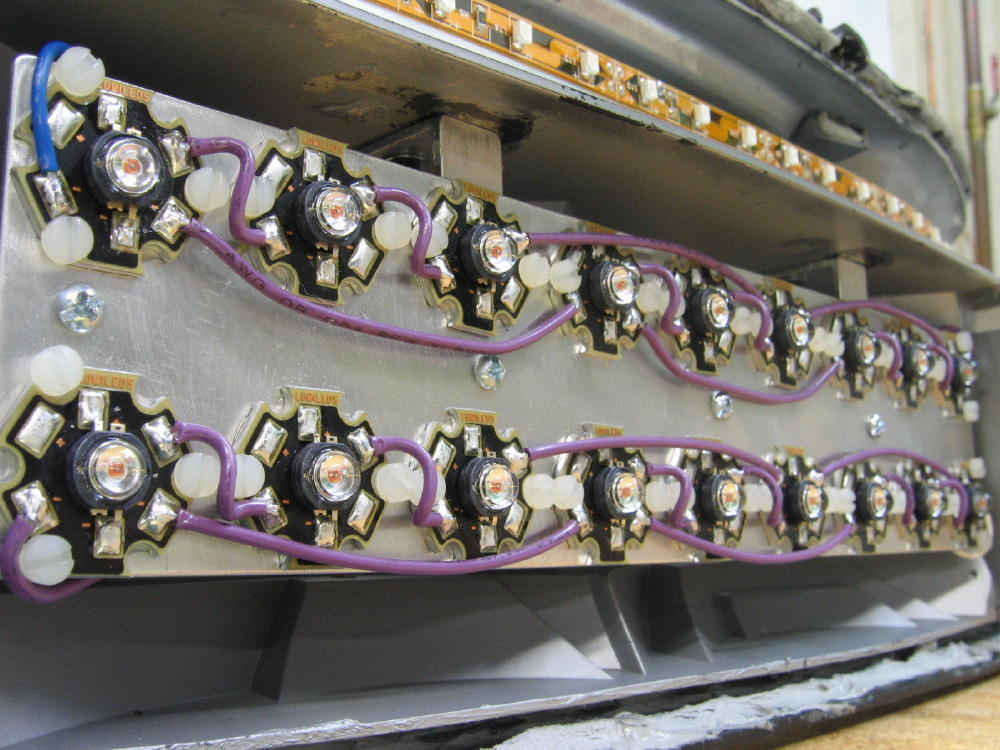
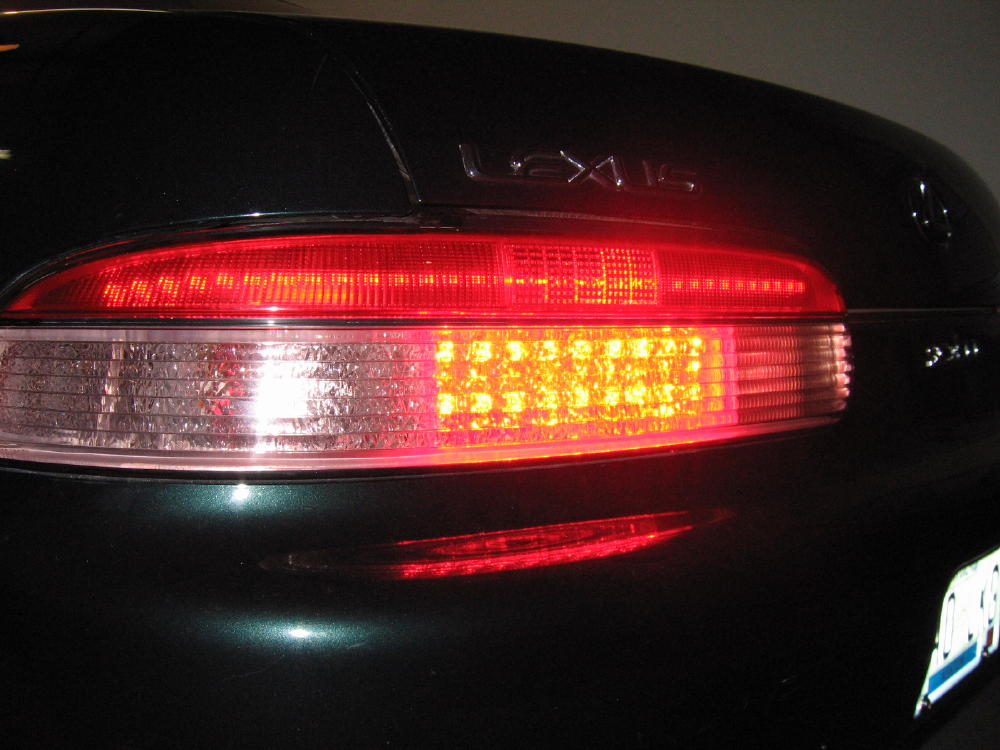
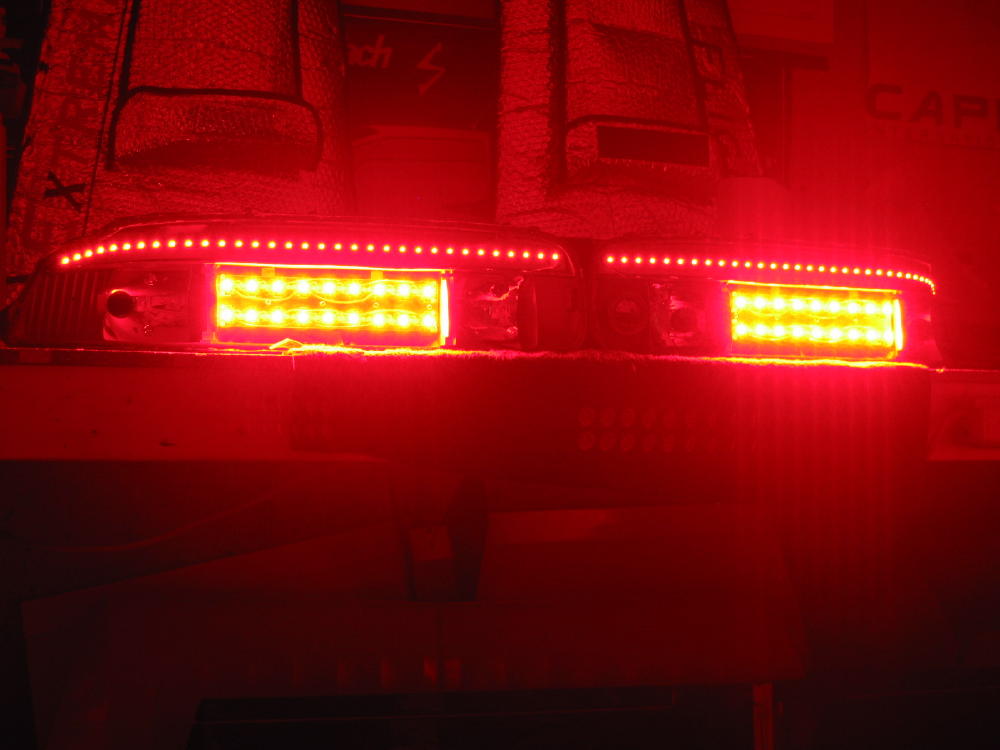
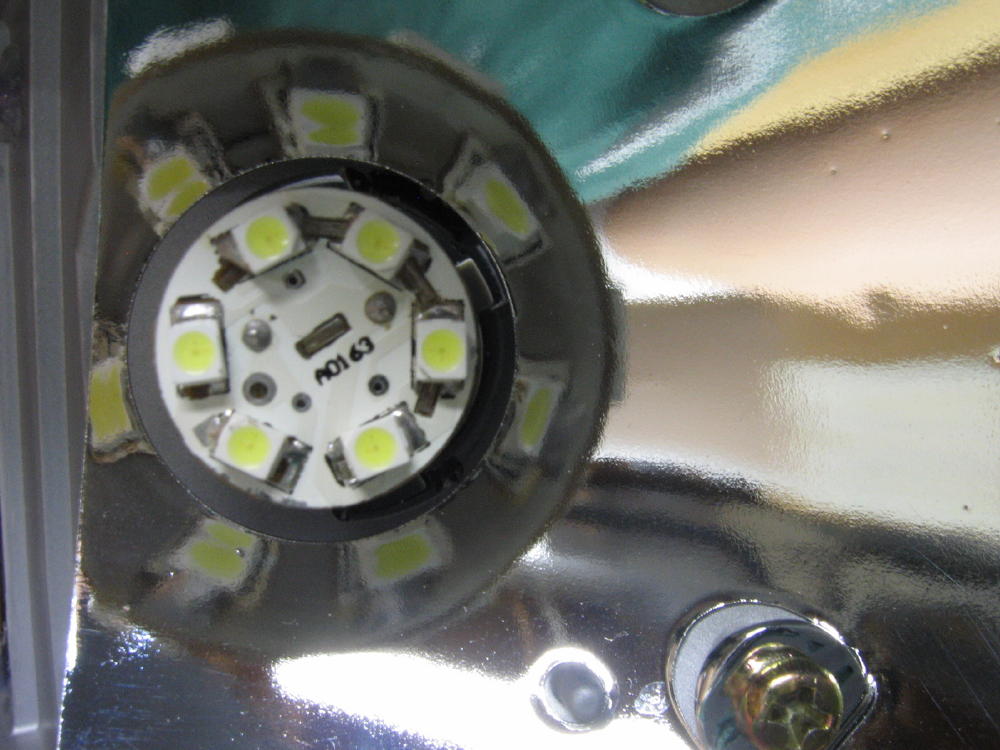
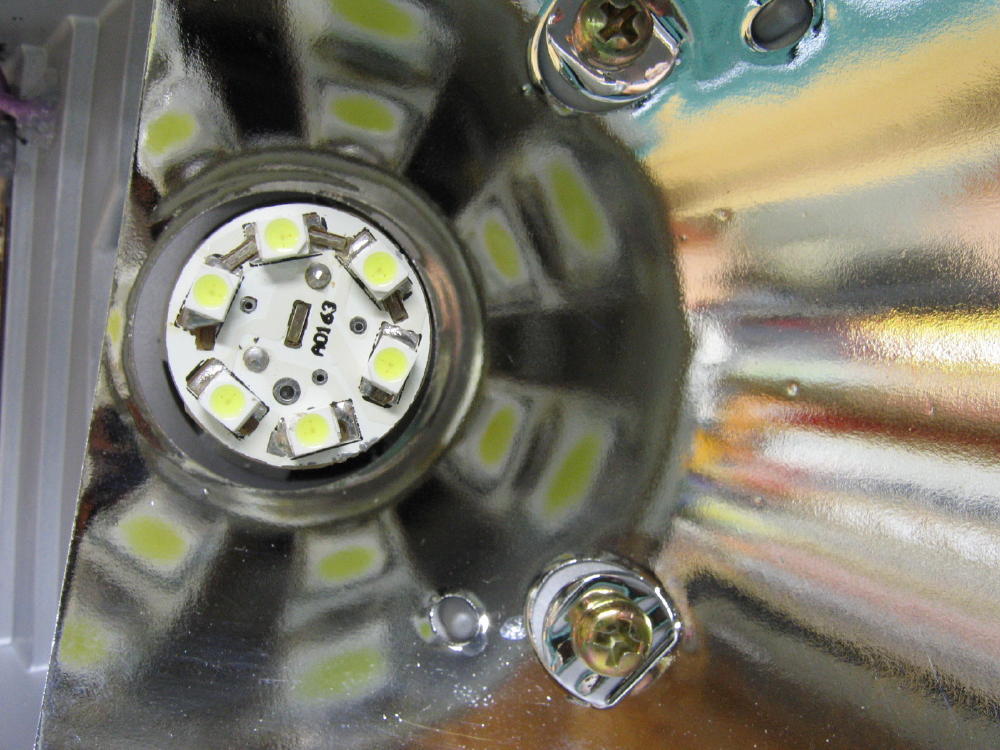
The brake lights posed quite a challenge, I just couldn't find anything readily available that was bright enough by the time the light went through the diffuser and the lens. This had me stumped while I researched what was available. I ended up building a custom array of high power 1 watt LEDs. Assuming 15 lumens per watt for an incandescent, the stock brake lights provided 630 lumens per side (21 watt bulbs) It would take 15 1 Watt LEDs to equal that, considering wiring requirements and the physical space I had, I decided to use 18 LEDs per side. I'm using Luxeon Star 1 Watt LEDs providing 44 lumens per watt at 350 mah, driven by Luxeon power puck 1000 mah drivers. This config gives 792 lumens, although LEDs and incandescents "appear" different (even with the same numbers) and lumens isn't necessarily a sure fire way to compare them, it was all the convincing I needed to build this array. I built a mount out of 1/16" aluminum, the 18 LEDs are bolted to it using 4-40 nylon screws with a daub of thermal grease (yes these do get hot) There are 2 drivers per side (bolted to the back side of the mount) each driver is powering 9 LEDs (3 parallel strings of 3 LEDs in series). Even though the incandescents provide light in all directions, the factory housing has almost no reflector for the brake lights, it's molded in , but it's just flat silver plastic, not a nice chrome reflector like the turn signal has. So with 100% of the LED output going through the lens, they are pretty intense !
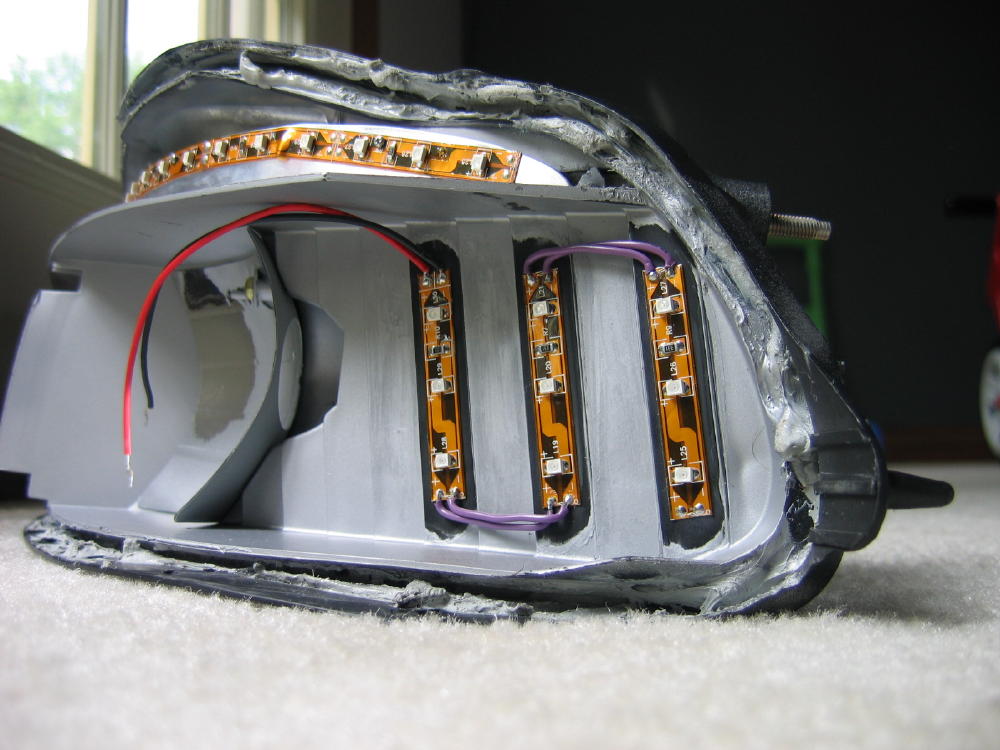
Where the outer lens wraps around the corner and covers the reflector, it appears to be less diffused there, and more "clear." I thought that would look nice with some light behind it, so I added some amber LED strips wired to the turnsignal.
I originally made a new clear diffuser out of the "prismatic clear" lens material from home depot. If you'll notice, it has a diagonal pattern to it.
I didn't think this would be a problem until I put it back together. The diagonal lines in the diffuser somewhat clash with the horizontal lines in the lens and it makes a funky wavy pattern. It's not that bad until you turn on the lights. It made my nice parallel row of LEDs look crooked, I wasn't happy with the distortion, and I wanted to see the distinct rows of LEDs.
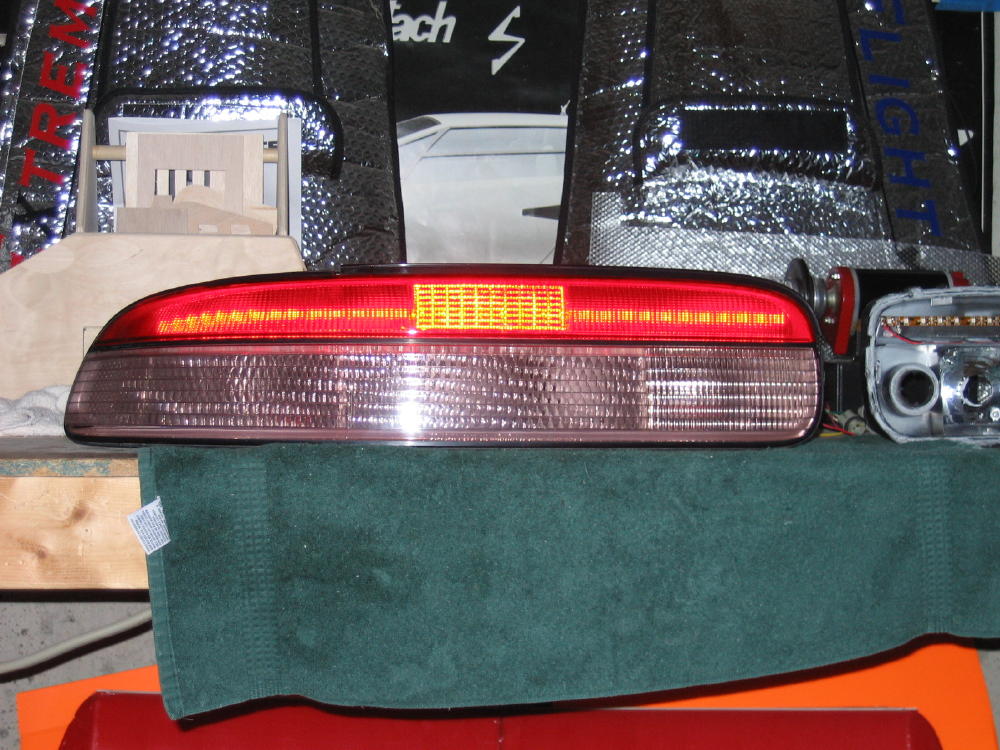
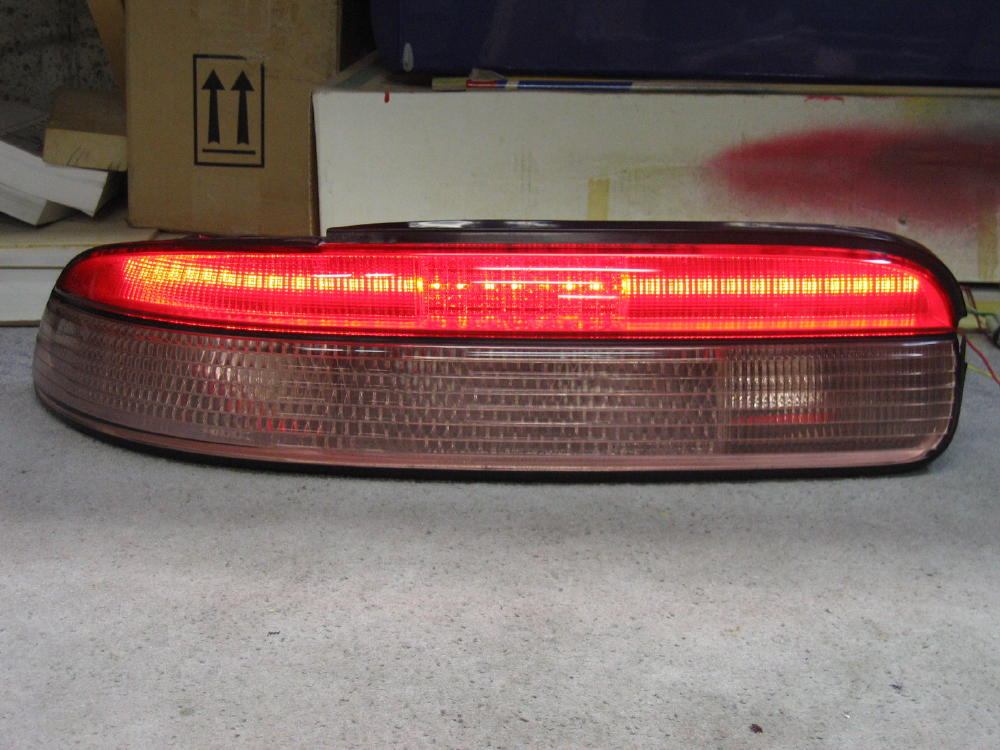
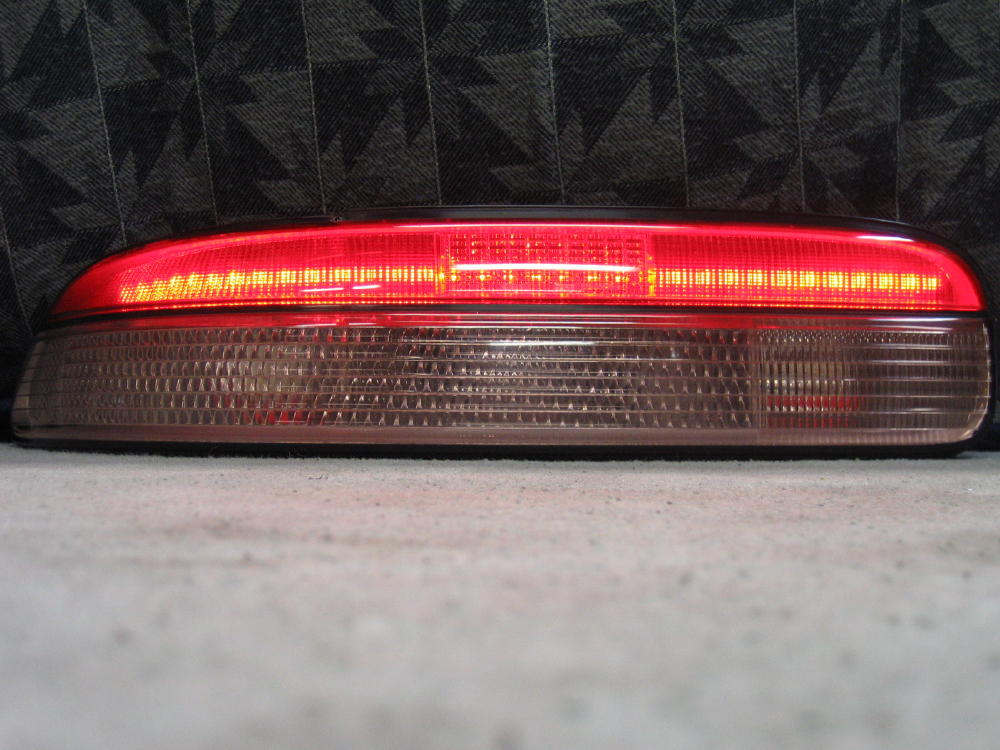
I ended up redoing the diffuser, I tried the "cracked ice" lens this time. I don't think it looks quite as "factory" with all the random lines in it, but with the lights on it doesn't get as distorted either.
Here are some bench testing pics.
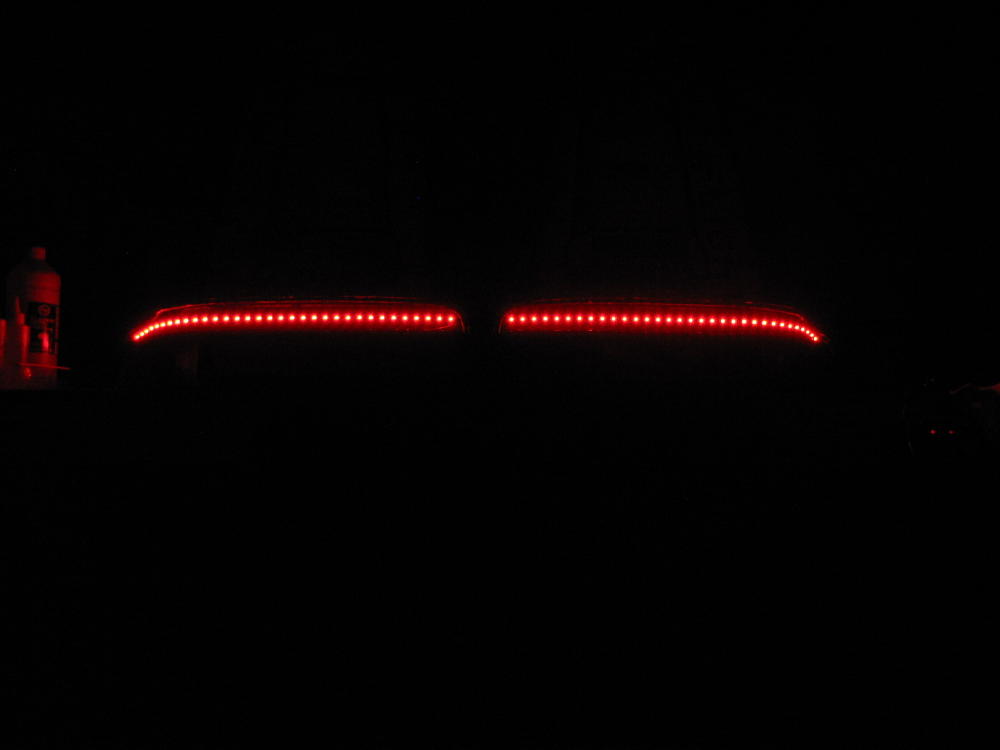
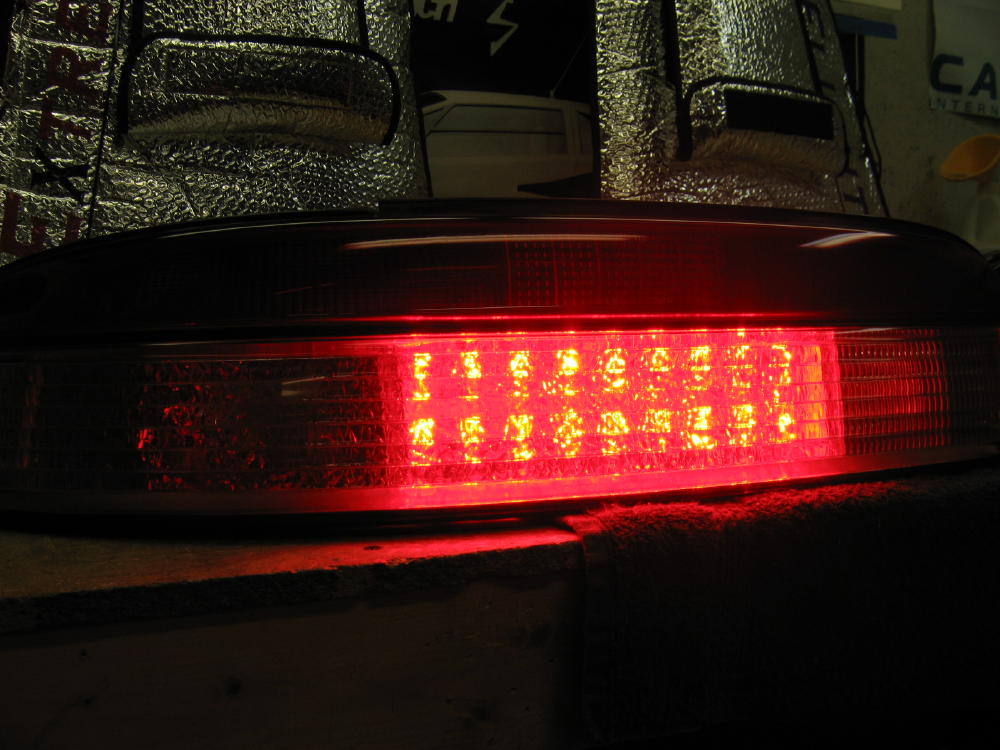
Tail lights, no lenses
Brake lights, no lenses
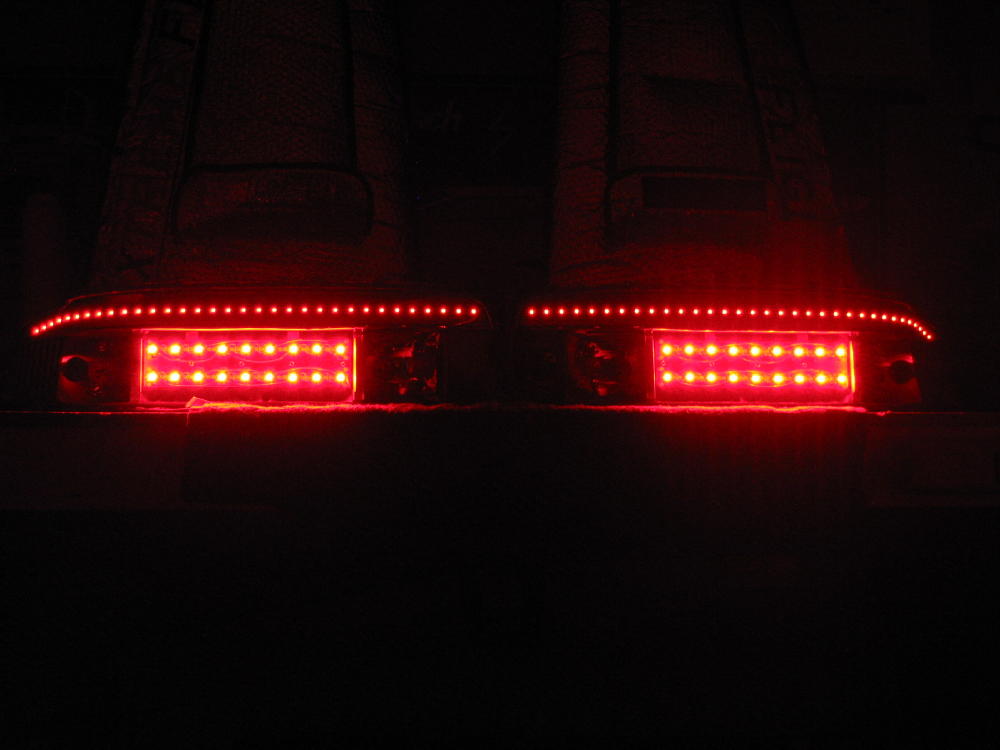
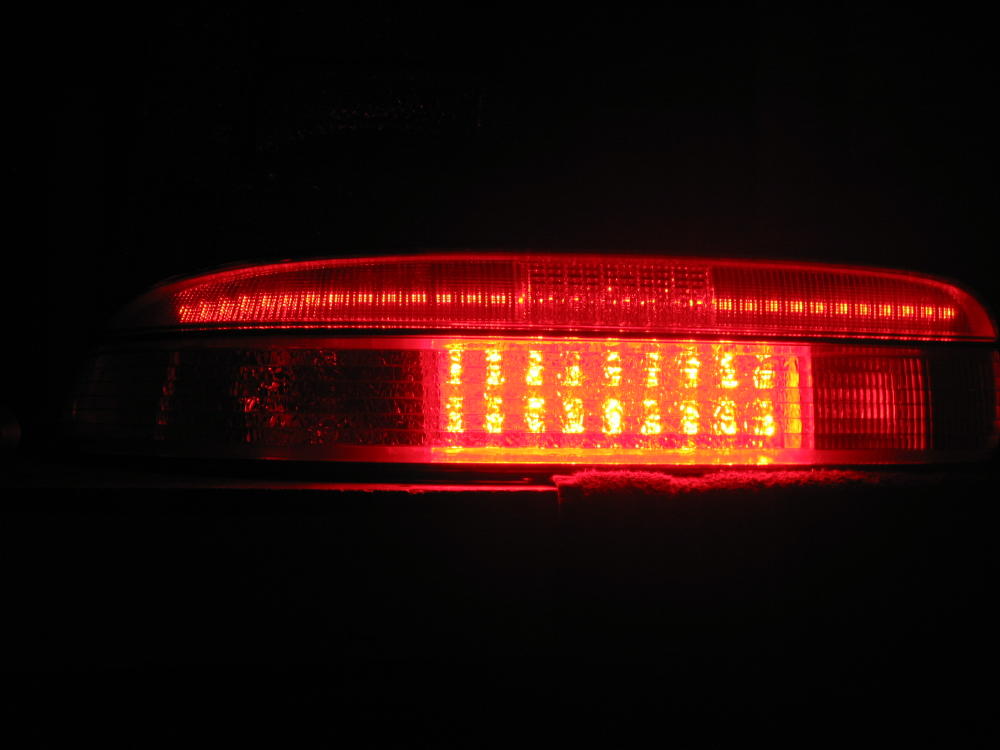
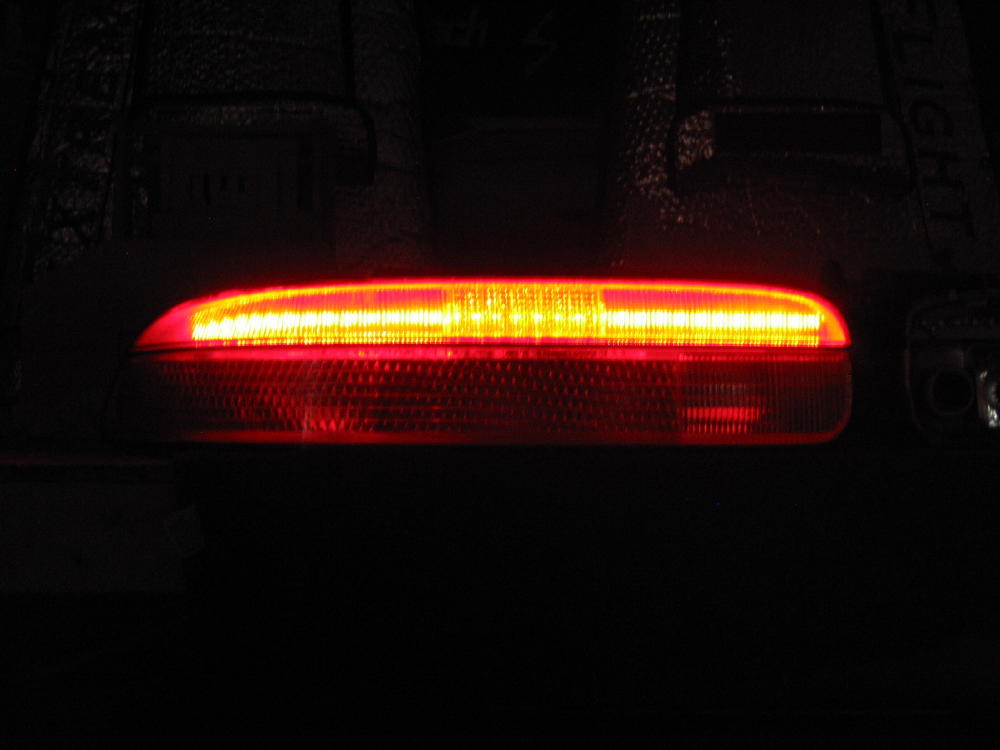
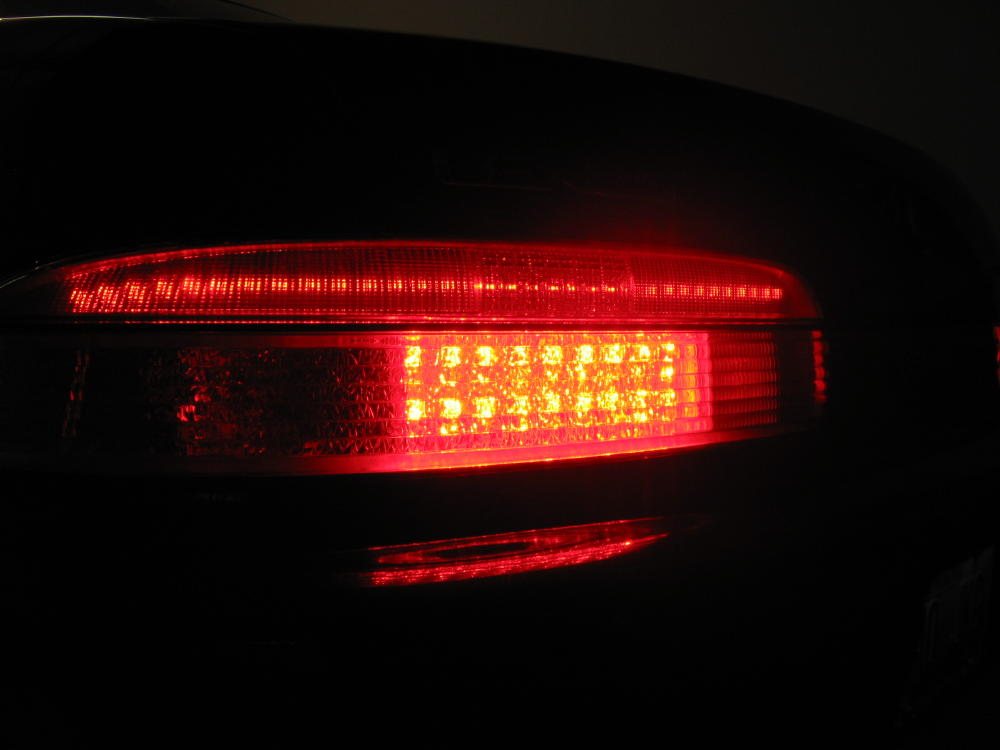
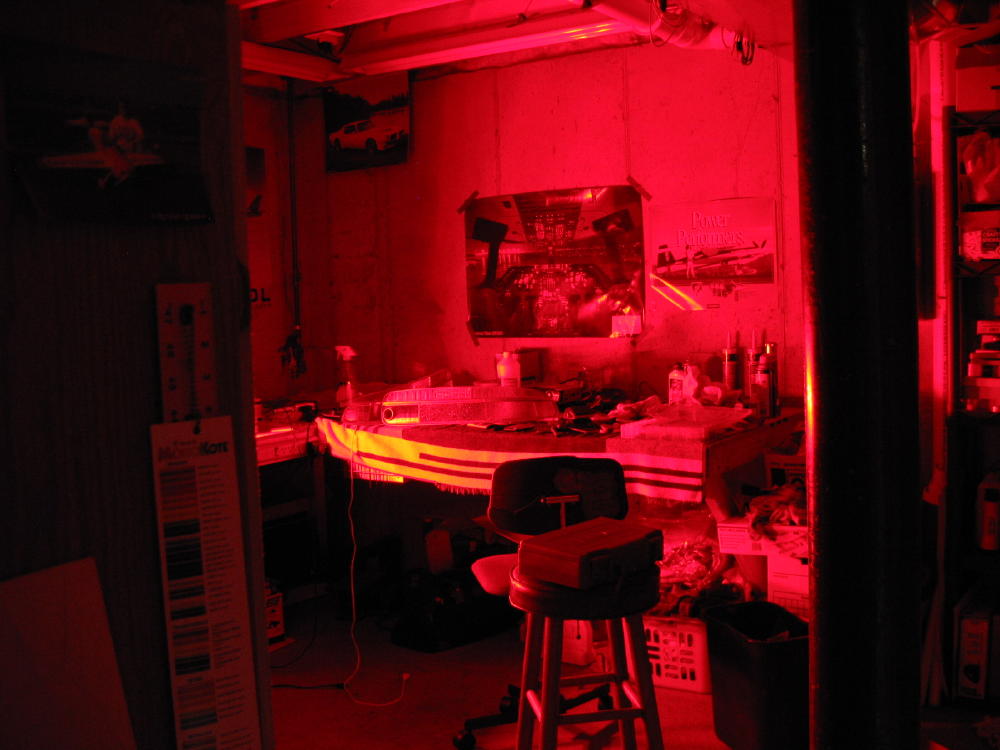
I thought this was cool, my basement looks like a submarine. This is one brake light in pitch dark.
I used a self adhesive LED strip for the tail lights, mounted to a piece of 1/16" aluminum. I curved the mount to follow the contour of the lens, and tapered it at the end where it wraps around the corner. It's bolted to the housing through different length wooden standoffs to maintain an equal distance from the lens. This new mount is roughly in the same position as the original diffuser was.
The brake lights posed quite a challenge, I just couldn't find anything readily available that was bright enough by the time the light went through the diffuser and the lens. This had me stumped while I researched what was available. I ended up building a custom array of high power 1 watt LEDs. Assuming 15 lumens per watt for an incandescent, the stock brake lights provided 630 lumens per side (21 watt bulbs) It would take 15 1 Watt LEDs to equal that, considering wiring requirements and the physical space I had, I decided to use 18 LEDs per side. I'm using Luxeon Star 1 Watt LEDs providing 44 lumens per watt at 350 mah, driven by Luxeon power puck 1000 mah drivers. This config gives 792 lumens, although LEDs and incandescents "appear" different (even with the same numbers) and lumens isn't necessarily a sure fire way to compare them, it was all the convincing I needed to build this array. I built a mount out of 1/16" aluminum, the 18 LEDs are bolted to it using 4-40 nylon screws with a daub of thermal grease (yes these do get hot) There are 2 drivers per side (bolted to the back side of the mount) each driver is powering 9 LEDs (3 parallel strings of 3 LEDs in series). Even though the incandescents provide light in all directions, the factory housing has almost no reflector for the brake lights, it's molded in , but it's just flat silver plastic, not a nice chrome reflector like the turn signal has. So with 100% of the LED output going through the lens, they are pretty intense !
Where the outer lens wraps around the corner and covers the reflector, it appears to be less diffused there, and more "clear." I thought that would look nice with some light behind it, so I added some amber LED strips wired to the turnsignal.
I originally made a new clear diffuser out of the "prismatic clear" lens material from home depot. If you'll notice, it has a diagonal pattern to it.
I didn't think this would be a problem until I put it back together. The diagonal lines in the diffuser somewhat clash with the horizontal lines in the lens and it makes a funky wavy pattern. It's not that bad until you turn on the lights. It made my nice parallel row of LEDs look crooked, I wasn't happy with the distortion, and I wanted to see the distinct rows of LEDs.
I ended up redoing the diffuser, I tried the "cracked ice" lens this time. I don't think it looks quite as "factory" with all the random lines in it, but with the lights on it doesn't get as distorted either.
Here are some bench testing pics.
Tail lights, no lenses
Brake lights, no lenses
I thought this was cool, my basement looks like a submarine. This is one brake light in pitch dark.
Last edited by BBriBro; 06-12-09 at 09:02 AM.
06-12-09 | 08:48 AM
#2
Thread Starter
Driver
Joined: Oct 2008
Posts: 166
Likes: 1
From: Ky
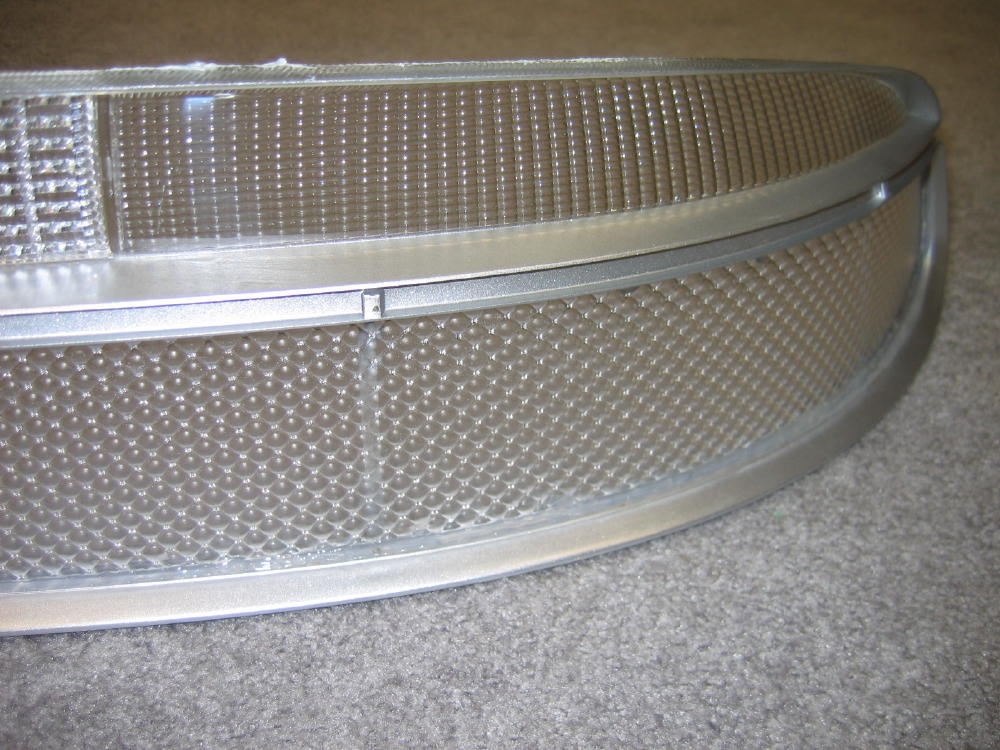
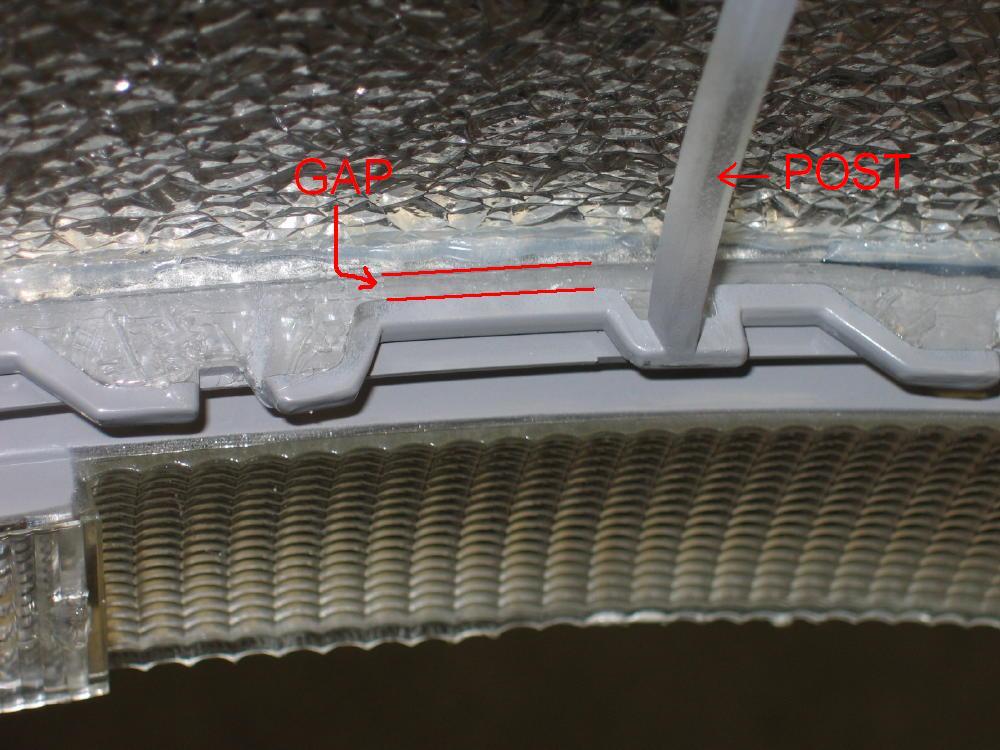
When putting the lenses back together, I noticed an "issue" that I didn't see mentioned in the other threads. The factory colored pieces are not flat, they are molded to give clearance even when bottomed in the frame. If you take a flat piece such as the home depot lens and bottom it in the frame, it will interfere with the housing when you put it back together. The "post" in this pic drops down past flush with the recess in the housing which will make the diffuser bow or even come lose if you don't leave this gap in there.
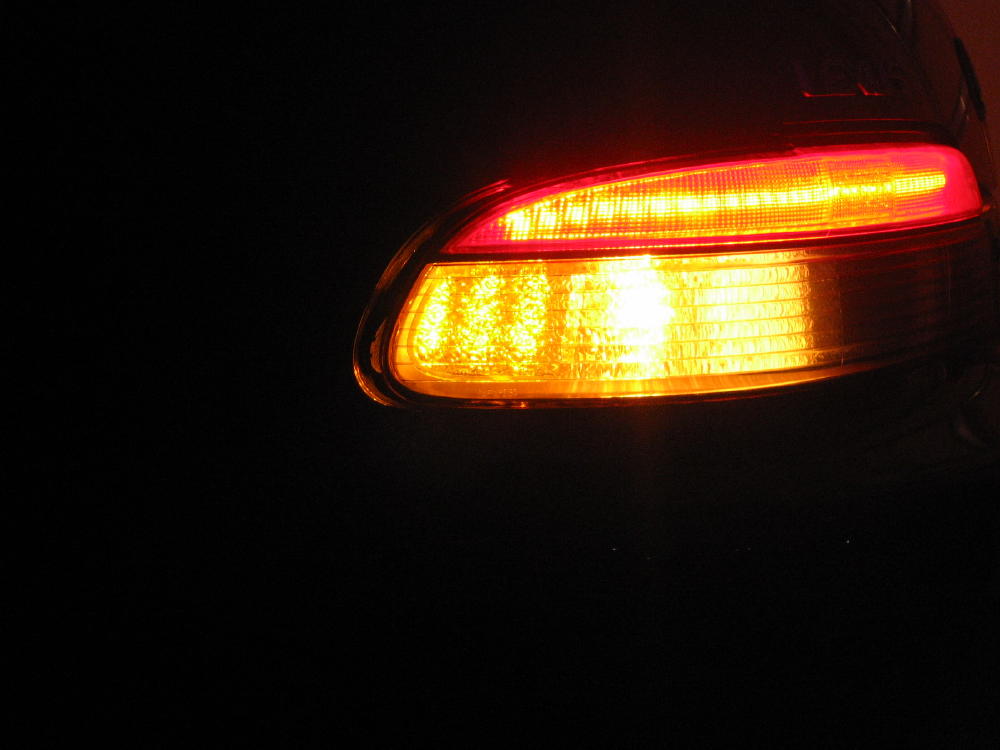
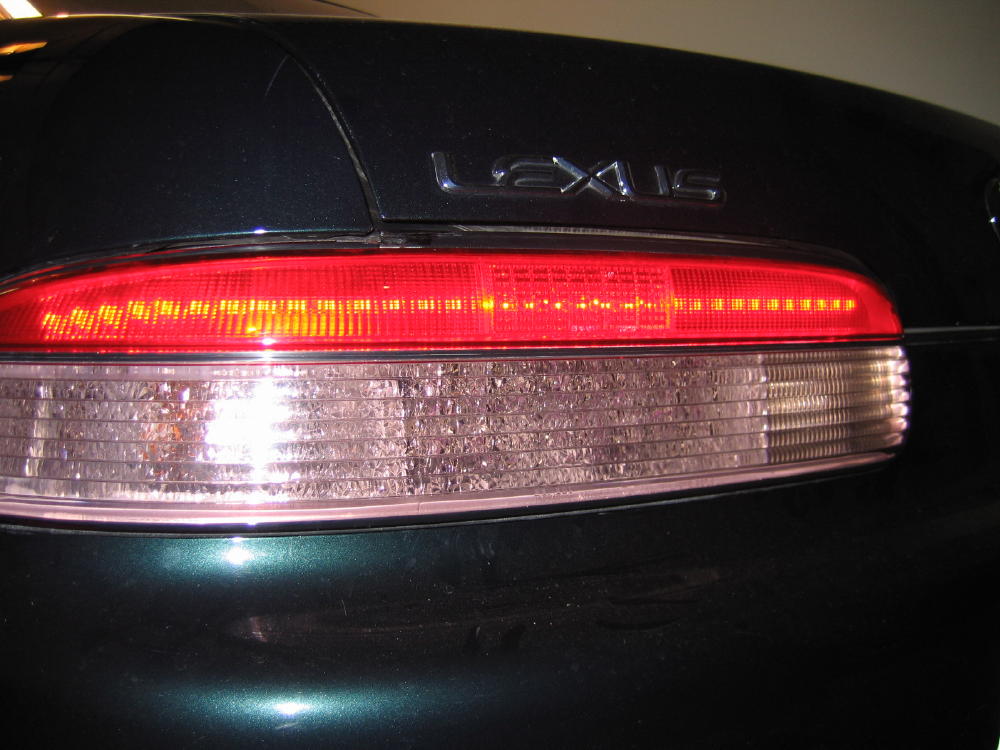
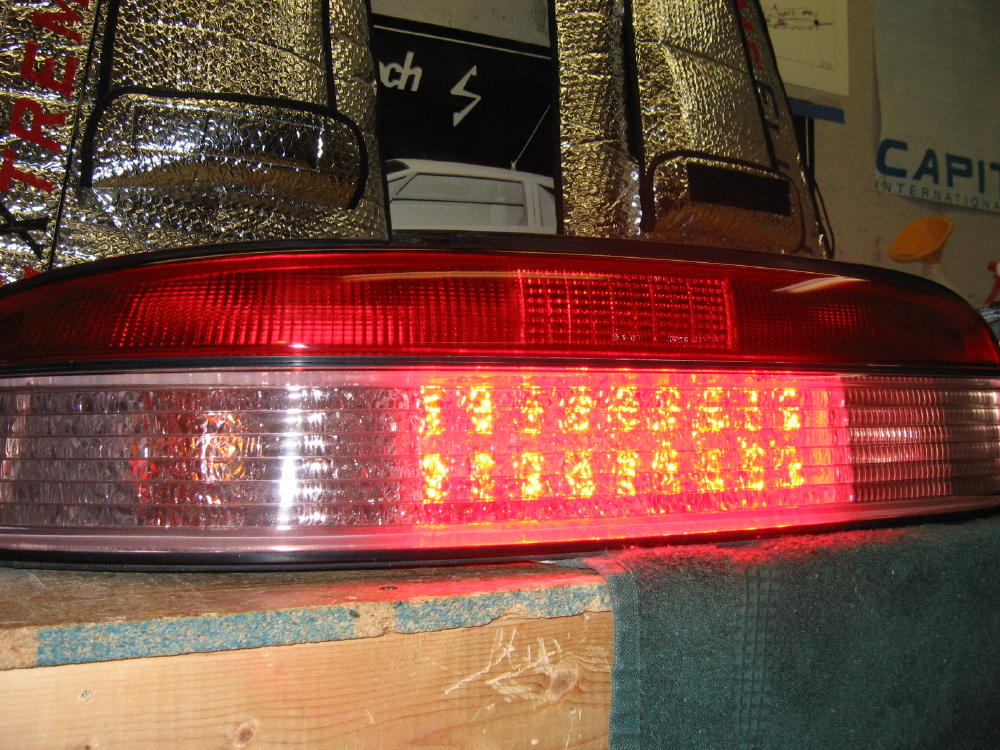
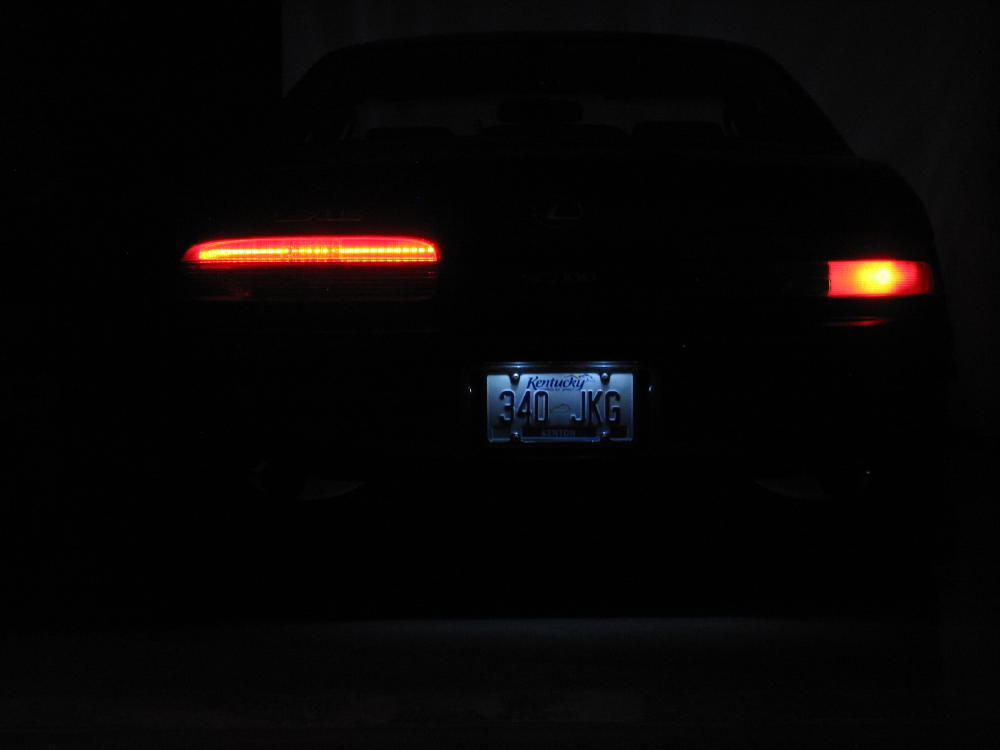
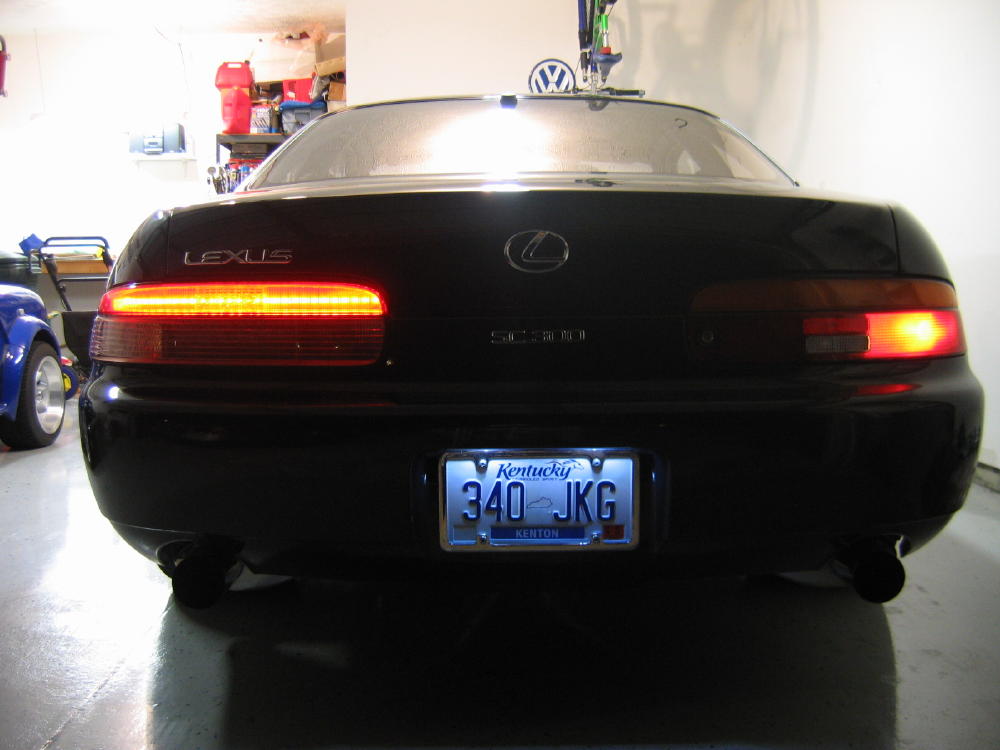
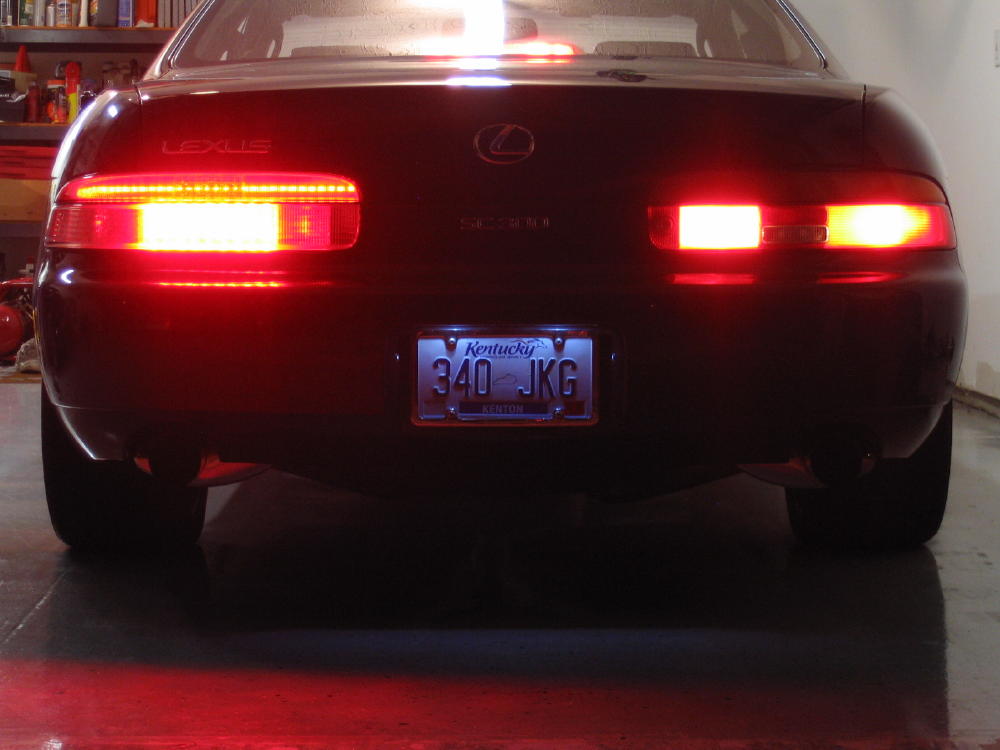
These pics on the car are a bit premature, the tail light is not back together yet, so there are gaps, but I was anxious to get some comparison pics !


For the back up lights, I'm using these 7 Watt high power LED bulbs from V-Leds, unfortunately they needed some modification. They were too short to be positioned properly in the reflector (I always wondered about this, and finally get to see it from the "other" side) I lengthened them by destroying a incandescent bulb, shortening it's base appropriately, then soldering it to the bottom of the LED bulb
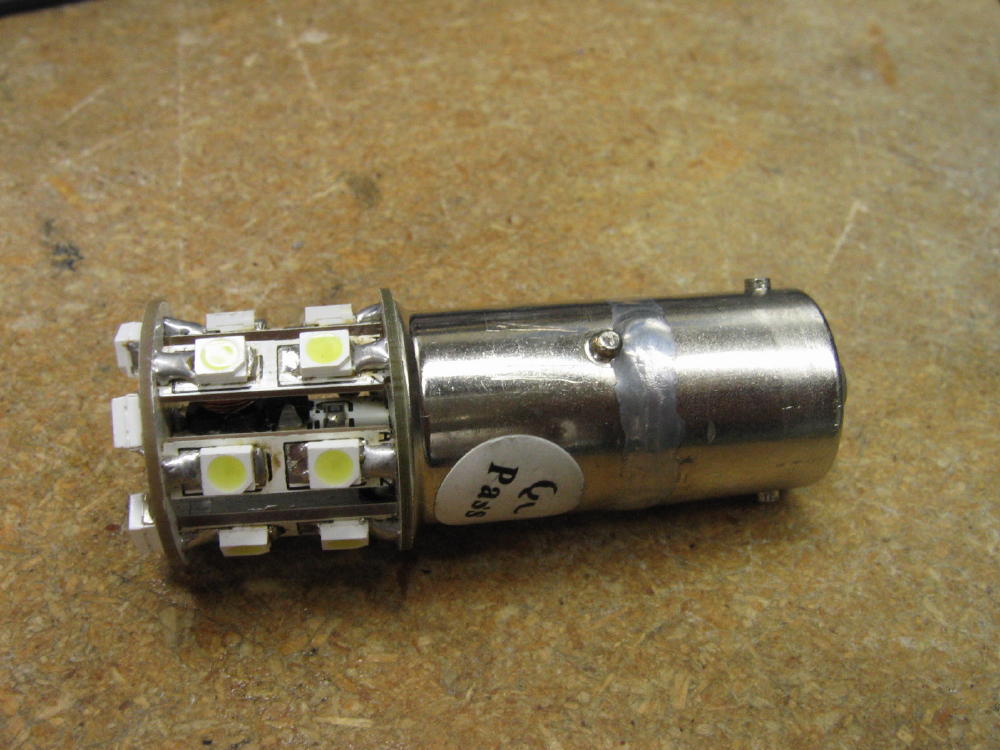
Only the side mounted LEDs are high power , the forward firing ones are not, so you really need to reflect all the light to get the full benefit from these. Notice with the standard length bulb you see just one row (circle) of LEDs in the reflection.
And here with it lengthened, you see 2 rows, and yes this is a noticeable difference when it's on.
A few comments about photographing this stuff. I hate to say the photos don't do it justice, but it's true. It's really hard to get accurate photos of lighting. You can overexpose the pic and make any light look super bright. If you tone it down a bit so you can see some detail then they don't "appear" as bright as they should be. I tried various settings, shutter speeds, even background lighting and posted the ones I thought where the best. It's tricky !
These pics on the car are a bit premature, the tail light is not back together yet, so there are gaps, but I was anxious to get some comparison pics !
For the back up lights, I'm using these 7 Watt high power LED bulbs from V-Leds, unfortunately they needed some modification. They were too short to be positioned properly in the reflector (I always wondered about this, and finally get to see it from the "other" side) I lengthened them by destroying a incandescent bulb, shortening it's base appropriately, then soldering it to the bottom of the LED bulb
Only the side mounted LEDs are high power , the forward firing ones are not, so you really need to reflect all the light to get the full benefit from these. Notice with the standard length bulb you see just one row (circle) of LEDs in the reflection.
And here with it lengthened, you see 2 rows, and yes this is a noticeable difference when it's on.
A few comments about photographing this stuff. I hate to say the photos don't do it justice, but it's true. It's really hard to get accurate photos of lighting. You can overexpose the pic and make any light look super bright. If you tone it down a bit so you can see some detail then they don't "appear" as bright as they should be. I tried various settings, shutter speeds, even background lighting and posted the ones I thought where the best. It's tricky !
Last edited by BBriBro; 06-12-09 at 09:00 AM.
06-12-09 | 08:59 AM
#3
looks really intense! Hate to be behind you 
I'm not a fan of the single strip, but love the brake light board. I've used those LEDs and they need an aplication like that where they are not on plastic. Good looking build and lots of effort.
I'm not a fan of the single strip, but love the brake light board. I've used those LEDs and they need an aplication like that where they are not on plastic. Good looking build and lots of effort.
 06-12-09 | 09:05 AM
#5
Thread Starter
Driver
Joined: Oct 2008
Posts: 166
Likes: 1
From: Ky
 Thanks for the compliment, I was curious what you would have to say since you do this stuff for a living.
06-12-09 | 09:20 AM
Thanks for the compliment, I was curious what you would have to say since you do this stuff for a living.
06-12-09 | 09:20 AM
#7
I've been waiting to see these, I know you've been working on them for a while. The bottom is very cool. I think you'll end up doing something else with the top strip though.
Trending Topics
06-12-09 | 10:17 AM
#11
Thread Starter
Driver
Joined: Oct 2008
Posts: 166
Likes: 1
From: Ky
The tail light strips are from http://www.oznium.com/ the brake lights I built myself, did you read the thread? the LEDs and drivers are from http://luxeonstar.com/
06-12-09 | 10:28 AM
#12

I agree, it looks awesome overall. I think your first choice of lens was better, as the ice one looks too random. If you could somehow get just horizontal lined lens and put a second strip at the top it would probably be one of the best tails ive ever seen.
good luck on the project
good luck on the project
06-12-09 | 10:34 AM
#13
I don't think I ever showed anyone what I had done with my tails. Look at the yellow blinker in this video I took.

I saw that a few years back and bought a set for my SC. I just haven't ever had the time to finish the install even though they have been mounted and cut into the housings for a while now collecting dust.
Maybe you can expand on your turn signals with something like that since you are messing with them right now.
They are nice, but they are $50.00 each
Last edited by O. L. T.; 06-12-09 at 10:39 AM.
06-12-09 | 10:39 AM
#14
Thread Starter
Driver
Joined: Oct 2008
Posts: 166
Likes: 1
From: Ky
I agree, it looks awesome overall. I think your first choice of lens was better, as the ice one looks too random. If you could somehow get just horizontal lined lens and put a second strip at the top it would probably be one of the best tails ive ever seen.
good luck on the project
good luck on the project