When you click on links to various merchants on this site and make a purchase, this can result in this site earning a commission. Affiliate programs and affiliations include, but are not limited to, the eBay Partner Network.
I recently replaced both of my door lock actuators on my SC400. Here are some tips on how to remove and install the actuator; overcoming a very tight fit.
- Remove the bottom screw on the window rail to provide some space to squeeze out the actuator. Be careful since the bottom screw strips easily. Have a screw extractor ready. I used an Alden Grabit kit.
- I also removed the other 2 screws on the window rail so that I could shift it a little more and gain some additional space. This require removing the upper door panel.
Here you see the actuator behind the window rail. The actuator will be pulled out between the window rail and the inner door panel on the left.
- There are 2 connecting rods between the actuator and the door handle assembly. They are attached to mounting holes on the door handle with a plastic clip. The procedure for disconnecting the rods are:
1) unhook the clip
2) Use a pry tool and pop the rod out leaving the clip in the mounting hole. Then remove the clip.
**** DO NOT Pry the rod together with the clip since that will deform the clip requiring that it be replaced. ****
- You can disconnect the large rod connection via the interior door panel opening.
- To disconnect the small rod connection, first remove the 2 bolts attaching the door handle assembly to the door. There are 2 access holes on the door panel for doing this.
- Pull out the door handle slightly on the exterior door and you will be able to unhook the the small rod through the small opening.
- You will then be able to pull out the door handle assembly completely from the door leaving behind an opening for the remaining steps.
Here you see the door handle pulled out slightly exposing the small rod and clip.
Here you see the door handle pulled out completely.
- Remove the 3 torx screws holding the actuator on the door.
- Feed the 2 steel cables from the actuator through the door handle opening so that they will not interfere when you pull the actuator out around the window rail.
- You should be able to squeeze the actuator out around the loosen window rail without too much trouble while feeding the 2 steel cables through the opening.
- For installation, reverse the above procedure. Again use the door handle opening to get the 2 steel cables out of the way before installing the new actuator.
- One thing to check is the foam weather stripping on the face of the new actuator. It may get displaced during the installation. Reposition it before tightening the torx screws.
Its nice having reliable door locks again. Hope this helps you decide to tackle this project.
good tips, when i bought my red SC, the passanger side door did not open from the outside... Definetly not a fun task, nice to have a few pics and tips for someone about to tackle this.
Fixed my lock the other day, huge PITA. It started to rain in the middle of the removal process A note for everyone who tries this, take a mental note of how the 2 rods are positioned before you take them out and be PATIENT! It's very easy to bend and break the rods or plastic clips. I was lucky and didn't break anything.
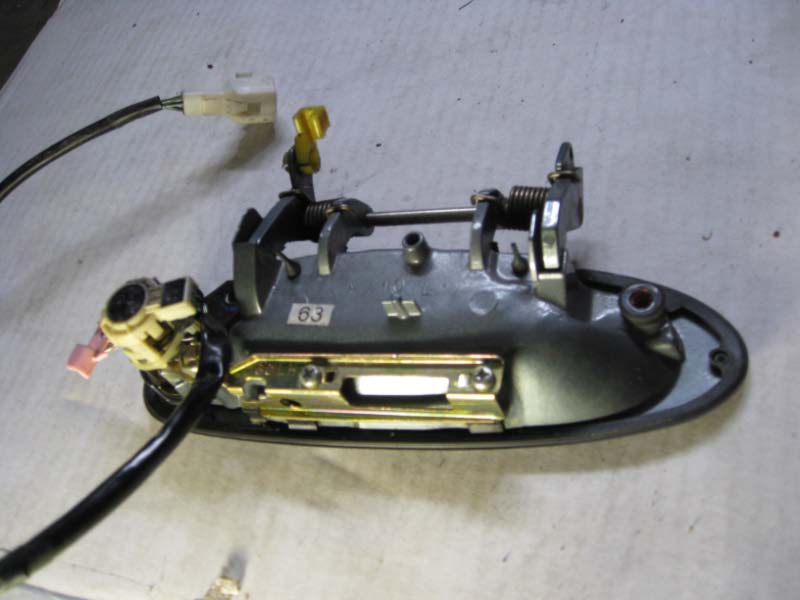
I just bought a '92 SC400 with the same problem. I was expecting to just replace the missing clip for the actuator rod but when I pulled the door panel off and looked inside, the rod is missing too. The part circled in red is what I'm referring too. Can this part be replaced or do I have to buy a new assembly?
I had the same issue a couple years ago. Except my rod was still there, but the fork on the end was broken off (very common for these cars). You have to buy the whole locking assembly. I got one used off ebay for $100.
I'm getting ready to do this jobs. Some comments / tips.
The door handle is held in by a pair of 10mm bolts.
The phillips screw holding the bottom of the window track to a _U_ bracket, spotwelded to the door, at least on my car is rusty. No way it's coming out without an extractor or other "advanced" technique. Looks like it's been previously stripped.
OP mentions removing the upper door trim to completely loosen the RHS window track; what he really is referring to is the window "garnish" which hides three phillips screws retaining the track.
If you break the plastic clips holding the door latch and lock rods, all is not lost, Lexus has them, NAPA also has an assortment bag for $10. The technique is to unclip the C-shaped HOLDER from the long part of the rod, and THEN pry the rod END out of the hole. Do not attempt to remove the clip from the bracket WITH THE ROD STILL IN IT or you will be out looking for clips. These do get old, brittle, so care needs taken.
There are two videos on removing the door latch actuator from a GS300/400. The one by the Asian guy, is worth watching. Unfortunately this job is considerably easier on the GS300 than it is on the SC due to the GS have better access holes, less interference, etc.
This job is probably an 9/10 and I was a professional auto technician. I wouldn't suggest it unless you have the tools and knowledge to deal with things that may go wrong.... like stripped screws, etc. The video will give you an idea what you're in for.
The GS and other videos show rebuilding THAT actuator with a new 12V motor. Obtaining a replacement actuator (Lexus or Ebay) is another option. I suggest cleaning a new (used) one up (using spray brake cleaner) and then a liberal spray of white lithium grease on all the levers and arms, etc.
The threads on the replacement actuator I purchased APPEAR to have a green threadlocker in them; you might want to chase them out and apply some LockTite Blue when re-assembling (Torx screws) to prevent future loosening.
I'll keep you posted once I actually complete this job.
The door handle is held in by a 10mm bolt, and a Phillips screw.
The phillips screws should just be for the window track (three in front, four in back, as I recall), with the door handle being all 10mm bolts (three, I think).
Except, as OP mentions, the phillips screw holding the bottom of the window track to a _U_ bracket, spotwelded to the door, at least on my car is rusty. No way it's coming out without an extractor or other "advanced" technique. Looks like it's been previously stripped.
Ugh. People seriously need to learn the difference between #1 and #2 phillips bits! I've seen so many of those stripped, just like yours. Use the right bit and they come out easily, despite many people saying how tough they are.
I usually "practice" on spare parts before I commit to cutting something off a running car apart and attempting to fix it, so
I bought a used SC400 door lock actuator and took it apart, with a mind to replacing the little 12V motor that gets "tired." (I probably should have just installed it...and prayed...)
Ordered the replacement 20mm "Maribuchi" motors (4 for $20) on eBay, along with a little gear puller used on RC helicopters. ($14)
Two problems immediately arise. The original motor is splined, to keep the worm gear from spinning on the shaft. Repair is going to have to
be epoxy, superglue, and/or prayer. I checked, a splined shaft motor is NOT listed on Ebay.
Second is the motor doesn't come with solderable terminals like OEM. Going to have to find a tight fitting pin to slide into the connector.
Third is, you have to be sure you get the motor spinning the same direction as the old one --- reversing + and - if necessary. Best that you confirm
direction of spin BEFORE you pull the worm gear. Also, measure or observe the HEIGHT of the worm gear above the motor case, so you don't glue it
on too high or too low.
The 20mm shaft is probably 3-4mm longer than OEM, but it doesn't appear to hit the end of the case or anything, so no worries.
One good piece of news about the rebuild is unlike the GS300 and other Lexus rmodels the actuator comes completely apart with screws, no sawing or
cracking necessary, although a back flip with a half-twist is necessary to undo the linkage from one half of the actuator from the other. You'll see.
I'm once again, reporting BEFORE the job is done, I'll post after succeeding or failing.
New motor at bottom, old motor, splined shaft, at top.
^ How did you get the snap ring off the shaft that holds the white plastic rain shield on? I tried taking apart my old actuator with a bent rod for ideas, and I couldn't come up with any way to get under that incredibly strong and flush fitting snap ring to pry at it. Eventually, I had to just break the shield.
I wonder if the motors are the same for L and R actuators, just reversed orientation?
One thing I've found with the SC is, the electric motors rarely die. When it seems like one is lazy, it's usually something in the switches, wiring, or gunked up movement. It might be worth buttoning the unit back up with the stock motor after cleaning (if possible) to see if there's a simpler solution. I've been wanting to try that with one of mine.
Mabuchi vs JECO motor for SC400 door lock actuator rebuild
Getting that @#$#!! snap ring off the white plastic shield was the hardest part, lol. I tried a Dremel, a pick, and eventually resulted to brute force and a screwdriver, damaging the snap ring in the process and marring the shield.
I took apart the old motor. Lot of grease/carbon "junk" inside, commutator completely "coated". This could easily make it "lazy." Brushes were thin but serviceable, so I used a little emery cloth to shine up the commutator and put it back together. Some of you may get away with doing this vs motor replacement. The PROBLEM is that you have to remove the worm gear to re-assemble the motor, because you must slip the commutator between the brushes, and THEN slide the housing/magnet assembly over that, then re-install worm gear. So you might as well replace it.
More info: The OEM motor is a JECO or JOCO or JECC or something like that, unreadable. It also says, JAPAN 8H254 molded in the plastic end. The oem motor is NOT the MABUCHI sold on eBay although it's ALMOST identical, same size, shaft length, etc. What's different are the missing splines on the shaft, AND, there is a resistor or thermistor of some sort INSIDE the JXXX motor. I assume that prevents motor burnout / excess current if the mechanism jams, whatever. There ALSO are no solderable terminals on the MABUCHI replacement, something you will have to MacGuyver.
I could not find the OEM motor, any listing for 8H254 anywhere on the web. Perhaps someone in Japan could contact AISIN, mfr of the assembly, to see if they could lead us to a source for the oem motor. FWIW I sent Johnson Controls (JOCO?) an email asking if it was their motor.
I rather doubt, however, that the resistor/thermistor is critical to operation. More important for longevity, etc. Assuming you can get the worm gear tightly epoxied onto the motor shaft, you should be good to go.
I'm going to (once again?) strongly suggest finding a working actuator out of a salvage car and swap the whole unit rather than attempt rebuild. My kitchen table has been covered up for a week and I'm not finished yet. If the epoxy fails, and the worm spins on the shaft after I install it, I will have wasted a LOT of hours of effort.
Photo showing *** end of motor with brushes and unknown item resistor? thermistor? (rectangular thing just to right of white plastic and red lead, looks like a sandwich with black layer and metal layer)) of JXXX motor
Getting that @#$#!! snap ring off the white plastic shield was the hardest part, lol. I tried a Dremel, a pick, and eventually resulted to brute force and a screwdriver, damaging the snap ring in the process and marring the shield.
Glad it wasn't just me! That thing definitely was not designed with disassembly in mind.
Yeah, once you open the unit up, it's quickly evident that replacing is a better alternative to servicing.
I'm going to (once again?) strongly suggest finding a working actuator out of a salvage car and swap the whole unit rather than attempt rebuild. My kitchen table has been covered up for a week and I'm not finished yet. If the epoxy fails, and the worm spins on the shaft after I install it, I will have wasted a LOT of hours of effort.
I'm of the opinion that exploration of this sort is never wasted effort. It generally leads to solutions or at least alternatives. It's only a matter of time until we can't rely on parts cars to keep these actuators working.
Step by Step - SC400 door lock actuator motor replace 1/6
Remove actuator from door.
Remove white cover by removing difficult-to-remove snapring and one screw. Remember this screw when it seems you have one left over.
Cut the zip-tie holding the wires to the end of the actuator.
Remove SIX screws holding motor assembly together -- 5 on the front, 1 in the rear. These are different length/size than rain cover screw.
I removed one of the control cables at this point just so it wasn't flopping around while I was working.
Turn and twist the top of the motor assembly to where you can remove the arm from the other thing. Gentle, now! No force is needed just ...persistence.
Motor snaps out. MEASURE distance from TOP of shaft to TOP of worm gear and match on new motor.
Check the DIRECTION the motor runs when +12V is applied to the red lead. Make sure you wire new motor to match direction.
Replace with new motor after transplanting worm gear.
MaGuyver up some terminals for replacment Mabuchi motor, or (perhaps...) cut away white plastic so you can solder to spring terminals. Something like a micro-spade
terminal is what's needed.
Re-assemble. Test with brief application of +12 / -12V to red lead @ connector. Reverse polarity and test again, unit should lock/unlock or unlock/lock, whichever.
I noticed a definite more noticeable "SNAP" with the new motor, which spins a lot faster.
Recommend spraying all levers, arms with White Lithium before re-install of white rain cover.
Step by Step - SC400 door lock actuator motor replace 2/6
Old motor, new motor, new motor with worm gear exposied on. The 20mm is correct length, nose height differs on old motor vs new. End result is same length, don't need to shorten new shaft. Notice knurling on OEM motor missing on replacements. Epoxy, don't fail me now!
 07-14-10, 12:21 AM