
Anatomy of a side mirror
 08-06-07 | 10:29 PM
#1

As the miles and years pour on with a few examples, the side mirrors is an area that can cause some grief. Here is a brief write up on how to service the side mirrors on these cars.
Issue: Continuous clicking noise from mirror anytime the car is placed in reverse and the mirror only tilted half way down. Mirror was adjusted fine. My car is out of warranty.
Options:
1) New mirror-guessing here-$350.00-$500.00 installed.
2) Fix the current mirror using parts from another mirror. Mirror assembly does not need to be removed from car.
I picked up a side mirror for a pretty good deal off of Ebay and though it was not the correct color, I was only interested in the guts.
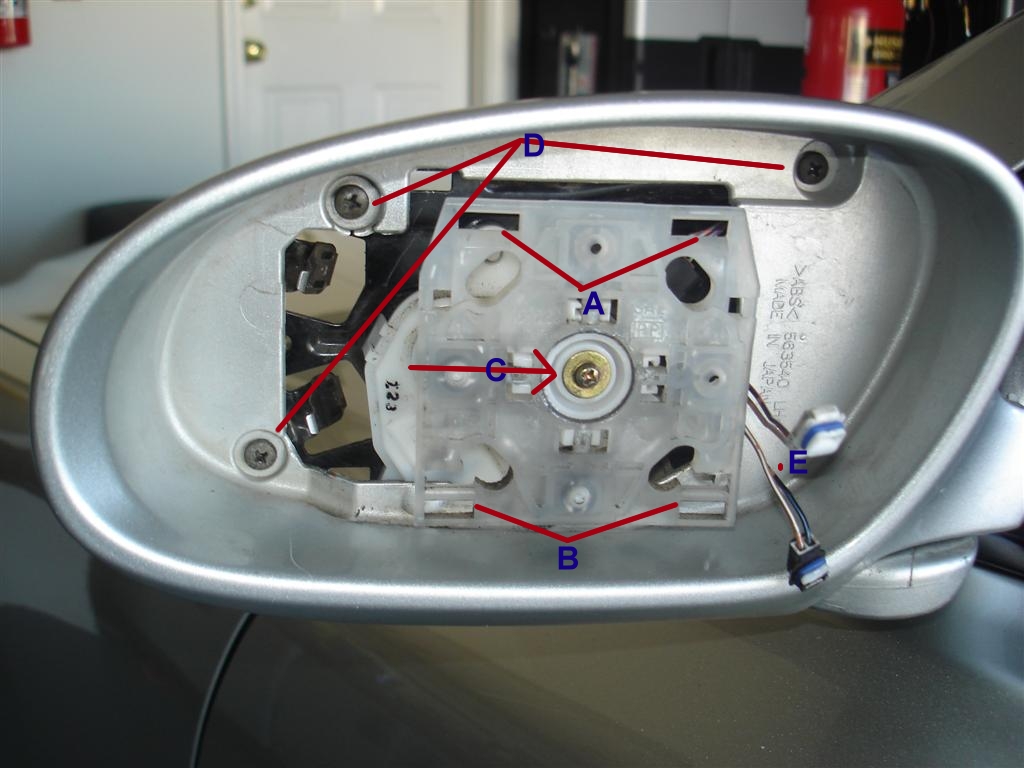
OK, first thing is to remove the mirror. Grab the mirror on the bottom and yank out with a quick tug towards you. The bottom of the mirror should pop out and then the top of the mirror slides out. You will then see the image below.Often times just one side of the bottom mirror comes out. Just pull on the other side.
E-These two leads are for the mirror heater. Just pry them out from the mirror using a flat head.
A-Those slots is where the top of the mirror slides into/out of during an R/R.
B-This is where the mirror snaps into/or out of during an R/R
C-Once the mirror is out of the way-remove this screw and the spring behind it. The white plastic square mirror holder can now be pulled out. Be gentle as there are two plastic worm bolts attaching this to the motor arms. Just give it a tug and work it out.
D-Now remove these 3 phillip screws which hold the front and rear housing together. This is the tricky part as on the bottom right Marked E is a plastic piece that snaps both pieces together. Moving the housing up and down will get it to lodge loose. In my case the tiny little clip snapped but no big deal as the mirror goes back just fine. You may be able to pry into the inside end of the mirror by removing a plastic clip (not shown). Get this and everything else is easy.
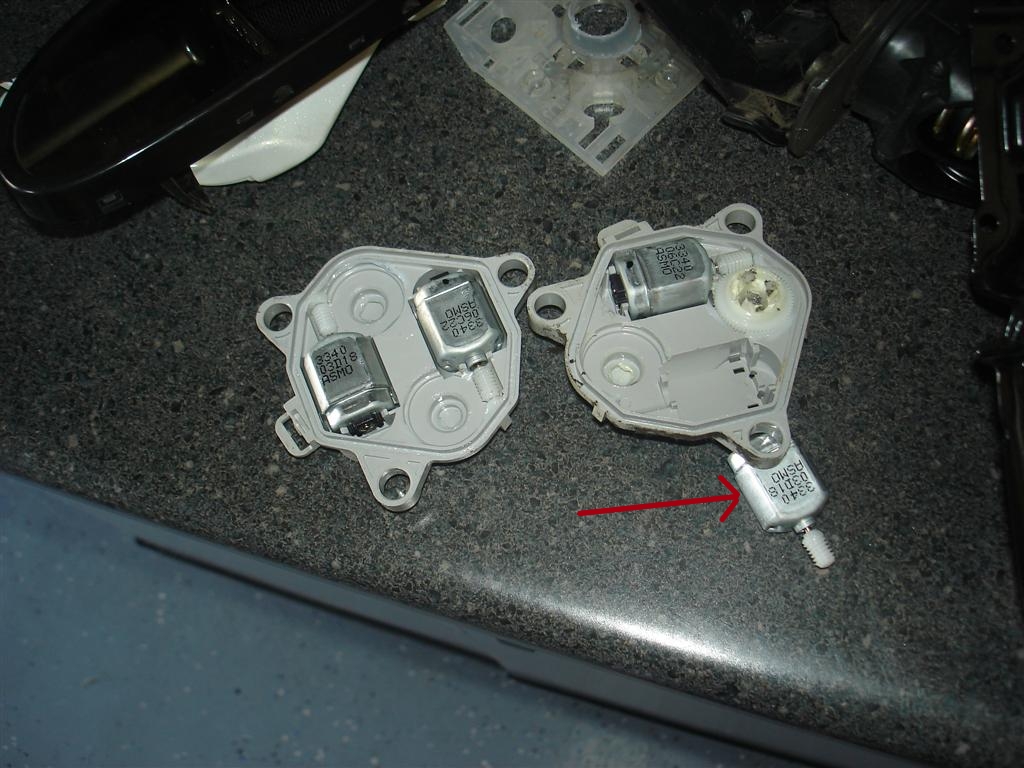
This is the housing frame. No need to remove the mirror from the car which makes things more complicated. The line points to the position sensor which slides right off the motor housing.
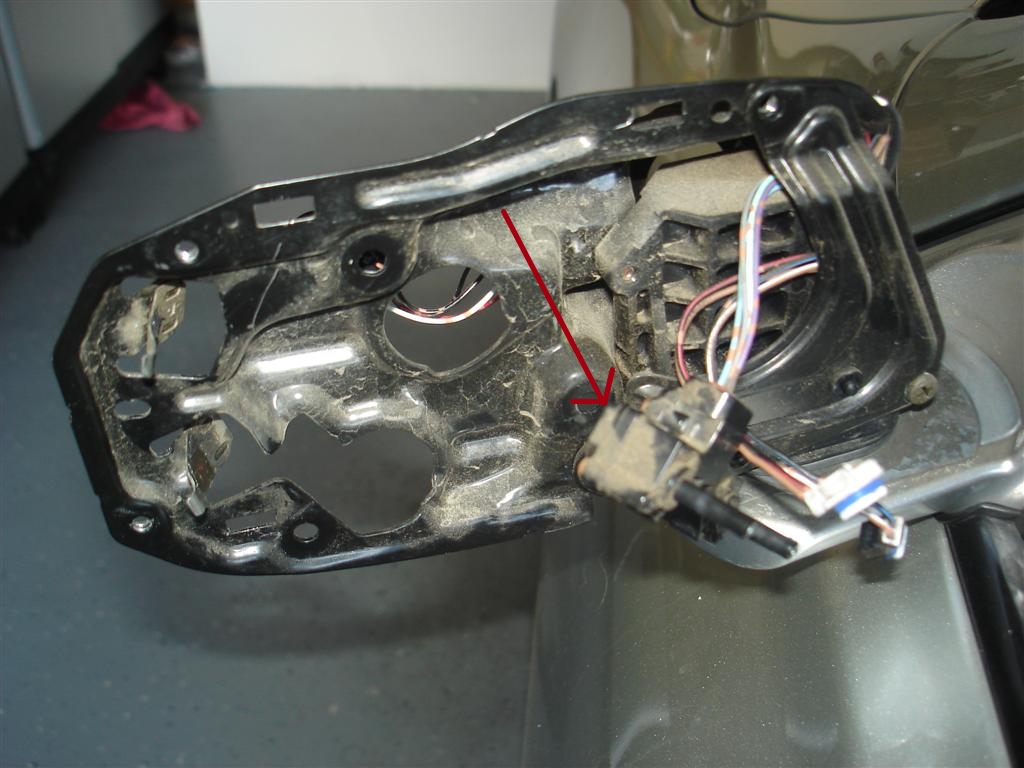
The two leads are for the two motors. One for up/down and the other for left/right. They pry right off with ease.
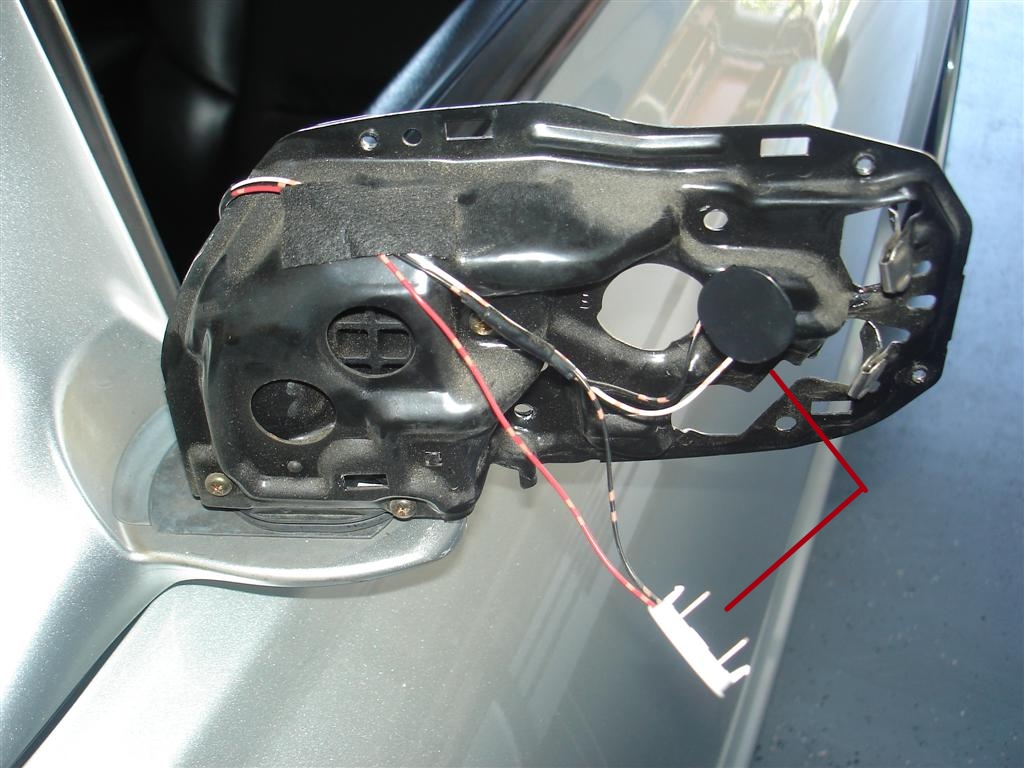
Front and rear housing. Notice the 3 clips that need to be squeezed to remove from the frame.
OK, after I tested the replacement mirror I noticed that one of the motors was bad (thus the price I paid). So I used one of my good motors in the motor housing which easily separates. Both motors are the same(notice part#) and interchangeable. Inspect the worm gear on the end as this could be a potential issue. There are 6 areas that can cause issues with the mirror. The primary one appears to be the worm bolt pictured below which strips over a period of time. The motor arms that grab the worm bolt can also wear over time causing the clicking. I had to replace both a plastic worm bolt and motor arm on mine as they were wore in the middle which explains why my mirror stopped midway while tilting down and just clicked.
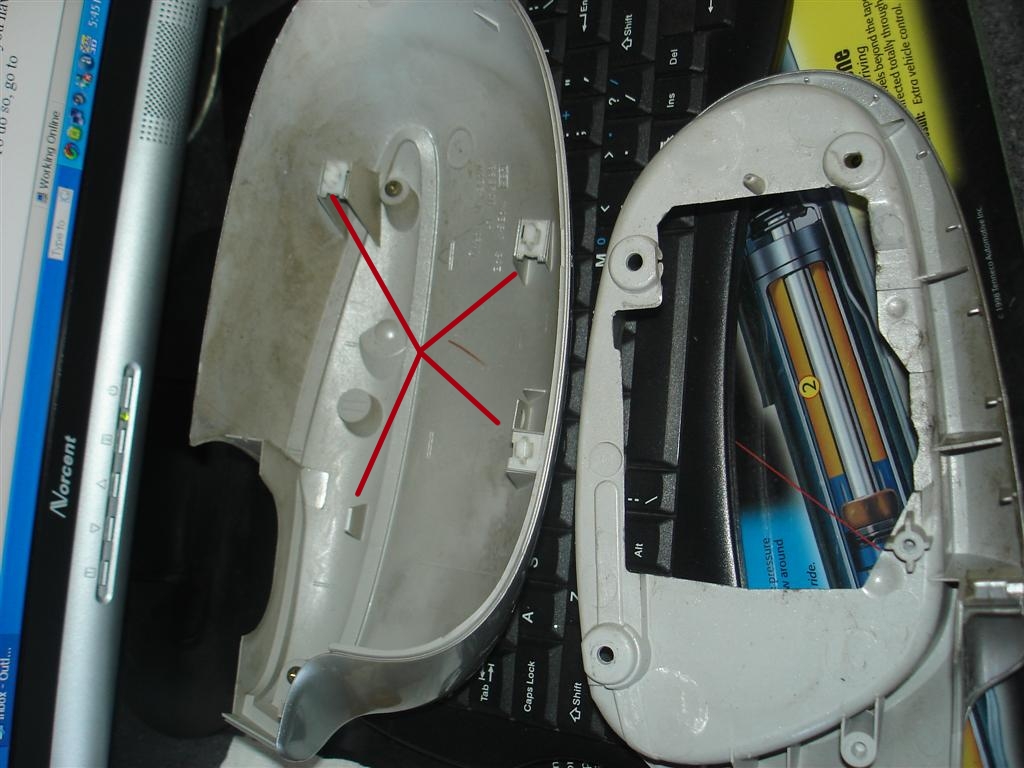
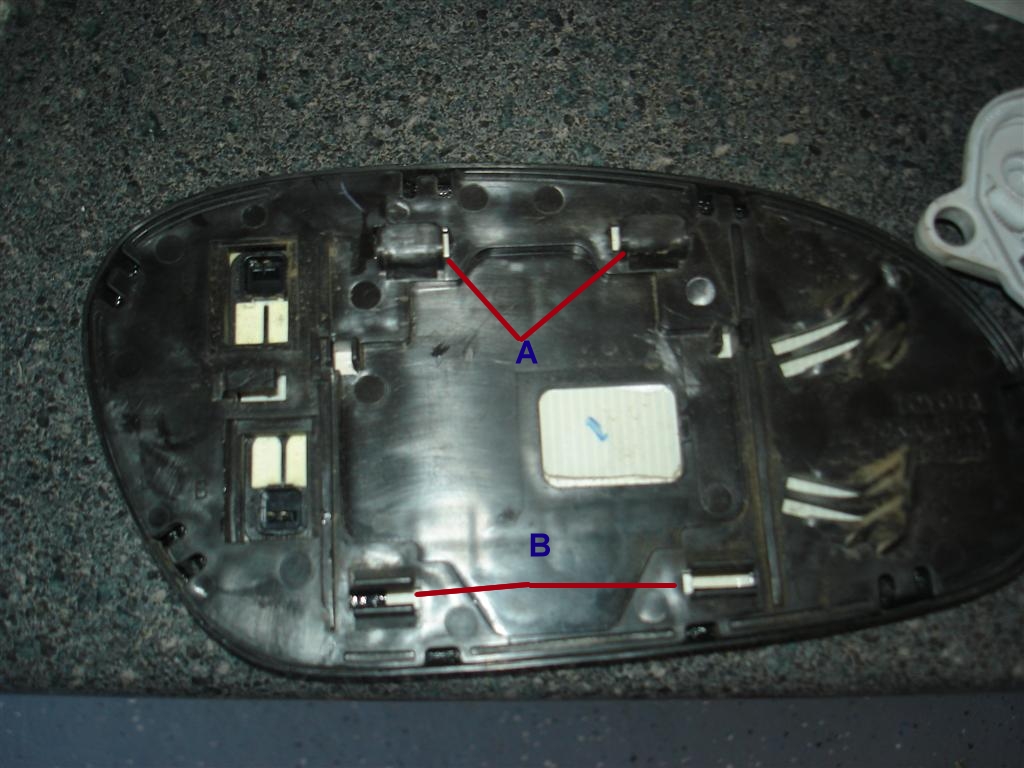
Back of the mirror. A-tilts into the slot and B snaps in the frame above. Notice where the heater leads go on the left side.
Motor housing separated. Notice the gears in there? Inspect for wear or broken teeth. Only takes one.

OK, this is the motor arm. The motor spins this and the arms go into the threads on the worm bolt which in turn moves the mirror around. If the tiny little arms are not sharp and worn then they will not fit into the grooves and click click click.
SEARCH WORDS: side mirror, click, clicking, tilt, tilting
Issue: Continuous clicking noise from mirror anytime the car is placed in reverse and the mirror only tilted half way down. Mirror was adjusted fine. My car is out of warranty.
Options:
1) New mirror-guessing here-$350.00-$500.00 installed.
2) Fix the current mirror using parts from another mirror. Mirror assembly does not need to be removed from car.
I picked up a side mirror for a pretty good deal off of Ebay and though it was not the correct color, I was only interested in the guts.
OK, first thing is to remove the mirror. Grab the mirror on the bottom and yank out with a quick tug towards you. The bottom of the mirror should pop out and then the top of the mirror slides out. You will then see the image below.Often times just one side of the bottom mirror comes out. Just pull on the other side.
E-These two leads are for the mirror heater. Just pry them out from the mirror using a flat head.
A-Those slots is where the top of the mirror slides into/out of during an R/R.
B-This is where the mirror snaps into/or out of during an R/R
C-Once the mirror is out of the way-remove this screw and the spring behind it. The white plastic square mirror holder can now be pulled out. Be gentle as there are two plastic worm bolts attaching this to the motor arms. Just give it a tug and work it out.
D-Now remove these 3 phillip screws which hold the front and rear housing together. This is the tricky part as on the bottom right Marked E is a plastic piece that snaps both pieces together. Moving the housing up and down will get it to lodge loose. In my case the tiny little clip snapped but no big deal as the mirror goes back just fine. You may be able to pry into the inside end of the mirror by removing a plastic clip (not shown). Get this and everything else is easy.
This is the housing frame. No need to remove the mirror from the car which makes things more complicated. The line points to the position sensor which slides right off the motor housing.
The two leads are for the two motors. One for up/down and the other for left/right. They pry right off with ease.
Front and rear housing. Notice the 3 clips that need to be squeezed to remove from the frame.
OK, after I tested the replacement mirror I noticed that one of the motors was bad (thus the price I paid). So I used one of my good motors in the motor housing which easily separates. Both motors are the same(notice part#) and interchangeable. Inspect the worm gear on the end as this could be a potential issue. There are 6 areas that can cause issues with the mirror. The primary one appears to be the worm bolt pictured below which strips over a period of time. The motor arms that grab the worm bolt can also wear over time causing the clicking. I had to replace both a plastic worm bolt and motor arm on mine as they were wore in the middle which explains why my mirror stopped midway while tilting down and just clicked.
Back of the mirror. A-tilts into the slot and B snaps in the frame above. Notice where the heater leads go on the left side.
Motor housing separated. Notice the gears in there? Inspect for wear or broken teeth. Only takes one.
OK, this is the motor arm. The motor spins this and the arms go into the threads on the worm bolt which in turn moves the mirror around. If the tiny little arms are not sharp and worn then they will not fit into the grooves and click click click.
SEARCH WORDS: side mirror, click, clicking, tilt, tilting
Last edited by Pearlpower; 04-05-10 at 09:29 PM.
The following 2 users liked this post by Pearlpower:
SC430inHK (05-01-23),
vanschoick (10-02-17)
08-06-07 | 10:29 PM
#2
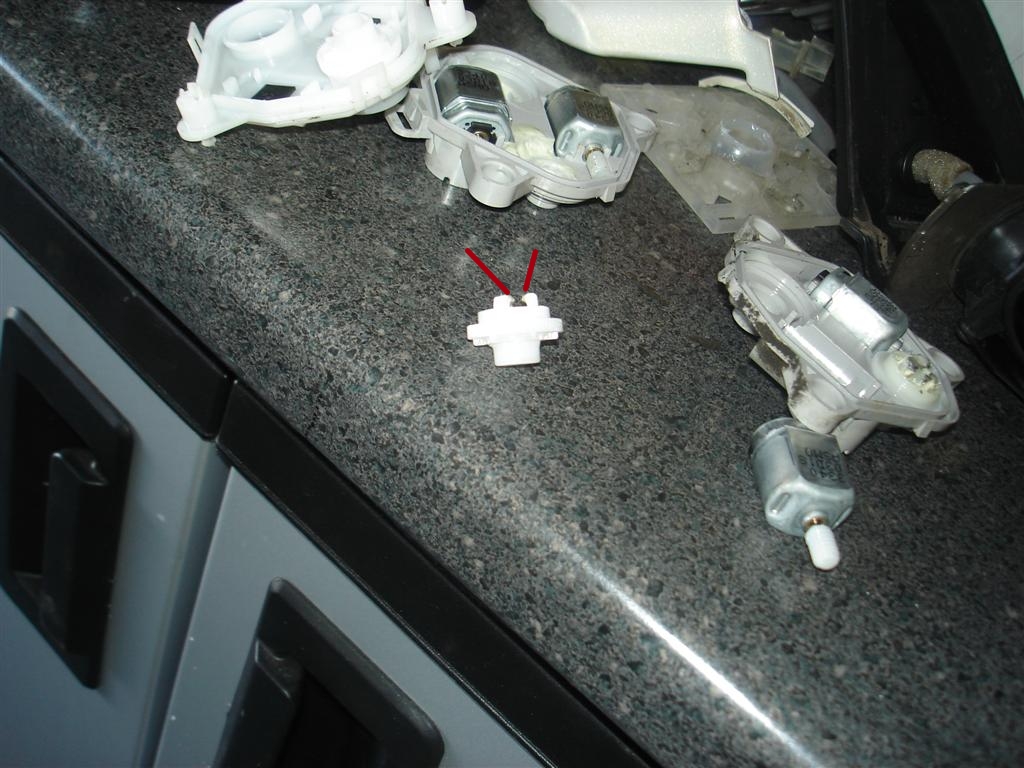
This is the mirror holder with the two referenced worm bolts as I call them.
These are plastic and wear. One of mine was wore only a tad but enough to cause me issues. They swivel in place and pop right out. Use some white lithium grease on every contact portion of the gears.

This is a rear shot showing the motor leads plugged in. They are just 12v leads so testing the motors is as simple as running 12v to them and checking for spin.

Some notes.
The chrome trim piece is attached to the housing with two screws and cannot be removed unless the housing is split.
Parts are not available from Lexus so a good used mirror would be in order.
Be careful of the paint on the housing while separating.
Internal parts are the same whether passenger side or drivers side mirror. Only difference is the mirror and housing. For this I used parts from a passenger mirror to fix my drivers mirror.
Anyhow, how did it work. Flawless. Mirror works as it should with no issues.
Lee
UPDATE: Pics posted again due to popular demand. Please do not PM for further instructions unless pics are down. Thank you.
These are plastic and wear. One of mine was wore only a tad but enough to cause me issues. They swivel in place and pop right out. Use some white lithium grease on every contact portion of the gears.
This is a rear shot showing the motor leads plugged in. They are just 12v leads so testing the motors is as simple as running 12v to them and checking for spin.
Some notes.
The chrome trim piece is attached to the housing with two screws and cannot be removed unless the housing is split.
Parts are not available from Lexus so a good used mirror would be in order.
Be careful of the paint on the housing while separating.
Internal parts are the same whether passenger side or drivers side mirror. Only difference is the mirror and housing. For this I used parts from a passenger mirror to fix my drivers mirror.
Anyhow, how did it work. Flawless. Mirror works as it should with no issues.
Lee
UPDATE: Pics posted again due to popular demand. Please do not PM for further instructions unless pics are down. Thank you.
Last edited by Pearlpower; 10-26-08 at 07:02 PM.
The following users liked this post:
DJHydrogen (02-19-20)
08-06-07 | 10:35 PM
#3

wow lee, thank you for all the pics! although without any captions, i have absolutely no idea what's going on and what to be fixed, but this is just great!!!!!!!
call it crazy, both of our mirrors had the same problem. after my wife and i switched seats, sometimes the mirror will start clicking and "stuck" after putting in reverse. no clue why
both of our mirrors were replaced under warranty. i thought that's just me since i didn't see anything posted here before. asked the tech and he has never seen it before neither. so strange
and now, seems like you had the same problem!!!!!
08-06-07 | 11:01 PM
#4
You caught me in the middle of posting before I added the captions Henry.
This appears to be a common issue with most Lexus's though the internals are a little different. I did not feel like removing my door panels and taking the mirror out so this option worked out well and it only cost me $20.00.
This appears to be a common issue with most Lexus's though the internals are a little different. I did not feel like removing my door panels and taking the mirror out so this option worked out well and it only cost me $20.00.
Last edited by Pearlpower; 08-06-07 at 11:40 PM.
08-06-07 | 11:31 PM
#5
haha now with captions it's so much better lee 
thanks again for the thread. as i experienced errors in BOTH of my mirrors, i was thankful they were under warranty. this is big, i didn't know it's a common problem!!!
guess we shouldn't tilt the mirror that much at all, hah
thanks again for the thread. as i experienced errors in BOTH of my mirrors, i was thankful they were under warranty. this is big, i didn't know it's a common problem!!!
guess we shouldn't tilt the mirror that much at all, hah
08-07-07 | 10:25 AM
#6
This thread will save you guys a lot of money.
The mirror assy will cost you MSRP $627 (driver side) and $467 (passenger side).
You can find used ones on eBay, but they may have the same issue as well.
The mirror assy will cost you MSRP $627 (driver side) and $467 (passenger side).
You can find used ones on eBay, but they may have the same issue as well.
Trending Topics
08-07-07 | 01:08 PM
#8
 08-07-07 | 09:03 PM
#9

Driver
Joined: Jul 2006
Posts: 100
Likes: 2
From: NC
Does anyone know if a european spec mirrow is available? I purchased some for my BMW in Germany. They have a vertical line on the outer 25% and beyond this line the mirror is extremely convex. The result, there is no blind spot. I think they are not legal here but if available, they are well worth the retrofit. Surteco
01-04-08 | 04:12 PM
#10

Driver School Candidate
Joined: Aug 2007
Posts: 1
Likes: 0
From: MD
Lee, Just want to say thank you very much for posting pics and instructions on how to remove the side mirror assembly. Someone stole the glass from my mirror and I had to repace it. With your pics and instructions, I was able to do that. Your instructions were very helpful. Thank you!!!
Bruce
Bruce
Last edited by bnn007; 01-04-08 at 04:16 PM.
01-04-08 | 05:09 PM
#11
Lee, Just want to say thank you very much for posting pics and instructions on how to remove the side mirror assembly. Someone stole the glass from my mirror and I had to repace it. With your pics and instructions, I was able to do that. Your instructions were very helpful. Thank you!!!
Bruce
Bruce

