Heads up display

 J/k. Can't hardly wait to see how it turns out.

 12-05-09, 01:54 PM
#17
OK, had to go to Home Depot with my wife this morning so the installation didn't start until about 2pm.
JohnnyCake and I took some installation pics while we went along (not that there's all that much to it). I'll post those...as well as the detailed steps we took later...but for now, for all you impatient folks...here are a couple of videos of it in action.
I JUST uploaded these to YouTube so, they might not be 100% ready yet...but should be done processing in the next few hours. Enjoy.
As always, comments welcome.
Video #1
Video #2
12-05-09, 01:58 PM
#18
VERY cool!!!! The only HUD I've ever seen is on a vette and that was in the uppper left hand part of the windshield. Just curious-why did you decide to mount in the middle?
What are the two red dots next to the MPH?
Very cool. Looks like you all had fun.
What are the two red dots next to the MPH?
Very cool. Looks like you all had fun.
12-05-09, 02:03 PM
#19
There's not a lot of room on the left side for it. I wanted it as low as possible on the right side...besides, I'm right-eye dominant so, it works well for me there.
Because of the defroster vent on the dash by the windshield, you can only put the device so far forward to get it low on the windshield.
There are two red indicators...one is a little speaker indicator, which means the audible speed alarm is SET. The second is an exclamation point with a circle around it...this indicates that you're currently exceeding the alarm speed.
 12-05-09, 03:39 PM
#21
But, I don't think it works the way you think it works.
The position of the projection is based on where the unit is, where the windshiled is...and where your head is.
If you get into the car and your head is in EXACTLY the same position every time you sit in the car, sure...you could make the tint patch smaller.
Realistically though, it wouldn't work well. In the few hours I've had it installed (I'm out now, drving around, at dinner, etc.) it seems to be just about the right size. It's mostly right in the middle of the patch...but there's "wiggle" room around it.
12-05-09, 05:46 PM
#22
Habious was nice enough to let me try a test drive and it was interesting. I think the video overstates the appearance of the display film on the windshield -- it's not that noticeable. Having said that, for the overcast day we had today, the film wasn't even necessary. Maybe it would be needed in sun, but it would be even more impressive without the film, imho.
Also, this unit is much more accurate than the SC spedo when backing up.
Also, this unit is much more accurate than the SC spedo when backing up.
12-06-09, 06:09 PM
#23
OK, here are the installation steps that we took...and a few observations from having used it over the weekend under various conditions.
Things you will need...
The HG-100 B HUD unit. I purchased mine from expansys-usa.com. They said they had it in stock, shipped it within 2 business days of me placing the order (I ordered it on the Wednesday before Thanksgiving and they shipped it out the following Tuesday via Fed-Ex Home Delivery, and I had it 3 days after that.
A couple of items from Radio Shack
- Part # 270-043 - Cigarette Lighter Y-adapter. It looks like this...

I didn't need this as Y-adapter per se, I really just needed a female cigarette lighter receptacle...and this was the cheapest thing that had one.
Hook-up wire - I used Part # 278-1509, which is just two-conductor, stranded, red/black hook-up wire. Fairly generic stuff. If you've got some wire lying around, I'm sure it'll work (as long as it's around 18-gaugeish). The HUD unit is not a high-current device so, you don't need a monstrous piece of wire to handle high-current.
A 2-foot piece of 3/16" clear vinyl tubing from Lowe's/Home Depot EDIT - NOTE: This is 3/16" ID (inside diameter) tubing
OK, here we go.
Step 1 - Open the driver's side door...Remove the A-pillar cover...it just pops off if you pry it with your hands.
Step 2 - Remove the lighted door-sill...again, just pry it off with your hands. Be careful, there's a short wire for the lighted Lexus logo. You can reach in and unplug it, setting the door sill aside.
Step 3 - Remove the vertical plastic trim piece that's in the door jamb, below the A-pillar, above the lighted door sill piece.
Step 4 - Use the non-slip pad included in the HUD kit to position it where you'd like the speed displayed. You can see the reflection of it easily enough in the windshield but, if you'd like, it's easy enough to just plug the unit into your cigarette lighter for now, just to get the display working.
Step 5 - Once you have the HUD unit where you like it, you need to install the tinted film. I just peeled the backing off and stuck it on the windshield, but I'm not 100% satisfied with the results. I'm considering removing it and trying to install it "wet", like a screen protector or window tint is installed. I don't have air bubbles in mine but it's a little "mottled" (only word I can come up with to describe it).
Step 6 - Remove the non-slip pad, install the included velcro strips on the underside of the unit, and stick the unit back onto the dash...now using the window tint piece as your guide for position.
Step 7 - Route the power wire into the channel where the windshield meets the dashboard. JohnnyCake and I tried several different things here...and I ended up trying about 4 other things after I left him last night before finding something that was cheap, easy-to-find, and worked very well. Take your 3/16" clear tubing and push it into the channel between the windshield and the dash.
The problem here is that the wire doesn't want to stay in the channel. It doesn't appear to be a V-shaped channel, so the wire doesn't want to wedge into it and stay...it's more of a C-shaped channel. Put the wire into the channel and use the clear tubing to hold it in place. I used a electrical-tape-wrapped 1.5" wide paint scraper to push the tubing into place. If you push it all the way into the channel (with the wire behind it) it's totally invisible (both the wire and the tubing) from both inside the car and outside looking in.
Another tip on installing the tubing. Make sure you have an inch or two too much on the left side. You want it to hang out past the end of the windshield. The excess will be hidden once you put the A-pillar trim piece back in, but it'll be invaluable if/when you want to remove the wire. Just pop the trim piece off, grab the end of the tube, and pull. This solution also has the elegance of not using anything adhesive...so nothing that will turn to goo in the summer sun.
Step 8 - Power. I'm going to have to be vague here, because I tapped into my own power source (part of my CarPC installation). But, the unit doesn't draw much current so, just about any 12V Switched source you can find will work. There's a fuse panel right where the parking brake pedal is...and there are several good circuits to tap into. MAKE SURE you tap into something non-critical...Accessory Power, Fog Lights, Seat Heaters, etc. If something ever goes wrong with your aftermarket accessory and blows the fuse, you don't want to be stranded...or do something like not realize your taillights are no longer functioning!!
Take one of the female cigarette lighter connectors from the Y-Adapter, cut the wire...leaving as much wire on the connector you're going to use as possible. Use the hook-up wire to extend this a bit (I used butt connectors) and splice this into your switched power source.
The HUD unit requires 5VDC so, you CANNOT just cut the included power wire and splice into the vehicle power with that. Also, by using the female cigarette lighter plug, you're not doing anything to the unit that you can't undo.
Step 9 - Once you've got the cigarette lighter plug hooked into power, plug in the HUD unit, route the wire down the A-pillar behind the trim pieces, and put it all back together, in reverse-order.
When you're done, the only sign of wiring should be a couple of inches of the power wire where it mysteriously appears in the middle of the dash and goes into the HUD unit itself.
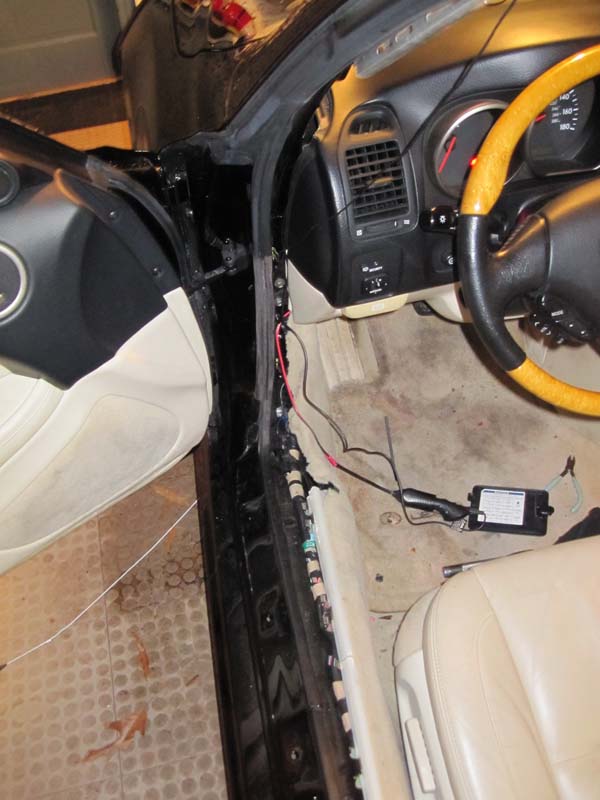
Here's a picture of the A-pillar area pulled apart...you can see where I spliced the power wires into the female cigarette lighter plug, and have the power connector for the HUD unit plugged into that.
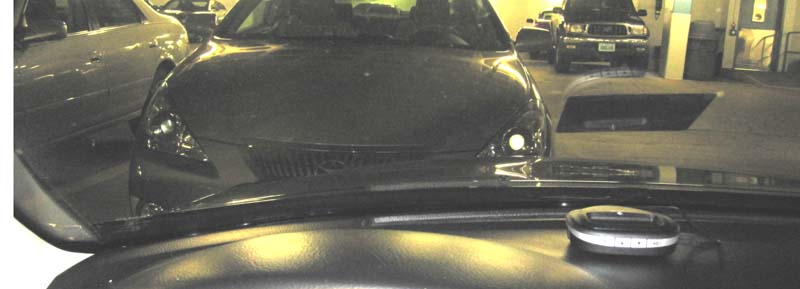
Here's what it looks like on the dash...before I figured out a good solution to tucking that power wire out of the way...
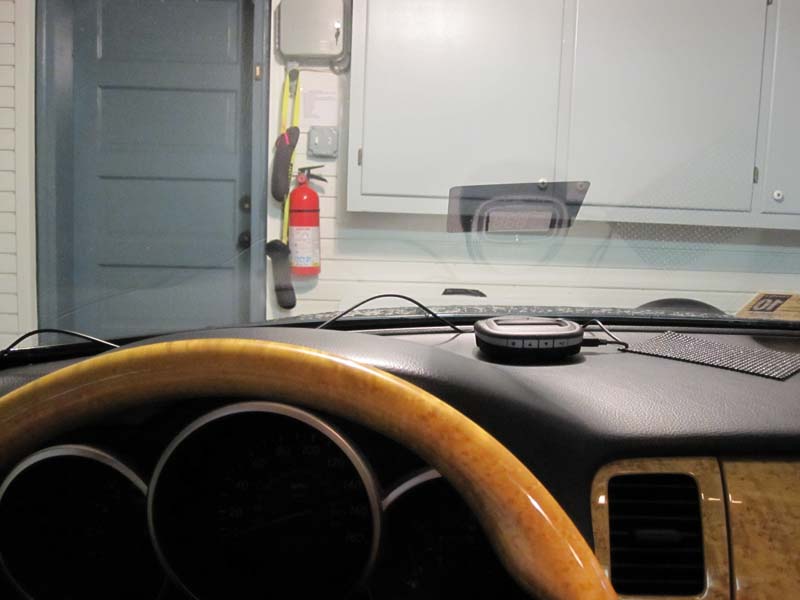
And here's what it looks like with the clear vinyl tubing installed.
A few notes about the operation...
The unit works extremely well...Period!
You could do without the film at night, and on overcast days. Today was a bright, sunny day. You'd have a hard time really using this without the tint film.
Also, if you don't use the film, you get a double-image, vertically separated by the thickness of the windshield. Basically, you see the image reflected back from the inside surface of the windshield...and the outside surface.
My recommendation...install the tint film.
You can easily see through it, and it's not that distracting (no more distracting than two LED numbers floating in mid-air in front of you).
Where I have the unit positioned, when I'm sitting in my normal driving position, looking down the road, the speed is in my lower-right corner...not in my field of view. Kind of like it's sitting in my "tray" (for you Windows fans).
One thing I did notice...I don't know whether to call it a "bug" or just a minor annoyance...but I'll bring it up.
If I start the car outside, where the unit has a clear view of the sky, it goes from "--- MPH" (which is what it displays when looking for a GPS lock) to "0 MPH" (what it displays when it's got a lock (and you're not moving)) in literally 2 seconds or so. It's QUICK. Start the car, put it in gear, release the parking break...it's already got a lock and is waiting for you to start moving.
Now, I live in a condo and my parking space is 3 floors underground...GPS lock? Not so much. So, when I start the car somewhere where it CANNOT get a GPS lock..once I come out of the garage and into the open sky...the unit takes 2-3 minutes to get a lock and start displaying speed.
Not the end of the world, and certainly not at all a deal-breaker for me on the unit. It works great otherwise...it would just be nice if the unit got a lock 2-3 seconds after I pulled out into open sky...instead of 2-3 minutes.
Questions/Comments always welcome.
Things you will need...
The HG-100 B HUD unit. I purchased mine from expansys-usa.com. They said they had it in stock, shipped it within 2 business days of me placing the order (I ordered it on the Wednesday before Thanksgiving and they shipped it out the following Tuesday via Fed-Ex Home Delivery, and I had it 3 days after that.
A couple of items from Radio Shack
- Part # 270-043 - Cigarette Lighter Y-adapter. It looks like this...
I didn't need this as Y-adapter per se, I really just needed a female cigarette lighter receptacle...and this was the cheapest thing that had one.
Hook-up wire - I used Part # 278-1509, which is just two-conductor, stranded, red/black hook-up wire. Fairly generic stuff. If you've got some wire lying around, I'm sure it'll work (as long as it's around 18-gaugeish). The HUD unit is not a high-current device so, you don't need a monstrous piece of wire to handle high-current.
A 2-foot piece of 3/16" clear vinyl tubing from Lowe's/Home Depot EDIT - NOTE: This is 3/16" ID (inside diameter) tubing
OK, here we go.
Step 1 - Open the driver's side door...Remove the A-pillar cover...it just pops off if you pry it with your hands.
Step 2 - Remove the lighted door-sill...again, just pry it off with your hands. Be careful, there's a short wire for the lighted Lexus logo. You can reach in and unplug it, setting the door sill aside.
Step 3 - Remove the vertical plastic trim piece that's in the door jamb, below the A-pillar, above the lighted door sill piece.
Step 4 - Use the non-slip pad included in the HUD kit to position it where you'd like the speed displayed. You can see the reflection of it easily enough in the windshield but, if you'd like, it's easy enough to just plug the unit into your cigarette lighter for now, just to get the display working.
Step 5 - Once you have the HUD unit where you like it, you need to install the tinted film. I just peeled the backing off and stuck it on the windshield, but I'm not 100% satisfied with the results. I'm considering removing it and trying to install it "wet", like a screen protector or window tint is installed. I don't have air bubbles in mine but it's a little "mottled" (only word I can come up with to describe it).
Step 6 - Remove the non-slip pad, install the included velcro strips on the underside of the unit, and stick the unit back onto the dash...now using the window tint piece as your guide for position.
Step 7 - Route the power wire into the channel where the windshield meets the dashboard. JohnnyCake and I tried several different things here...and I ended up trying about 4 other things after I left him last night before finding something that was cheap, easy-to-find, and worked very well. Take your 3/16" clear tubing and push it into the channel between the windshield and the dash.
The problem here is that the wire doesn't want to stay in the channel. It doesn't appear to be a V-shaped channel, so the wire doesn't want to wedge into it and stay...it's more of a C-shaped channel. Put the wire into the channel and use the clear tubing to hold it in place. I used a electrical-tape-wrapped 1.5" wide paint scraper to push the tubing into place. If you push it all the way into the channel (with the wire behind it) it's totally invisible (both the wire and the tubing) from both inside the car and outside looking in.
Another tip on installing the tubing. Make sure you have an inch or two too much on the left side. You want it to hang out past the end of the windshield. The excess will be hidden once you put the A-pillar trim piece back in, but it'll be invaluable if/when you want to remove the wire. Just pop the trim piece off, grab the end of the tube, and pull. This solution also has the elegance of not using anything adhesive...so nothing that will turn to goo in the summer sun.
Step 8 - Power. I'm going to have to be vague here, because I tapped into my own power source (part of my CarPC installation). But, the unit doesn't draw much current so, just about any 12V Switched source you can find will work. There's a fuse panel right where the parking brake pedal is...and there are several good circuits to tap into. MAKE SURE you tap into something non-critical...Accessory Power, Fog Lights, Seat Heaters, etc. If something ever goes wrong with your aftermarket accessory and blows the fuse, you don't want to be stranded...or do something like not realize your taillights are no longer functioning!!
Take one of the female cigarette lighter connectors from the Y-Adapter, cut the wire...leaving as much wire on the connector you're going to use as possible. Use the hook-up wire to extend this a bit (I used butt connectors) and splice this into your switched power source.
The HUD unit requires 5VDC so, you CANNOT just cut the included power wire and splice into the vehicle power with that. Also, by using the female cigarette lighter plug, you're not doing anything to the unit that you can't undo.
Step 9 - Once you've got the cigarette lighter plug hooked into power, plug in the HUD unit, route the wire down the A-pillar behind the trim pieces, and put it all back together, in reverse-order.
When you're done, the only sign of wiring should be a couple of inches of the power wire where it mysteriously appears in the middle of the dash and goes into the HUD unit itself.
Here's a picture of the A-pillar area pulled apart...you can see where I spliced the power wires into the female cigarette lighter plug, and have the power connector for the HUD unit plugged into that.
Here's what it looks like on the dash...before I figured out a good solution to tucking that power wire out of the way...
And here's what it looks like with the clear vinyl tubing installed.
A few notes about the operation...
The unit works extremely well...Period!
You could do without the film at night, and on overcast days. Today was a bright, sunny day. You'd have a hard time really using this without the tint film.
Also, if you don't use the film, you get a double-image, vertically separated by the thickness of the windshield. Basically, you see the image reflected back from the inside surface of the windshield...and the outside surface.
My recommendation...install the tint film.
You can easily see through it, and it's not that distracting (no more distracting than two LED numbers floating in mid-air in front of you).
Where I have the unit positioned, when I'm sitting in my normal driving position, looking down the road, the speed is in my lower-right corner...not in my field of view. Kind of like it's sitting in my "tray" (for you Windows fans).
One thing I did notice...I don't know whether to call it a "bug" or just a minor annoyance...but I'll bring it up.
If I start the car outside, where the unit has a clear view of the sky, it goes from "--- MPH" (which is what it displays when looking for a GPS lock) to "0 MPH" (what it displays when it's got a lock (and you're not moving)) in literally 2 seconds or so. It's QUICK. Start the car, put it in gear, release the parking break...it's already got a lock and is waiting for you to start moving.
Now, I live in a condo and my parking space is 3 floors underground...GPS lock? Not so much. So, when I start the car somewhere where it CANNOT get a GPS lock..once I come out of the garage and into the open sky...the unit takes 2-3 minutes to get a lock and start displaying speed.
Not the end of the world, and certainly not at all a deal-breaker for me on the unit. It works great otherwise...it would just be nice if the unit got a lock 2-3 seconds after I pulled out into open sky...instead of 2-3 minutes.
Questions/Comments always welcome.
Last edited by Habious; 12-07-09 at 08:26 AM. Reason: Added stuff about some things...and stuff.
12-06-09, 07:11 PM
#24
Lead Lap

Excellent write up Habious.
With regards to the GPS lock, that actually somewhat makes sense. If you start power the GPS up outside, it probably still has the previous location (and maybe time) still in memory making it much easier and quicker for the GPS to find the satellites. (Thhe GPS uses the current time and its location to determine which satellites should be where and on what frequency.) That is called a warm or hot start, depending on a couple of items.
The other comes close to being a cold start, where the GPS doesn't know what time it is or where it is. It wakes up and can't hear the satellites. (The GPS signal is extremely weak and so it doesn't take a lot to block it or much noise to make it too difficult to get a clear enough signal. Canopy/tree cover, tall buildings and storms/heavy cloud cover can block the signals, for instance. GPS receivers have gotten much more sensitive and have improved their software considerably to lessen these issues though.) So the GPS basically has to start from ground zero and begin searching for all the satellites by a process of elimination basically and that takes longer.
It is possible that it may work better if you were to keep the power off until you get out of the parking garage and then turn it on. But, of course, that would be kind of a pain that you are most likely attempting to avoid.
Nice job!
Last edited by Harold57; 12-06-09 at 07:15 PM.
12-12-09, 03:51 AM
#28
Lead Lap
Wow, very nice!!! I ued to have the nissan 240sx that had the digital display mph on the window shield. Very cool toy to have. Now, what else can we do with the display there???

Thread
Thread Starter
Forum
Replies
Last Post
guyrat7
RX - 2nd Gen (2004-2009)
3
09-27-16 03:33 PM
470, display, gps, heads, headsup, hud, installed, installing, lexus, obd, popup, projection, rx, windsheild, youtubecom