
Smog Sensor DIY w/pics
 08-04-12 | 12:05 PM
#1
I haven't seen a DIY for a smog sensor cleaning on the SC so I thought I would post one. My SC is an 05 with 52K. As you can see in the pic, it was FILTHY with leaf particles. With some high mileage SC's on the road, you can bet they have never been cleaned. If you have 15 minutes and can turn a wrench, you can do this.
Tools needed - 10mm socket - flat head screwdriver
Open the hood and locate the smog sensor on the right side of the front radiator support.
Using a 10mm socket, remove the one bolt.
Next, disconnect the wiring harness.
Now the sensor is completely removed from the car.
Using a flat head screwdriver, open the four clips that keep it secured.
With the sensor now open, you should see the filter.
Remove it and clean it. I used dish washing detergent and worked the grime and dirt out with my hands until it became clean.
I then used a heat gun and made sure the filter was completely dry. A hair dryer will work also.
Put the filter back in, ensure the four clips are secure, reconnect the wiring harness and secure it with the 10mm bolt. Your done!!
[IMG]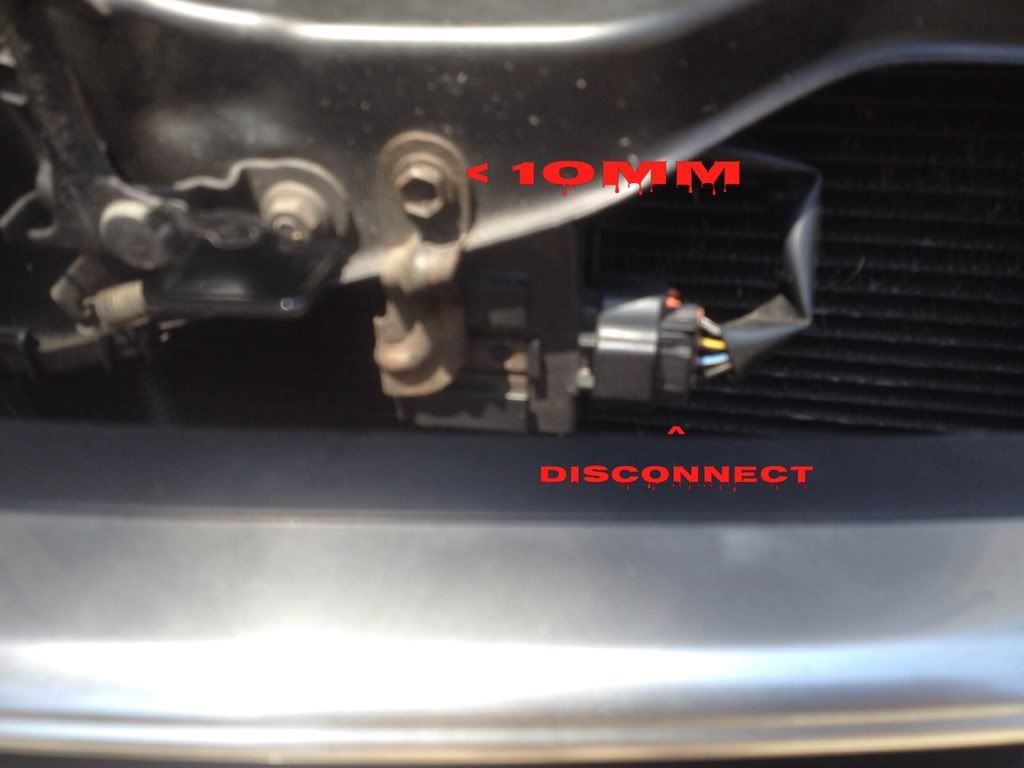 [/IMG]
[IMG]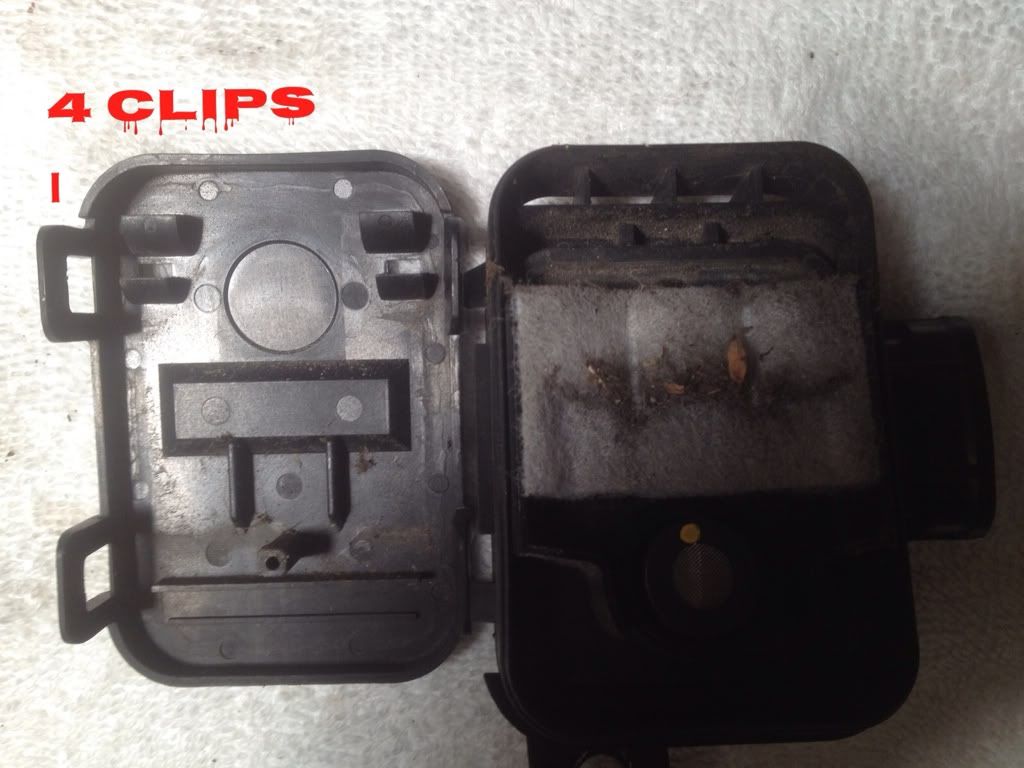 [/IMG]
[IMG]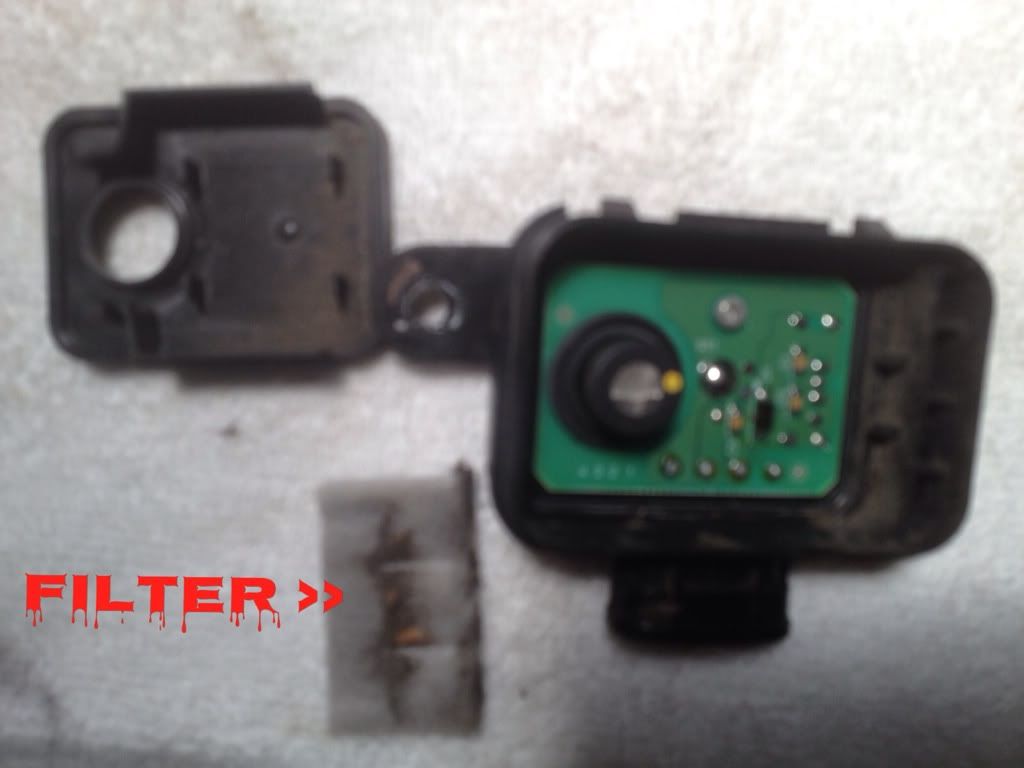 [/IMG]
Tools needed - 10mm socket - flat head screwdriver
Open the hood and locate the smog sensor on the right side of the front radiator support.
Using a 10mm socket, remove the one bolt.
Next, disconnect the wiring harness.
Now the sensor is completely removed from the car.
Using a flat head screwdriver, open the four clips that keep it secured.
With the sensor now open, you should see the filter.
Remove it and clean it. I used dish washing detergent and worked the grime and dirt out with my hands until it became clean.
I then used a heat gun and made sure the filter was completely dry. A hair dryer will work also.
Put the filter back in, ensure the four clips are secure, reconnect the wiring harness and secure it with the 10mm bolt. Your done!!
[IMG]
[/IMG][IMG]
[/IMG][IMG]
[/IMG]
08-07-12 | 08:48 AM
#3
 08-07-12 | 03:54 PM
#5
Pole Position
Joined: Dec 2001
Posts: 240
Likes: 1
From: USA
 08-07-12 | 07:07 PM
#7
A Lexus tech told me they had a LS430 with 140K miles come in for service and the filter had never been cleaned and was completely clogged. He told me the DIY method so I wanted to share it with CL. Glad it worked for you.
Trending Topics
 08-08-12 | 06:10 AM
#9
Moderator
Joined: Feb 2001
Posts: 3,688
Likes: 242
From: Cincinnati
Thanks for that great tip.
My car is over 10 years old and I bet that the filter has never been cleaned.
I'll find out this weekend, and it won't cost me anything.
You have provided a great service to us all with that neat bit of heretofore unknown information.
My car is over 10 years old and I bet that the filter has never been cleaned.
I'll find out this weekend, and it won't cost me anything.
You have provided a great service to us all with that neat bit of heretofore unknown information.

 08-26-12 | 01:31 PM
#13

Rookie
Joined: May 2012
Posts: 51
Likes: 0
From: CA
just did this cleaning this morning. i didn't pay attention to the configuration of the cover and put it up side down causing the sensor screen getting poked by the plastic stud. just want to remind the those who diy will need to make sure the circle indent on the cover is over the sensor while the plastic stud is next to the filter.
08-26-12 | 02:29 PM
#14
Moderator
Joined: Feb 2001
Posts: 3,688
Likes: 242
From: Cincinnati
I did this neat little cleaning a week or so ago. I went real slow and the whole thing took perhaps ten minutes.
The filter media cleaned up nicely with soap and water, and I dried it by squeezing in a paper towel.
Re-assembly, as noted above, must be done carefully to keep the correct alignment of the cover.
After 45,000 miles, my filter was only a little bit dirty, so this is not something that needs to be done very often.
My thanks to the OP for posting this helpful advice.

Thread
Thread Starter
Forum
Replies
Last Post
steveis350
IS - 2nd Gen (2006-2013)
9
02-05-24 08:56 AM