
DIY leather seat covers?
 09-03-14 | 02:33 AM
#61
Thread Starter
Lead Lap
iTrader: (8)
Joined: Apr 2014
Posts: 4,690
Likes: 237
From: Location: Location!
the process is: sew the panels together, sew the fabric sleeves to the panels, sew the foam pads to the panels and the fabric sleeves.
I received a suggestion for the passenger seat: Rather than tear apart a cover still in reasonably good shape to re-craft it with matching white leather, use the SEM paint on the inset pieces to make it look nearly the same. I don't have passengers very often, so the fact that it isn't as supple as the new stuff won't be much of an issue.
09-03-14 | 02:17 PM
#62
Thread Starter
Lead Lap
iTrader: (8)
Joined: Apr 2014
Posts: 4,690
Likes: 237
From: Location: Location!
Pretty much complete. I still need to take the seat out and fasten the cushion down to the frame, put the seat back hard cover and lower trim (garnish) on, etc. I was able to connect about half of the rods in the seat back, which seemed to be more than enough to line everything up properly and pull it tight. Some were just beyond me how to get at.
I have a couple spots in corners where the threads are visible, but you'd have to look pretty close to see them. Other than that, the only negative is that the springs on the headrest seem to have taken a beating or aren't seated properly, because they aren't pushing the button back out when the head rest leg is in the slot, so it isn't quite staying put. I'll have to keep toying with that. There's not much you can do without clipping zip ties (much easier than working with hog rings!) to lift parts of the cover off to reposition things, though.
One thing I neglected to mention is the v-notches along the edge of the leather panels. I traced them in the same spots as the factory panels. They're there as flex points so the leather doesn't pinch from the various fold lines. I began with cutting them out, then decided there wasn't much point in doing so with my way of clamping and sewing, and the suppleness of the leather. However, they are extremely useful for lining everything up, as the factory pieces all have corresponding notches where the panels and foam pads, and even some of the fabric sleeves, join up.
So there you have it, the $1 (*) DIY seat cover reupholstering! Total savings of $749 vs the local auto upholstery shop's quote.
(*) Thread cost. I look at leather needles and remaining thread as part of my sewing kit for future projects.
 09-03-14 | 10:16 PM
#64
Thread Starter
Lead Lap
iTrader: (8)
Joined: Apr 2014
Posts: 4,690
Likes: 237
From: Location: Location!
I actually cut the panel for the upper of the two pieces out of the smooth leather initially, then decided I preferred the soft stuff for that section. I didn't use the wrinkly leather for the smaller top inset panel because that wouldn't have tied in as well with the surround. Plus, that isn't much of a pressure point.
I'll get another picture when the sun isn't directly on it, as that washes out the white leather pretty bad.
I borrowed a friend's butt for a seat test today and it -- the seat, not the butt - got major thumbs up for comfort in addition to aesthetics.
09-04-14 | 05:16 PM
#65
Thread Starter
Lead Lap
iTrader: (8)
Joined: Apr 2014
Posts: 4,690
Likes: 237
From: Location: Location!
Fastening the seat cushion down to the seat frame is arguably the toughest part of the whole project, but all's somewhat well that ends somewhat well. The fabric sleeves that drop down on the sides of the seat, alongside the rails, are pretty much impossible to access from below. I couldn't even figure out what they were supposed to attach to on the underside, so I improvised... At one point, I was maneuvering three flathead screwdrivers and a pair of needle nose pliers simultaneously, trying to fish zip ties through holes I couldn't even get my fingers near.
Picture #2 sort of shows it, although even the camera can barely capture it due to how recessed an area that is. The clipped zip tie pulls the leather seam down into the foam and is the "easy" part. The unclipped one is the sleeve/rod that pulls the outer leather/fabric down around the edges of the seat, but the rod itself goes down into the frame, directly above the rails.
I think I screwed up by not clipping the front piece in before doing the rest. It has three long, black plastic clips that tuck under the seat frame, above the minuscule slot above the position control unit. They were one of the more difficult things to remove initially, and I forgot just how bad until trying to reattach them. The problem is, there's no way to reach the far end of the clip to pull them over. (Are you supposed to disassemble the entire seat frame??) I sort of got them clipped over the metal lip, but not entirely. In the end, I just tightened the 12mm brass bolts down behind them, figuring they can't pull free with the bolts in the way. The cushion isn't pulled down quite as low into the plastic surround as before, but it was the best I could do after a miserable six hours of working on it.
I cleaned up the wrinkly leather and took another picture without the direct sunlight that washed it out.
04-27-16 | 01:51 PM
#67
Thread Starter
Lead Lap
iTrader: (8)
Joined: Apr 2014
Posts: 4,690
Likes: 237
From: Location: Location!
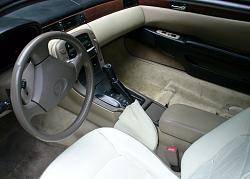
I whipped up an e-brake boot to match the driver's seat, having recently switched to a black e-brake handle and ruining the surprisingly delicate stock boot while cleaning it in preparation for dying.
I'd grade it a B/B- first effort, having changed plans a few times midstream due to the leather being so much thicker than the stock vinyl and not taking well to the same folds. If I decide I like it with the white boot (opted to try it while choosing between the $20 black vinyl ebay boots and $50 black leather Redline Goods boot), I'll make a second version and see if I can fine tune the pattern with some ideas I came up with along the way.

I'd grade it a B/B- first effort, having changed plans a few times midstream due to the leather being so much thicker than the stock vinyl and not taking well to the same folds. If I decide I like it with the white boot (opted to try it while choosing between the $20 black vinyl ebay boots and $50 black leather Redline Goods boot), I'll make a second version and see if I can fine tune the pattern with some ideas I came up with along the way.

Thread
Thread Starter
Forum
Replies
Last Post
H1_OFICR
Automotive Care & Detailing
13
06-01-15 11:48 AM
kino1161OL
GS - 1st Gen (1993-1997)
6
08-04-06 04:32 AM