
FIGS MEGA ARMS for 2GS, installation and review! PICS!
 06-19-09, 12:32 PM
#1
Driver
Thread Starter

Join Date: Oct 2006
Location: Texas
Posts: 107
Likes: 0
Received 0 Likes
on
0 Posts
Figs Mega Arms Review.
Ok, so finally I got these installed on my GS. Now, to start this review thread off I would like everyone to know that I am by no means a suspension expert, so the majority of this thread is going to be pictures, and well as “my” brief synopsis of my installation experience, quality, and driving experience I have had with the arms so far.
To start off, Mike at FIGS is a great guy and I have been on the phone with him quite a bit as he has explained the function of these arms vs. other camber correction alternatives. He is a good guy, very knowledgeable about suspension, and his product is well received by the IS300 community, so I figured I would give it a shot.
My current setup is simple: Bone Stock GS3, GS400 17’s, Tein SS, Toms 6 link, and now, Figs Mega Arms
When the product was received I specifically requested that the arms not be painted as I wanted the CL community to see the quality of the arms in RAW form (Mike does offer these painted ). Here are the pics of them as I received them raw.


Now that I showed the raw form, time to coat with some Zinc…not the prettiest, but I am not one for showing off the bottom of my car


Now, time to get at it; Removal of the Rear Lower Control Arm:


Compared to the OEM LRCA, you can see where the holes in the arms line up. Also note that this arm, when fully retracted is roughly �” shorter than the OEM arm, hence its purpose, which I am sure Mike will chime in, in this thread to explain in detail

When installing, you can see that you have two optional holes to set the strut, I opted for the inside hole, as it deemed more practical because the outer would angle the strut (I am assuming that this outer position is for track purpose). Everything else was plug and play.

Installed


We set the camber adj. in the middle and lowered the car
Now, before, I had my front “slightly” lower than my rear, but, when I installed the arms, and “brought” in the bottom of the tire it gave my car this tilted look…but, being that I had plenty of room to go on my rear, I lowered it more at the alignment shop.

At the alignment shop, I lowered my car in the rear another inch to offset the tilted look and level it out, and knew that I had room to go with the arms being shorter. Hear is how low it is on Tein SS as far as the coil in the rear:


When we were finished for the night, here were my rear numbers:
Left Rear Camber – 1.0 deg.
Right Rear Camber – 0.5 deg
Left Rear Toe - 0.11 deg
Right rear Toe - -0.19 deg ( I will go back next week to fix this)
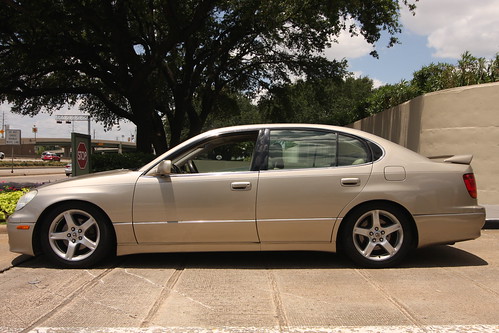
Here is a picture of the car right now without the tilted look of before sitting level:
Overall synopsis:
Good Quality Product, well made, and DOES IT's JOB
Ease of Install – 30 minutes with right tools
Improved ride quality, but then again I also lowered the rear more, and I am no pro driver, so, I think you need to evaluate the basics of suspension geometry and decide for yourself
Great Value for the buck
For install instructions, refer to the following link
http://www.figsengineering.com/FIGS_..._MEGA_ARMS.pdf
I will be doing another review in about 12000 miles (3-4 months), to show how the product holds up. I drive my car everyday, and like a bat out of hell, through all conditions. It’s my daily. Enjoy
and sorry, I really dont have any good pics of before, just now.
Ok, so finally I got these installed on my GS. Now, to start this review thread off I would like everyone to know that I am by no means a suspension expert, so the majority of this thread is going to be pictures, and well as “my” brief synopsis of my installation experience, quality, and driving experience I have had with the arms so far.
To start off, Mike at FIGS is a great guy and I have been on the phone with him quite a bit as he has explained the function of these arms vs. other camber correction alternatives. He is a good guy, very knowledgeable about suspension, and his product is well received by the IS300 community, so I figured I would give it a shot.
My current setup is simple: Bone Stock GS3, GS400 17’s, Tein SS, Toms 6 link, and now, Figs Mega Arms
When the product was received I specifically requested that the arms not be painted as I wanted the CL community to see the quality of the arms in RAW form (Mike does offer these painted ). Here are the pics of them as I received them raw.
Now that I showed the raw form, time to coat with some Zinc…not the prettiest, but I am not one for showing off the bottom of my car
Now, time to get at it; Removal of the Rear Lower Control Arm:
Compared to the OEM LRCA, you can see where the holes in the arms line up. Also note that this arm, when fully retracted is roughly �” shorter than the OEM arm, hence its purpose, which I am sure Mike will chime in, in this thread to explain in detail
When installing, you can see that you have two optional holes to set the strut, I opted for the inside hole, as it deemed more practical because the outer would angle the strut (I am assuming that this outer position is for track purpose). Everything else was plug and play.
Installed
We set the camber adj. in the middle and lowered the car
Now, before, I had my front “slightly” lower than my rear, but, when I installed the arms, and “brought” in the bottom of the tire it gave my car this tilted look…but, being that I had plenty of room to go on my rear, I lowered it more at the alignment shop.
At the alignment shop, I lowered my car in the rear another inch to offset the tilted look and level it out, and knew that I had room to go with the arms being shorter. Hear is how low it is on Tein SS as far as the coil in the rear:
When we were finished for the night, here were my rear numbers:
Left Rear Camber – 1.0 deg.
Right Rear Camber – 0.5 deg
Left Rear Toe - 0.11 deg
Right rear Toe - -0.19 deg ( I will go back next week to fix this)
Here is a picture of the car right now without the tilted look of before sitting level:
Overall synopsis:
Good Quality Product, well made, and DOES IT's JOB
Ease of Install – 30 minutes with right tools
Improved ride quality, but then again I also lowered the rear more, and I am no pro driver, so, I think you need to evaluate the basics of suspension geometry and decide for yourself
Great Value for the buck
For install instructions, refer to the following link
http://www.figsengineering.com/FIGS_..._MEGA_ARMS.pdf
I will be doing another review in about 12000 miles (3-4 months), to show how the product holds up. I drive my car everyday, and like a bat out of hell, through all conditions. It’s my daily. Enjoy
and sorry, I really dont have any good pics of before, just now.
Last edited by J0hnP; 06-19-09 at 12:36 PM.

 06-19-09, 12:47 PM
#4
Driver
Thread Starter
Join Date: Oct 2006
Location: Texas
Posts: 107
Likes: 0
Received 0 Likes
on
0 Posts
That is correct, , I will get some side profile shots to show later, but it is night and day to what it was before, feels better in the rear too!...no homo lol
Seriously though, I was looking for something to fix rear camber adjustment and at the same time work with performace for the ride, and this was my answer. One full moving piece, hell yes, well worth the $
, I will get some side profile shots to show later, but it is night and day to what it was before, feels better in the rear too!...no homo lolSeriously though, I was looking for something to fix rear camber adjustment and at the same time work with performace for the ride, and this was my answer. One full moving piece, hell yes, well worth the $
Last edited by J0hnP; 06-19-09 at 12:51 PM.
06-19-09, 01:29 PM
#6
iModerate
Looks like a straight forward install. 
My guess would be that you can use both side walls vs. one side to cushion against bumps.  But this is purely a guess.
But this is purely a guess.
06-19-09, 05:10 PM
#7
The main performance increase comes from the replacement of the inner rubber bushing with a precision rod end. Before you say that it will cause noise after time, I have tested Aurora PTFE lined bearings through some very harsh conditions and I have never seen them show hint of loosening up.
EDIT: The QA1 rod end offering I have is a better value for non racing applications. The QA1 offering will be the base offereing with the Aurora as an upgrade. The QA1 is still a precision rod end with a PTFE liner.
Thanks for the write up John and thanks for being willing to be the first one to try these out on a 2 GS.
Fig
__________________
Redefining Lexus Aftermarket Parts Since 2001
-- We are your Lexus suspension experts--
BCR - KW - PENSKE - OHLINS - HKS - GREDDY - STANCEPARTS
Links - Arms - SuperPro Poly Bushings - Solid Bearing Conversions - Motor Mounts
RB BBK's and 2P Rotors, G-Loc pads, Radium Fuel Systems
Custom Fabrication Design and Machining - Industrial 3D Printing - Laser Cutting
2018 USTCC Sportsman Class Champions - 2018 NASA ST5 National Champions
Last edited by FIGS; 06-20-09 at 10:54 AM.
Trending Topics
06-21-09, 07:49 AM
#10
Left Rear Toe - 0.11 deg
Right rear Toe - -0.19 deg ( I will go back next week to fix this)
Right rear Toe - -0.19 deg ( I will go back next week to fix this)
Factory specified range for both sides is -0.03 to 0.17 degrees. Have the tech match the toe angles on both sides.. Is there infinite range on the toe adjustment with these arms?
06-22-09, 07:17 AM
#11
Driver
Thread Starter
Join Date: Oct 2006
Location: Texas
Posts: 107
Likes: 0
Received 0 Likes
on
0 Posts
I think that is something that Mike would have to answer, but the arms taht were installed on my car would not, as they are 1/4" shorter than the OEM Rear LCA.
06-22-09, 07:19 AM
#12
Driver
Thread Starter
Join Date: Oct 2006
Location: Texas
Posts: 107
Likes: 0
Received 0 Likes
on
0 Posts
left rear is 0.11, the right is what is out of spec. As far as toe is concerned, the range is the same as before i believe
06-22-09, 12:17 PM
#13
The shorter lower arm actually fights the toe in under compression to give less bump steer in the rear. While the toe adjustment remains the same, the factory specs are not necessarily valid on a lowered suspension as the toe link is now at an angle, where at stock right height it is flat. So at each incremental movement of the suspension, the toe link travels more inward than it does in the stock setup. I always advise slight 0 to toe out with a lower setup to put the toe influence back into a more neutral spec.
To answer on the Camber adjustment. The rod end has about 1" of range adjustment. I can weld the offset at different nominal locations to give a starting point, but if you wanted to run extreme negative camber, I would also advise longer toe links so that you do not scrub the tires the same way. I preset John's for what I felt would be a good range so that all he would need to adjust is the eccentric bolt on the outside. In his case, he can still unthread the rod end to get it back to stock length if he needed, plus a hair more for additional neg camber. These are all built to order, I am not a mass production shop nor do I want to be Suspensions are too preferential to offer a standard product I have found.
Fig
To answer on the Camber adjustment. The rod end has about 1" of range adjustment. I can weld the offset at different nominal locations to give a starting point, but if you wanted to run extreme negative camber, I would also advise longer toe links so that you do not scrub the tires the same way. I preset John's for what I felt would be a good range so that all he would need to adjust is the eccentric bolt on the outside. In his case, he can still unthread the rod end to get it back to stock length if he needed, plus a hair more for additional neg camber. These are all built to order, I am not a mass production shop nor do I want to be
Suspensions are too preferential to offer a standard product I have found.Fig
__________________
Redefining Lexus Aftermarket Parts Since 2001
-- We are your Lexus suspension experts--
BCR - KW - PENSKE - OHLINS - HKS - GREDDY - STANCEPARTS
Links - Arms - SuperPro Poly Bushings - Solid Bearing Conversions - Motor Mounts
RB BBK's and 2P Rotors, G-Loc pads, Radium Fuel Systems
Custom Fabrication Design and Machining - Industrial 3D Printing - Laser Cutting
2018 USTCC Sportsman Class Champions - 2018 NASA ST5 National Champions
06-22-09, 01:21 PM
#14
0.11 or -0.11? If it is the latter (-0.11) it is way out. The stock toe adjustment is very limited with the stock toe link/eccentric bolt in place. I had a toe adjustement issue with my car & now it has been solved with aftermarket toe links.. Keep us posted.
