
Tein S Tech Lowering Springs
 05-10-14, 09:09 PM
#106
TEIN H TECH
Attachment 497556
TEIN S TECH
Attachment 497557
TEIN Street Flex Coilovers
Attachment 497558
TANABE NF210
Attachment 497559
RSR HALF DOWN
Attachment 497560
Attachment 497561
Attachment 497562
RSR DOWN
Attachment 497563
Attachment 497564
RSR SUPER DOWN
Attachment 497565
RSR Super I - Coilovers
Attachment 497566
Attachment 497567
RSR Luxury Best - Coilovers
Attachment 497568
HKS Hipermax IV GT
Attachment 497569
 05-11-14, 10:45 PM
#107
Lexus Test Driver
iTrader: (1)

Join Date: Jun 2007
Location: Ma
Posts: 870
Likes: 0
Received 0 Likes
on
0 Posts
So I'm trying to get these for my 350 awd but not sure if they are compatible can someone confirm this for me please? http://www.tein.com/price/lexus.html the site doesn't list anything about the AWD version just "2wd" so are they in fact only for the 2wd?
Last edited by dAiLL3sT; 05-12-14 at 02:39 PM.
05-14-14, 05:24 PM
#109

I know a couple of those are IS250 cars in there. It will make a significant difference from IS250 to IS350 so you have to make sure all models are the same to compare accurately.
I wondered this too. I contacted Tein yesterday and they confirmed that they made a mistake on their website and they reversed the specifications between the IS250 and the IS350 on their website. The Stech on the IS350 lowers 1.4/1.0 and the IS250 1.2/1.0 and the Htech on the IS350 lowers 1.0/0.6 and the IS250 0.8/0.6.
It also appears the Tein Mono Sport coilovers are now available in Japan and should be available here soon with a part number GSQ74-71AS3.
Mike
It also appears the Tein Mono Sport coilovers are now available in Japan and should be available here soon with a part number GSQ74-71AS3.
Mike
Last edited by bhvrdr; 05-15-14 at 04:28 AM.
05-15-14, 07:28 PM
#110
bhvrdr, you could then factor in guys with aftermarket rims - or AWD etc etc
atleast this guys you a basic idea - up to the individual to read the actual specs per the actual vehicle they are ordering them for.
better than 0.
atleast this guys you a basic idea - up to the individual to read the actual specs per the actual vehicle they are ordering them for.
better than 0.
05-19-14, 06:43 AM
#111
Driver School Candidate

Join Date: Jan 2014
Location: Fl
Posts: 42
Likes: 0
Received 0 Likes
on
0 Posts
I have a set of velgen 19 inch on my car with 235 /35 in the front and 265/30 in the rear. I have a little bit of room. And I actually had a friend put his 20 inch vossens on my car and it was fine made the drop look way better I have the tien S techs vey comfortable ride. Only problem I've been having the alignment issues. The camber is off the rear and seem like there is no rear camber arms avaiable bit I haven't had an abnormal tire wear yet and it's been 5 k miles


 01-28-15, 11:21 PM
#118
01-29-15, 04:18 PM
#119
Driver School Candidate

Thought I would write a brief writeup on how I installed these springs. I signed up (2 days) at https://techinfo.toyota.com and printed out the service manual instructions. They let you download other items in PDF but unfortunately not the service manual. I basically followed the procedures for one side which took me a longer time to do and then was much faster on the other side.
Disclaimer: I'm not a mechanic by trade but like to work on cars. With that said, I'm not responsible for any damage that may occur if you decide to follow my writeup. Also, I am not going to mention socket sizes below but you will use mainly 17mm and 19mm.
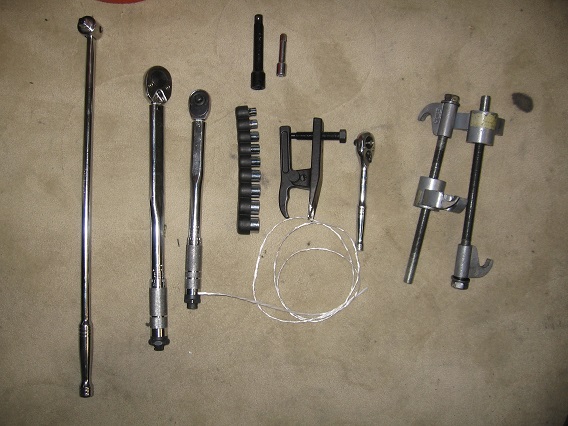
Tools used:
1. Sockets and socket wrench
2. Breaker bar
3. Spring compressor
4. Torque wrenches
5. Ball joint separator tool
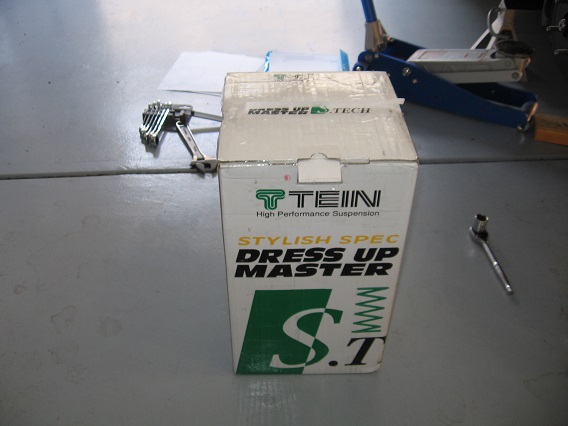
The TEIN springs (Part number: SKQ74-AUB00:
I did the rear first but will start the writeup with the front.
Fronts (procedure same for both sides)
1. Chock rear wheels. You can choose not to and leave it up to the e-brake but I do it anyways
.
2. Loosen front lugs.
3. Jack up front of car. I used the center jack point and placed jack stands on the sides on the inside of the pinch weld location.
4. Remove front wheel.
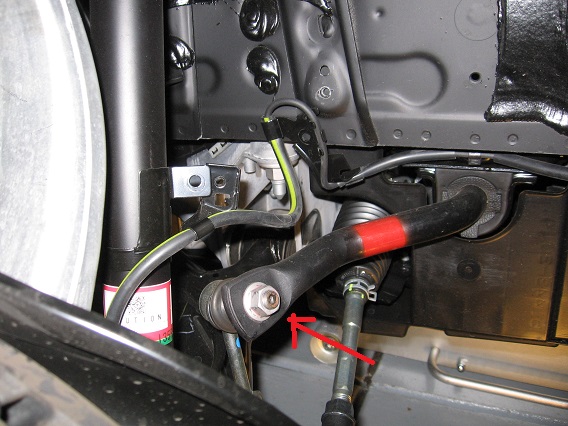
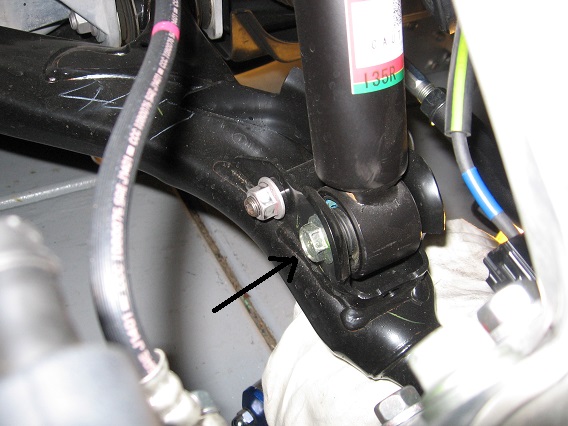
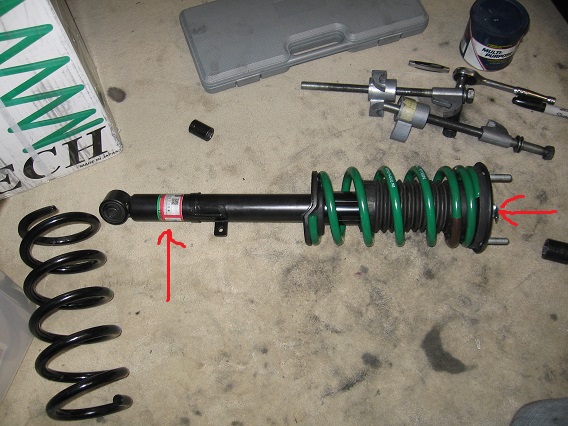
5. Separate skid control sensor wire and remove upper swaybar link (red arrow). Pic shows bolts removed. If you want to get the wire completely out of the way, you can disconnect the end of the cable from the spindle but I couldn't figure out how to remove it. Didn't have any problems just leaving the wire connected and had plenty of room.
6. Remove front upper suspension arm assembly. Remove the clip and nut.
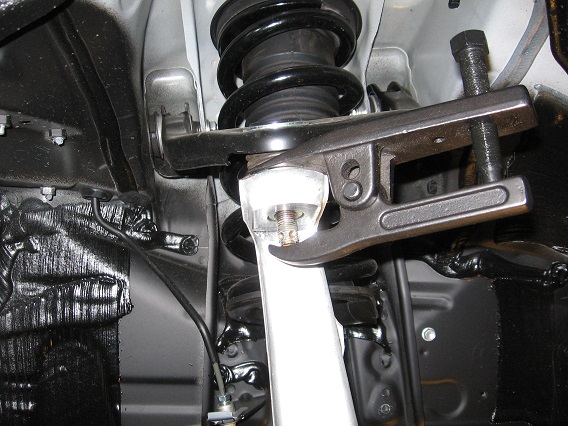
7. Attach ball joint separator tool and detach ball joint from suspension arm. I had a jack underneath the lower suspension arm and was holding onto the spindle while using the tool. It takes a few turns before you hear a loud pop.
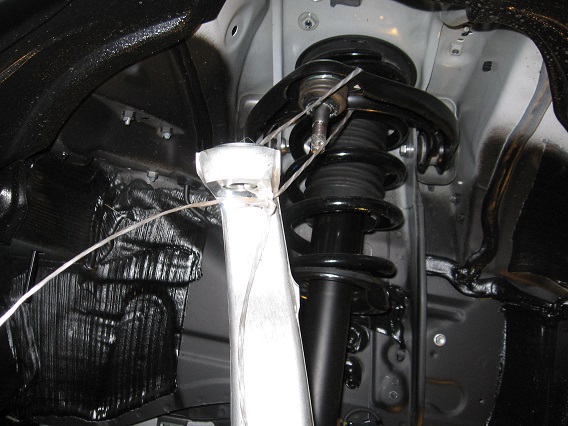
8. Support the spindle. I used twine from IKEA I had laying around. Cable ties work as well. If you don't support it, it will pull on the brake line which you don't want to do.
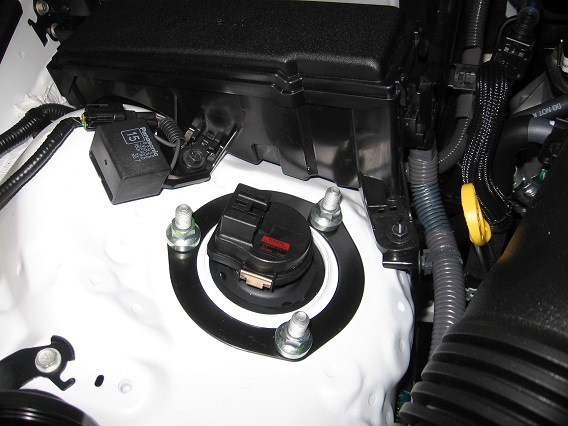
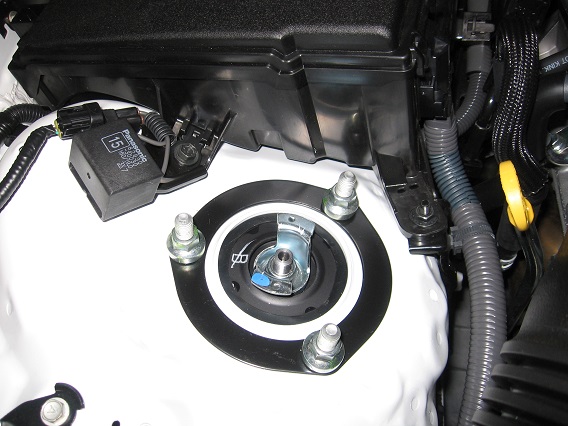
9. Remove the upper shock absorber cap (w/ AVS). 3 bolts.

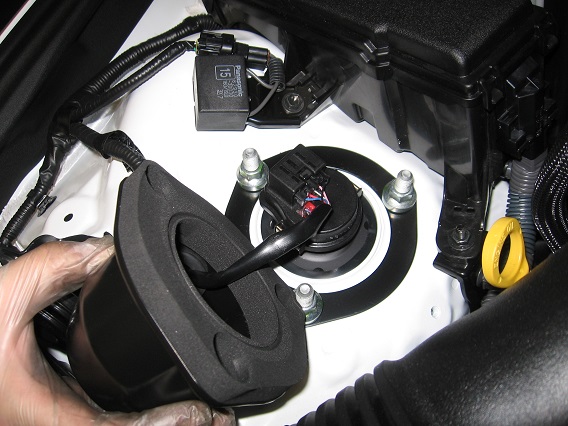
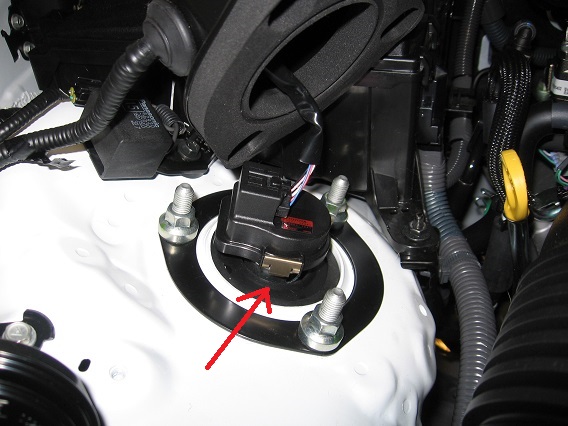
10. Remove the clip from the actuator. Carefully twist it counterclockwise 40 degrees and lift.
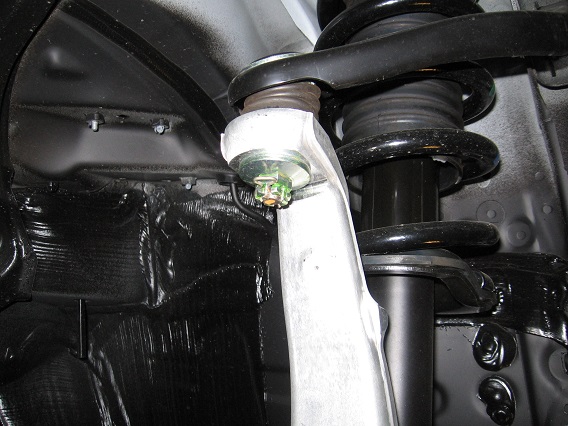
11. Support the lower suspension arm with a jack and remove lower shock bolt (black arrow). NOTE: Remove the bolt not the nut because the nut has ridges on the face of it. So loosen the bolt only. I used an old towel or block of wood on top of the jack to protect the finish of the arm.
12. Loosen the nut on top of the shock. Don't remove it. It will help when you take off the springs.
13. Remove the 3 nuts from the top of the shock.
14. Slowly lower your jack supporting the lower suspension arm and wrestle out the shock. At this point you may want to loosen your twine/cable ties from the spindle so it can drop low enough.
15. At this point I also marked the shock top and bottom orientation with a marker so when I put it back together, everything should line up perfectly.
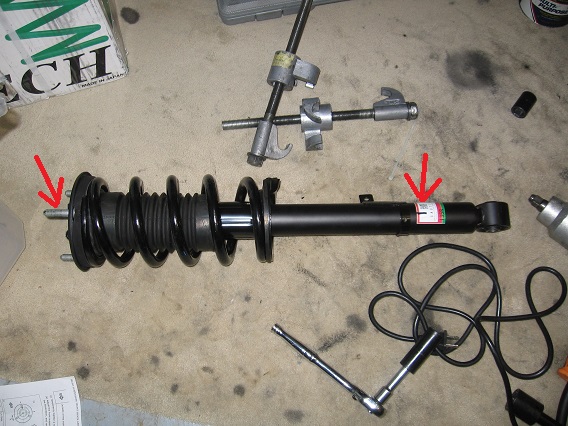
16. Use a spring compressor and remove old spring.
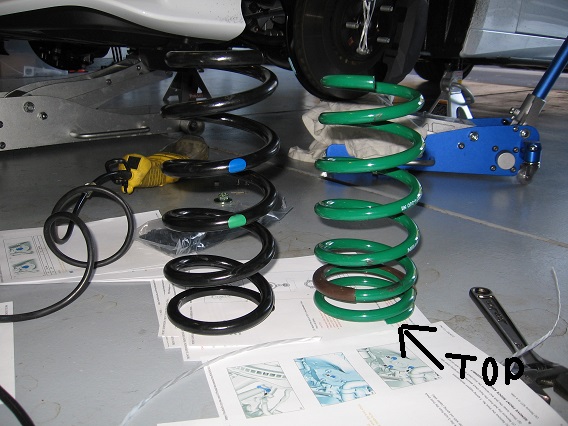
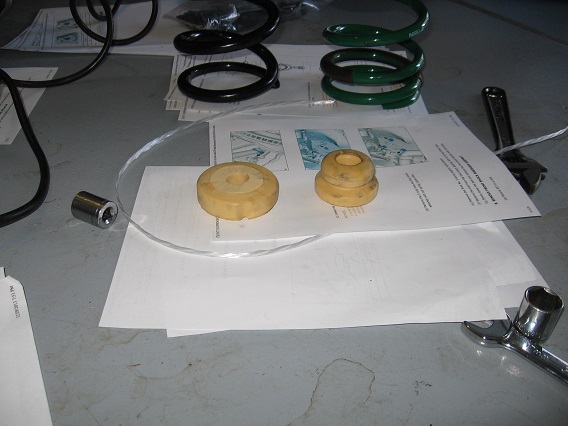
17. Per TEIN's instructions, I also cut the bump stop.
18. Use spring compressor on new spring and reassemble to shock body. Make sure everything lines up and you have the correct spring orientation. Don't fully tighten the upper shock nut. It will be tightened after the shock is re-installed.
19. And then reinstall everything in reverse order. NOTE: Be careful when you reinstall the absorber actuator. It is held on by 2 clips. Make sure the clips clear the mount before you turn it clockwise 40 degrees. I just missed one side and the right clip (red arrow) popped off and ended up somewhere in the engine bay. Luckily after removing some undercarriage panels, I found it and reinstalled.
20. Torque everything down to specs. Make sure you don't tighten the side with nut or bolt with the ridges.
Torque specs:
a. Upper shock mount x3 (49 ft.lb)
b. Upper shock nut (20 ft. lb)
c. Actuator cap (14 ft.lb)
d. Ball joint nut (64 ft.lb)
e. Swaybar upper endlink nut (62 ft.lb)
f. Lower shock bolt (133 ft.lb)
g. Skid control sensor wire (10 ft.lb (shock body), 53 in.lb (fender body))
Disclaimer: I'm not a mechanic by trade but like to work on cars. With that said, I'm not responsible for any damage that may occur if you decide to follow my writeup. Also, I am not going to mention socket sizes below but you will use mainly 17mm and 19mm.
Tools used:
1. Sockets and socket wrench
2. Breaker bar
3. Spring compressor
4. Torque wrenches
5. Ball joint separator tool
The TEIN springs (Part number: SKQ74-AUB00:
I did the rear first but will start the writeup with the front.
Fronts (procedure same for both sides)
1. Chock rear wheels. You can choose not to and leave it up to the e-brake but I do it anyways
.
2. Loosen front lugs.
3. Jack up front of car. I used the center jack point and placed jack stands on the sides on the inside of the pinch weld location.
4. Remove front wheel.
5. Separate skid control sensor wire and remove upper swaybar link (red arrow). Pic shows bolts removed. If you want to get the wire completely out of the way, you can disconnect the end of the cable from the spindle but I couldn't figure out how to remove it. Didn't have any problems just leaving the wire connected and had plenty of room.
6. Remove front upper suspension arm assembly. Remove the clip and nut.
7. Attach ball joint separator tool and detach ball joint from suspension arm. I had a jack underneath the lower suspension arm and was holding onto the spindle while using the tool. It takes a few turns before you hear a loud pop.
8. Support the spindle. I used twine from IKEA I had laying around. Cable ties work as well. If you don't support it, it will pull on the brake line which you don't want to do.
9. Remove the upper shock absorber cap (w/ AVS). 3 bolts.
10. Remove the clip from the actuator. Carefully twist it counterclockwise 40 degrees and lift.
11. Support the lower suspension arm with a jack and remove lower shock bolt (black arrow). NOTE: Remove the bolt not the nut because the nut has ridges on the face of it. So loosen the bolt only. I used an old towel or block of wood on top of the jack to protect the finish of the arm.
12. Loosen the nut on top of the shock. Don't remove it. It will help when you take off the springs.
13. Remove the 3 nuts from the top of the shock.
14. Slowly lower your jack supporting the lower suspension arm and wrestle out the shock. At this point you may want to loosen your twine/cable ties from the spindle so it can drop low enough.
15. At this point I also marked the shock top and bottom orientation with a marker so when I put it back together, everything should line up perfectly.
16. Use a spring compressor and remove old spring.
17. Per TEIN's instructions, I also cut the bump stop.
18. Use spring compressor on new spring and reassemble to shock body. Make sure everything lines up and you have the correct spring orientation. Don't fully tighten the upper shock nut. It will be tightened after the shock is re-installed.
19. And then reinstall everything in reverse order. NOTE: Be careful when you reinstall the absorber actuator. It is held on by 2 clips. Make sure the clips clear the mount before you turn it clockwise 40 degrees. I just missed one side and the right clip (red arrow) popped off and ended up somewhere in the engine bay. Luckily after removing some undercarriage panels, I found it and reinstalled.
20. Torque everything down to specs. Make sure you don't tighten the side with nut or bolt with the ridges.
Torque specs:
a. Upper shock mount x3 (49 ft.lb)
b. Upper shock nut (20 ft. lb)
c. Actuator cap (14 ft.lb)
d. Ball joint nut (64 ft.lb)
e. Swaybar upper endlink nut (62 ft.lb)
f. Lower shock bolt (133 ft.lb)
g. Skid control sensor wire (10 ft.lb (shock body), 53 in.lb (fender body))
