Log In
Register
Forums
Vendor News
Club Lexus Vendor Product Announcements
Lexus Model Forums
IS Models
RC Models
GS Models
SC Models
LC Model (2018-present)
LFA Model (2012)
CT 200h Model (2011-2017)
HS 250h Model (2010-2012)
ES Models
LS Models
UX Models (2019-present)
NX Models
RX Models
TX Models (2024-present)
GX Models
LX Models
RZ Model (2023-present)
Lexus Prototypes and Next-Gen Technology
Vendor Marketplace and Member Classifieds
Marketplace
General Classifieds
Club Lexus Vendor Marketplace
Lexus Special Interest Forums
Automotive Care & Detailing
Lexus Audio, Video, Security & Electronics
Lighting
Maintenance
Wheels, Tires & Brakes Forum
Special Interest Groups
Lexus Motorsports and Racing
General Forums
Car Chat
EV Chat
Local Chapters and Regional Forums
Regional ClubLexus Forums
NELOC
Florida Lexus Club
Chicago Lexus Club
Northern California Lexus Club
CL of Southern California
CL of Hawaii
North Texas Lexus Club
Site Suggestions & Problems
Site Suggestions & Problems
Gallery
Tools
Car Payment Calculator
Tire Rim Calculator
Vin Decoder
Recalls
Technical Service Bulletins (TSBs)
Members List
Live Feed
Marketplace
Marketplace
Vendor Directory
Become a Vendor
Lexus News
Lexus CT200h
Lexus ES
Lexus GS
Lexus GX
Lexus HS250h
Lexus IS
Lexus IS-F
Lexus LC500
Lexus LFA
Lexus LS
Lexus LX
Lexus NX
Lexus RC
Lexus RX
Lexus RZ
Lexus SC
Lexus TX
Lexus UX
New Posts
How-Tos
FAQ
View Dark Mode
Please register or login to enable Dark Mode.
Log In
Register
Threads
Google
Threads
Posts
Advanced
Dark Mode
Please register or login to enable Dark Mode.
Log In
Forgot your Password?
By logging into your account, you agree to our
Terms of Use
and
Privacy Policy
, and to the use of cookies as described therein.
or
Login with Google
Login with Facebook
Recent
Commented
Albums
My Pictures
My Post Pictures
miket000
December 9, 2019
1239
0
Sort:
Default
Default
Most Recent
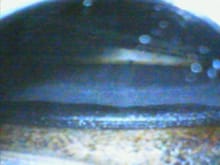
I could see the oil wick to both the valve face and valve seat as it opened.
0
2022/09/09 13:26:46
miket000
valve opened. The yellow valve face has a film of oil.
0
2022/09/09 13:27:07
miket000
0
2022/09/12 11:37:23
miket000
0
2022/09/12 11:46:49
miket000
0
2022/09/12 11:47:02
miket000
0
2022/09/16 13:37:20
miket000
0
2022/09/16 13:37:26
miket000
0
2022/09/16 13:37:35
miket000
0
2022/09/16 13:37:38
miket000
0
2022/09/16 13:37:42
miket000
0
2022/09/16 13:38:14
miket000
0
2022/09/16 13:39:30
miket000
0
2022/09/21 13:02:26
miket000
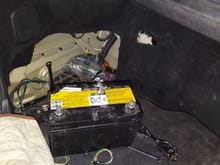
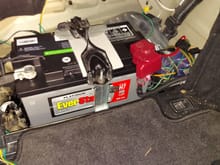
Out with the old D31
0
2022/09/23 13:07:32
miket000
There were 2 bumps in the tray which I cut out. With them removed the H7 fit. Another option would have been to shave off some of the plastic on the battery.
0
2022/09/23 13:08:08
miket000
0
2022/09/23 13:08:28
miket000
Then to top off the fun. The battery ended up 1\4" too short. I stuffed some spacers under the bracket for a snug fit.
0
2022/09/23 13:08:35
miket000
Temp sensor wires are visible near the green stripe. It goes in the top of the battery.
0
2022/09/23 18:43:45
miket000
0
2022/10/13 19:38:55
miket000
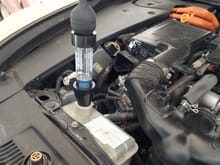
I started by checking for a bad head gasket. Fluid stayed blue, no exhaust gasses in the coolant. Thanks for suggesting this Anfanger. Test was free as I rented this setup at Oreillys.
0
2022/10/16 17:26:48
miket000
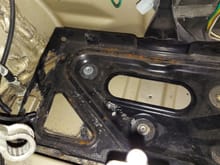
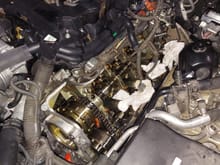
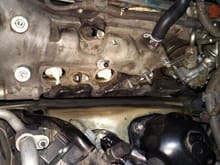
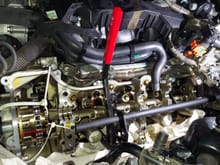
Once removed there is just enough room to access the valve cover bolts.
0
2022/10/16 17:30:44
miket000
0
2022/10/16 17:32:12
miket000
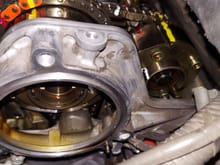
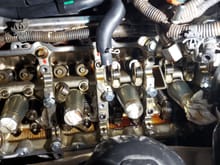
I questioned if it was possible to remove the valve cover because as pictured the bolts are not accessible. It turns out that black plastic piece is removable.
0
2022/10/16 17:33:37
miket000
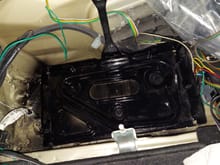
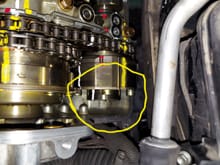
Close up of black cover.
0
2022/10/16 17:37:39
miket000
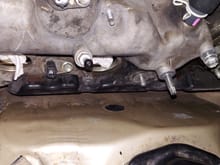
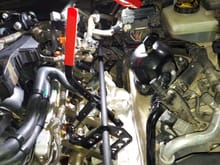
I plan on removing the hpfp mounting studs when I reinstall the valve cover. I was able to sneak the cover off with them installed but it was not easy.
0
2022/10/16 17:38:43
miket000
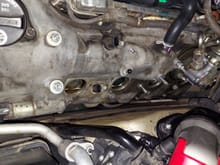
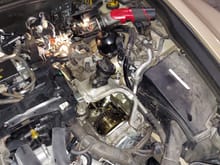
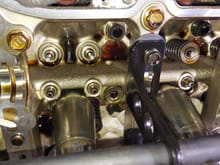
Let the fun begin! I used a white pen to mark 0 degree, front piston at TDC.
0
2022/10/16 17:41:12
miket000
Instructions suggest using 2 different marking pens. I used 3. Red and yellow are at 110 degrees before tdc ( this is the position cams get removed ). I make multiple marks to eliminate some of the guesswork upon reassembly.
0
2022/10/16 17:43:28
miket000
Big round opening made the intake cam bolt easy to remove. The exhaust bolt has the timing chain cover blocking access. It looks like you can sneak a socket and extension on there but it's not possible. The bolt is further down than it appears.
0
2022/10/16 18:23:15
miket000
This gap is about .7" Not even a shallow socket will slide in without modification. Bolt takes a 17mm socket.
0
2022/10/16 18:23:33
miket000
My initial plan was to weld a shallow socket to a 1/4" thick piece of steel to use as a handle. While purchasing the socket I realized welding it to a wrench would save some time.
0
2022/10/16 18:27:38
miket000
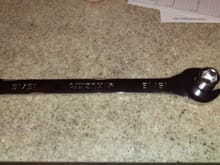
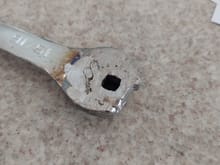
In order to make the thickness less than .7" I had to grind the back of the wrench and front of the socket. Grinder and paint makes me the welder i ain't.
0
2022/10/16 18:27:40
miket000
I only cleaned this up to prevent slag from falling off into the engine. 15/16" wrench with a 17mm socket :)
0
2022/10/16 18:27:42
miket000
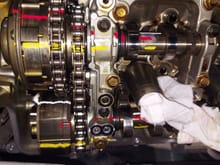
Success. Cam's and gears removed!
0
2022/10/16 18:34:29
miket000
This is the amazon tool setup to remove the exhaust springs and keepers.
0
2022/10/16 18:49:26
miket000
This is the angle at which it removes the intake springs and keepers.
0
2022/10/16 18:49:34
miket000
With the piston at tdc ( top dead center) The piston is close enough to prevent the valves from lowering too far. Because of this I didn't need to use my air compressor to fill the cylinder with air. I was able to compress the springs just enough to remove the keepers.
0
2022/10/16 18:50:37
miket000
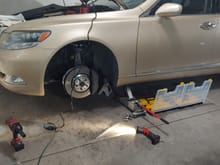
While removing the valves a keeper decided it wanted a new home ( shot out of the spring). I pulled the tire off in an attempt to find the keeper. With the tire off I found it in about 30 seconds. I'm very lucky it didn't fall down into the chain cavity.
0
2022/10/16 18:50:52
miket000
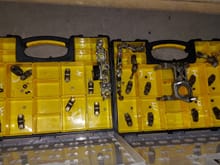
Trying to keep the parts in order.
0
2022/10/16 19:03:40
miket000
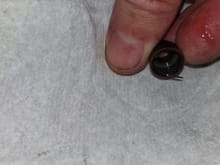
As the valve stem seals are removed the lower part of the seal is cracking on each one. They are not flexible anymore.
0
2022/10/16 19:04:09
miket000
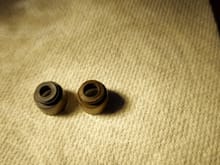
Valve stem seals. New on left. Old on right. The new one is much more pliable. There is also a considerable difference in diameter. I'm trying not to get excited but the old one does seem to be in poor shape.
0
2022/10/16 19:04:19
miket000
First
Page
22 of 31
Last
Go To
Page
1
...
20
21
22
23
24
...
31
22 of 31
Go To
GO
Go to page
of 31
pages
1
...
20
21
22
23
24
...
31