Log In
Register
Forums
Vendor News
Club Lexus Vendor Product Announcements
Lexus Model Forums
IS Models
RC Models
GS Models
SC Models
LC Model (2018-present)
LFA Model (2012)
CT 200h Model (2011-2017)
HS 250h Model (2010-2012)
ES Models
LS Models
UX Models (2019-present)
NX Models
RX Models
TX Models (2024-present)
GX Models
LX Models
RZ Model (2023-present)
Lexus Prototypes and Next-Gen Technology
Vendor Marketplace and Member Classifieds
Marketplace
General Classifieds
Club Lexus Vendor Marketplace
Lexus Special Interest Forums
Automotive Care & Detailing
Lexus Audio, Video, Security & Electronics
Lighting
Maintenance
Wheels, Tires & Brakes Forum
Special Interest Groups
Lexus Motorsports and Racing
General Forums
Car Chat
EV Chat
Local Chapters and Regional Forums
Regional ClubLexus Forums
NELOC
Florida Lexus Club
Chicago Lexus Club
Northern California Lexus Club
CL of Southern California
CL of Hawaii
North Texas Lexus Club
Site Suggestions & Problems
Site Suggestions & Problems
Gallery
Tools
Car Payment Calculator
Tire Rim Calculator
Vin Decoder
Recalls
Technical Service Bulletins (TSBs)
Members List
Live Feed
Marketplace
Marketplace
Vendor Directory
Become a Vendor
Lexus News
Lexus CT200h
Lexus ES
Lexus GS
Lexus GX
Lexus HS250h
Lexus IS
Lexus IS-F
Lexus LC500
Lexus LFA
Lexus LS
Lexus LX
Lexus NX
Lexus RC
Lexus RX
Lexus RZ
Lexus SC
Lexus TX
Lexus UX
New Posts
How-Tos
FAQ
View Dark Mode
Please register or login to enable Dark Mode.
Log In
Register
Threads
Google
Threads
Posts
Advanced
Dark Mode
Please register or login to enable Dark Mode.
Log In
Forgot your Password?
By logging into your account, you agree to our
Terms of Use
and
Privacy Policy
, and to the use of cookies as described therein.
or
Login with Google
Login with Facebook
Recent
Commented
Albums
My Pictures
My Post Pictures
miket000
December 9, 2019
1237
0
Sort:
Most Recent
Default
Most Recent
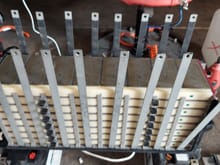
These top rivets were fairly easy to pop. The 8 on the bottom of the pack had a plastic piece which didn't allow my rivet gun to fit flush.
0
2023/04/05 07:45:38
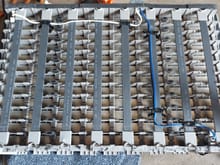
miket000
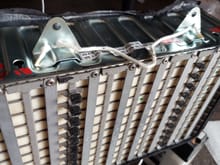
A strong set of clamps is required to squeeze everything into alignment.
0
2023/04/05 07:45:32
miket000
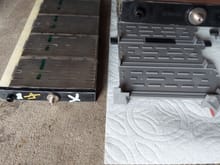
A plastic tray goes between each module.
0
2023/04/05 07:45:26
miket000
This is the easy part.
0
2023/04/05 07:45:20
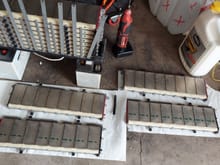
miket000
Modules 1,2,3, and bad 4.
0
2023/04/05 07:45:14
miket000
Take note where each temperature sensor goes. I only removed one. I only pulled 4 modules out to access my bad module.
0
2023/04/05 07:42:57
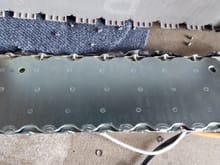
miket000
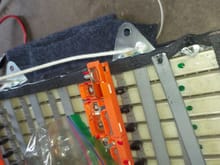
Grabbing the shank with pliers and pulling / twisting is the easiest way to remove them. You'll notice due to the shape of the metal bracket you cannot simply punch the shank out of the hole it has nowhere to go (when the pack is assembled).
0
2023/04/05 07:35:54
miket000
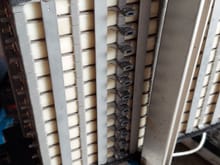
Each rivet shank is still stuck in the plate.
0
2023/04/05 07:35:46
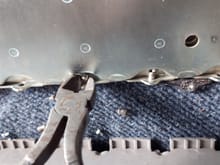
miket000
All rivet heads removed.
0
2023/04/05 07:35:35
miket000
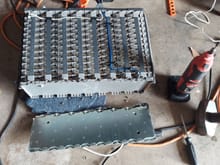
In order to replace a module in a RX400h pack you must remove 16 steel rivets. I used a dremel tool with a metal cutting bit. I simply ground the top of the rivet off. This method takes 5 minutes. 1st rivet head is removed in this picture.
0
2023/04/05 07:35:22
miket000
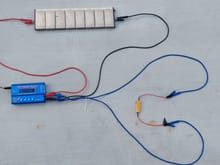
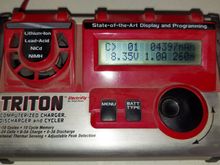
You cannot charge these modules as pictured. They MUST be clamped tightly in a pack. This is just a demo pic of how the circuit looks. This is during discharge Resistor is plugged in ( blue wire). This is what's going on with the chargers on the glass table.
0
2023/04/04 22:05:16
miket000
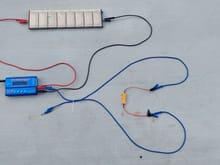
You cannot charge these modules as pictured. They MUST be clamped tightly in a pack. This is just a demo pic of how the circuit looks. This is during charge 50 watt resistor is unplugged ( blue wire)
0
2023/04/04 22:05:14
miket000
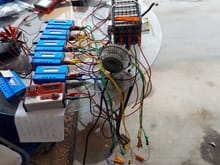
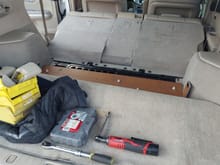
These are the 6 chargers I bought.
0
2023/04/04 22:05:09
miket000
This is what everything looked like when cycling them.
0
2023/04/04 22:05:01
miket000
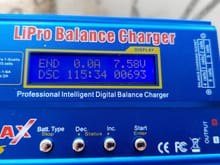
This is my 25 year old charger. It has a 3 amp max discharge. I used to to measure a few modules to verify things were working as I cycled the packs. I wish I had 6 of these chargers! I only used this on a few modules to check capacity. No additional resistor was needed with this charger. During discharge cycle the capacity readout was fairly accurate.
0
2023/04/04 21:52:02
miket000
I used marker on the buss bars to identify their location for reassembly. ( yellow mark)
0
2023/04/04 21:51:13
miket000
Yeah, not the best location for this. I moved this hot mess outside a short while later.
0
2023/04/04 21:49:05
miket000
Labeled both sides of each module 1-12.
0
2023/04/04 21:48:13
miket000
The white and orange connectors get unplugged. I marked each one with a marker to be safe. I seem to remember them being different sizes so this might not matter.
0
2023/04/04 21:46:36
miket000
See the shoe lace strings.
0
2023/04/04 21:46:27
miket000
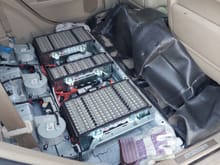
The 3 fans have to be unbolted to remove the battery connections. I left the fans plugged in, just unbolted the 3 nuts holding each one down.
0
2023/04/04 21:39:32
miket000
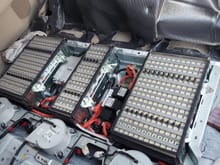
3 battery sections exposed.
0
2023/04/04 21:39:27
miket000
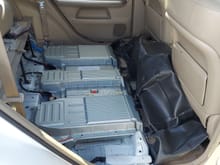
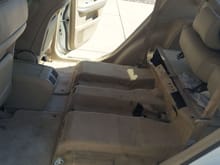
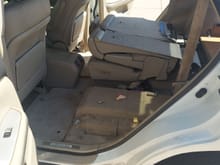
I tucked the carpet up against the front seats. There is no need to remove it further. The metal battery cover is light but it will slice you up. It has plenty of sharp edges.
0
2023/04/04 21:38:55
miket000
The old cheerios were stale but crunchy.
0
2023/04/04 21:38:47
miket000
At this point I have under 2K invested now that I found some change!
0
2023/04/04 21:38:20
miket000
This flap folds back.
0
2023/04/04 21:37:43
miket000
Starting the disassembly.
0
2023/04/04 21:37:41
miket000
0
2023/04/04 21:37:07
miket000
0
2023/02/20 08:04:52
miket000
0
2023/01/29 15:02:41
miket000
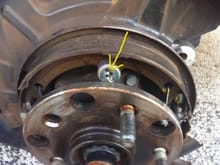
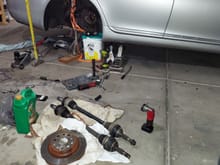
This is not my hub. Just an example of what the spring looks like when assembled. The pin is in the center holding it together.
0
2022/11/22 19:56:10
miket000
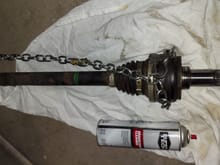
I've removed a few cv axles this way. I wrap the end of the chain on my big yellow hammer. Then swing away!
0
2022/11/22 19:43:31
miket000
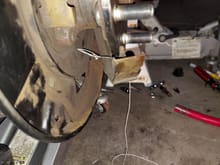
Then I used hot glue to attach the pin to the string. I was able to coax the pin back into the hole with this method.
0
2022/11/22 19:43:25
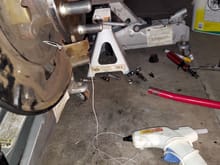
miket000
Who designed this thing! This spring pin fell out and has no access. I fed kite string through the hole.
0
2022/11/22 19:43:19
miket000
It is out!
0
2022/11/22 19:43:12
miket000
I felt relieved simply getting the axle out of the hub :)
0
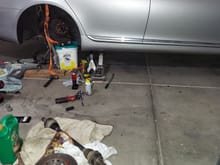
2022/11/22 19:43:06
miket000
I have a lot disconnected in there.
0
2022/11/22 19:43:00
miket000
At this point I realized this was going to be somewhat challenging.
0
2022/11/22 19:42:53
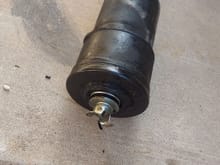
miket000
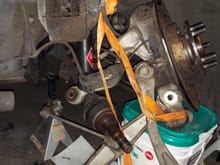
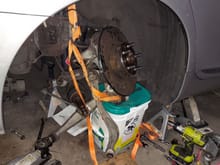
That's not supposed to happen. Age and oil ate away at the rubber.
0
2022/11/07 12:04:04
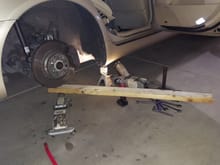
miket000
I used a jack under the hub to line the sway link back up. 2x4 was just used as padding.
0
2022/11/07 12:00:42
miket000
First
Page
8 of 31
Last
Go To
Page
1
...
6
7
8
9
10
...
31
8 of 31
Go To
GO
Go to page
of 31
pages
1
...
6
7
8
9
10
...
31